版权声明:本文为博主原创文章,未经博主允许不得转载。 https://blog.csdn.net/qq_22067469/article/details/84640996
前言
在我们平常的java开发中,会经常使用到很多配制文件(xxx.properties,xxx.xml),而当我们在本地开发(dev),测试环境测试(test),线上生产使用(product)时,需要不停的去修改这些配制文件,次数一多,相当麻烦。现在,利用maven的filter和profile功能,我们可实现在编译阶段简单的指定一个参数就能切换配制,提高效率,还不容易出错。
profile可以让我们定义一系列的配置信息,然后指定其激活条件。这样我们就可以定义多个profile,然后每个profile对应不同的激活条件和配置信息,从而达到不同环境使用不同配置信息的效果。
Maven Profile 热身
Maven项目修改pom.xml文件,增加profile定义
<profiles>
	<profile>
		<id>dev</id>
		<properties>
			<port>9105</port>
		</properties>
	</profile>

	<profile>
		<id>pro</id>
		<properties>
			<port>9205</port>
		</properties>
	</profile>
</profiles>

<build>
	 <plugins>
	     <plugin>
			<groupId>org.apache.tomcat.maven</groupId>
			<artifactId>tomcat7-maven-plugin</artifactId>
			<version>2.2</version>
			<configuration>
				<!-- 指定端口 -->
				<port>${port}</port>
				<!-- 请求路径 -->
				<path>/</path>
			</configuration>
	 	  </plugin>
	 </plugins>
 </build>
- 执行命令
tomcat7:run -P pro发现启动端口为9205 - 执行命令
tomcat7:run -P dev发现启动端口为9105 - -P 后边跟着的是profile的id
切换数据库连接配置
- 先贴上目录结构
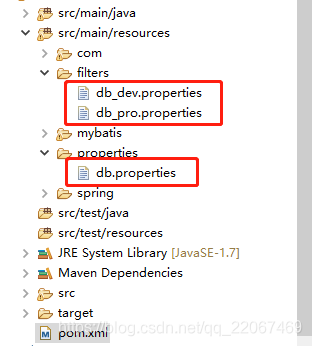
- 工程src/main/resources下创建filters文件夹
- filters文件夹下创建
db_dev.properties、用于配置开发环境用到的数据库连接配置
env.jdbc.driver=com.mysql.jdbc.Driver
env.jdbc.url=jdbc:mysql://localhost:3306/test_dev?characterEncoding=utf-8
env.jdbc.username=root
env.jdbc.password=root
- filters文件夹下创建
db_pro.properties、用于配置生产环境用到的数据库连接配置
env.jdbc.driver=com.mysql.jdbc.Driver
env.jdbc.url=jdbc:mysql://localhost:3306/test_pro?characterEncoding=utf-8
env.jdbc.username=root
env.jdbc.password=root
- 修改 properties下的
db.properties文件
jdbc.driver=${env.jdbc.driver}
jdbc.url=${env.jdbc.url}
jdbc.username=${env.jdbc.username}
jdbc.password=${env.jdbc.password}
- 修改pom.xml
<!-- 默认为开发环境 -->
 <properties>
 	<env>dev</env>
 </properties>

 <profiles>
 	<profile>
 		<!-- 开发环境 -->
 		<id>dev</id>
 		<properties>
			<env>dev</env>
		</properties>
 	</profile>
 	<profile>
 		<!-- 生产环境 -->
 		<id>pro</id>
 		<properties>
			<env>pro</env>
		</properties>
 	</profile>
 </profiles>

 <build>
 	<filters>
 		<filter>src/main/resources/filters/db_${env}.properties</filter>
 	</filters>
 	<!-- 利用filter实现对资源文件(resouces) 过滤 -->
 	<resources>
 		<resource>
 			<directory>src/main/resources</directory>
 			<filtering>true</filtering>
 		</resource>
 	</resources>
 </build>
- 执行命令
package -P pro,解压生成的jar包,观察db.properties配置文件内容,已经替换为生产环境的值 - 执行命令
package -P dev,解压生成的jar包,观察db.properties配置文件内容,已经替换为开发环境的值
切换注册中心连接配置
- 现在项目有很多服务,每个服务都要用到注册中心,都要配置注册中心的地址,这样维护起来就相当麻烦。解决办法,在common工程中配置好注册中心,其它服务只要依赖此模块即可
- 目录结构
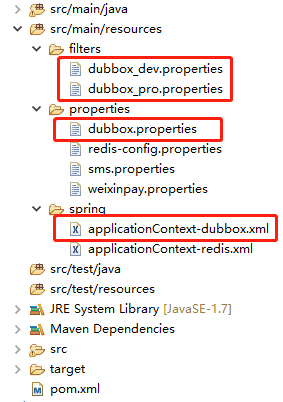
- properties下创建dubbox.properties
address=119.29.181.136:2181
- Spring目录下创建spring配置文件 applicationContext-dubbox.xml 配置如下
<?xml version="1.0" encoding="UTF-8"?>
<beans xmlns="http://www.springframework.org/schema/beans"
	xmlns:xsi="http://www.w3.org/2001/XMLSchema-instance" xmlns:p="http://www.springframework.org/schema/p"
	xmlns:context="http://www.springframework.org/schema/context"
	xmlns:dubbo="http://code.alibabatech.com/schema/dubbo" xmlns:mvc="http://www.springframework.org/schema/mvc"
	xsi:schemaLocation="http://www.springframework.org/schema/beans http://www.springframework.org/schema/beans/spring-beans.xsd
        http://www.springframework.org/schema/mvc http://www.springframework.org/schema/mvc/spring-mvc.xsd
        http://code.alibabatech.com/schema/dubbo http://code.alibabatech.com/schema/dubbo/dubbo.xsd
        http://www.springframework.org/schema/context http://www.springframework.org/schema/context/spring-context.xsd">

<context:property-placeholder location="classpath*:properties/*.properties" />
<dubbo:registry protocol="zookeeper" address="${address}"/>
</beans>
- 再次强调所有的服务工程与web工程都要依赖common。并删除每个工程中关于注册中心地址的配置
- 工程中创建filters目录 ,目录下建立dubbox_dev.properties
env.address=119.29.181.136:2181
- 建立dubbox_pro.properties
env.address=119.29.181.137:2181
- 修改dubbox.properties
address=${env.address}
- 最后修改pom.xml文件
<!-- 默认为开发环境 -->
 <properties>
 	<env>dev</env>
 </properties>

 <profiles>
 	<profile>
 		<!-- 开发环境 -->
 		<id>dev</id>
 		<properties>
			<env>dev</env>
		</properties>
 	</profile>
 	<profile>
 		<!-- 生产环境 -->
 		<id>pro</id>
 		<properties>
			<env>pro</env>
		</properties>
 	</profile>
 </profiles>

 <build>
 	<filters>
 		<filter>src/main/resources/filters/db_${env}.properties</filter>
 	</filters>
 	<!-- 利用filter实现对资源文件(resouces) 过滤 -->
 	<resources>
 		<resource>
 			<directory>src/main/resources</directory>
 			<filtering>true</filtering>
 		</resource>
 	</resources>
 </build>
- 测试步骤和上面基本类似