在开发中,我们经常需要通过配置不同的环境,来调试代码,比如数据源配置,日志配置,以及其他一些配置。避免使用同一套配置,这样开发和测试时,如果出现问题,只是影响测试环境,不会造成线上的问题。下面记录一下通过maven中的profile来配置不同开发环境,以及在代码中如何读取配置文件中的配置。
1、配置文件
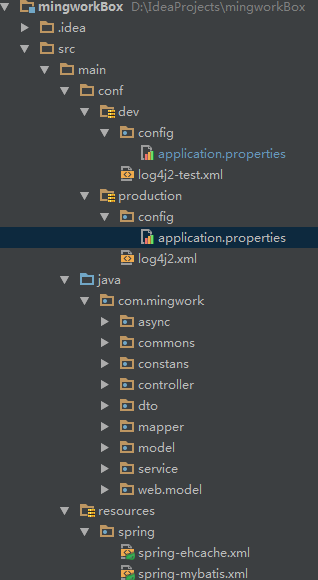
先看一下工程目录
然后是pom.xml中的配置
 <profiles>
        <!-- 默认激活 dev 开发环境 -->
        <!-- 线上使用 mvn 打包添加 -Pproduction 变量 -->
        <profile>
            <!-- 本地开发环境 -->
            <id>development</id>
            <properties>
                <profiles.active>dev</profiles.active>
            </properties>
            <activation>
                <activeByDefault>true</activeByDefault>
            </activation>
        </profile>
        <profile>
            <!-- 生产环境 -->
            <id>production</id>
            <properties>
                <profiles.active>production</profiles.active>
            </properties>

        </profile>
    </profiles>

    <build>
        <finalName>mingworkBox</finalName>
        <resources>
            <resource>
                <directory>src/main/resources</directory>
            </resource>
            <resource>
                <directory>src/main/conf/${profiles.active}</directory>
                <!-- 对该目录下的配置build时启用filter 过滤替换-->
                <filtering>true</filtering>
            </resource>
        </resources>

        <plugins>
            <plugin>
                <groupId>org.apache.maven.plugins</groupId>
                <artifactId>maven-compiler-plugin</artifactId>
                <version>2.3.2</version>
                <configuration>
                    <source>${jdk.version}</source>
                    <target>${jdk.version}</target>
                    <encoding>${project.build.sourceEncoding}</encoding>
                </configuration>
            </plugin>

        </plugins>
    </build>
其实现主要是通过配置frofile来实现。上面配置了2个环境(dev,production)。dev环境是默认激活的。同时每个profile还定义了两个属性,其中profiles.active表示被激活的profile的配置文件的目录。
注意build中的<filtering>true</filtering>很关键,一开始少了这行,结果每次都是后面的profile会覆盖前面的profile
2、线上maven编译
线上maven编译时需要指定production环境,因此使用下面的命令
mvn clean -U package -DskipTests -Pproduction 就可以了
附带一个服务器上从git拉取代码,并且自动编译重启服务的脚步
扫描二维码关注公众号,回复:
1006238 查看本文章

#!/bin/sh
git_path="/alidata/server/tomcat/sourceCode/mingworkBox"
war_path=$git_path"/target/mingworkBox.war"

pro_path="/alidata/server/tomcat/webapps/mingworkBox"
backup_path="/alidata/server/tomcat/backup"
tom_bin="/alidata/server/tomcat/bin"

time=$(date "+%Y%m%d-%H%M%S")

echo "goto..."$git_path
cd $git_path
echo "git...pull...begin..."
git pull
echo "git...pull...end..."

echo "build...war...begin..."
#mvn clean -U package -DskipTests -Pdev > /dev/null
mvn clean -U package -DskipTests -Pproduction
echo "build...war...end..."

echo "backup...start..."
cp -a $pro_path $backup_path"/mingworkBox."$time
echo "backup...end..."

unzip -o $war_path -d $pro_path > /dev/null
echo "unzip...war...end..."

echo "tomcat...reload...begin..."
sh $tom_bin"/shutdown.sh"
sleep 1
sh $tom_bin"/startup.sh"
echo "tomcat...reload...end....."
3、代码中读取配置文件
定义一个文件读取类
public class PropertyUtil {
    private static final Logger logger = LoggerFactory.getLogger(PropertyUtil.class);
    private static Properties props;
    static{
        loadProps();
    }
    synchronized static private void loadProps(){
        logger.info("开始加载properties文件内容.......");
        props = new Properties();
        InputStream in = null;
        try {
//     <!--通过类加载器进行获取properties文件流-->
            in = PropertyUtil.class.getClassLoader().getResourceAsStream("config/application.properties");
            props.load(in);
        } catch (FileNotFoundException e) {
            logger.error("jdbc.properties文件未找到");
        } catch (IOException e) {
            logger.error("出现IOException");
        } finally {
            try {
                if(null != in) {
                    in.close();
                }
            } catch (IOException e) {
                logger.error("jdbc.properties文件流关闭出现异常");
            }
        }
        logger.info("加载properties文件内容完成...........");
        logger.info("properties文件内容:" + props);
    }

    public static String getProperty(String key){
        if(null == props) {
            loadProps();
        }
        return props.getProperty(key);
    }

    public static String getProperty(String key, String defaultValue) {
        if(null == props) {
            loadProps();
        }
        return props.getProperty(key, defaultValue);
    }
}
然后代码中这样使用就可以了
String accessKeyId = PropertyUtil.getProperty("oss.accessKeyId");