4、IOC依赖注入
4.1、什么是IOC(面试经常问)
IOC 全称指的是 Inverse Of Control 控制反转。 控制反转是指将bean对象的创建权力交给spring来操作。在使用Spring以前 。都是通过手动代码new 对象();
1.IOC是控制反转,控制反转是指将bean对象的创建交给Spring来管理。并且IOC是Spring框架中提供的一个非常重要的功能。
2.IOC容器就是Spring提供的一个用来管理各种bean对象的容器功能。
3.IOC强调将对象的创建权反转到IOC容器中
4.2、什么是DI
DI 指的是Dependency Injection 。是依赖注入的意思。简单点说,就是给一个对象中依赖的另一个对象赋值。
1.在运行期由外部容器动态地将依赖对象注入组件
2.DI强调IOC容器将对象的依赖关系动态注入对象之中
3.DI是IOC具体的实现过程。
使用Spring之前需要通过代码进行注入赋值。
BookService {
BookDao bookDao = new BookDao();

	 public void setBookDao( BookDao bookDao ) {
		 this.bookDao = bookDao;
	 }
}
使用Spring以后只需要进行配置赋值。
通过以下40个实验了解IOC
实验1:通过IOC容器创建对象,并为属性赋值★
实验2:根据bean的类型从IOC容器中获取bean的实例★
实验3:通过构造器为bean的属性赋值
实验4:通过index属性指定参数的位置
实验5:通过参数类型注入
实验6:通过p名称空间为bean赋值
实验7:测试使用null值
实验8:引用其他bean★
实验9:引用内部bean
实验10:使用List类型的集合属性
实验11:使用Map类型的集合属性
实验12:使用prop子元素为Properties类型的属性赋值
实验13:通过util名称空间创建集合类型的bean
实验14:给bean的级联属性赋值
实验15:配置通过静态工厂方法创建的bean
实验16:配置通过实例工厂方法创建的bean
实验17:配置FactoryBean
实验18:通过继承实现bean配置信息的重用
实验19:通过abstract属性创建一个模板bean
实验20:bean之间的依赖
实验21:测试bean的作用域,分别创建单实例和多实例的bean★
实验22:创建带有生命周期方法的bean
实验23:测试bean的后置处理器
实验24:引用外部属性文件★
实验25:基于XML的自动装配
实验26:[SpEL测试I]在SpEL中使用字面量
实验27:[SpEL测试II]在SpEL中引用其他bean
实验28:[SpEL测试III]在SpEL中引用其他bean的某个属性值
实验29:[SpEL测试IV]在SpEL中调用非静态方法
实验30:[SpEL测试V]在SpEL中调用静态方法
实验31:[SpEL测试VI]在SpEL中使用运算符
实验32:通过注解分别创建Dao、Service、Controller★
实验33:使用context:include-filter指定扫描包时要包含的类
实验34:使用context:exclude-filter指定扫描包时不包含的类
实验35:使用@Autowired注解实现根据类型实现自动装配★
实验36:如果资源类型的bean不止一个,默认根据@Autowired注解标记的成员变量名作为id查找bean,进行装配★
实验37:如果根据成员变量名作为id还是找不到bean,可以使用@Qualifier注解明确指定目标bean的id★
实验38:在方法的形参位置使用@Qualifier注解
实验39:@Autowired注解的required属性指定某个属性允许不被设置
实验40:测试泛型依赖注入★
4.3、第一个IOC示例程序 – 通过id获取对象(重点)
实验1:通过IOC容器创建对象,并为属性赋值★
创建一个java工程:
导入jar包

通过new的菜单选项,选择如下的菜单 ,创建Spring的配置文件:


配置applicationContext.xml配置文件:
<?xml version="1.0" encoding="UTF-8"?>
<beans xmlns="http://www.springframework.org/schema/beans"
	xmlns:xsi="http://www.w3.org/2001/XMLSchema-instance"
	xsi:schemaLocation="http://www.springframework.org/schema/beans http://www.springframework.org/schema/beans/spring-beans.xsd">
	<!--
		bean 标签可以用来配置一个对象
			id属性配置一个唯一的标识
			class属性配置bean对象的全类名
	 -->
	<bean id="p1" class="com.pojo.Person">
		<!--
			property标签可以配置bean对象的属性值
				name属性配置bean对象的属性名
				value属性配置当前属性的值
		 -->
		<!-- 将属性id赋值为:1,name赋值为:名字... -->
		<property name="id" value="1" />
		<property name="name" value="名字" />
		<property name="phone" value="18688886666" />
		<property name="sex" value="1" />
	</bean>

</beans>
实体类:
public class Person {

	private int id;
	private String name;
	private String phone;
	private String sex;
测试类:
class SpringTest {
	@Test
	public void test1() throws Exception {
		// 首先需要有一个Spring IOC 容器对象。在spring中一个接口就表示了这个Spring IOC窗口对象
		// ClassPathXmlApplicationContext类表示从Classpath类路径下加载xml配置文件创建SpringIOC容器对象
		//FileSystemXmlApplicationContext applicationContext = new FileSystemXmlApplicationContext("config/applicationContext.xml");
		ApplicationContext applicationContext = new ClassPathXmlApplicationContext("applicationContext.xml");
		// 从Spring IOC容器中获取一个id为p1的对象
		Person person = (Person) applicationContext.getBean("p1");
		System.out.println( person );
	}
}
问题:
1、FileSystemXmlApplicationContext怎么用?
答:跟使用JavaSE的相对路径一样
2、Bean是在什么时候被创建的?
答:在创建ApplicatiocnContext对象的时候创建(默认)
3、如果调用getBean多次,会创建几个?
答:默认创建同一个
4.4、IOC示例程序 – 通过类型获取对象(重点)
实验2:根据bean的类型从IOC容器中获取bean的实例★
配置applicationContext.xml配置文件:
<?xml version="1.0" encoding="UTF-8"?>
<beans xmlns="http://www.springframework.org/schema/beans"
	xmlns:xsi="http://www.w3.org/2001/XMLSchema-instance"
	xsi:schemaLocation="http://www.springframework.org/schema/beans http://www.springframework.org/schema/beans/spring-beans.xsd">
	<!--
		bean 标签可以用来配置一个对象
			id属性配置一个唯一的标识
			class属性配置bean对象的全类名
	 -->
	<bean id="p1" class="com.pojo.Person">
		<!--
			property标签可以配置bean对象的属性值
				name属性配置bean对象的属性名
				value属性配置当前属性的值
		 -->
		<!-- 将属性id赋值为:1,name赋值为:名字... -->
		<property name="id" value="1" />
		<property name="name" value="名字" />
		<property name="phone" value="18688886666" />
		<property name="sex" value="1" />
	</bean>
	<bean id="p2" class="com.pojo.Person">
		<property name="id" value="2" />
		<property name="name" value="什么是爱情?" />
		<property name="phone" value="18688886666" />
		<property name="sex" value="1" />
	</bean>
</beans>
测试类:
@Test
	public void test2() throws Exception {
		// 首先需要有一个Spring IOC 容器对象。在spring中一个接口就表示了这个Spring IOC窗口对象
		// ClassPathXmlApplicationContext类表示从Classpath类路径下加载xml配置文件创建SpringIOC容器对象
		ApplicationContext applicationContext = new ClassPathXmlApplicationContext("applicationContext.xml");
		// 从Spring IOC容器中获取一个id为p1的对象
		/**
		 *  按类型查找,如果只找到一个,就直接返回<br/>
		 *  如果找到多个,就直接报错<br/>
		 *  如果找不到,也报错。
		 */
		Person person = (Person) applicationContext.getBean(Person.class);
		System.out.println( person );
	}
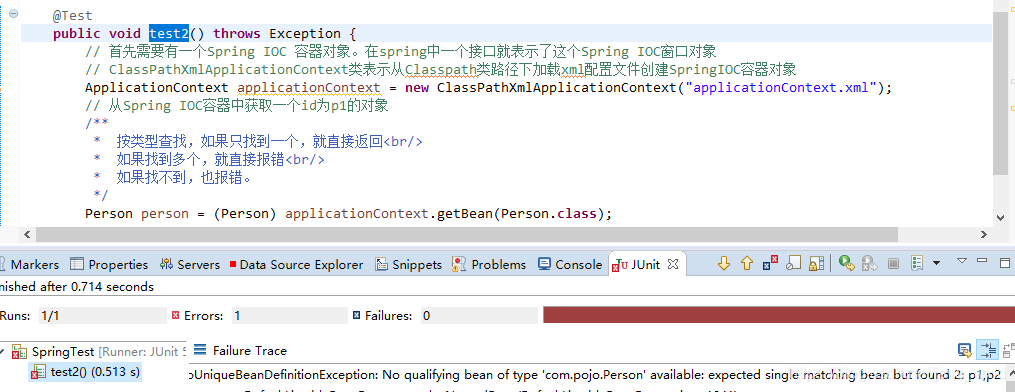
可以看到找到多个,就直接报错
4.5、IOC示例程序 – 通过构造方法参数名注入值
实验3:通过构造器为bean的属性赋值
配置applicationContext.xml配置文件:
<bean id="p3" class="com.pojo.Person">
		<!--
			constructor-arg标签是通过构造方法赋值
				name属性表示设置构造器参数名
				value属性就是你要赋的值
		 -->
		<constructor-arg name="id" value="3" />
		<constructor-arg name="name" value="这是构造器赋的值"/>
		<constructor-arg name="phone" value="18688886666"/>
		<constructor-arg name="sex" value="0"/>
	</bean>
测试代码:
	@Test
	public void test3() throws Exception {
		ApplicationContext applicationContext = new ClassPathXmlApplicationContext("applicationContext.xml");
		Person person = (Person) applicationContext.getBean("p3");
		System.out.println( person );
	}
4.6、IOC示例程序 – index属性指定参数的位置
实验4:通过index属性指定参数的位置
配置applicationContext.xml配置文件:
<bean id="p4" class="com.pojo.Person">
		<!--
			constructor-arg 表示使用构造器赋值
				index 是参数索引 从零开始
		 -->
		<constructor-arg index="0" value="4" />
		<constructor-arg index="1" value="老天,请赐给我一个妹子吧!" />
		<constructor-arg index="2" value="18616816888" />
		<constructor-arg index="3" value="1" />
</bean>
测试类:
	@Test
	public void test4() throws Exception {
		ApplicationContext applicationContext = new ClassPathXmlApplicationContext("applicationContext.xml");
		Person person = (Person) applicationContext.getBean("p4");
		System.out.println( person );
	}
4.7、IOC示例程序 – 根据参数类型注入
实验5:根据参数类型注入
给person构造器重载
public Person() {
	super();
	System.out.println("无参构造器Person");
}

public Person(Integer id, String name, String phone, Integer sex) {
	super();
	this.id = id;
	this.name = name;
	this.phone = phone;
	this.sex = sex;
	System.out.println("有参构造器Person");
}

public Person(Integer id, String name, Integer sex, String phone) {
	super();
	this.id = id;
	this.name = name;
	this.phone = phone;
	this.sex = sex;
	System.out.println("有参构造器Person");
}
applicationContext.xml配置文件:
<bean id="p5" class="com.pojo.Person">
	<constructor-arg index="0" type="java.lang.Integer" value="5" />
	<constructor-arg index="1" type="java.lang.String" value="构造器重载" />
	<constructor-arg index="2" type="java.lang.String" value="1"/>
	<constructor-arg index="3" type="java.lang.Integer" value="0" />
</bean>
测试类:
 @Test
	public void test5() throws Exception {
		ApplicationContext applicationContext = new ClassPathXmlApplicationContext("applicationContext.xml");
		Person person = (Person) applicationContext.getBean("p5");
		System.out.println( person );
	}
4.8、IOC之 P名称空间
实验6:通过p名称空间为bean赋值
添加p名称空间
配置applicationContext.xml配置文件:
	<!-- p名称空间,是给属性赋值的另一种方法 -->
	<bean id="p6" class="com.pojo.Person"
		p:id="6" p:name="通过p名称空间赋值" p:phone="这是p名称空间的电话" p:sex="1"/>
测试类:
	@Test
	public void test6() throws Exception {
		ApplicationContext applicationContext = new ClassPathXmlApplicationContext("applicationContext.xml");
		Person person = (Person) applicationContext.getBean("p6");
		System.out.println( person );
	}
4.9、测试null值的使用
实验7:测试使用null值
配置applicationContext.xml配置文件:
<bean id="p7" class="com.pojo.Person">
	<property name="id" value="7" />
	<property name="name" value="这是null值测试" />
	<!--如果只是单独的写一个value="null"它会传一个字符串,长度为4-->
	<property name="phone" >
		<null></null>
	</property>
	<property name="sex" value="1" />
</bean>
测试类:
	@Test
	public void test7() throws Exception {
		ApplicationContext applicationContext = new ClassPathXmlApplicationContext("applicationContext.xml");
		Person person = (Person) applicationContext.getBean("p7");
		System.out.println( person.getPhone().length() );
	}
给了null才报null指针异常

4.10、IOC之子对象的赋值
实验8:引用其他bean★
创建实体类
public class Car {

	private String carNo;
	private String name;

public class Person {

	private Integer id;
	private String name;
	private Car car;
applicationContext.xml配置:
<bean id="car01" class="com.pojo.Car">
	<property name="carNo" value="京B123412" />
	<property name="name" value="蓝波基泥" />
</bean>

<bean id="p8" class="com.pojo.Person">
	<property name="id" value="8" />
	<property name="name" value="今天特帅!" />
	<!-- ref属性设置引用哪个bean对象 -->
	<property name="car" ref="car01" />
</bean>
测试代码:
@Test
public void test1() throws Exception {

	ApplicationContext applicationContext = new ClassPathXmlApplicationContext("applicationContext.xml");
	System.out.println( applicationContext.getBean("p8") );

}
4.11、IOC之内部Bean的使用
实验9:引用内部bean
<bean id="p9" class="com.pojo.Person">
	<property name="id" value="9" />
	<property name="name" value="国哥今天特点帅!" />
	<property name="car">
		<!-- 内部bean -->
		<bean id="car02" class="com.pojo.Car">
			<property name="carNo" value="京B123411" />
			<property name="name" value="奇锐" />
		</bean>
	</property>
</bean>
测试代码:
@Test
public void test2() throws Exception {
	ApplicationContext applicationContext = new ClassPathXmlApplicationContext("applicationContext.xml");
	System.out.println( applicationContext.getBean("p9") );
	System.out.println( applicationContext.getBean("car01") );
	System.out.println( applicationContext.getBean("car02") );
}
常见错误:内部的Bean不能被外部使用

4.12、IOC之List属性的赋值
实验10:使用list子元素为List类型的属性赋值
public class Person {
private Integer id;
private String name;
private Car car;
private List<String> list;
配置信息:
<bean id="p10" class="com.pojo.Person">
	<property name="id" value="10" />
	<property name="name" value="内存门" />
	<property name="list">
		<list>
			<value>string1</value>
			<value>string2</value>
			<value>string3</value>
		</list>
	</property>
</bean>
测试代码:
@Test
public void test3() throws Exception {
	ApplicationContext applicationContext = new ClassPathXmlApplicationContext("applicationContext.xml");
	System.out.println( applicationContext.getBean("p10") );
}
4.13、IOC之Map属性的赋值
实验11:使用map子元素为Map类型的属性赋值
person对象修改
public class Person {
	private Integer id;
	private String name;
	private Car car;
	private List<String> list;
	private Map<String, Object> map;
配置信息
<bean id="p11" class="com.pojo.Person">
	<property name="id" value="11" />
	<property name="name" value="今天是个好日子,因为要停水" />
	<property name="map">
		<map>
			<entry key="key1" value="value1" />
			<entry key="key2" value="value2" />
			<entry key="key3" value="value3" />
		</map>
	</property>
</bean>
测试代码:
@Test
public void test4() throws Exception {
	ApplicationContext applicationContext = new ClassPathXmlApplicationContext("applicationContext.xml");
	System.out.println( applicationContext.getBean("p11") );
}
4.14、IOC之Properties属性的赋值
实验12:使用prop子元素为Properties类型的属性赋值
public class Person {
	private Integer id;
	private String name;
	private Car car;
	private List<String> list;
	private Map<String, Object> map;
	private Properties properties;
配置信息:
<bean id="p12" class="com.pojo.Person">
	<property name="id" value="11" />
	<property name="name" value="今天是个好日子,因为要停水" />
	<property name="properties">
		<props>
			<prop key="user">root</prop>
			<prop key="url">jdbc:mysql://localhost:3306/test</prop>
		</props>
	</property>
</bean>
测试代码:
@Test
public void test5() throws Exception {
	ApplicationContext applicationContext = new ClassPathXmlApplicationContext("applicationContext.xml");
	System.out.println( applicationContext.getBean("p12") );
}
4.15、IOC之util 名称空间
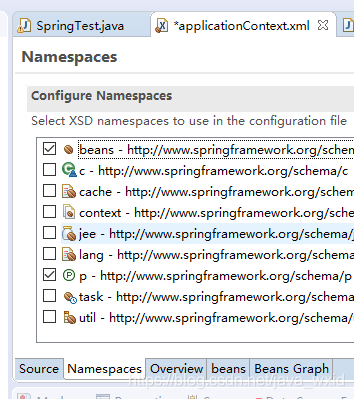
util名称空间,可以定义
实验13:通过util名称空间创建集合类型的bean
添加Utils名称空间:

配置信息:
<!-- 通过util名称空间定义list集合 -->
<util:list id="list01">
	<value>string1</value>
	<value>string2</value>
	<value>string3</value>
</util:list>

<bean id="p13" class="com.pojo.Person">
	<property name="list" ref="list01" />
</bean>
测试代码:
@Test
public void test6() throws Exception {
	ApplicationContext applicationContext = new ClassPathXmlApplicationContext("applicationContext.xml");
	System.out.println( applicationContext.getBean("list01") );
	System.out.println( applicationContext.getBean("p13") );
}
4.16、IOC之级联属性赋值
实验14:给bean的级联属性赋值
配置信息:
<bean id="p14" class="com.pojo.Person">
	<property name="car" ref="car01" />
	<!-- 当我们通过级联属性赋值的时候,需要先给子对象赋值 -->
	<property name="car.name" value="级联属性赋值" />
</bean>
测试代码:
@Test
public void test7() throws Exception {
	ApplicationContext applicationContext = new ClassPathXmlApplicationContext("applicationContext.xml");
	System.out.println( applicationContext.getBean("p14") );
}
常见错误:
级联属性一定要先注入对象。再注入对象的属性
4.17、IOC之静态工厂方法创建Bean
实验15:配置通过静态工厂方法创建的bean
工厂代码:
public class PersonFactory {

	public static Person createPerson() {
		return new Person(null, "静态工厂方法创建的person对象", null);
	}

}
配置信息:
<!--
	factory-method是表示调用class类对象的静态方法createPerson创建对象
 -->
<bean id="p15" factory-method="createPerson" class="com.factory.PersonFactory"></bean>
测试代码:
@Test
public void test7() throws Exception {
	ApplicationContext applicationContext = new ClassPathXmlApplicationContext("applicationContext.xml");
	System.out.println( applicationContext.getBean("p15") );
}
4.18、IOC之工厂实例方法创建Bean
实验16:配置通过实例工厂方法创建的bean
创建一个工厂
public class PersonFactory {
	public Person createPerson2() {
		return new Person(null, "工厂实例方法创建的person对象", null);
	}
}
配置信息:
<!-- 定义person工厂  -->
<bean id="personFactory" class="com.factory.PersonFactory" />
<!-- 定义工厂调用哪个方法创建 -->
<bean id="p16" factory-bean="personFactory" factory-method="createPerson2" />
测试代码:
@Test
public void test8() throws Exception {
	ApplicationContext applicationContext = new ClassPathXmlApplicationContext("applicationContext.xml");
	System.out.println( applicationContext.getBean("p16") );
}
4.19、IOC之FactoryBean接口方式创建对象
实验17:配置FactoryBean接口创建Bean对象
public class PersonFactoryBean implements FactoryBean<Person>{

	/**
	 * 创建对象用的方法
	 */
	@Override
	public Person getObject() throws Exception {
		return new Person(null, "这是FactoryBean接口创建的对象", null);
	}

	/**
	 * 返回对象的具体类型
	 */
	@Override
	public Class<?> getObjectType() {
		return Person.class;
	}

	/**
	 * 是否是单例
	 */
	@Override
	public boolean isSingleton() {
		return true;
	}
}
配置信息:
<bean id="p17" class="com.factory.PersonFactoryBean" />
测试代码:
@Test
public void test9() throws Exception {
	ApplicationContext applicationContext = new ClassPathXmlApplicationContext("applicationContext.xml");
	System.out.println( applicationContext.getBean("p17") );
}
4.20、IOC之继承Bean配置
实验18:通过继承实现bean配置信息的重用
配置信息:
<!--
	abstract="true" 设置当前配置为抽象配置
 -->
<bean id="parent" class="com.pojo.Person" abstract="true">
	<property name="id" value="100" />
	<property name="name" value="我是王爸爸" />
	<property name="car" ref="car01" />
</bean>

<!--
	parent属性设置你继承哪个bean对象
 -->
<bean id="p18" class="com.pojo.Person" parent="parent">
	<property name="id" value="18" />
</bean>
测试代码:
@Test
public void test10() throws Exception {
	ApplicationContext applicationContext = new ClassPathXmlApplicationContext("applicationContext.xml");
	System.out.println( applicationContext.getBean("p18") );
}
4.21、IOC之abstract抽象Bean
实验19:通过abstract属性创建一个模板bean
<!--
	abstract="true" 设置当前配置为抽象配置
 -->
<bean id="parent" class="com.pojo.Person" abstract="true">
	<property name="id" value="100" />
	<property name="name" value="我是王爸爸" />
	<property name="car" ref="car01" />
</bean>
测试类:
@Test
public void test11() throws Exception {
	ApplicationContext applicationContext = new ClassPathXmlApplicationContext("applicationContext.xml");
	System.out.println( applicationContext.getBean("parent") );
}
4.22、IOC之组件创建顺序
实验20:bean之间的依赖 depends-on 属性
public class A {
	public A() {
		System.out.println("我是A");
	}
}
public class B {
	public B() {
		System.out.println("我是B");
	}
}
public class C {
	public C() {
		System.out.println("我是C");
	}
}
配置:
<?xml version="1.0" encoding="UTF-8"?>
<beans xmlns="http://www.springframework.org/schema/beans"
	xmlns:xsi="http://www.w3.org/2001/XMLSchema-instance"
	xsi:schemaLocation="http://www.springframework.org/schema/beans http://www.springframework.org/schema/beans/spring-beans.xsd">
	<!--
		depends-on 设置依赖
	 -->
	<bean id="a" class="com.pojo.A" depends-on="b,c"></bean>
	<bean id="b" class="com.pojo.B"></bean>
	<bean id="c" class="com.pojo.C"></bean>
</beans>
测试的代码:
@Test
public void test12() throws Exception {
	ApplicationContext applicationContext = new ClassPathXmlApplicationContext("applicationContext.xml");
}
4.23、IOC之Bean的单例和多例(重点)
实验21:测试bean的作用域,分别创建单实例和多实例的bean★
配置:
<!--
	scope 属性设置bean对象的作用域范围

	singleton				默认值,单例
							1、会在Spring IOC容器被创建的时候创建。
							2、每次调用getBean方法都会获取之前创建的对象

	prototype				多例
							1、多例的bean对象,不会随着容器对象的创建而创建。
							2、每次调用getBean方法都会创建一个Person对象

	request					是指,每次调用getBean对象,只要是同一个请求,每次都返回同一个对象

							getBean() 原理:
								Object bean = request.getAttribute(id);
								if (bean == null) {
									bean = new Object();
									request.setAttribute( id,bean );
								}
								return bean;

	session					只要当前是相同的一个会话对象,不管调用多少次的getBean,都会返回同一个bean对象

							getBean() 原理:
								Object bean = session.getAttribute(id);
								if (bean == null) {
									bean = new Object();
									session.setAttribute( id,bean );
								}
								return bean;

 -->
<bean id="p21" class="com.pojo.Person" scope="prototype"></bean>
4.24、基于xml配置文件的自动注入
先创建Person类和Car类
public class Car {

	private String name;

public class Person {

	private Car car;

	public Person(Car car) {
		this.car = car;
	}
配置:
<!--
		autowire 是自动注入值
			default和no都表示不注入值。

			byName 表示将属性名做为id,到springIOC容器中去查找对象,并注入
					如果没有找到,就注入null值
			byType 表示按属性对象类型来进行查找,然后注入
					1、找到一个就直接注入
					2、只要按类型查找,找到多个就报错。
					3、没有找到就注入null值
			constructor	按构造器注入值
					1、先按照类型进行查找,找到一个就注入
					2、如果找到多个。接着按参数名做为id查找并注入
					3、如果找不到就注入null

	 -->
	<bean id="p24" class="com.pojo.Person" autowire="constructor">
		<property name="id" value="24"></property>
	</bean>