SpringBoot 2.X中使用缓存注解时,发现某些配置方面与SpringBoot 1.X有些异同,这里作为第一篇博客记录下来。
1.创建SpringBoot 2.0.1 工程,引入spring-boot-starter-data-redis依赖

2.配置redis的连接属性
spring:
  redis:
    password:
    host: localhost
    port: 6379
  cache:
    type: redis
spring.cache.type 指定注解缓存使用redis
3.添加@EnableCaching开启缓存注解
@EnableCaching
@SpringBootApplication
public class SpringBoot2Application {
    public static void main(String[] args) {
        SpringApplication.run(SpringBoot2Application.class, args);
    }
}
4.使用缓存注解
通用属性解释:
value属性:要使用缓存的名称
key属性:使用SpEL表达式自定义缓存Key,例如:#name—以参数name作为自定义缓存Key,#result.name—以返回值结果的name属性作为自定义缓存Key
(1)@Cacheable注解
如果没有缓存则会执行方法并将返回值缓存,如果有缓存时,不会执行方法而是直接返回缓存中的值
@GetMapping
@Cacheable(value = "users", key = "#name")
public User getByName(String name) {
    log.info("get user info...");
    User user = new User();
    user.setName(name);
    return user;
}
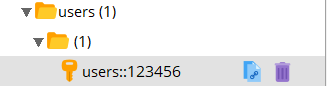
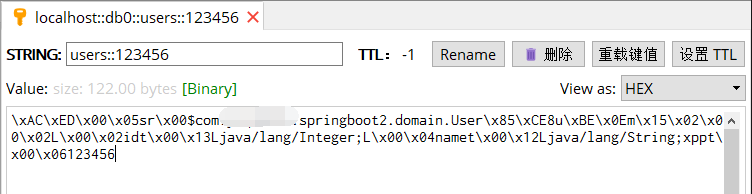
第一次发起GET请求/users?name=123456时,会输出get user info...日志并且查看redis会发现以下结果
再次发起一个GET请求/users?name=123456,并没有日志输出,可见有缓存时并不会调用方法。
(2)@CachePut注解
不管有没有缓存都会执行方法并将结果缓存起来
@PostMapping
@CachePut(value = "users", key = "#result.name")
public User add(String name) {
    User user = new User();
    user.setId(1);
    user.setName(name);
    if (userRepository.save(user)) {
        log.info("用户:%s 保存成功!\n", user);
    }
    return user;
}
发起POST请求/users?name=123456,可见每次都会打印保存成功的日志并且将最新的结果缓存起来
(3)@CacheEvict注解
移除指定缓存
@DeleteMapping
@CacheEvict(value = "users", key = "#name")
public void deleteByName(String name) {
    log.info("delete user by name :{}", name);
}
发起DELETE请求/users?name=123456,可见每次都会打印删除日志并且删除缓存
注意:
a.User对象需要实现序列化接口
b.只有@CacheEvict注解的方法返回值可以为void
5.使用@CacheConfig注解进一步简化
@Slf4j
@CacheConfig(cacheNames = "users")
@RestController
@RequestMapping("/users")
public class UserController {
    private final UserRepository userRepository;

    @Autowired
    public UserController(UserRepository userRepository) {
        this.userRepository = userRepository;
    }

    @PostMapping
    @CachePut
    public User add(String name) {
        User user = new User();
        user.setName(name);
        if (userRepository.save(user)) {
            log.info("用户:%s 保存成功!\n", user);
        }
        return user;
    }

    @GetMapping
    @Cacheable
    public User getByName(String name) {
        log.info("get user info...");
        User user = new User();
        user.setName(name);
        return user;
    }

    @DeleteMapping
    @CacheEvict
    public void deleteByName(String name) {
        log.info("delete user by name :{}", name);
    }
}
使用@CacheConfig声明类下的缓存注解的value默认是"users",让代码更简洁、优雅,效果与上面一样。
6.指定序列化器
上面就已经简单的使用了缓存注解,实际上还有很多注解属性没有介绍到,因为并不是本篇的重点,有兴趣的小伙伴可以自己进行拓展,比如,条件化缓存,XML方式对源码中的方法进行缓存,分组缓存等特性。上面当我们去redis查看value值时,我们一脸懵逼根本看不懂存的是啥东西。下面让我们自定义序列化器来让缓存的value值透明化,这里的自定义配置也是SpringBoot 2.X 与SpringBoot 1.X不一样的地方。
@Bean
public RedisCacheConfiguration redisCacheConfiguration() {
    return RedisCacheConfiguration
            .defaultCacheConfig()
            .serializeKeysWith(
                    RedisSerializationContext
                            .SerializationPair
                            .fromSerializer(new StringRedisSerializer()))
            .serializeValuesWith(
                    RedisSerializationContext
                            .SerializationPair
                            .fromSerializer(new GenericJackson2JsonRedisSerializer()));
}
当我们添加以上配置后,使用缓存注解时会使用StringRedisSerializer对Key进行序列化,使用GenericJackson2JsonRedisSerializer对Value进行反序列化。
此时重新启动我们删除原有的缓存后再次发起一个GET请求/users?name=123456
与之前效果一样,不一样的在于我们终于能看懂缓存中Value装的是啥玩意儿了,如下图:
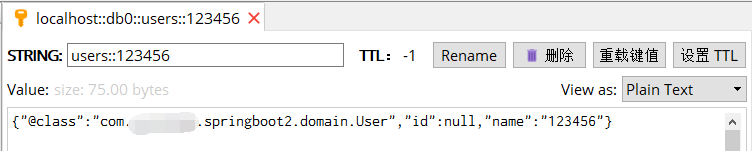
class用于在反序列化时将其由JSON数据反序列化为User实体
id与name都是User实体中的属性
7.源码分析
SpringBoot 1.X 中自定义序列化器通常是声明一个RedisCacheManager并在其构造中传一个RedisTemplate,接着对RedisTemplate配置自定义序列化器就可达到自定义序列化器的目的。但是SpringBoot 2.X 中你会发现RedisCacheManager的构造方法完全变样了,不再是依赖RedisTemplate。下面来走源码分析一波。
首先,我们进到RedisCacheConfiguration看一波
//默认声明的RedisCacheManager
@Bean
public RedisCacheManager cacheManager(RedisConnectionFactory redisConnectionFactory, ResourceLoader resourceLoader) {
    //与Spring Boot 1.X 中RedisCacheManager的构造方式不同
    RedisCacheManagerBuilder builder = RedisCacheManager.builder(redisConnectionFactory).cacheDefaults(this.determineConfiguration(resourceLoader.getClassLoader()));
    List<String> cacheNames = this.cacheProperties.getCacheNames();
    if (!cacheNames.isEmpty()) {
        builder.initialCacheNames(new LinkedHashSet(cacheNames));
    }

    return (RedisCacheManager)this.customizerInvoker.customize(builder.build());
}
SpringBoot 的契约优于配置的特性已经帮我们配了一个默认的RedisCacheManager
//决定使用的RedisCacheConfiguration配置
private org.springframework.data.redis.cache.RedisCacheConfiguration determineConfiguration(ClassLoader classLoader) {
    //如果有自定义的RedisCacheConfiguration则使用自定义的
    if (this.redisCacheConfiguration != null) {
        return this.redisCacheConfiguration;
    //没有则使用默认配置
    } else {
        Redis redisProperties = this.cacheProperties.getRedis();
        org.springframework.data.redis.cache.RedisCacheConfiguration config = org.springframework.data.redis.cache.RedisCacheConfiguration.defaultCacheConfig();
        //默认使用JDK自带的序列化器
        config = config.serializeValuesWith(SerializationPair.fromSerializer(new JdkSerializationRedisSerializer(classLoader)));
        if (redisProperties.getTimeToLive() != null) {
            config = config.entryTtl(redisProperties.getTimeToLive());
        }

        if (redisProperties.getKeyPrefix() != null) {
            config = config.prefixKeysWith(redisProperties.getKeyPrefix());
        }

        if (!redisProperties.isCacheNullValues()) {
            config = config.disableCachingNullValues();
        }

        if (!redisProperties.isUseKeyPrefix()) {
            config = config.disableKeyPrefix();
        }

        return config;
    }
}
可以发现如果没有找到RedisCacheConfiguration Bean对象 则使用默认配置中的序列化器—JDK自带的序列化器,如果有就使用自定义的RedisCacheConfiguration,这就可以解释为什么我们想使用自定义的序列化器需要声明一个RedisCacheConfiguration Bean对象了。
8.Jackson序列化器
Jackson序列化器其实有两个,Jackson2JsonRedisSerializer和我们上面使用的GenericJackson2JsonRedisSerializer。
如果使用Jackson2JsonRedisSerializer在反序列化时会遇到问题,因为没有具体泛型或泛型为Object时,会将缓存中的数据反序列化为LinkedHashMap,而我们需要的是User对象,因此就会抛出一个异常。
@Bean
public RedisCacheConfiguration redisCacheConfiguration() {
    return RedisCacheConfiguration
            .defaultCacheConfig()
            .serializeKeysWith(RedisSerializationContext.SerializationPair.fromSerializer(new StringRedisSerializer()))
            //如果将Object.class替换为User.class也可以暂时解决问题但是这就不是一个通用的序列化器了
            .serializeValuesWith(RedisSerializationContext.SerializationPair.fromSerializer(new Jackson2JsonRedisSerializer<>(Object.class)));
}
Jackson2JsonRedisSerializer<T>源码
public T deserialize(@Nullable byte[] bytes) throws SerializationException {
    if (SerializationUtils.isEmpty(bytes)) {
        return null;
    } else {
        try {
            return this.objectMapper.readValue(bytes, 0, bytes.length, this.javaType);
        } catch (Exception var3) {
            throw new SerializationException("Could not read JSON: " + var3.getMessage(), var3);
        }
    }
}
使用Jackson2JsonRedisSerializer反序列化时的转换异常
java.lang.ClassCastException: java.base/java.util.LinkedHashMap cannot be cast to com.springboot2.domain.User而使用GenericJackson2JsonRedisSerializer就可以避免这种情况。