接上篇《JAVA WEB快速入门之从编写一个JSP WEB网站了解JSP WEB网站的基本结构、调试、部署》,通过一个简单的JSP WEB网站了解了JAVA WEB相关的知识,比如:Servlet、Fitler、Listner等,这为后面搭建基于SSM的框架奠定了基础知识,当然光了解JSP相关的知识还不行,我们还得了解掌据Spring相关的知识,因为SSM,是基于Spring框架(SpringMVC)搭建的,好了废话不多说,直接进入主题。
什么是Spring?
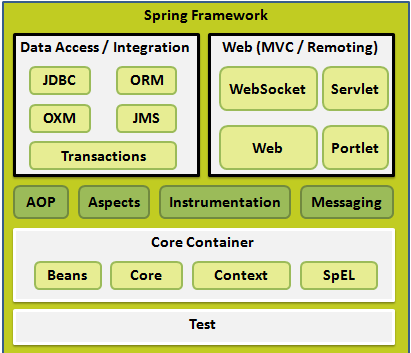
Spring是一个开放源代码的设计层面框架,他解决的是业务逻辑层和其他各层的松耦合问题,因此它将面向接口的编程思想贯穿整个系统应用...详见百度百科:https://baike.baidu.com/item/spring/85061
核心模块如下图示:(来源网络)
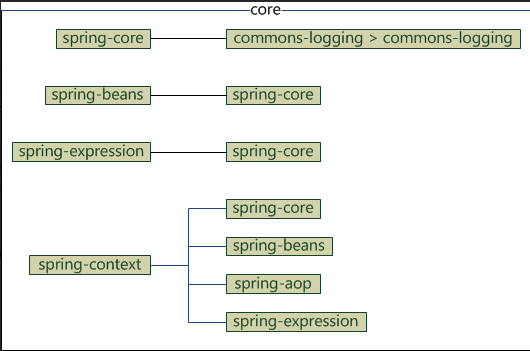
依赖关系:(来源网络)
一、建立一个Spring项目:
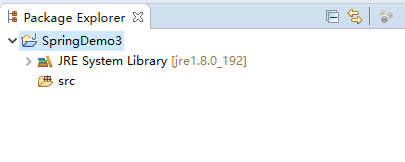
1.1打开eclipse,依次操作:File->New->Java Project,然后设置一些必要的项目属性(类似操作在上一篇),最后finish创建完成一个空的JAVA Project,注意目前并没有Spring环境。如下图示:
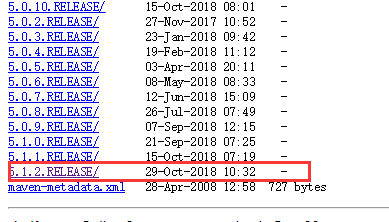
1.2下载Spring相关的JAR包(下载地址:http://repo.spring.io/release/org/springframework/spring/ 或使用MAVAN的下载地址:http://maven.springframework.org/release/org/springframework/spring/)

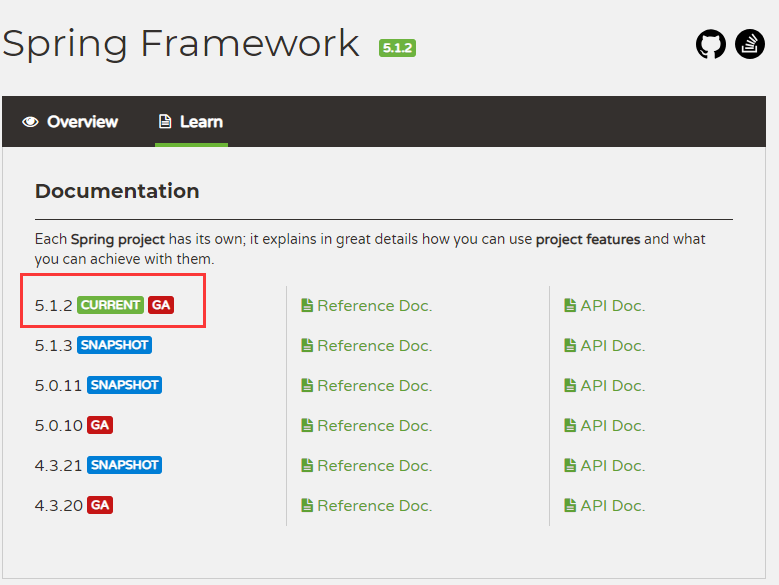
打开下载页面后,从列表中找到最新的一个地址,如目前的最新版本:(5.1.2.RELEASE)
通过Spring官网也能看到当前显示的最新版本(官网地址:https://spring.io/projects/spring-framework#learn)
1.3点击进入选择的下载版本链接,然后点击如下图示的地址下载Spring JAR包:

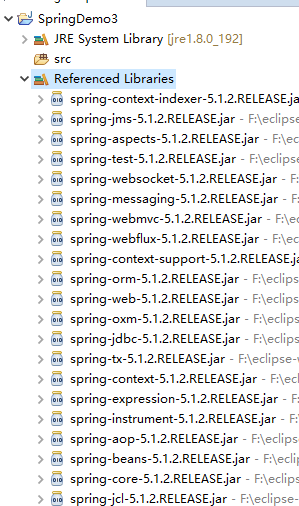
1.4下载后解压,然后在JAVA项目中引入刚才下载的Spring JAR包(在解压后的libs目录下),引入方式与上篇介绍基本相同,通过项目右击:Buid path->Configure Buid Path->切换到Libraries页签->Add External JARs(即:添加外部JAR包),如下图示:

导入到项目后的效果如下图示:
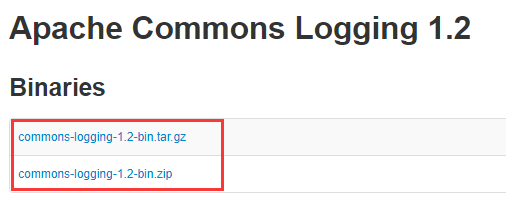
当然除了引入Spring相关JAR包外,应该还需要导入一个Commons Logging JAR包,因为Spring-core 包有依赖此包,故我们也应该下载并引入(地址:http://commons.apache.org/proper/commons-logging/download_logging.cgi),下载页面如下图示:
导入方法同上面导入Spring JAR包操作相同,故不再重述。
到目前为止一个Spring的项目环境已经搭建好了,有点感觉像在VS中创建一个空的WEB项目,然后引入相关的DLL最后形成一个MVC或WEB API框架。
二、 使用Spring的依赖注入功能
2.1 了解依赖注入必要知识:
Srping IOC容器:是 Spring 框架的核心。容器将创建对象并把它们连接在一起,配置它们,并管理他们的整个生命周期从创建到销毁。Spring 容器使用依赖注入(DI)来管理组成一个应用程序的组件(这些对象被称为 Spring Beans)。通过阅读配置元数据提供的指令,容器知道对哪些对象进行实例化,配置和组装。配置元数据可以通过 XML,Java 注解或 Java 代码来表示。IOC 容器负责实例化、定位、配置应用程序中的对象及建立这些对象间的依赖。通常new一个实例,控制权由程序员控制,而"控制反转"是指new实例工作不由程序员来做而是交给Spring容器来做。简容容器对象接口:BeanFactory(常用实现类:XmlBeanFactory)、高级容器对象接口:ApplicationContext(常用实现类:FileSystemXmlApplicationContext、ClassPathXmlApplicationContext、WebXmlApplicationContext)
Spring Bean:所有可以被spring容器实例化并管理的java类都可以称为SpringBean
POJO、Java Bean、Spring Bean区别:
POJO是一个简单的、普通Java对象,特点是有private的属性(在C#中称为字段)和public的getter、setter方法,除此之外不具有任何特殊角色,不继承或不实现任何其它Java框架的类或接口。一般用于数据的传输,比如作为DTO对象;
JavaBean 是一种JAVA语言写成的可重用组件。JavaBean符合一定规范编写的Java类,不是一种技术,而是一种规范。它的方法命名,构造及行为必须符合特定的约定:
A.所有属性为private。B.类必须具有一个公共的(public)无参构造函数,C.private属性必须提供public的getter和setter来给外部访问,并且方法的命名也必须遵循一定的命名规范。 D.这个类应是可序列化的,要实现serializable接口。
当一个POJO可序列化,有一个无参的构造函数,使用getter和setter方法来访问属性时,他就是一个JavaBean,而Spring Bean,不需要像JavaBean 一样遵循一些规范(不过对于通过设值方法注入的Bean,一定要提供setter 方法。)
2.2在项目根目录下创建Beans.xml文件(Spring Bean配置文件),操作步骤:src右键->New->Other->搜索xml->选择xml file->按默认步骤操作直至完成即可,创建完的XML文件可能只有如下内容:
<?xml version="1.0" encoding="UTF-8"?>
这时我们需要手动添加必要的Spring Bean的命名空间(xmlns),添加后的完整的Spring Bean空配置文件如下:
<?xml version="1.0" encoding="UTF-8"?>
<beans xmlns="http://www.springframework.org/schema/beans"
    xmlns:xsi="http://www.w3.org/2001/XMLSchema-instance"
    xsi:schemaLocation="http://www.springframework.org/schema/beans
    http://www.springframework.org/schema/beans/spring-beans-4.3.xsd">


</beans>
其中http://www.springframework.org/schema/beans/spring-beans-4.3.xsd这个4.3是目前最新的版本,可以根据http://www.springframework.org/schema/beans获得最新的XSD文件
2.3定义一个Bean,并配置到Bean配置文件中(beans.xml),同时使用ClassPathXmlApplicationContext IOC容器来获得实例,代码如下:
package cn.zuowenjun.java;


public class FirstBean {
	private String uuidStr = java.util.UUID.randomUUID().toString();

	private String message;

	public String getMessage() {
		return message;
	}

	public void setMessage(String message) {
		this.message = message;

	}

	public void showMessage(String name) {
		System.out.printf("hello,%1$s,Message:%2$s UUID:%3$s %n", name, message, uuidStr);
	}

	public void throwEx() throws Exception {
		throw new Exception("throw a new Exception!");
	}

	public void init() {
		System.out.println(uuidStr + ":init...");
	}

	public void destroy() {
		System.out.println("destroy...");
	}
}


package cn.zuowenjun.java;

import org.springframework.context.support.ClassPathXmlApplicationContext;

public class SpringDemoApp {

	public static void main(String[] args) {
		// TODO Auto-generated method stub
		ClassPathXmlApplicationContext context=new ClassPathXmlApplicationContext("Beans.xml");
		context.start();

		FirstBean firstBean= (FirstBean)context.getBean("firstBean");
		firstBean.showMessage("梦在旅途");

		context.close();

		context.registerShutdownHook();

	}

}
在Beans.xml中注册FirstBean(省略XML声明定义的固定部份,仅贴出Bean的定义)
	<bean id="firstBean" class="cn.zuowenjun.java.FirstBean"
	init-method="init" destroy-method="destroy"
	scope="singleton">
		<property name="message" value="i love Spring!"></property>
	</bean>
运行SpringDemoApp即可看到输出的结果:

配置说明:
bean元素:表示注册一个bean;
id:bean的唯一识别名称(IOC容器getBean就是取这个名称);
class:bean的完整类名(包含包名);
init-method:定义bean初始化完成后回调的方法;(也可以通过将Bean实现InitializingBean接口,重写afterPropertiesSet方法)
destroy-method:定义当包含该 bean 的容器被销毁时回调方法;(也可以通过将Bean实现DisposableBean接口,重写destroy方法)
注:如果你有太多具有相同名称的初始化或者销毁回调方法的 Bean,那么你不需要在每一个 bean 上声明初始化方法和销毁方法,直接在Bean元素中配置 default-init-method 和 default-destroy-method 属性即可
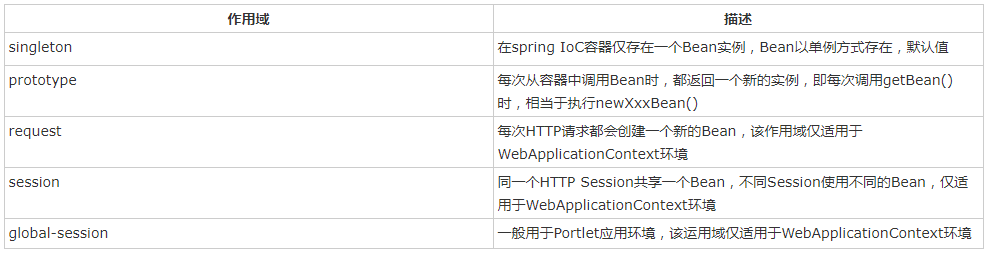
scope:定义bean的作用域,生命周期范围,具体值如下图示:(来源网络)
property元素:表示Bean的属性
当然还有其它属性,我们稍后示例中有用到的时候再补充说明。
注:可以通过定义一个类并实现BeanPostProcessor接口(称为:Bean 后置处理器),实现在调用初始化方法前后对 Bean 进行额外的处理
2.4分别再定义SecondBean、ThirdBean类,演示通过构造函数注入、属性注入,实现代码如下:
package cn.zuowenjun.java;

import java.util.List;

public class SecondBean {
	private int intProp;
	private String strProp;
	private ThirdBean thirdBean;

	private FirstBean firstBean=null;

	public SecondBean(int ipro,String sPro,FirstBean frtBean) {
		this.intProp=ipro;
		this.strProp=sPro;
		this.firstBean=frtBean;
	}

	public int getIntProp() {
		return intProp;
	}

	public void setIntProp(int intProp) {
		this.intProp = intProp;
	}

	public String getStrProp() {
		return strProp;
	}

	public void setStrProp(String strProp) {
		this.strProp = strProp;
	}

	public ThirdBean getThirdBean() {
		return thirdBean;
	}

	public void setThirdBean(ThirdBean thirdBean) {
		this.thirdBean = thirdBean;
	}


	public void outPutAll() {
		System.out.println("output start>>>>");
		System.out.printf("intProp:%d,strProp:%s %n",intProp,strProp);
		firstBean.showMessage(strProp);
		List<Integer> list=thirdBean.getListProp();
		StringBuffer strBuffer=new StringBuffer();
		for(Integer i:list)
		{
			strBuffer.append(i.toString()+",");
		}

		System.out.println(strBuffer.toString());

		System.out.println("output end<<<<");
	}

}


package cn.zuowenjun.java;

import java.util.*;

public class ThirdBean {

	private List<Integer> listProp;

	public List<Integer> getListProp() {
		return listProp;
	}

	public void setListProp(List<Integer> listProp) {
		this.listProp = listProp;
	}
}
配置注册相关Bean:
	<bean id="firstBean" class="cn.zuowenjun.java.FirstBean"
		init-method="init" destroy-method="destroy" scope="singleton">
		<property name="message" value="i love Spring!"></property>
	</bean>

	<bean id="secondBean" class="cn.zuowenjun.java.SecondBean">
	<constructor-arg type="int" value="520"></constructor-arg>
	<constructor-arg type="java.lang.String" value="JAVAER"></constructor-arg>
	<constructor-arg name="frtBean" ref="firstBean"></constructor-arg>
	<property name="thirdBean" ref="thirdBean"></property>
	</bean>

	<bean id="thirdBean" class="cn.zuowenjun.java.ThirdBean">
		<property name="listProp">
			<list>
				<value>1</value>
				<value>2</value>
				<value>3</value>
				<value>4</value>
				<value>5</value>
				<value>6</value>
				<value>7</value>
				<value>8</value>
				<value>9</value>
			</list>
		</property>
	</bean>
配置补充说明:
constructor-arg元素:表示构造函数参数,type:表示参数类型,name:表示参数名,value:表示参数注入的值(一般常用于基础类型及字符串),ref:表示参数注入的依赖Bean的ID;
property下的list元素表示的是注入这个属性的值为list集合,按照list集合方式配置集合中的每个值,当然除了list还有其它的集合注入方式,可参见:https://www.w3cschool.cn/wkspring/kp5i1ico.html
在constructor-arg元素使用ref可以实现构造函数注入指定依赖的Bean,property元素使用ref可以实现属性setter方法注入指定依赖的Bean
从上面的配置来看,构造函数注入可以根据name、type来实现自动匹配完成依赖注入,还支持根据参数个数索引来实现自动匹配完成依赖注入,如下所示:
	<bean id="secondBean" class="cn.zuowenjun.java.SecondBean">
		<constructor-arg index="0" value="520"></constructor-arg>
		<constructor-arg index="1" value="JAVAER"></constructor-arg>
		<constructor-arg index="2" ref="firstBean"></constructor-arg>
		<property name="thirdBean" ref="thirdBean"></property>
	</bean>
除了在XML中显式的配置 constructor-arg、property元素来指定注入,我们还可以通过Bean的自动装配功能实现自动根据构造函数或属性的参数名(byName)、类型(byType)自动匹配注入依赖项,具体做法是:
在定义Bean元素时,autowire属性设置为:byName或byType或constructor或autodetect(优先尝试通过构造函数参数类型匹配,若不行则按照byType),同时对应的constructor-arg、property元素可省略不匹配;(注意要符合自动装配要求)
最后在main方法加入如下代码然后运行:
		SecondBean secondBean=(SecondBean)context.getBean("secondBean");
		secondBean.outPutAll();
输出结果如下:

2.5通过JAVA注解来配置依赖注入,这样Bean配置文件可以少些配置,要实现注解配置依赖注入首先需要在Bean配置文件的根元素(beans)添加context命名空间,然后去掉相关的依赖注入的元素节点,最后改造完成的bean配置如下:
<?xml version="1.0" encoding="UTF-8"?>
<beans xmlns="http://www.springframework.org/schema/beans"
	xmlns:xsi="http://www.w3.org/2001/XMLSchema-instance"
	xmlns:context="http://www.springframework.org/schema/context"
	xsi:schemaLocation="http://www.springframework.org/schema/beans
    http://www.springframework.org/schema/beans/spring-beans-4.3.xsd
    http://www.springframework.org/schema/context
    http://www.springframework.org/schema/context/spring-context-4.3.xsd">

	<context:annotation-config />

	<bean id="firstBean" class="cn.zuowenjun.java.FirstBean"
		init-method="init" destroy-method="destroy" scope="singleton">
		<property name="message" value="i love Spring!"></property>
	</bean>

	<bean id="firstBean2" class="cn.zuowenjun.java.FirstBean"
		init-method="init" destroy-method="destroy" scope="singleton">
		<property name="message" value="i love Spring -2!"></property>
	</bean>

	<bean id="secondBean" class="cn.zuowenjun.java.SecondBean">
		<constructor-arg type="int" value="520"></constructor-arg>
		<constructor-arg type="java.lang.String" value="JAVAER"></constructor-arg>
	</bean>

	<bean id="thirdBean" class="cn.zuowenjun.java.ThirdBean">
		<property name="listProp">
			<list>
				<value>1</value>
				<value>2</value>
				<value>3</value>
				<value>4</value>
				<value>5</value>
				<value>6</value>
				<value>7</value>
				<value>8</value>
				<value>9</value>
			</list>
		</property>
	</bean>

</beans>
配置变化点:增加了context命名空间及对应的schemaLocation信息,然后添加了<context:annotation-config />元素,该元素告诉Spring IOC容器采要注解配置,最后移除了有关之前使用ref的依赖注入的元素,改为在代码中通过如下一系列注解来实现:
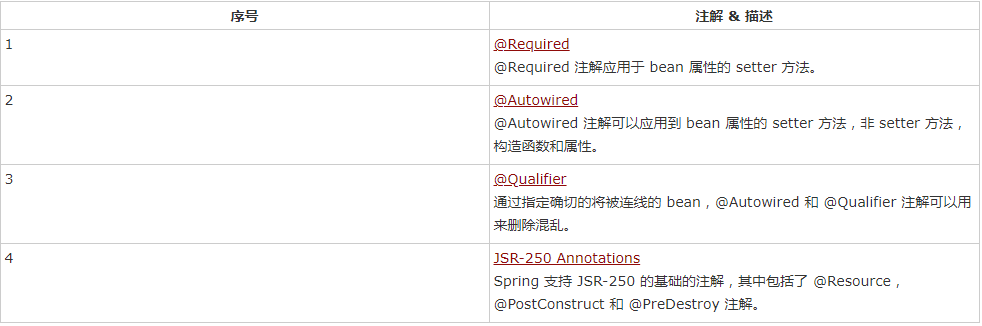
注意:@Required已被废弃,使用@Autowired(required=true)替代,有些网上教程还是旧的。
代码改变部份(主要是给FirstBean增加@PostConstruct、@PreDestroy注解,用于指示初始回调、销毁回调方法,给SecondBean增加@Autowired(required=true)、@Qualifier注解):
package cn.zuowenjun.java;

import javax.annotation.*;

public class FirstBean {
	private String uuidStr = java.util.UUID.randomUUID().toString();

	private String message;

	public String getMessage() {
		return message;

	}

	public void setMessage(String message) {
		this.message = message;

	}

	public void showMessage(String name) {
		System.out.printf("hello,%1$s,Message:%2$s UUID:%3$s %n", name, message, uuidStr);
	}

	public void throwEx() throws Exception {
		throw new Exception("throw a new Exception!");
	}

	@PostConstruct
	public void init() {
		System.out.println(uuidStr + ":init...");
	}

	@PreDestroy
	public void destroy() {
		System.out.println("destroy...");
	}
}


package cn.zuowenjun.java;

import java.util.List;

import org.springframework.beans.factory.annotation.*;

public class SecondBean {
	private int intProp;
	private String strProp;

	private ThirdBean thirdBean;

	private FirstBean firstBean=null;

	@Autowired(required=true)
	public SecondBean(int ipro,String sPro,@Qualifier("firstBean2") FirstBean frtBean) {
		this.intProp=ipro;
		this.strProp=sPro;
		this.firstBean=frtBean;
	}

	public int getIntProp() {
		return intProp;
	}

	public void setIntProp(int intProp) {
		this.intProp = intProp;
	}

	public String getStrProp() {
		return strProp;
	}

	public void setStrProp(String strProp) {
		this.strProp = strProp;
	}

	public ThirdBean getThirdBean() {
		return thirdBean;
	}

	@Autowired(required=true)
	public void setThirdBean(ThirdBean thirdBean) {
		this.thirdBean = thirdBean;
	}


	public void outPutAll() {
		System.out.println("output start>>>>");
		System.out.printf("intProp:%d,strProp:%s %n",intProp,strProp);
		firstBean.showMessage(strProp);
		List<Integer> list=thirdBean.getListProp();
		StringBuffer strBuffer=new StringBuffer();
		for(Integer i:list)
		{
			strBuffer.append(i.toString()+",");
		}

		System.out.println(strBuffer.toString());

		System.out.println("output end<<<<");
	}

}
注意@Autowired默认是按byType模式进行自动装配(即:bean的类型与被标注的成员:字段、属性、构造函数参数类型相同即为匹配注入),如果存在注册多个相同的bean类型,这时可能会报错,因为Spring容器不知道使用哪个类型进行注入实例,如上面示例的Bean配置文件中的FirstBean, 定义了有两个,只是id不同,那么这种情况我们就需要使用@Qualifier("firstBean2")来显式指定注入哪个bean;
另外@Autowired(required=true)中的required表示是否必需依赖注入,如果为true,且在bean配置文件中没有找到注入的bean则会报错,如果为false则在注入失败时忽略,即为默认值。
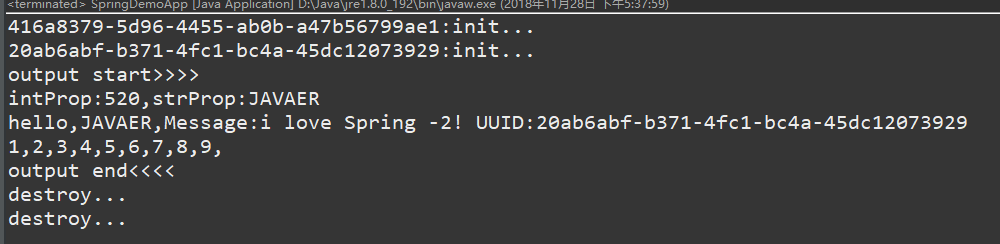
最后我们运行SpringDemoApp,最终结果如下:(大家可能注意到初始回调方法、销毁回调方法分别调用了2次,都打印了2次,这是因为在bean配置文件中,FirstBean注册了两次,虽然名字不同,虽然只用了其中的一个,但这两个方法是与同一个bean类型有关,同时scope配置为了singleton,由于是单例,故需要为每一个注册的bean都初始化一下,经过认证,如果把scope改为prototype将只会出现一次)
2.6通过定义Spring Bean配置类+注解来实现Bean的注册及依赖注入的设置 ,具体实现代码如下
SpringBeansConfig bean配置类:(用以取代beans.xml配置文件)
package cn.zuowenjun.java;

import java.util.Arrays;

import org.springframework.context.annotation.*;

@Configuration
public class SpringBeansConfig {

	@Bean(initMethod="init",destroyMethod="destroy")
	@Scope(value="prototype")
	public FirstBean firstBean() {
		FirstBean firstBeanObj= new FirstBean();
		firstBeanObj.setMessage("i love java!");
		return firstBeanObj;
	}

	@Bean
	public SecondBean secondBean() {
		return new SecondBean(666,"梦在旅途",firstBean());
	}

	@Bean
	public ThirdBean thirdBean() {
		ThirdBean thirdBeanObj= new ThirdBean();
		thirdBeanObj.setListProp(Arrays.asList(1,2,3,4,5,6,7,8,9));

		return thirdBeanObj;
	}
}
然后在main方法添加如下代码:(这次使用的是AnnotationConfigApplicationContext 的IOC容器,无需bean xml配置文件)
		AnnotationConfigApplicationContext annoCfgAppContext=new AnnotationConfigApplicationContext(SpringBeansConfig.class);

		annoCfgAppContext.start();

		FirstBean firstBean= (FirstBean)annoCfgAppContext.getBean("firstBean");
		firstBean.showMessage("firstBean单独");

		SecondBean secondBean= annoCfgAppContext.getBean(SecondBean.class);
		secondBean.outPutAll();

		annoCfgAppContext.close();

		annoCfgAppContext.registerShutdownHook();
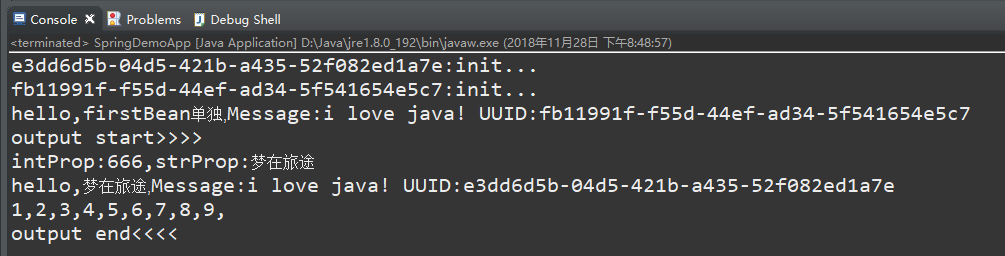
运行效果如下图示:(发现没有,destroy方法没有输出,知道为什么?因为FirstBean的scope使用了prototype模式,如果不指定或指定为singleton,则能正常输出destroy方法打印的内容,但具体原因大家自行查找资料)
2.7 定义相关Spring事件处理器类(继承自ApplicationListener泛型接口,泛型参数为具体的事件ApplicationEvent的子类),从而订阅相关的Spring事件触发的事件方法,Spring 提供了以下的标准事件接口:(图片来源网络)
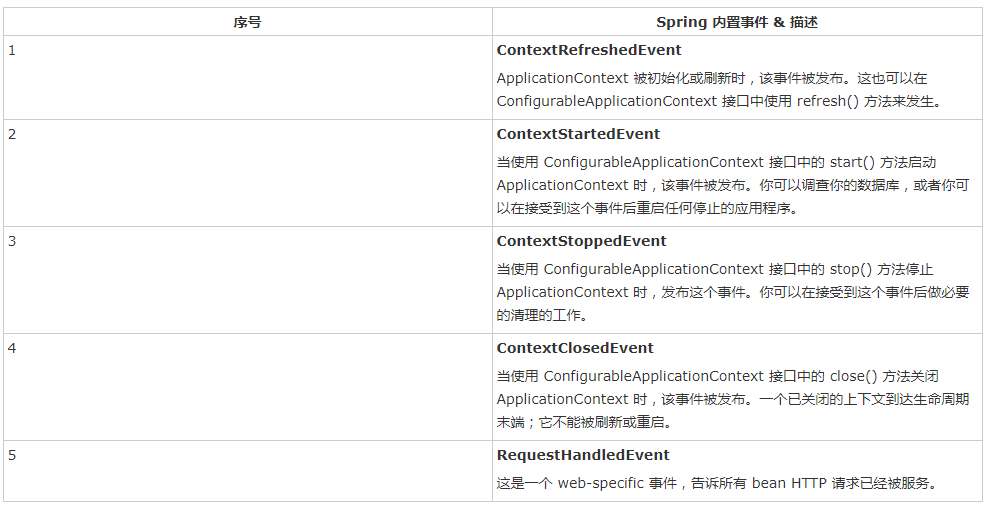
示例代码如下:(订阅开始及停止事件)
package cn.zuowenjun.java;

import org.springframework.context.ApplicationListener;
import org.springframework.context.event.ContextStartedEvent;

public class CStartEventHandler implements ApplicationListener<ContextStartedEvent> {

	@Override
	public void onApplicationEvent(ContextStartedEvent event) {

		String appName= event.getApplicationContext().getDisplayName();
		System.out.println(appName + " was Started!");
	}

}


package cn.zuowenjun.java;

import org.springframework.context.ApplicationListener;
import org.springframework.context.event.ContextStoppedEvent;

public class CStopEventHandler implements ApplicationListener<ContextStoppedEvent> {

	@Override
	public void onApplicationEvent(ContextStoppedEvent event) {

		String appName= event.getApplicationContext().getDisplayName();
		System.out.println(appName + " was Stopped!");
	}


}


//SpringBeansConfig 类中增加注册上述两个Bean(如果是用XML配置文件则换成在XML中定义相关的bean元素)
	@Bean
	public CStartEventHandler cStartEventHandler() {
		return new CStartEventHandler();
	}

	@Bean
	public CStopEventHandler cStopEventHandler() {
		return new CStopEventHandler();
	}


//最后main方法运行如下逻辑:
		AnnotationConfigApplicationContext annoCfgAppContext=new AnnotationConfigApplicationContext(SpringBeansConfig.class);
		annoCfgAppContext.setDisplayName("SpringDemoAppContext");
		annoCfgAppContext.start(); //start,以触发start事件

		SecondBean secondBean= annoCfgAppContext.getBean(SecondBean.class);
		secondBean.outPutAll();

		annoCfgAppContext.stop();//stop,以触发stop事件

		annoCfgAppContext.close();

		annoCfgAppContext.registerShutdownHook();
运行结果如下图示:

当然除了标准的事件外,我们还可以自定义事件,主要是分别定义:继承ApplicationEvent (即:自定义事件消息类)、实现ApplicationEventPublisherAware(即:事件发布类或称触发事件类)、实现ApplicationListener(即:实现订阅事件类),由于篇幅有限,具体的实现代码在此不再贴出,可参见:https://www.w3cschool.cn/wkspring/7jho1ict.html
特别说明:以上通过各种示例代码分别演示了:通过IOC容器获得bean的实例对象、基于bean配置文件实现构造函数及属性依赖注入、基于注解及Bean配置类实现构造函数及属性依赖注入等,但其实示例代码中并没有充分发挥依赖注入的功能或者说是核心思想(解除直接依赖,依赖抽象,而不能依赖具体实现),因为都是基于普通类来实现注入的,只是把实例化的过程(new)交给了Spring容器而矣,依赖仍然存在,无法替换,那要如何做呢?其实很简单,我们只需要给对应的bean定义接口,然后bean去实现这个接口,我们在再bean配置中注册实现类即可,这样就真正的发挥了IOC的作用了,代码改造如下:
//定义一个IFirstBean 接口
package cn.zuowenjun.java;

public interface IFirstBean {
	String getMessage();
	void setMessage(String message);
	void showMessage(String name);
	void init();
	void destroy();
}


//FirstBean 实现IFirstBean 接口
package cn.zuowenjun.java;

import javax.annotation.*;

public class FirstBean implements IFirstBean {
	private String uuidStr = java.util.UUID.randomUUID().toString();

	private String message;

	public String getMessage() {
		return message;

	}

	public void setMessage(String message) {
		this.message = message;

	}

	public void showMessage(String name) {
		System.out.printf("hello,%1$s,Message:%2$s UUID:%3$s %n", name, message, uuidStr);
	}

	public void throwEx() throws Exception {
		throw new Exception("throw a new Exception!");
	}

	@PostConstruct
	public void init() {
		System.out.println(uuidStr + ":init...");
	}

	@PreDestroy
	public void destroy() {
		System.out.println("destroy...");
	}
}


package cn.zuowenjun.java;

import java.util.List;

import org.springframework.beans.factory.annotation.*;

public class SecondBean {
	private int intProp;
	private String strProp;

	private ThirdBean thirdBean;

	private IFirstBean firstBean=null;//这里依赖关系由实现类改为接口IFirstBean

	@Autowired(required=true)
	public SecondBean(int ipro,String sPro,@Qualifier("firstBean2") IFirstBean frtBean) {
		this.intProp=ipro;
		this.strProp=sPro;
		this.firstBean=frtBean;
	}
....省略其它代码
}

//main方法运行如下代码:
		AnnotationConfigApplicationContext annoCfgAppContext=new AnnotationConfigApplicationContext(SpringBeansConfig.class);
		annoCfgAppContext.setDisplayName("SpringDemoAppContext");
		annoCfgAppContext.start();

		IFirstBean firstBean= (IFirstBean)annoCfgAppContext.getBean(IFirstBean.class);
		firstBean.showMessage("firstBean单独");

		SecondBean secondBean= annoCfgAppContext.getBean(SecondBean.class);
		secondBean.outPutAll();

		annoCfgAppContext.stop();

		annoCfgAppContext.close();

		annoCfgAppContext.registerShutdownHook();
最终运行的结果与之前是一样的,当然这样归功于Spring的byType(找同类型或父类或实现类) 、byName(找注册bean的id)依赖注入方式。
三、 使用Spring的面向切面功能(AOP)
之前我曾写过一篇专门介绍AOP的文章《C# 实现AOP 的几种常见方式》,虽然那是用C#实现的,但思路及实现原理是一样的,今天我们就借助于Spring AOP框架来实现面向切面编程的能力,由于AOP的一些原理及基本实现已经讲过了不在重述,这里就直接演示实现过程及效果。
3.1下载并安装AspectJ框架环境
下载页面:https://www.eclipse.org/aspectj/downloads.php,找到合适的下载版本链接(最新稳定版本)点击下载,如下图示:
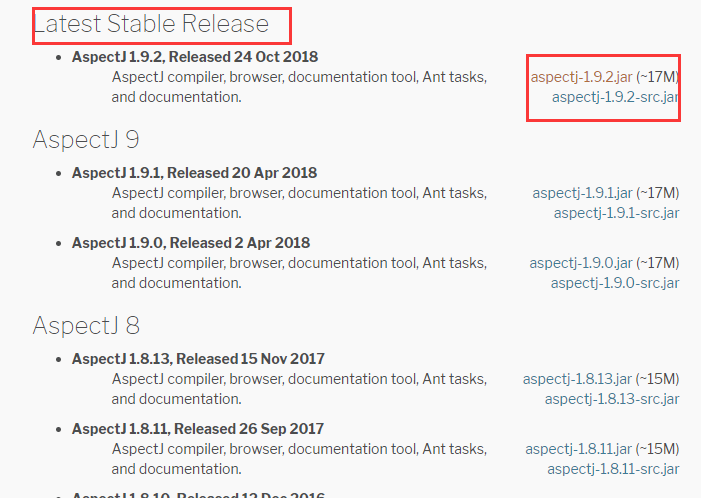
Latest Stable Release翻译成中文就是:最新稳定版本,每个版本都有两个下载链接,一个是编译后的字节码包,一个是src源码包,我这里下载的是可执行的字节码包,下载后需要通过java命令运行该jar包(其实就是一个安装程序,安装后会释放出相关的jar包)
java -jar aspectj-xxxx.jar
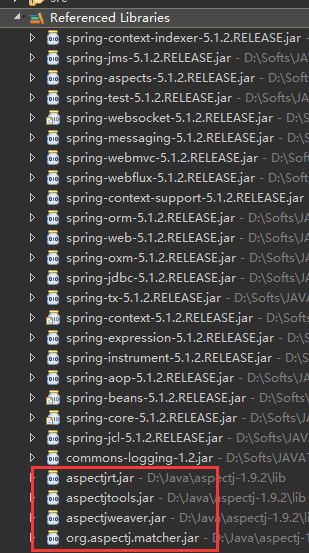
项目中引用AspectJ安装lib目录下的相关jar包,引用外部JAR包之前都有说明在此不重述,引入后效果:
至此一个Spring的AOP项目开发环境就准备OK了,当然AOP环境OK了,还需要了解必要的AOP知识要点,因为网上有很多相关的介绍,我就不在一 一说明了,可参考:
https://www.cnblogs.com/hongwz/p/5764917.html 、https://blog.csdn.net/csdn_terence/article/details/55804421
以下是我的简单理解:
aspect:切面,实现各种通知的API方法集合类;
pointcut:切入点,指从哪个位置进行拦截并通知;
joinpoint:连接点,被拦截到的对象信息(一般指:方法,属性、构造器);
advice:通知,指被拦截后在相应的时机(有:前置、后置、异常、最终、环绕通知)处理的方法
Target object:目标对象,被代理的对象
Weaving:织入,将切面应用到目标对象并导致代理对象创建的过程
Introduction:引用,在运行时期,可动态的添加新方法或属性到现有的类中。
3.2 通过XML配置AOP,实现步骤如下
A.定义一个Aspect的类(MyAspect),里面主要包含各种通知处理方法:
package cn.zuowenjun.java;

import org.aspectj.lang.JoinPoint;
import org.aspectj.lang.ProceedingJoinPoint;

public class MyAspect {
	public void before(JoinPoint point) {
		System.out.println("call MyAspect.before!" + point.getSignature().getName());
	}

	public void after(JoinPoint point) {
		System.out.println("call MyAspect.after!" + point.getSignature().getName());
	}


	public void afterReturning(Object retVal){
		System.out.println("call MyAspect.afterReturning! return Value:" + retVal);
	}

	public void afterThrowing(Exception ex) {

		System.out.println("call MyAspect.afterThrowing! Exception:" + ex.getMessage());
	}

    public Object around(ProceedingJoinPoint pjp) throws Throwable
    {
        System.out.println("call around start-" + pjp.getSignature().getName());
        Object obj=pjp.proceed();
        System.out.println("call around end-" + pjp.getSignature().getName());
        return obj;
    }
}
改造一下IFirstBean及FirstBean,以便后面可以进行AOP的演示(增加一个throwEx方法),改动后如下:
package cn.zuowenjun.java;

public interface IFirstBean {
	String getMessage();
	void setMessage(String message);
	void showMessage(String name);
	void init();
	void destroy();
	void throwEx();
}


package cn.zuowenjun.java;

import javax.annotation.*;

public class FirstBean implements IFirstBean {
	private String uuidStr = java.util.UUID.randomUUID().toString();

	private String message;

	public String getMessage() {
		return message;

	}

	public void setMessage(String message) {
		this.message = message;

	}

	public void showMessage(String name) {
		System.out.printf("hello,%1$s,Message:%2$s UUID:%3$s %n", name, message, uuidStr);
	}

	public void throwEx() {
		System.out.println("need throw a Exception");
		throw new IllegalArgumentException("a test Exception msg!");
	}

	@PostConstruct
	public void init() {
		System.out.println(uuidStr + ":init...");
	}

	@PreDestroy
	public void destroy() {
		System.out.println("destroy...");
	}
}
B.配置AOP,将Aspect类(MyAspect)注册到Spring 容器中,完整AOP相关的XML配置如下:(为了演示效果,仅保留FirstBean注册及AOP的配置)
<?xml version="1.0" encoding="UTF-8"?>
<beans xmlns="http://www.springframework.org/schema/beans"
	xmlns:xsi="http://www.w3.org/2001/XMLSchema-instance"
	xmlns:context="http://www.springframework.org/schema/context"
	xmlns:aop="http://www.springframework.org/schema/aop"
	xsi:schemaLocation="http://www.springframework.org/schema/beans
    http://www.springframework.org/schema/beans/spring-beans-4.3.xsd
    http://www.springframework.org/schema/context
    http://www.springframework.org/schema/context/spring-context-4.3.xsd
    http://www.springframework.org/schema/aop
    http://www.springframework.org/schema/aop/spring-aop-4.3.xsd">

	<context:annotation-config />

	<bean id="firstBean" class="cn.zuowenjun.java.FirstBean"
		init-method="init" destroy-method="destroy" scope="singleton">
		<property name="message" value="i love Spring!"></property>
	</bean>


	<bean id="myaspectHandler" class="cn.zuowenjun.java.MyAspect">
	</bean>

	<aop:config>
		<aop:aspect id="myaspect" ref="myaspectHandler">
			<aop:pointcut id="showCut" expression="execution(public * cn.zuowenjun.java.*.show*(..))" />
			<aop:pointcut id="exCut" expression="execution(public * cn.zuowenjun.java.*.*(..))" />
			<aop:pointcut id="getterCut" expression="execution(public Object+ cn.zuowenjun.java.*.get*())" />
			<aop:before method="before" pointcut-ref="showCut"/>
			<aop:after method="after" pointcut-ref="showCut"/>
			<aop:around method="around" pointcut-ref="getterCut"/>
			<aop:after-returning method="afterReturning" pointcut-ref="getterCut" returning="retVal"/>
			<aop:after-throwing method="afterThrowing" pointcut-ref="exCut" throwing="ex"/>

		</aop:aspect>
	</aop:config>


</beans>
可以看到,配置文件根节点中增加了aop的命名空间,同时增加了AOP的配置节点aop:config,aop:config中分别配置了:aspect(同时ref指向注册的bean的id)、pointcut、以及相关的通知方法(都关联到pointcut),其中关于pointcut的表达式的用法比较复杂,深入了解可以参见:https://blog.csdn.net/zhengchao1991/article/details/53391244
最后在main方法中运行如下代码:
		ClassPathXmlApplicationContext context = new ClassPathXmlApplicationContext("Beans.xml");
		context.start();

		IFirstBean firstBean = (IFirstBean)context.getBean("firstBean");
		firstBean.showMessage("梦在旅途");

		String msg= firstBean.getMessage();
		System.out.println("print getMessage:" + msg);

		try {
			firstBean.throwEx();

		}catch(Exception ex) {
			System.out.println("catch Exception:" + ex.getMessage());
		}


		context.stop();
		context.close();

		context.registerShutdownHook();
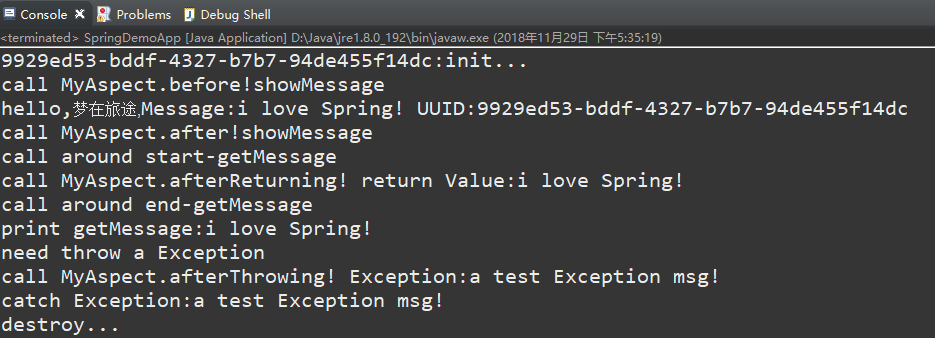
运行效果如下:
3.3通过注解配置AOP,我们只需改造之前的MyAspect类,然后加上相关的AOP注解即可实现无需XML配置,完善后的MyAspect类代码如下:
package cn.zuowenjun.java;

import org.aspectj.lang.JoinPoint;
import org.aspectj.lang.ProceedingJoinPoint;
import org.aspectj.lang.annotation.*;
import org.springframework.stereotype.Component;

@Aspect
@Component
public class MyAspect {

	@Pointcut(value="execution(public * cn.zuowenjun.java.*.show*(..))")
	private void showCut() {

	}

	@Pointcut(value="execution(public * cn.zuowenjun.java.*.*(..))")
	private void exCut() {

	}

	@Pointcut(value="execution(public Object+ cn.zuowenjun.java.*.get*())")
	private void getterCut() {

	}

	@Before("showCut()")
	public void before(JoinPoint point) {
		System.out.println("call MyAspect.before!" + point.getSignature().getName());
	}

	@After("showCut()")
	public void after(JoinPoint point) {
		System.out.println("call MyAspect.after!" + point.getSignature().getName());
	}

	@AfterReturning(pointcut="getterCut()",returning="retVal")
	public void afterReturning(Object retVal){
		System.out.println("call MyAspect.afterReturning! return Value:" + retVal);
	}

	@AfterThrowing(pointcut="exCut()",throwing="ex")
	public void afterThrowing(Exception ex) {

		System.out.println("call MyAspect.afterThrowing! Exception:" + ex.getMessage());
	}

	@Around("getterCut()")
    public Object around(ProceedingJoinPoint pjp) throws Throwable
    {
        System.out.println("call around start-" + pjp.getSignature().getName());
        Object obj=pjp.proceed();
        System.out.println("call around end-" + pjp.getSignature().getName());
        return obj;
    }
}
从上面代码可以看出差异的部份,仅仅在类上增加了:@Aspect、@Component ,在对应的方法上增加了@Pointcut、@Before、@After、@AfterReturning、@AfterThrowing、@Around,每个被特定注解标记的方法都代表着相应的作用,从注解含义就可以看得出来。
当然还有一个很重要的点的就是XML配置中还需要增加一点配置,如下:
<aop:aspectj-autoproxy />

<bean id="myaspect" class="cn.zuowenjun.java.MyAspect">
</bean>
最后直接运行之前的main方法(逻辑全部都不用变),得到的输出结果与上面3.2节(用XML配置AOP)显示的一样。
话说虽然省掉了AOP的XML配置但仍然还有一点配置,能不能完全不配置呢?答案是可以的,我们在上面2.6节介绍过可以使用定义Spring Bean配置类+注解来实现Bean的注册及依赖注入的设置,那这里同样我们将MyAspect加入到Spring Bean配置类中,并在Spring Bean配置类(示例类:SpringBeansConfig)上添加@EnableAspectJAutoProxy注解即可,如下所示:
package cn.zuowenjun.java;

import java.util.Arrays;

import org.springframework.context.annotation.*;

@Configuration
@EnableAspectJAutoProxy
public class SpringBeansConfig {

	@Bean(initMethod="init",destroyMethod="destroy")
	@Scope(value="prototype")
	public FirstBean firstBean() {
		FirstBean firstBeanObj= new FirstBean();
		firstBeanObj.setMessage("i love java!");
		return firstBeanObj;
	}

	@Bean
	public MyAspect myAspect() {
		return new MyAspect();
	}

}


//main方法代码:

AnnotationConfigApplicationContext annoCfgAppContext=new AnnotationConfigApplicationContext(SpringBeansConfig.class);
		annoCfgAppContext.setDisplayName("SpringDemoAppContext");
		annoCfgAppContext.start();

		IFirstBean firstBean = (IFirstBean)annoCfgAppContext.getBean(IFirstBean.class);
		firstBean.showMessage("梦在旅途");

		String msg= firstBean.getMessage();
		System.out.println("print getMessage:" + msg);

		try {
			firstBean.throwEx();

		}catch(Exception ex) {
			System.out.println("catch Exception:" + ex.getMessage());
		}


		annoCfgAppContext.stop();

		annoCfgAppContext.close();

		annoCfgAppContext.registerShutdownHook();
最终运行的结果仍然与3.2节(XML配置AOP)、注解+XML配置AOP 相同,说明完全可以不用XML了。
好了,本文的主题(IOC、AOP)就分享到这里,我们总结一下吧!
最后小结:
1.Spring的IOC主要解决抽象与实现分离,代码中若有依赖尽可能的使用抽象类或接口,比如示例中的:(SecondBean依赖IFristBean),实现部份可以单独一个项目(JAR包),然后通过 XML配置或注解配置注入即可。我们在配置中一般配置实现类。
2.Spring的AOP(准确的说是:AspectJ AOP)主要解决横切面问题,消除功能相同的代码逻辑,比如:日志、监控、异常捕获、验证、拦截、过滤等,可以把相同的业务逻辑代码集中到某一类Aspec类中,便于统一管理与扩展。同样支持XML配置或注解配置
3.虽然IOC、AOP功能强大,但配置有些繁琐,依赖的JAR包要自己手动添加不够智能,需要能有像VS的NUGET包一样的依赖管理工具,JAVA这边MAVEN就出场了,解决依赖问题,后续将会分享基于MAVEN来快速构建Spring项目。
PS:本篇文章涉及的知识点虽然只有IOC、AOP但里面包括的细节非常多,我也是在工作之余反复学习与尝试,希望对JAVA新手或对Spring不了解的人有帮助,谢谢!若觉得帮助到你,支持一下吧。^ v ^