一个简单的java web项目

本文转载自: 本文来源.


这周因为要准备java和四级考试,所以没有做什么太多的东西,只是把我们之前做的javaweb项目又重新写了一下,现在就简单的说一下我做的东西.

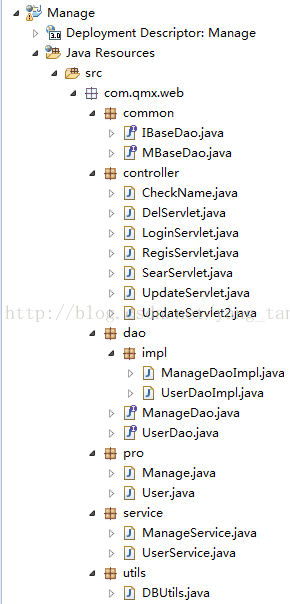
我做的就是一个简单的用户注册和管理员页面.下面是我项目的一个简单的框架.

下面我就一个删除的操作简单的说明一下,因为其他的大概都是一样的.

1,首先数据库要连接,我这里连接的是MySQL,也就是我上面的那个utils包里的java类,就是我的连接数据库的代码.


  1. package com.qmx.web.utils;
  2. import java.sql.Connection;
  3. import java.sql.DriverManager;
  4. import java.sql.SQLException;
  5. public class DBUtils {
  6. static String loginName = "root";
  7. static String loginPassword = "123456";
  8. static{
  9. try {
  10. Class.forName("com.mysql.jdbc.Driver");
  11. } catch (ClassNotFoundException e) {
  12. e.printStackTrace();
  13. }
  14. }
  15. public static Connection GetConnection() throws SQLException{
  16. String url = "jdbc:mysql://localhost:3306/webdb";
  17. return DriverManager.getConnection(url, loginName, loginPassword);
  18. }
  19. public static void main(String args[]) throws SQLException{
  20. System.out.println(GetConnection());
  21. }
  22. }

2,接下来是要准备好操作的对象,也就是我项目里面的User类


  1. package com.qmx.web.pro;
  2. public class User {
  3. private int id; //编号
  4. private String name; //姓名
  5. private String sex; //性别
  6. private int age; //年龄
  7. private String profess;//专业
  8. private String grade; //年级
  9. private String phone; //电话
  10. public User() {
  11. }
  12. public User(String name, String sex, int age, String profess, String grade, String phone) {
  13. this.name = name;
  14. this.sex = sex;
  15. this.age = age;
  16. this.profess = profess;
  17. this.grade = grade;
  18. this.phone = phone;
  19. }
  20. public int getId() {
  21. return id;
  22. }
  23. public void setId(int id) {
  24. this.id = id;
  25. }
  26. public String getName() {
  27. return name;
  28. }
  29. public void setName(String name) {
  30. this.name = name;
  31. }
  32. public String getSex() {
  33. return sex;
  34. }
  35. public void setSex(String sex) {
  36. this.sex = sex;
  37. }
  38. public int getAge() {
  39. return age;
  40. }
  41. public void setAge(int age) {
  42. this.age = age;
  43. }
  44. public String getProfess() {
  45. return profess;
  46. }
  47. public void setProfess(String profess) {
  48. this.profess = profess;
  49. }
  50. public String getGrade() {
  51. return grade;
  52. }
  53. public void setGrade(String grade) {
  54. this.grade = grade;
  55. }
  56. public String getPhone() {
  57. return phone;
  58. }
  59. public void setPhone(String phone) {
  60. this.phone = phone;
  61. }
  62. @Override
  63. public String toString() {
  64. return "User [id=" + id + ", name=" + name + ", sex=" + sex + ", age=" + age + ", profess=" + profess
  65. + ", grade=" + grade + ", phone=" + phone + "]";
  66. }
  67. }

3,接下来就是定义我的接口以及实现接口,这个项目用到的主要知识是dao工厂模式.主要的我目前搞的也不是很清楚,但是大概会那么用.


  1. package com.qmx.web.common;
  2. import java.sql.SQLException;
  3. import java.util.List;
  4. public interface IBaseDao <K,V> {
  5. public boolean doInsert(V v) throws SQLException;
  6. public boolean doDelete(K id) throws SQLException;
  7. public boolean doUpdate(V v) throws SQLException;
  8. public V findById(K id) throws Exception;
  9. public List <V> findAll() throws SQLException;
  10. public List <V> findAllPaging(String column,String keyWord,int currentPage,int pageSize);
  11. }


  1. package com.qmx.web.dao;
  2. import com.qmx.web.common.IBaseDao;
  3. import com.qmx.web.pro.User;
  4. public interface UserDao extends IBaseDao <String,User>{
  5. }

下面这个代码仅仅是我实现的删除的代码,不是全部,主要就是UserDaoimpl类实现UserDao接口,

public class UserDaoImpl implements UserDao


  1. @Override
  2. public boolean doDelete(String id) throws SQLException {
  3. conn = DBUtils.GetConnection();
  4. String sql = "delete from user where name = ?";
  5. ps = conn.prepareStatement(sql);
  6. ps.setString(1, id);
  7. if(ps.executeUpdate() > 0){
  8. if(ps != null)
  9. ps.close();
  10. if(conn != null)
  11. conn.close();
  12. return true;
  13. }
  14. return false;
  15. }

下面是service包中的方法

5,然后是创建一个简单servlet,继承HttpServlet类,并实现doGet、doPost方法


  1. package com.qmx.web.controller;
  2. import java.io.IOException;
  3. import javax.servlet.ServletException;
  4. import javax.servlet.http.HttpServlet;
  5. import javax.servlet.http.HttpServletRequest;
  6. import javax.servlet.http.HttpServletResponse;
  7. import com.qmx.web.service.UserService;
  8. public class DelServlet extends HttpServlet {
  9. private static final long serialVersionUID = 1L;
  10. @Override
  11. protected void doGet(HttpServletRequest req, HttpServletResponse resp) throws ServletException, IOException {
  12. String name = req.getParameter("name");
  13. UserService userService = new UserService();
  14. try {
  15. if(userService.doDelete(name)){
  16. req.getRequestDispatcher("delsuccess.jsp").forward(req, resp);
  17. }else{
  18. req.getRequestDispatcher("delfail.jsp").forward(req, resp);
  19. }
  20. } catch (Exception e) {
  21. // TODO: handle exception
  22. e.printStackTrace();
  23. }
  24. }
  25. }

上面的我是使用了doGet()方法,因为我后面的jsp文件使用了a链接来操作删除方法,使用a链接默认的方法是doGet()方法.

6,然后就是编写jsp文件了

<td><a href="DelServlet?name=<%=t.getName()%>">删除</a></td>


7,之后别忘了要配置XML文件


  1. <servlet>
  2. <servlet-name>DelServlet </servlet-name>
  3. <servlet-class>com.qmx.web.controller.DelServlet </servlet-class>
  4. </servlet>
  5. <servlet-mapping>
  6. <servlet-name>DelServlet </servlet-name>
  7. <url-pattern>/DelServlet </url-pattern>
  8. </servlet-mapping>

8,之后如果没有其他的错误的话,项目就会成功

发布了47 篇原创文章 · 获赞 46 · 访问量 8508

猜你喜欢

转载自blog.csdn.net/weixin_43649997/article/details/103996763