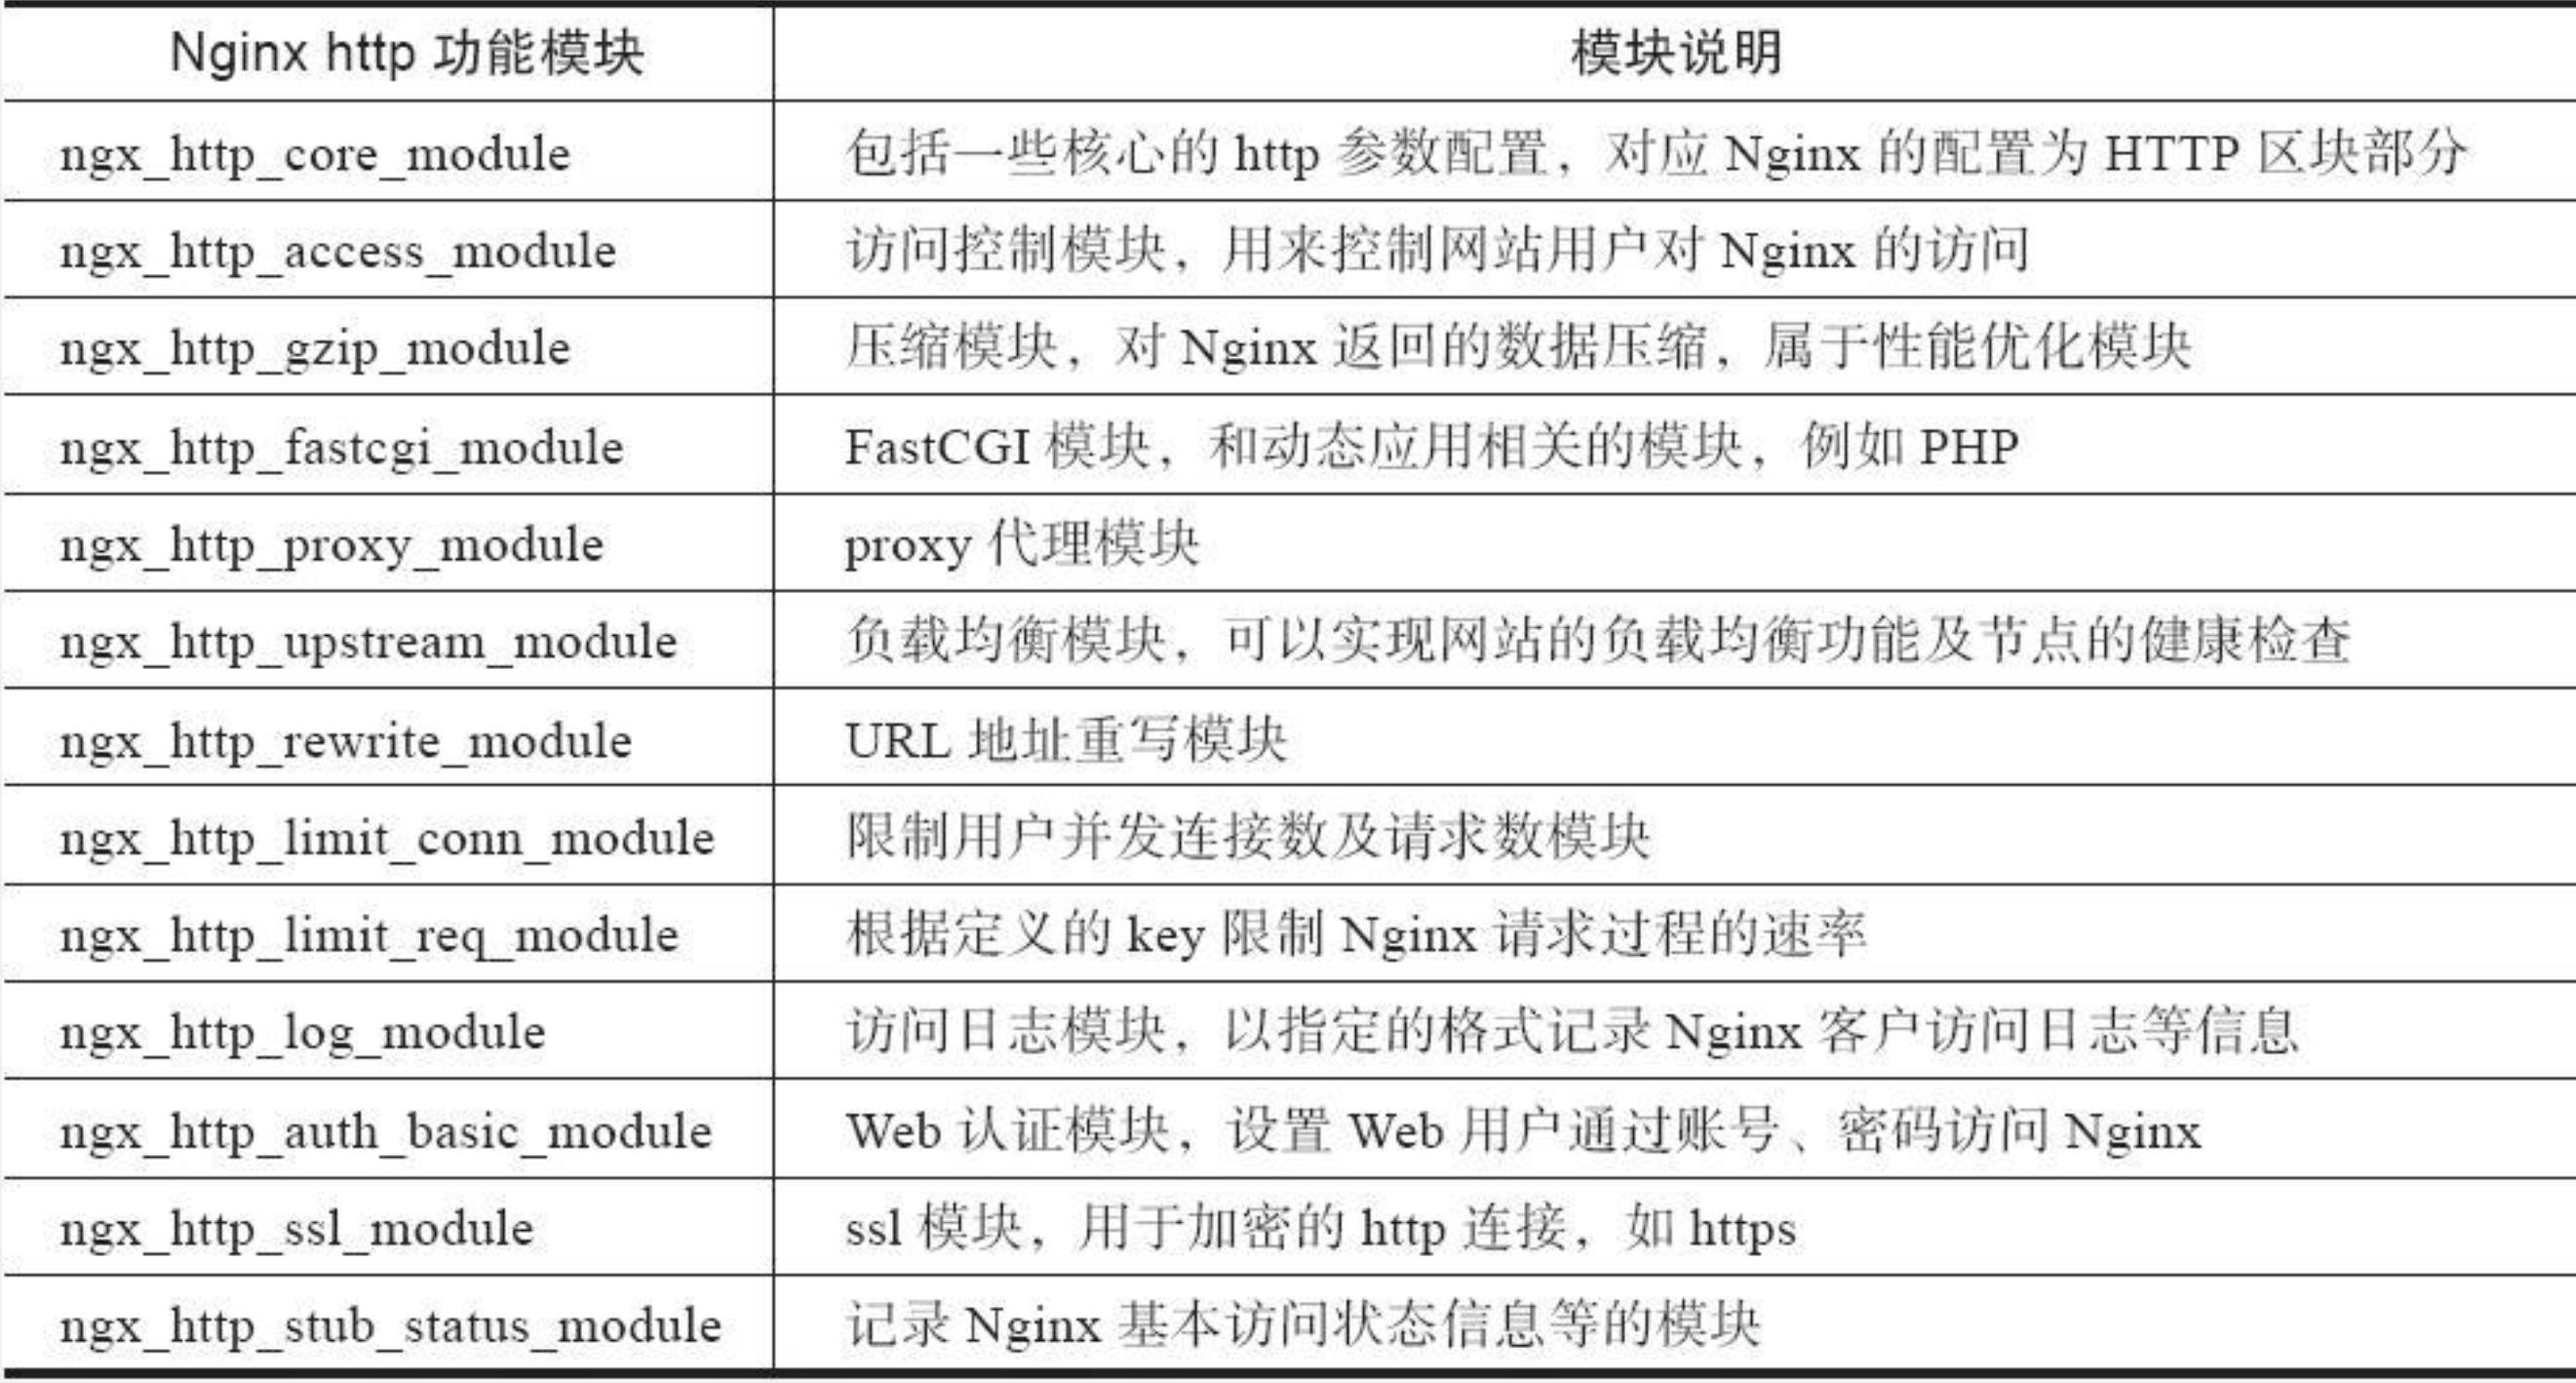
1.LNMP之MySQL数据库
1.1 安装步骤介绍
(1)创建mysql用户的账号
[root@localhost ~]# groupadd mysql[root@localhost ~]# useradd -s /sbin/nologin -g mysql -M mysql[root@localhost ~]# tail -1 /etc/passwdmysql:x:501:501::/home/mysql:/sbin/nologin[root@localhost ~]# id mysqluid=501(mysql) gid=501(mysql) groups=501(mysql)
(2)获取MySQL二进制软件包
百度云盘:http://pan.baidu.com/s/1hrBCzsC
提取码:4yjf

(3)采用二进制方式安装MySQL
[root@localhost ~]# tar xf mysql-5.5.32-linux2.6-x86_64.tar.gz -C /usr/local/[root@localhost ~]# cd /usr/local/[root@localhost local]# mv mysql-5.5.32-linux2.6-x86_64 mysql-5.5.32[root@localhost local]# ln -s mysql-5.5.32 mysql[root@localhost local]# lsbin games lib libexec mysql-5.5.32 nginx-1.10.2 shareetc include lib64 mysql nginx sbin src[root@localhost local]# cd /usr/local/mysql[root@localhost mysql]# lsbin data include lib mysql-test scripts sql-benchCOPYING docs INSTALL-BINARY man README share support-files#提示:二进制安装包,仅需要解压就可以了,不需要执行cmake/configure,make,make install等过程
- 当安装LNMP一体化环境时,MySQL数据库要装在Nginx所在的机器上。如果MySQL和Nginx不在一台机器上,那么,Nginx服务器上的MySQL数据库软件包只要解压移动到/usr/local/目录,改名为mysql就可以了,不需要进行后面的初始化配置。
- 在非一体的LNMP环境(Nginx和MySQL不在一台机器上),编译PHP环境时,也是需要MySQL数据库环境的,但是高版本的PHP,例如5.3版本以上,内置了PHP需要的MySQL程序,因此,对于此类版本就不需要在Nginx服务器上安装MySQL软件,只需要在编译PHP时指定相关参数即可。这个PHP的编译参数为--with-mysql=mysqlnd,表示PHP程序在编译时会调用内置的MySQL的库。
mysql数据库环境需不需要在nginx安装取决于php版本是否是5.3版本以上,是一样需要编译php指定相关参数, --with-mysql=mysqlnd
(4)初始化MySQL配置文件my.cnf
[root@localhost ~]# cd /usr/local/mysql[root@localhost mysql]# ls -l support-files/*.cnf-rw-r--r--. 1 7161 wheel 4691 Jun 19 2013 support-files/my-huge.cnf-rw-r--r--. 1 7161 wheel 19759 Jun 19 2013 support-files/my-innodb-heavy-4G.cnf-rw-r--r--. 1 7161 wheel 4665 Jun 19 2013 support-files/my-large.cnf-rw-r--r--. 1 7161 wheel 4676 Jun 19 2013 support-files/my-medium.cnf-rw-r--r--. 1 7161 wheel 2840 Jun 19 2013 support-files/my-small.cnf[root@localhost mysql]# /bin/cp support-files/my-small.cnf /etc/my.cnf
提示:
- support-files下有my.cnf的各种配置样例。
- 使用cp全路径/bin/cp,可实现拷贝而不出现替换提示,即如果有重名文件会直接覆盖
- 本例为测试安装环境,因此选择参数配置小的my-small.cnf配置模版,如果是生产环境可以根据硬件选择更高级的配置文件,上述配置文件模版对硬件的要求从低到高依次为:
my-medium.cnf (最低)
my-small.cnf
my-large.cnf
my-huge.cnf
my-innodb-heavy-4G.cnf(最高)
(5)初始化MySQL数据库文件
[root@localhost ~]# mkdir -p /usr/local/mysql/data #建立MySQL数据文件目录[root@localhost ~]# chown -R mysql.mysql /usr/local/mysql #授权mysql用户管理MySQL的安装目录[root@localhost ~]# yum -y install libaio #光盘源安装依赖包,否则下一步的编译会报错[root@localhost ~]# /usr/local/mysql/scripts/mysql_install_db --basedir=/usr/local/mysql --datadir=/usr/local/mysql/data --user=mysql#初始化MySQL数据库文件,会有很多信息提示,如果没有ERROR级别的错误,会有两个OK的字样,表示初始化成功,否则就要解决初始化的问题初始化内容如下:Installing MySQL system tables...OKFilling help tables...OKTo start mysqld at boot time you have to copysupport-files/mysql.server to the right place for your systemPLEASE REMEMBER TO SET A PASSWORD FOR THE MySQL root USER !To do so, start the server, then issue the following commands:/usr/local/mysql/bin/mysqladmin -u root password 'new-password'/usr/local/mysql/bin/mysqladmin -u root -h localhost password 'new-password'Alternatively you can run:/usr/local/mysql/bin/mysql_secure_installationwhich will also give you the option of removing the testdatabases and anonymous user created by default. This isstrongly recommended for production servers.See the manual for more instructions.You can start the MySQL daemon with:cd /usr/local/mysql ; /usr/local/mysql/bin/mysqld_safe &You can test the MySQL daemon with mysql-test-run.plcd /usr/local/mysql/mysql-test ; perl mysql-test-run.plPlease report any problems with the /usr/local/mysql/scripts/mysqlbug script!
以上的命令主要作用是生成如下数据库文件
[root@localhost ~]# tree /usr/local/mysql/data//usr/local/mysql/data/├── mysql│ ├── columns_priv.frm│ ├── columns_priv.MYD│ ├── columns_priv.MYI│ ├── db.frm│ ├── db.MYD│ ├── db.MYI│ ├── event.frm│ ├── event.MYD│ ├── event.MYI│ ├── func.frm│ ├── func.MYD│ ├── func.MYI│ ├── general_log.CSM│ ├── general_log.CSV│ ├── general_log.frm│ ├── help_category.frm│ ├── help_category.MYD│ ├── help_category.MYI│ ├── help_keyword.frm...以下省略若干...#这些MySQL数据文件是MySQL正确运行所必需的基本数据库文件,其功能是对MySQL权限,状态等进行管理。
(6)初始化故障排错集锦
错误示例1:
usr/local/mysql/bin/mysqld: error while loading shared libraries: libaio.so.1: cannot open shared ob#错误原因是没有libaio函数库的支持。需要yum -y install libaio
错误示例2:
WARNING:The host'mysql'could not be looked up with resolveip#需要修改主机名解析,使其和uname -n一样,修改后的结果如下:[root@localhost ~] # grep `uname -n` /etc/hosts
错误示例3:
ERROR:1004Can't create file '/tmp/#sql300e_1_o.frm'(errno:13)#原因是/tmp目录的权限有问题。解决办法为处理/tmp目录,如下:[root@localhost ~]# ls -ld /tmpdrwxrwxrwt. 3 root root 4096 Jul 14 07:56 /tmp[root@localhost ~]# chmod -R 1777 /tmp/
此故障必须解除,否则,后面会出现登陆不了数据库等问题。
1.2 配置并启动MySQL数据库
(1)设置MySQL启动脚本,命令如下:
[root@localhost mysql]# cp support-files/mysql.server /etc/init.d/mysqld#拷贝MySQL启动脚本到MySQL的命令路径[root@localhost mysql]# chmod +x /etc/init.d/mysqld#使脚本可执行
(2)MySQL二进制默认安装路径是/usr/local/mysql,启动脚本里是/usr/local/mysql。如果安装路径不同,那么脚本里路径等都需要替换
(3)启动MySQL数据库,命令如下:
[root@localhost mysql]# /etc/init.d/mysqld startStarting MySQL.. SUCCESS!
以上是启动数据库的规范方法之一,但还可以用如下方式启动,
/usr/local/mysql/bin/mysqld_safe --user=mysql &
这个命令结尾的“&”符号,作用是在后台执行MySQL服务,命令执行完还需要按下回车才能进入命令行状态。
(4)检查MySQL数据库是否启动,命令如下:
[root@localhost mysql]# netstat -antup | grep mysqltcp 0 0 0.0.0.0:3306 0.0.0.0:* LISTEN 1702/mysqld
如果发现3306端口没起来,请
tail -100 /usr/local/mysql/data/主机名.err查看日志信息,看是否有报错信息,然后根据相关错误提示进行调试。经常查看服务运行日志是个很好的习惯,也是高手的习惯。
(5)查看MySQL数据库启动结果日志,命令如下:
[root@localhost mysql]# tail -10 /usr/local/mysql/data/localhost.errInnoDB: Creating foreign key constraint system tablesInnoDB: Foreign key constraint system tables created170714 8:33:47 InnoDB: Waiting for the background threads to start170714 8:33:48 InnoDB: 5.5.32 started; log sequence number 0170714 8:33:48 [Note] Server hostname (bind-address): '0.0.0.0'; port: 3306170714 8:33:48 [Note] - '0.0.0.0' resolves to '0.0.0.0';170714 8:33:48 [Note] Server socket created on IP: '0.0.0.0'.170714 8:33:49 [Note] Event Scheduler: Loaded 0 events170714 8:33:49 [Note] /usr/local/mysql/bin/mysqld: ready for connections.Version: '5.5.32' socket: '/tmp/mysql.sock' port: 3306 MySQL Community Server (GPL)
(6)设置MySQL开机自启动,命令如下:
[root@localhost mysql]# chkconfig --add mysqld[root@localhost mysql]# chkconfig mysqld on[root@localhost mysql]# chkconfig --list mysqldmysqld 0:off 1:off 2:on 3:on 4:on 5:on 6:off#提示:也可以将启动命令/etc/init.d/mysqld start 放到/etc/rc.local里面
(7)配置mysql命令的全局使用路径,命令如下:
[root@localhost mysql]# ln -s /usr/local/mysql/bin/* /usr/local/bin/[root@localhost mysql]# which mysqladmin/usr/local/bin/mysqladmin
(8)登陆MySQL测试,命令如下:
[root@localhost mysql]# mysql #直接输入命令即可登陆Welcome to the MySQL monitor. Commands end with ; or \g.Your MySQL connection id is 2Server version: 5.5.32 MySQL Community Server (GPL)Copyright (c) 2000, 2013, Oracle and/or its affiliates. All rights reserved.Oracle is a registered trademark of Oracle Corporation and/or itsaffiliates. Other names may be trademarks of their respectiveowners.Type 'help;' or '\h' for help. Type '\c' to clear the current input statement.mysql> show databases; #查看当前所有的数据库+--------------------+| Database |+--------------------+| information_schema || mysql || performance_schema || test |+--------------------+4 rows in set (0.00 sec)mysql> select user(); #查看当前的登陆用户+----------------+| user() |+----------------+| root@localhost |+----------------+1 row in set (0.00 sec)mysql> quitBye#提示:MySQL安装完成以后,默认情况下,root账户是无密码的,这个必须要设置。
1.3 MySQL安全配置
(1)为MySQL的root用户设置密码,命令如下:
[root@localhost mysql]# mysqladmin -u root password '123123' #设置密码[root@localhost mysql]# mysql #无法直接登陆了ERROR 1045 (28000): Access denied for user 'root'@'localhost' (using password: NO)[root@localhost mysql]# mysql -uroot -p #新的登陆方式Enter password: #输入设置的密码Welcome to the MySQL monitor. Commands end with ; or \g.Your MySQL connection id is 5Server version: 5.5.32 MySQL Community Server (GPL)Copyright (c) 2000, 2013, Oracle and/or its affiliates. All rights reserved.Oracle is a registered trademark of Oracle Corporation and/or itsaffiliates. Other names may be trademarks of their respectiveowners.Type 'help;' or '\h' for help. Type '\c' to clear the current input statement.mysql>
(2)清理无用的MySQL用户及库,命令如下:
mysql> select user,host from mysql.user;+------+-----------+| user | host |+------+-----------+| root | 127.0.0.1 || root | ::1 || | localhost || root | localhost |+------+-----------+4 rows in set (0.00 sec)mysql> drop user "root"@"::1";Query OK, 0 rows affected (0.00 sec)mysql> drop user ""@"localhost";Query OK, 0 rows affected (0.00 sec)mysql> select user,host from mysql.user;+------+-----------+| user | host |+------+-----------+| root | 127.0.0.1 || root | localhost |+------+-----------+2 rows in set (0.00 sec)mysql> flush privileges;Query OK, 0 rows affected (0.00 sec)
2.LNMP之Nginx安装部署
2.1 nginx的编译安装部署
yum install -y pcre-devel openssl-devel #用本地yum仓库安装依赖包#wget -q http://nginx.org/download/nginx-1.10.2.tar.gz #下载软件源码包useradd -s /sbin/nologin -M www #创建程序用户tar xf nginx-1.10.2.tar.gz -C /usr/src/ #解压缩cd /usr/src/nginx-1.10.2./configure --user=www --group=www --prefix=/usr/local/nginx --with-http_stub_status_module --with-http_ssl_module #预配置make && make install #编译和安装ln -s /usr/local/nginx/sbin/* /usr/local/sbin/ #给命令做软连接,以便PATH能找到/usr/local/nginx/sbin/nginx #启动nginx
/usr/local/nginx/sbin/nginx -s reloadnginx平滑重启命令/usr/local/nginx/sbin/nginx -s stopnginx停止服务命令
2.1.1 Nginx的功能模块说明
2.2 web排错三部曲下面介绍客户端排查的思路
第一步,在客户端上ping服务器端IP,命令如下:
ping 10.0.0.8排除物理线路问题影响第二步,在客户端上telnet服务器端IP,端口,命令如下:
telnet 10.0.0.8 80排除防火墙等得影响第三步,在客户端使用wget命令检测,如下:
wget 10.0.0.8(curl -I 10.0.0.8)模拟用户访问,排除http服务自身问题,根据输出在排错
2.3 Nginx主配置文件nginx.conf
[root@chensiqi conf]# egrep -v "#|^$" nginx.conf #去掉包含#号和空行的内容worker_processes 1; #worker进程的数量error_log logs/error.log; #错误日志(默认没开)pid logs/nginx.pid; #进程号(默认没开)events { #事件区块开始worker_connections 1024; #每个worker进程支持的最大连接数} #事件区块结束http { #http区块开始include mime.types; #Nginx支持的媒体类型库文件包含default_type application/octet-stream; #默认的媒体类型sendfile on; #开启高效传输模式keepalive_timeout 65; #连接超时。server { #网站配置区域(第一个server第一个虚拟主机站点)listen 80; #提供服务的端口,默认80server_name www.chensiqi.org; #提供服务的域名主机名location / { #第一个Location区块开始root html; #站点的根目录(相对于nginx安装路径)index index.html index.htm; #默认的首页文件,多个用空格分开}error_page 500 502 503 504 /50x.html; #出现对应的http状态码时,使用50x.html回应客户location = /50x.html { #Location区块开始,访问50x.htmlroot html; #指定对应的站点目录为html}}server { #网站配置区域(第二个server第二个虚拟主机站点)listen 80; #提供服务的端口,默认80server_name bbs.chensiqi.org; #提供服务的域名主机名location / { #服务区块root html; #相对路径(nginx安装路径)index index.html index.htm;}location = /50x.html { #发生错误访问的页面root html;}}}
分离式LNMP需要给Nginx配置为如下:
http {include mime.types;default_type application/octet-stream;sendfile on;keepalive_timeout 65;server {listen 80;server_name www.asd.com;root /www; #设置跟目录,location都生效location / {index index.html index.htm index.php;}location ~ .*\.(php|php5)?$ {fastcgi_pass 192.168.200.149:9000;fastcgi_index index.php;include fastcgi.conf;}}}
创建访问目录
mkdir -p /www #进入网页echo "sssss" > /www/index.html #写入内容touch /www/index.php #防止找不到php而报错shown -R www.www /www #给程序用户权限
配置完毕重启Nginx
[root@localhost html]# nginx -tnginx: the configuration file /usr/local/nginx/conf/nginx.conf syntax is oknginx: configuration file /usr/local/nginx/conf/nginx.conf test is successful[root@localhost html]# nginx -s reload
测试: 
成功
3.LNMP之PHP(FastCGI方式)服务的安装和准备
3.1 检查Nginx及MySQL的安装情况
3.1.1 检查确认Nginx及MySQL的安装路径
[root@localhost ~]# ls -ld /usr/local/nginxlrwxrwxrwx. 1 root root 24 Jul 9 14:31 /usr/local/nginx -> /usr/local/nginx-1.10.2/[root@localhost ~]# ls -ld /usr/local/mysqllrwxrwxrwx. 1 mysql mysql 12 Jul 14 07:13 /usr/local/mysql -> mysql-5.5.32
3.1.2 检查端口及启动情况
[root@localhost ~]# netstat -antup | grep -E "80|3306"tcp 0 0 0.0.0.0:80 0.0.0.0:* LISTEN 1193/nginxtcp 0 0 0.0.0.0:3306 0.0.0.0:* LISTEN 1702/mysqld
3.1.3 测试访问Nginx及MySQL是否OK
[root@localhost ~]# wget 127.0.0.1 #测试Nginx--2017-07-14 09:54:12-- http://127.0.0.1/Connecting to 127.0.0.1:80... connected.HTTP request sent, awaiting response... 200 OKLength: 624 [text/html]Saving to: “index.html”100%[=========================================================================================>] 624 --.-K/s in 0s2017-07-14 09:54:12 (2.12 MB/s) - “index.html” saved [624/624][root@localhost ~]# mysql -uroot -p #测试MySQLEnter password:Welcome to the MySQL monitor. Commands end with ; or \g.Your MySQL connection id is 6Server version: 5.5.32 MySQL Community Server (GPL)Copyright (c) 2000, 2013, Oracle and/or its affiliates. All rights reserved.Oracle is a registered trademark of Oracle Corporation and/or itsaffiliates. Other names may be trademarks of their respectiveowners.Type 'help;' or '\h' for help. Type '\c' to clear the current input statement.mysql> quitBye#如果访问结果和上述一致,就表明Nginx及MySQL的安装一切正常
3.2 检查安装PHP所需的lib库
- PHP程序在开发及运行时会调用一些诸如zlib,gd等函数库,因此需要确认lib库是否已经安装
[root@localhost ~]# rpm -qa zlib-devel libxml2-devel libjpeg-devel libjpeg-turbo-devel libiconv-develzlib-devel-1.2.3-29.el6.x86_64[root@localhost ~]# rpm -qa freetype-devel libpng-devel gd libcurl-devel libxslt-devel#模板机需要安装openssl-devel,因为是分离式需要开启远程ssh访问
3.2.1 执行下面命令安装相关的lib软件包
[root@localhost ~]# yum -y install zlib-devel libxml2-devel libjpeg-devel libjpeg-turbo-devel libiconv-devel[root@localhost ~]# yum -y install freetype-devel libpng-devel gd libcurl-devel libxslt-devel
安装后的结果如下:
[root@localhost ~]# rpm -qa zlib-devel libxml2-devel libjpeg-devel libjpeg-turbo-devel libiconv-develzlib-devel-1.2.3-29.el6.x86_64libxml2-devel-2.7.6-14.el6.x86_64libjpeg-turbo-devel-1.2.1-1.el6.x86_64#这里仅缺少libiconv-devel包[root@localhost ~]# rpm -qa freetype-devel libpng-devel gd libcurl-devel libxslt-develfreetype-devel-2.3.11-14.el6_3.1.x86_64libpng-devel-1.2.49-1.el6_2.x86_64libcurl-devel-7.19.7-37.el6_4.x86_64libxslt-devel-1.1.26-2.el6_3.1.x86_64gd-2.0.35-11.el6.x86_64
3.2.2 安装yum无法安装的libiconv库
[root@localhost ~]# wget http://ftp.gnu.org/pub/gnu/libiconv/libiconv-1.14.tar.gz[root@localhost ~]# lsanaconda-ks.cfg install.log libiconv-1.14.tar.gz nginx-1.10.2.tar.gzindex.html install.log.syslog mysql-5.5.32-linux2.6-x86_64.tar.gz[root@localhost ~]# tar xf libiconv-1.14.tar.gz -C /usr/src/[root@localhost ~]# cd /usr/src/libiconv-1.14/[root@localhost libiconv-1.14]# ./configure --prefix=/usr/local/libiconv && make && make install
3.2.3 安装libmcrypt库
#推荐使用简单的在线yum的方式安装:wget -O /etc/yum.repos.d/epel.repo http://mirrors.aliyun.com/repo/epel-6.repo编译安装过程略[root@localhost yum.repos.d]# yum -y install libmcrypt-devel
3.2.4 安装mhash加密扩展库
#推荐使用简单的在线yum的方式安装:wget -O /etc/yum.repos.d/epel.repo http://mirrors.aliyun.com/repo/epel-6.repo编译安装过程略[root@localhost yum.repos.d]# yum -y install mhash
3.2.5 安装mcrvpt加密扩展库
#推荐使用简单的在线yum的方式安装:wget -O /etc/yum.repos.d/epel.repo http://mirrors.aliyun.com/repo/epel-6.repo编译安装过程略[root@localhost yum.repos.d]# yum -y install mcrypt
3.2.6 创建访问程序用户
#应为是分离式所以有这一步useradd -s /sbin/nologin -M www
3.3 开始安装PHP(FastCGI方式)服务
3.3.1 获取PHP软件包
[root@localhost ~]# wget http://cn2.php.net/get/php-5.3.28.tar.gz/from/this/mirror
3.3.2 解压配置PHP
[root@localhost ~]# tar xf php-5.3.28.tar.gz -C /usr/src/[root@localhost ~]# cd /usr/src/php-5.3.28/[root@localhost php-5.3.28]# ./configure \> --prefix=/usr/local/php5.3.28 \> --with-mysql=mysqlnd \ #这里也要改,因为高于5.3> --with-iconv-dir=/usr/local/libiconv \> --with-freetype-dir \> --with-jpeg-dir \> --with-png-dir \> --with-zlib \> --with-libxml-dir=/usr \> --enable-xml \> --disable-rpath \> --enable-safe-mode \> --enable-bcmath \> --enable-shmop \> --enable-sysvsem \> --enable-inline-optimization \> --with-curl \> --with-curlwrappers \> --enable-mbregex \> --enable-fpm \> --enable-mbstring \> --with-mcrypt \> --with-gd \> --enable-gd-native-ttf \> --with-openssl \> --with-mhash \> --enable-pcntl \> --enable-sockets \> --with-xmlrpc \> --enable-zip \> --enable-soap \> --enable-short-tags \> --enable-zend-multibyte \> --enable-static \> --with-xsl \> --with-fpm-user=www \ #用户> --with-fpm-group=www \ #用户组> --enable-ftp#或./configure --prefix=/usr/local/php5.3.28 --with-mysql=mysqlnd --with-iconv-dir=/usr/local/libiconv --with-freetype-dir --with-jpeg-dir --with-png-dir --with-zlib --with-libxml-dir=/usr --enable-xml --disable-rpath --enable-safe-mode --enable-bcmath --enable-shmop --enable-sysvsem --enable-inline-optimization --with-curl --with-curlwrappers --enable-mbregex --enable-fpm --enable-mbstring --with-mcrypt --with-gd --enable-gd-native-ttf --with-openssl --with-mhash --enable-pcntl --enable-sockets --with-xmlrpc --enable-zip --enable-soap --enable-short-tags --enable-zend-multibyte --enable-static --with-xsl --with-fpm-user=yinuo --with-fpm-group=yinuo --enable-ftp#特别强调:上述每行结尾的换行符反斜线(\)之后不能再有任何字符包括空格#报错什么装什么,例如:yum -y install openssl-devel #会把以openssl前缀开头的包全装了
3.3.3 编译PHP
#[root@localhost php-5.3.28]# ln -s /usr/local/mysql/lib/libmysqlclient.so.18#libmysqlclient.so.18 libmysqlclient.so.18.0.0#[root@localhost php-5.3.28]# ln -s /usr/local/mysql/lib/libmysqlclient.so.18 /usr/lib64/#[root@localhost php-5.3.28]# touch ext/phar/phar.phar#分离式不需要上面做软连接,直接编译就可以[root@localhost php-5.3.28]# make#make最后的正确提示Build complete.Don't forget to run 'make test'.
3.3.4 安装PHP生成文件到系统
[root@localhost php-5.3.28]# make install
3.3.5 配置PHP引擎配置文件php.ini
1)设置软链接以方便访问,命令如下:
[root@localhost ~]# ln -s /usr/local/php5.3.28/ /usr/local/php[root@localhost ~]# ls -l /usr/local/phplrwxrwxrwx. 1 root root 21 Jul 14 13:06 /usr/local/php -> /usr/local/php5.3.28/
(2)查看PHP配置默认模版文件,命令如下:
[root@localhost ~]# cd /usr/src/php-5.3.28/[root@localhost php-5.3.28]# ls php.ini*php.ini-development php.ini-production

从对比结果可以看出,开发环境更多的是开启日志,调试信息,而生产环境都是关闭状态
(3)拷贝PHP配置文件到PHP默认目录,并更改文件名称为php.ini,命令如下:
[root@localhost php-5.3.28]# cp php.ini-production /usr/local/php/lib/php.ini[root@localhost php-5.3.28]# ls -l /usr/local/php/lib/php.ini-rw-r--r--. 1 root root 69627 Jul 14 13:25 /usr/local/php/lib/php.ini
3.3.6 配置PHP(FastCGI方式)的配置文件php-fpm.conf
[root@localhost php-5.3.28]# cd /usr/local/php/etc/[root@localhost etc]# lspear.conf php-fpm.conf.default[root@localhost etc]# cp php-fpm.conf.default php-fpm.conf[root@localhost etc]# vim php-fpm.conf #应为是做分离式需要修改配置监听端口148 ; specific port;149 ; '/path/to/unix/socket' - to listen on a unix socket.150 ; Note: This value is mandatory.151 listen = 192.168.200.128:9000 #改为监听本地ip(本机ip)端口不变152153 ; Set listen(2) backlog. A value of '-1' means unlimited.154 ; Default Value: 128 (-1 on FreeBSD and OpenBSD)
关于php-fpm.conf,暂时可用默认的配置,先把服务搭好,以后再进行优化。
3.3.7 启动PHP服务(FastCGI方式)
#启动php服务php-fpm[root@localhost etc]# /usr/local/php/sbin/php-fpm#检查PHP服务php-fpm的进程及启动端口的情况[root@localhost etc]# ps -ef | grep php-fpmroot 126611 1 0 13:36 ? 00:00:00 php-fpm: master process (/usr/local/php5.3.28/etc/php-fpm.conf)nginx 126612 126611 0 13:36 ? 00:00:00 php-fpm: pool wwwnginx 126613 126611 0 13:36 ? 00:00:00 php-fpm: pool wwwroot 126619 126548 0 13:39 pts/1 00:00:00 grep php-fpm[root@localhost etc]# lsof -i:9000 #默认9000端口提供服务COMMAND PID USER FD TYPE DEVICE SIZE/OFF NODE NAMEphp-fpm 126611 root 7u IPv4 136041 0t0 TCP localhost:cslistener (LISTEN)php-fpm 126612 nginx 0u IPv4 136041 0t0 TCP localhost:cslistener (LISTEN)php-fpm 126613 nginx 0u IPv4 136041 0t0 TCP localhost:cslistener (LISTEN)
3.3.8 创建访问目录
#根据nginx配置文件mkdir -p /wwwecho "sssss.php" > /www/index.php
4.测试
4.1 基本访问
C:\Windows\System32\drivers\etc下的host文件就是windows的映射文件
添加一条映射如:
192.168.200.149 www.asd.com
保存退出,浏览器访问 
4.2 运用upstream跳转php服务器(反向代理)
(1)修改nginx配置文件
[root@localhost www]# vim /usr/local/nginx/conf/nginx.confworker_processes 1;events {worker_connections 1024;}http {include mime.types;default_type application/octet-stream;sendfile on;keepalive_timeout 65;# upstream www {# server 192.168.200.154:9000;# server 192.168.200.155:9000;# }server {listen 80;server_name www.asd.com;root /www;location / {index index.html index.htm;}location ~ .*\.(php|php5)?$ {# fastcgi_pass www;fastcgi_index index.php;include fastcgi.conf;}}}#修改注释这几处
两台php服务器的文件建立和写入内容略过,参照前面 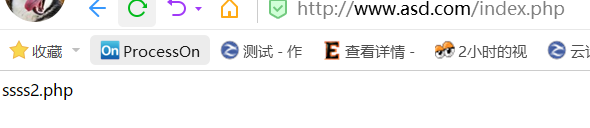
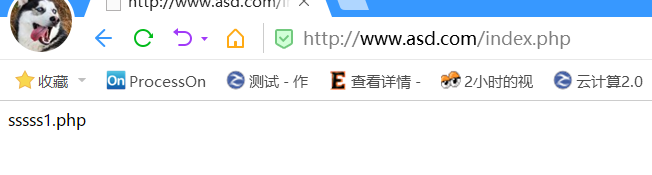
跳转成功,达到了负载均衡的作用