简介
1.Redis
redis是一个key-value存储系统。它支持存储的value类型相对更多,包括string(字符串)、list(链表)、set(集合) 和hash(哈希类型)。这些数据类型都支持push/pop、add/remove及取交集并集和差集及更丰富的操作,而且这些操作都是原子性的。在此基础上,redis支持各种不同方式的排序。与memcached一样,为了保证效率,数据都是缓存在内存中的,它的性能极高 ,Redis能读的速度是110000次/s,写的速度是81000次/s 。
2.Cache
Spring Cache 是作用在方法上的,其核心思想是这样的:当我们在调用一个缓存方法时会把该方法参数和返回结果作为一个键值对存放在缓存中,等到下次利用同样的参数来调用该方法时将不再执行该方法,而是直接从缓存中获取结果进行返回。
与 Redis 的区别:
集群环境下,每台服务器的 Spring Cache 是不同步的,这样会出问题的,Spring Cache 只适合单机环境。Spring Cache + Redis 是设置单独的缓存服务器,所有集群服务器统一访问 Redis,不会出现缓存不同步的情况。
Spring Cache + Redis 是基于注解的,对代码侵入比较小,但是支持的 api 太少了,不能满足大部分业务需求。Redis 基于 api,优点是 api 类型多,缺点是业务代码入侵。
3.分布式 Session
对于微服务系统来说,每个服务都是独立的系统,我们在这个服务中创建的 Session ,和在另一个服务中创建的 Session 是两个不同的 Session ,这就难以对用户的状态进行管理,分布式 Session 是对 Session 进行统一管理,把 Session 存储到 Redis 服务器中,当用户需要访问各个不同的服务时,从 Redis 服务器中对 Session 进行校验,以访问各个不同的服务,简单来说,就是各个微服务共享一个 Session。
环境
1. 安装 Redis
2.添加依赖
		<dependency>
			<groupId>org.springframework.boot</groupId>
			<artifactId>spring-boot-starter-data-redis</artifactId>
		</dependency>

		<!--分布式session共享-->
		<dependency>
			<groupId>org.springframework.session</groupId>
			<artifactId>spring-session-data-redis</artifactId>
		</dependency>

		<dependency>
			<groupId>org.springframework.boot</groupId>
			<artifactId>spring-boot-starter-cache</artifactId>
		</dependency>
3.application.yml 配置
spring:
  cache:
      redis:
        time-to-live: 100000 # #缓存超时时间ms @Bean配置后,这里的配置无效
        # cache-null-values: false #是否缓存空值
      type: redis

  datasource:
      type: com.alibaba.druid.pool.DruidDataSource
      driver-class-name: com.mysql.jdbc.Driver
      username: root
      password: roof
      url: jdbc:mysql://localhost:3306/sirius?useSSL=false&useUnicode=true&characterEncoding=utf-8&zeroDateTimeBehavior=convertToNull&autoReconnect=true

  redis:
    # Redis数据库索引,默认为0
    database: 0
    # Redis服务器地址
    host: 127.0.0.1
    # Redis服务器连接端口
    port: 6379
    # Redis密码,默认为空
    password:
    # Redis连接池最大连接数(负值表示没有限制
    jedis:
      pool:
        max-active: 10
        # 连接池最大阻塞等待时间
        max-wait: -1
        # 连接池最大空闲链接
        max-idle: 10
        # 连接池最小空闲链接
        min-idle: 0
    # 链接超时使劲
    timeout: 10000

    # 配置前端Thymeleaf模板引擎
  thymeleaf:
  # 打包末尾无/
    prefix: classpath:/templates/
    check-template-location: true
    suffix: .html
    encoding: UTF-8
    servlet:
      content-type: text/html
    mode: HTML5
    # 禁止后实现前端热部署
    cache: false

# 集成Mybatis
mybatis:
  # Mybatis映射
  mapper-locations: classpath:mapper/*.xml
  type-aliases-package: com.hly.sirius.domain

# 端口设置
server:
  port: 8080
4.Redis + Cache 配置
/**
 * @author :hly
 * @github :https://github.com/huangliangyun
 * @blog :blog.csdn.net/Sirius_hly
 * @date :2018/11/26
 */
@Configuration
@EnableCaching
public class RedisConfig extends CachingConfigurerSupport {

    //设置缓存的键值和参数,加上了包名和方法名,可以不配置
    /*@Bean
    public KeyGenerator keyGenerator() {
        return new KeyGenerator() {
            @Override
            public Object generate(Object target, Method method, Object... params) {
                StringBuilder sb = new StringBuilder();
                sb.append(target.getClass().getName());
                sb.append(method.getName());
                for (Object obj : params) {
                    sb.append(obj.toString());
                }
                return sb.toString();
            }
        };
    }*/

    //解决 Cache 存放到 Redis 数据库序列化乱码即类型无法转化问题
    @Bean
    CacheManager cacheManager(RedisConnectionFactory connectionFactory) {
        //初始化一个RedisCacheWriter
        RedisCacheWriter redisCacheWriter = RedisCacheWriter.nonLockingRedisCacheWriter(connectionFactory);
        //设置CacheManager的值序列化方式
        ClassLoader loader = this.getClass().getClassLoader();
        JdkSerializationRedisSerializer jdkSerializer = new JdkSerializationRedisSerializer(loader);
        RedisSerializationContext.SerializationPair<Object> pair = RedisSerializationContext.SerializationPair.fromSerializer(jdkSerializer);
        RedisCacheConfiguration defaultCacheConfig=RedisCacheConfiguration.defaultCacheConfig().serializeValuesWith(pair).entryTtl(Duration.ofSeconds(30));
        //.disableCachingNullValues();//不保存空值
        //初始化RedisCacheManager
        RedisCacheManager cacheManager = new RedisCacheManager(redisCacheWriter, defaultCacheConfig);
        return cacheManager;
    }
    //配置序列化,不然会出现 \xAC\xED\x00\x05t\x00\x06之类的
    @Bean
    public RedisTemplate<String, String> redisTemplate(RedisConnectionFactory factory) {
        //// 配置连接工厂
        StringRedisTemplate template = new StringRedisTemplate(factory);
        ////使用Jackson2JsonRedisSerializer来序列化和反序列化redis的value值,效率高(默认使用JDK的序列化方式)
        Jackson2JsonRedisSerializer jackson2JsonRedisSerializer = new Jackson2JsonRedisSerializer<>(Object.class);
        ObjectMapper om = new ObjectMapper();
        //// 指定要序列化的域,field,get和set,以及修饰符范围,ANY是都有包括private和public
        om.setVisibility(PropertyAccessor.ALL, JsonAutoDetect.Visibility.ANY);
        //// 指定序列化输入的类型,类必须是非final修饰的,final修饰的类,比如String,Integer等会跑出异常
        om.enableDefaultTyping(ObjectMapper.DefaultTyping.NON_FINAL);
        jackson2JsonRedisSerializer.setObjectMapper(om);
        //使用StringRedisSerializer来序列化和反序列化redis的key值
        template.setKeySerializer(new StringRedisSerializer());
        //// 值采用json序列化
        template.setValueSerializer(jackson2JsonRedisSerializer);
        // 设置hash key 和value序列化模式
        template.setHashKeySerializer(new StringRedisSerializer());
        template.setHashValueSerializer(jackson2JsonRedisSerializer);
        template.afterPropertiesSet();
        return template;
    }
}
5.配置 Session
@SpringBootApplication
@EnableCaching//开启全局缓存
@EnableRedisHttpSession(maxInactiveIntervalInSeconds = 1800)//开启session共享,session有效期30分钟
public class SpringBootRedisApplication {

	public static void main(String[] args) {
		SpringApplication.run(SpringBootRedisApplication.class, args);
	}
}
使用
1.Redis 的使用
启动 Redis 数据库
启动项目访问以下路径
http://localhost:8080/redis/addUser
/**
 * @author :hly
 * @github :https://github.com/huangliangyun
 * @blog :blog.csdn.net/Sirius_hly
 * @date :2018/11/26
 */
@RestController
public class RedisController {

    //只针对键值对都是字符型的数据进行操作
    @Autowired
    private StringRedisTemplate stringRedisTemplate;

    @Autowired
    private RedisTemplate redisTemplate;

    @RequestMapping("redis/addUser")
    public User addUserByRedis(){
        //保存对象
        User  user = new User();
        user.setUsername("hly");
        user.setPassword("123");
        ValueOperations<String,User> operations = redisTemplate.opsForValue();
        operations.set("user",user);
        System.err.println(operations.get("user"));

        ValueOperations operations1 = stringRedisTemplate.opsForValue();
        operations1.set("hly","123");
        System.err.println(operations1.get("hly"));
        //operations.set("user",user,1, TimeUnit.SECONDS);
        return user;
    }
}
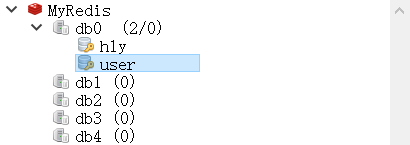
数据已经保存到 Redis
2.Spring Cache + Redis 的使用
为了方便使用,我已经把路径粘贴了出来,直接复制访问即可,每一个注解的含义也都注释写明了。
/**
 * @author :hly
 * @github :https://github.com/huangliangyun
 * @blog :blog.csdn.net/Sirius_hly
 * @date :2018/11/26
 */
@RestController
public class CacheController {

    /**
     * value:缓存的名字
     * key 使用SpEL表达式自定义的缓存Key,比如:#username是以参数username为key的缓存
     * @return
     */

    //把集合写入redis,放进缓存
    //http://localhost:8080/cache/addUsers
    @GetMapping("/cache/addUsers")
    @Cacheable(value = "user")//读取数据到方法上,先从缓存中读取,没有再从数据库中读取
    public List<User> postAllUser() {
        User user1 = new User("hly","124");
        User user2 = new User("sirius","123");
        List<User> users = new ArrayList<User>();
        users.add(user1);
        users.add(user2);
        return users;
    }

    //空方法,拿上面方法的缓存
    //http://localhost:8080/cache/all
    @GetMapping("/cache/all")
    @Cacheable(value = "user")//读取数据到方法上,先从缓存中读取,没有再从数据库中读取
    public List<User> getAllUser() {
        List<User> users = new ArrayList<User>();
        return users;
    }

    //增加,修改缓存到空方法
    //http://localhost:8080/cache/update
    @CachePut(value = "user")
    @GetMapping("/cache/update")
    public List<User> updateUsers() {
        List<User> users = new ArrayList<User>();
        User user1 = new User("hly","125");
        users.add(user1);
        return users;
    }

    //删除空方法设置的缓存
    //http://localhost:8080/cache/del
    @GetMapping("/cache/del")
    @CacheEvict(value = "user")
    public String delAllCache() {
        //删除后redis中还有
        return "以删除所有缓存";
    }

    //EL表达式来指定的key,有则取出,无则放入缓存,返回到方法User返回参数,没有则设置User user
    //http://localhost:8080/cache/object?username=hly
    @Cacheable(value = "user",key="#user.username")
    @GetMapping("/cache/object")
    public User getUserOfAdd(User user) {
        user.setUsername("hly");
        user.setPassword("129");
        return user;
    }

    //直接拿到
    //http://localhost:8080/cache/object/get/?username=hly
    @Cacheable(value = "user",key="#user.username")
    @GetMapping("/cache/object/get")
    public User getUser(User user) {
        return user;
    }

    //根据键值,增加,修改
    //http://localhost:8080/cache/update/object/?username=hly
    @CachePut(value = "user",key="#user.username")
    @GetMapping("/cache/update/object")
    public User updateUser(User user) {
        user.setUsername("hly");
        user.setPassword("128");
        return user;
    }

    //按名字删除缓存
    //http://localhost:8080/cache/del/object?username=hly
    @GetMapping("/cache/del/object")
    @CacheEvict(value = "user",key="#user.username")
    public String delCacheByName(User user) {
        //删除后redis中还有
        return "按名字删除缓存";
    }
}

3.分布式 Session 的使用
@ResponseBody
    @RequestMapping("/uuid")
    public String sessionTest(HttpSession session){
        UUID uuid = (UUID)session.getAttribute("uuid");
        if(uuid == null){
            uuid = UUID.randomUUID();
        }
        session.setAttribute("uuid",uuid);
        return session.getId();
    }
//分布式Session
    @RequestMapping("/login")
    public String login(@RequestParam("username") String username, @RequestParam("password") String password, HttpSession session){
       if(session.getAttribute("uuid")!=null)
            return "redirect:/admin";
        return "redirect:/";
    }
运行项目,访问 http://localhost:8080/uuid
会出现 一串 id,这是 Session 的 id。

这个 id 会保存到 Redis 数据库 。
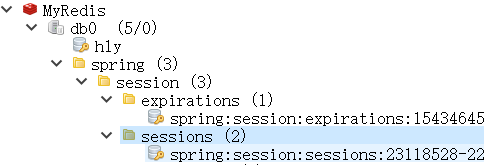
到测试页面进行测试 http://localhost:8080/
在没有把这串 id 存到数据库之前是无法进行登录的,如果换个浏览器,如同换了个用户,我们必须重新获取一个 id ,才能进行验证。同理,我们可以在不同的项目进行相同的 Redis 服务器配置,启动多个项目,同一个 Session 可以访问不同的项目,尽管他们的端口号,服务器不同。
源码下载:https://github.com/huangliangyun/Spring-Boot-2.X
参考:http://www.ityouknow.com/springboot/2016/03/06/spring-boot-redis.html
QQ交流群:865061230