前言: 一直想着啥时候能把vue全家桶的东西源码全部撸一遍,可惜无奈能力有限啊(哈哈,最近一直在补js基础),看vuex代码的时候觉得也还好,基本上是边学边解析源码的方式把vuex撸了一遍(毕竟整个vuex加起来也没多少代码),可当碰到vue-router的时候,首先就被它那几千行代码吓到了,刚开始看的时候是有点懵逼啊,所以把vue-router官网上的api看了一遍又一遍, 然后带着某个api功能再去看的源码,然后一行一行的debug,哈哈! 我能说我把vue-router的源码都debug了个遍吗?? 嗯嗯~~ 不推荐小伙伴这样干哈,太浪费时间,纠结了好久,文章也是真的不知道该怎么写,下面记录下我学习vue-router的笔记,大牛勿喷!
先附上vue-router的官网:
https://router.vuejs.org/zh/
在学习vue-router之前,我们先认识两个东西:
window.history.pushState()、window.history.replaceState()
window.location.hash
我们一个一个来哈,先说一下history对象的pushState跟replaceState方法
pushState方法: 简单的来说就是向浏览器插入一条历史记录
replaceState方法: 替换浏览器中的一条历史记录
我这只是简单的描述了一下哈,童鞋们如果需要深入了解的话,可以去看这上面的解释,比我专业的多哈https://developer.mozilla.org/zh-CN/docs/Web/API/History_API
pushState跟replaceState方法可以在不重新加载页面的情况下修改location跟浏览器的历史记录,这样说有点抽象哈,我们结合我们的demo来说一下.
需求是这样的: 我们需要通过location的变化,去匹配我们当前的页面,达到路由跳转的效果,具体实现的效果看截图.
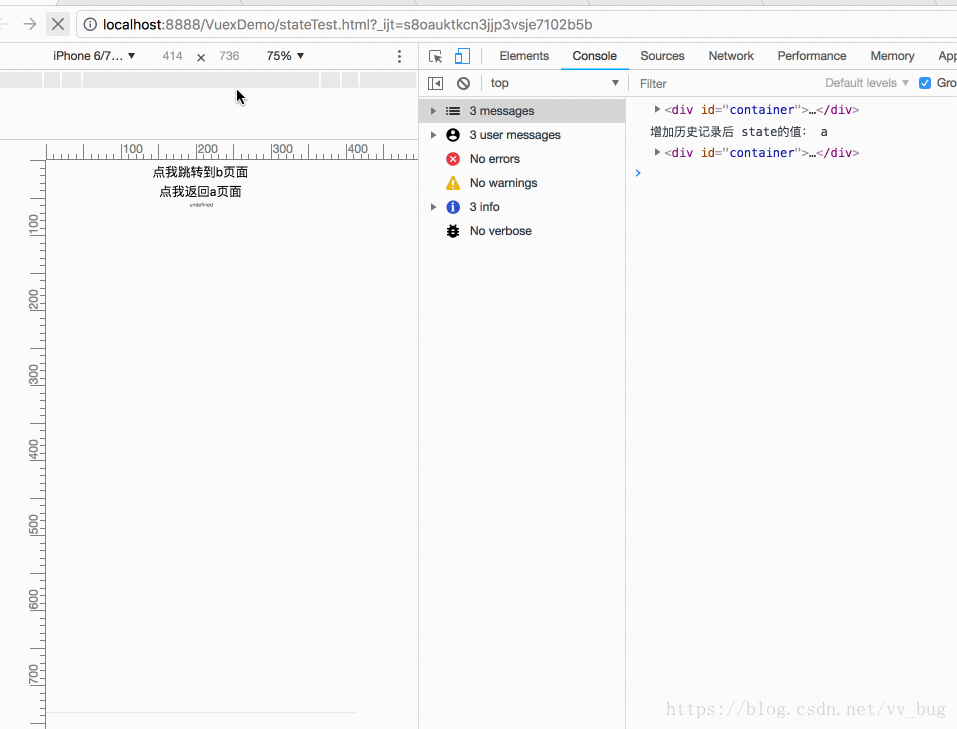
可以看到,当我们点击按钮“跳转b页面”的时候,我们的container模块切换到了b页面.然后点击按钮“返回a页面”的时候,切换到了a页面.
好啦,我们一步一步的来实现!
首先创建两条标签数据来模拟a跟b页面:
var components = {
    a: '<div style="height: 500px;text-align: center;color: #000;font-size: 20px;background-color: red">我是a页面</div>',
    b: '<div style="height: 500px;text-align: center;color: #000;font-size: 20px;background-color: yellow">我是b页面</div>'
  };
然后初始化一个页面:
//初始化一个a页面
  push('a');
  /**
   * 添加一个页面
   * @param pageName  页面名称
   */
  function push(pageName) {
    // 增加一个历史记录
    history.pushState(pageName, '', pageName+'.html');
    //更新当前页面
    updateCom(components[pageName]);
  }
   /**
   * 更新当前container
   * @param com
   */
  function updateCom(com) {
    var container = document.getElementById('container');
    container.innerHTML = com;
    console.log(container);
  }
当我们点击按钮跳转b页面的时候,我们调用push方法替换当前页面,并且通过pushstate方法添加一条历史记录:
<button onclick="push('b')">点我跳转到b页面</button>
此时我们可以看到,我们的url变成了
http://localhost:xx/VuexDemo/b.html
页面也切换到了b页面
最后当我们点击返回a页面按钮的时候,我们直接调用:
 /**
   * 浏览器返回
   */
  function back() {
    history.go(-1);
  }
然后监听state的变化,并且根据当前state处理页面跳转:
 //监听浏览器的返回操作
  window.addEventListener('popstate', function () {
    var state = history.state;
    updateCom(components[state]);
  });
最后运行代码就可以看到我们截图的效果了,代码比较简单,我就直接全部附上了:
<!DOCTYPE html>
<html lang="en">
<head>
  <meta charset="UTF-8">
  <title>Title</title>
  <style type="text/css">
    button {
      font-size: 40px;
    }
  </style>
</head>
<body style="text-align: center;">
<button onclick="push('b')">点我跳转到b页面</button>
<br>
<button onclick="back()">点我返回a页面</button>
<br>
<div id="container"></div>
<script>
  var components = {
    a: '<div style="height: 500px;text-align: center;color: #000;font-size: 20px;background-color: red">我是a页面</div>',
    b: '<div style="height: 500px;text-align: center;color: #000;font-size: 20px;background-color: yellow">我是b页面</div>'
  };
  //监听浏览器的返回操作
  window.addEventListener('popstate', function () {
    var state = history.state;
    updateCom(components[state]);
  });
  //初始化一个a页面
  push('a');

  /**
   * 添加一个页面
   * @param pageName  页面名称
   */
  function push(pageName) {
    // 增加一个历史记录
    history.pushState(pageName, '', pageName+'.html');
    //更新当前页面
    updateCom(components[pageName]);
  }

  /**
   * 浏览器返回
   */
  function back() {
    history.go(-1);
  }

  /**
   * 更新当前container
   * @param com
   */
  function updateCom(com) {
    var container = document.getElementById('container');
    container.innerHTML = com;
    console.log(container);
  }
</script>
</body>
</html>
貌似不是所有的浏览器都支持pushstate跟replacestate方法,所以还有一种实现这种效果的方法,那就是我们接下来要说的location.hash了.
#是用来指导浏览器动作的,对服务器端完全无用。所以,HTTP请求中不包括#,并且每一次改变#后的部分,都会在浏览器的访问历史中增加一个记录,使用"后退"按钮,就可以回到上一个位置,最后还可以通过onhashchange事件监听hash的变化,我们直接模拟一下上面的demo哈.
代码比较简单,跟上面pushstate的方式大致一样,我就直接贴代码了哈:
<!DOCTYPE html>
<html lang="en">
<head>
  <meta charset="UTF-8">
  <title>Title</title>
  <style type="text/css">
    button {
      font-size: 40px;
    }
  </style>
</head>
<body style="text-align: center;">
<button onclick="push('b')">点我跳转到b页面</button>
<br>
<button onclick="back()">点我返回a页面</button>
<br>
<div id="container"></div>
<script>
  var components = {
    a: '<div style="height: 500px;text-align: center;color: #000;font-size: 20px;background-color: red">我是a页面</div>',
    b: '<div style="height: 500px;text-align: center;color: #000;font-size: 20px;background-color: yellow">我是b页面</div>'
  };
  window.addEventListener('hashchange', function () {
    //获取当前location的hash值
    var hash = window.location.hash;
    //根据当前hash值做路由跳转
    updateCom(components[hash.substring(hash.indexOf('#')+1)]);
  });
  //初始化一个页面a
  push('a');

  /**
   * 添加一个页面
   * @param pageName
   */
  function push(pageName) {
    // 修改当前location的hash值,并且增加一个历史记录
    location.hash=pageName;
    //更新当前路由
    updateCom(components[pageName]);
  }

  function back() {
    history.go(-1);
  }

  function updateCom(com) {
    var container = document.getElementById('container');
    container.innerHTML = com;
  }
</script>
</body>
</html>
最后运行的效果跟上面的demo一样.
那除了兼容性问题,我们为啥不直接用location的hash的方式呢? 为啥还用pushstate的方式呢?
在某种意义上,调用 pushState() 与 设置 location.hash的方式 类似,二者都会在当前页面创建并激活新的历史记录。但 pushState() 具有如下几条优点:
新的 URL 可以是与当前URL同源的任意URL 。而设置 window.location 仅当你只修改了哈希值时才保持同一个 document。
如果需要,你可以不必改变URL。而设置 window.location = “#foo”;在当前哈希不是 #foo 的情况下, 仅仅是新建了一个新的历史记录项。
你可以为新的历史记录项关联任意数据。而基于哈希值的方式,则必须将所有相关数据编码到一个短字符串里。
假如 标题 在之后会被浏览器用到,那么这个数据是可以被使用的(哈希则不然)。
好啦!!! 有小伙伴要说了,你不是在写vue-router的文章吗? 对的!! 不知道小伙伴有没有感觉了呢?? 其实整个vue-router最主要的就是利用了pushstate跟location.hash来实现的,只是针对vue跟api做了一系列的封装.这也许就是一个干了20年的程序员写helloworld跟一个刚起步程序员的区别了,哈哈!! 不早啦,睡啦睡啦~~~ 未完待续哈!
欢迎入群,欢迎交流,qq群链接:

参考链接: