what is lightning?
The Lightning Component framework is a UI framework for developing web apps for mobile and desktop devices. It’s a modern framework for building single-page applications with dynamic, responsive user interfaces for Lightning Platform apps. It uses JavaScript on the client side and Apex on the server side.
1.Attribute Data Types
Accessing structured data is a nice segue back to talking about attributes, and specifically about non-primitive attribute types. message is a string, but there are a number of different attribute types.
- Primitives data types, such as Boolean, Date, DateTime, Decimal, Double, Integer, Long, or String. The usual suspects in any programming language.
- Standard and custom Salesforce objects, such as Account or MyCustomObject__c.
- Collections, such as List, Map, and Set.
- Custom Apex classes.
- Framework-specific types, such as Aura.Component, or Aura.Component[]. These are more advanced than we’ll get to in this module, but you should know they exist.
2.Fun with Attributes and Expressions
helloPlayground.cmp
<aura:component>
<aura:attribute name="messages" type="List"
default="['You look nice today.',
'Great weather we\'re having.',
'How are you?']"/>
<h1>Hello Playground</h1>
<p>Silly fun with attributes and expressions.</p>
<h2>List Items</h2>
<p><c:helloMessage message="{!v.messages[0]}"/></p>
<p><c:helloMessage message="{!v.messages[1]}"/></p>
<p><c:helloMessage message="{!v.messages[2]}"/></p>
<h2>List Iteration</h2>
<aura:iteration items="{!v.messages}" var="msg">
<p><c:helloMessage message="{!msg}"/></p>
</aura:iteration>
<h2>Conditional Expressions and Global Value Providers</h2>
<aura:if isTrue="{!$Browser.isIPhone}">
<p><c:helloMessage message="{!v.messages[0]}"/></p>
<aura:set attribute="else">
<p><c:helloMessage message="{!v.messages[1]}"/></p>
</aura:set>
</aura:if>
</aura:component>
What happens if someone creates a <c:helloPlayground> with only two messages? Accessing the third item will fail, and while it won’t cause a crash here, with more complex components it might.(This is for List Items,I think it is risk )
So, in the List Iteration section, you can see a better way to work through all items in the list. The <aura:iteration>component repeats its body once per item in its items attribute, so the list shrinks or grows as we have fewer or more messages.
In the Conditional Expressions and Global Value Providers section, you can see a way to choose between two different possible outputs. The format is a bit awkward, because this is markup rather than, say, JavaScript, but the <aura:if>component lets you, for example, add an edit button to a page only if the user has edit privileges on the object.
3.Handle Action with Controllers
Example Code:
helloMessageInteractive.cmp
<aura:component>
<aura:attribute name="message" type="String"/>
<p>Message of the day: {!v.message}</p>
<div>
<lightning:button label="You look nice today."
onclick="{!c.handleClick}"/>
<lightning:button label="Today is going to be a great day!"
onclick="{!c.handleClick}"/>
</div>
</aura:component>
helloMessageInteractive.js
({
handleClick: function(component, event, helper) {
var btnClicked = event.getSource(); // the button
var btnMessage = btnClicked.get("v.label"); // the button's label
component.set("v.message", btnMessage); // update our message
}
})
Because this is super important, let’s break it down line-by-line.
handleClick: function(component, event, helper) {
The action handler name, followed by an anonymous function declaration. The important thing here is the function signature. While it’s not technically required, you should always declare your controller functions to take these three parameters. We’ll talk more about them as we go, but for now, these parameters represent:
- component—the component. In this case, it’s helloMessageInteractive.
- event—the event that caused the action handler to be called.
- helper—the component’s helper, another JavaScript resource of reusable functions.
var btnClicked = event.getSource(); // the button
Remember that handleClick is connected to our <lightning:button> tag and its onclick attribute. The event, then, is someone clicking the button. Inside that event it has the notion of a source, the thing that generated the event, which is the button itself. So, calling event.getSource() gets us a reference to the specific <lightning:button> that was clicked.
var btnMessage = btnClicked.get("v.label"); // the button's label
What do we do now that we have a reference to the button? We look inside it and get its label, which is set on the <lightning:button> in the component markup. For example, <lightning:button label="You look nice today." ... >.
Let’s think about that a bit more. We don’t have the definition of <lightning:button> in front of us, but label is just another attribute, much like the message attribute we added to helloMessageInteractive. You can call get() on any component and provide the name of the attribute you want to retrieve, in the format v.attributeName. The result is the attribute value.
Note that, as in component markup, v represents the view, the component itself—but in this case, it’s the <lightning:button>child component, not helloMessageInteractive! Think of it this way. btnClicked.get("v.label") taps on the shoulder of whatever component btnClicked is and says “Hey, give me v.label”. That component thinks “v is me,” looks inside itself, and returns the value of its label attribute.
So now that we have a text string retrieved from the button, we just have one step left: to change our message attribute to the new message text. Unsurprisingly, just as get() reads a value from a component, set() writes a value.
component.set("v.message", btnMessage); // update our message
However, let’s notice one important difference. We called get() on btnClicked, the <lightning:button> that’s inside helloMessageInteractive. We’re calling set() on component—the helloMessageInteractive component itself. This is a pattern you’ll repeat in virtually every component you create: get values from child components, maybe do some processing, and set values in the component itself.
4.Handle Form Submission in an Action Handler
expenses.cmp
<aura:component>
    <aura:attribute name="expenses" type="Expense__c[]"/>
    <aura:attribute name="newExpense" type="Expense__c"
                    default="{ 'sobjectType': 'Expense__c',
                        'Name': '',
                        'Amount__c': 0,
                        'Client__c': '',
                        'Date__c': '',
                        'Reimbursed__c': false }"/>

    <!-- PAGE HEADER -->
    <lightning:layout class="slds-page-header slds-page-header--object-home">
        <lightning:layoutItem>
            <lightning:icon iconName="standard:scan_card" alternativeText="My Expenses"/>
        </lightning:layoutItem>
        <lightning:layoutItem padding="horizontal-small">
            <div class="page-section page-header">
                <h1 class="slds-text-heading--label">Expenses</h1>
                <h2 class="slds-text-heading--medium">My Expenses</h2>
            </div>
        </lightning:layoutItem>
    </lightning:layout>
    <!-- / PAGE HEADER -->
    <!-- NEW EXPENSE FORM -->
    <lightning:layout>
        <lightning:layoutItem padding="around-small" size="6">
            <!-- [[ expense form goes here ]] -->
            <!-- CREATE NEW EXPENSE -->
            <div aria-labelledby="newexpenseform">
                <!-- BOXED AREA -->
                <fieldset class="slds-box slds-theme--default slds-container--small">
                    <legend id="newexpenseform" class="slds-text-heading--small
          slds-p-vertical--medium">
                        Add Expense
                    </legend>

                    <!-- CREATE NEW EXPENSE FORM -->
                    <form class="slds-form--stacked">
                        <lightning:input aura:id="expenseform" label="Expense Name"
                                         name="expensename"
                                         value="{!v.newExpense.Name}"
                                         required="true"/>
                        <lightning:input type="number" aura:id="expenseform" label="Amount"
                                         name="expenseamount"
                                         min="0.1"
                                         formatter="currency"
                                         step="0.01"
                                         value="{!v.newExpense.Amount__c}"
                                         messageWhenRangeUnderflow="Enter an amount that's at least $0.10."/>
                        <lightning:input aura:id="expenseform" label="Client"
                                         name="expenseclient"
                                         value="{!v.newExpense.Client__c}"
                                         placeholder="ABC Co."/>
                        <lightning:input type="date" aura:id="expenseform" label="Expense Date"
                                         name="expensedate"
                                         value="{!v.newExpense.Date__c}"/>
                        <lightning:input type="checkbox" aura:id="expenseform" label="Reimbursed?"
                                         name="expreimbursed"
                                         checked="{!v.newExpense.Reimbursed__c}"/>
                        <lightning:button label="Create Expense"
                                          class="slds-m-top--medium"
                                          variant="brand"
                                          onclick="{!c.clickCreate}"/>
                    </form>
                    <!-- / CREATE NEW EXPENSE FORM -->

                </fieldset>
                <!-- / BOXED AREA -->
            </div>
            <!-- / CREATE NEW EXPENSE -->
        </lightning:layoutItem>
    </lightning:layout>
    <!-- / NEW EXPENSE FORM -->
</aura:component>
expenseController.js
({
clickCreate: function(component, event, helper) {
var validExpense = component.find('expenseform').reduce(function (validSoFar, inputCmp) {
// Displays error messages for invalid fields
inputCmp.showHelpMessageIfInvalid();
return validSoFar && inputCmp.get('v.validity').valid;
}, true);
// If we pass error checking, do some real work
if(validExpense){
// Create the new expense
var newExpense = component.get("v.newExpense");
console.log("Create expense: " + JSON.stringify(newExpense));
helper.createExpense(component, newExpense);
}
}
})
OK, this is all new, so let’s look at it carefully. First, let’s note that this action handler function is basically divided into three sections, or steps:
- Setup
- Process form values
- If there are no errors, do something
This structure might be familiar to you, because it’s a pretty fundamental way to process user input in a web application. Let’s look at each of the steps, to see how they work in the Lightning component.
For setup, all we do is initialize the state of our error checking. It’s a simple flag, is this a valid expense? Each time theclickCreate action handler is called, we’ll start on the assumption that the expense data is OK, and then invalidate it if we find a problem. Here’s a rundown of the validExpense flag, with an initial value that’s set to true.
- component.find('expenseform') gets a reference to the array of <lightning:input> fields that require validation. If the ID is unique, the reference returns the component. In this case, the ID is not unique and the reference returns an array of components.
- The JavaScript reduce() method reduces the array to a single value that’s captured by validSoFar, which remains true until it finds an invalid field, changing validSoFar to false. An invalid field can be a required field that’s empty, a field that has a number lower than a specified minimum number, among many others.
- inputCmp.get('v.validity').valid returns the validity of the current input field in the array.
- inputCmp.showHelpMessageIfInvalid() displays an error message for invalid fields. <lightning:input> provides default error messages that can be customized by attributes like messageWhenRangeUnderflow, which you’ve seen in the expense form example.
Connect to Salesforce with Server-Side Controllers
| Identifier |
Context |
Meaning |
|---|---|---|
| c. |
Component markup |
Client-side controller |
| c. |
Controller code |
Server-side controller |
| c: |
Markup |
Default namespace |
"同步模式"就是上一段的模式,后一个任务等待前一个任务结束,然后再执行,程序的执行顺序与任务的排列顺序是一致的、同步的;"异步模式"则完全不同,每一个任务有一个或多个回调函数(callback),前一个任务结束后,不是执行后一个任务,而是执行回调函数,后一个任务则是不等前一个任务结束就执行,所以程序的执行顺序与任务的排列顺序是不一致的、异步的。
"异步模式"非常重要。在浏览器端,耗时很长的操作都应该异步执行,避免浏览器失去响应,最好的例子就是Ajax操作。在服务器端,"异步模式"甚至是唯一的模式,因为执行环境是单线程的,如果允许同步执行所有http请求,服务器性能会急剧下降,很快就会失去响应。
回调函数
这是异步编程最基本的方法。
假定有两个函数f1和f2,后者等待前者的执行结果。
f1();
f2();
如果f1是一个很耗时的任务,可以考虑改写f1,把f2写成f1的回调函数。
function f1(callback){
setTimeout(function () {
// f1的任务代码
callback();
}, 1000);
}
执行代码就变成下面这样:
f1(f2);
采用这种方式,我们把同步操作变成了异步操作,f1不会堵塞程序运行,相当于先执行程序的主要逻辑,将耗时的操作推迟执行。
回调函数的优点是简单、容易理解和部署,缺点是不利于代码的阅读和维护,各个部分之间高度耦合(Coupling),流程会很混乱,而且每个任务只能指定一个回调函数。
Lightning 中的函数作用域的问题?
campintListController.js
doInit: function (component, event, helper) {
    var action = component.get("c.getItems");
    action.setCallback(this, function (response) {
        var state = response.getState();
        if (state === "SUCCESS") {
            console.log("action::::::::::" + JSON.stringify(response.getReturnValue()));
            component.set("v.items", response.getReturnValue());
        } else {
            console.log("Failed with state: " + state);
        }
    })
    $A.enqueueAction(action);
}
之前这么写的:
doInit: function (component, event, helper) {
    var action = component.get("c.getItems");
    action.setCallback(this, function (response) {
        var state = response.getState();
        if (state === "SUCCESS") {
            console.log("action::::::::::" + JSON.stringify(action.response.getReturnValue()));
            component.set("v.items", action.response.getReturnValue());
        } else {
            console.log("Failed with state: " + state);
        }
    })
    $A.enqueueAction(action);
}
刚开始以为两种action.response.getReturnValue()和action.getReturnValue()有啥区别,后来经过指导,了解到这边存在函数作用域的问题,再callback中的function的作用于取不到action的东西,只能通过function中的参数response来操作,不然就会出错。(可以去查查JS函数作用域相关文档)
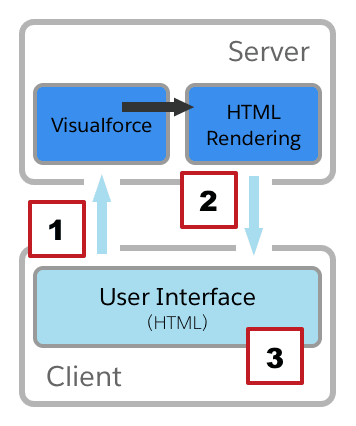
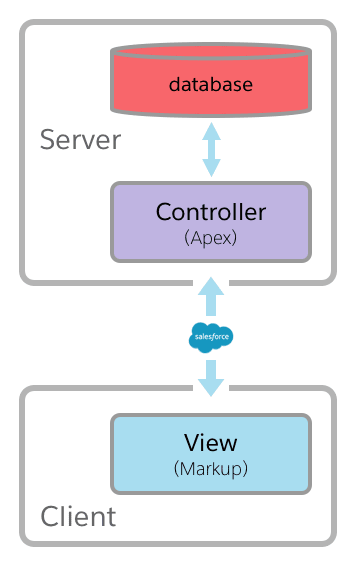
Different between visualforce and lightning
| Visualforce Request Cycle | Lightning Components Request Cycle |
|---|---|
 |
 |
|
|
First, remember that Visualforce controllers run on the server side, while Lightning component controllers run on the client side. And sometimes on the server side, too. Visualforce controllers are written in Apex, while Lightning component controllers are written in JavaScript. And sometimes also in Apex.
| Visualforce Controller Architecture | Lightning Components Controller Architecture |
|---|---|
 |
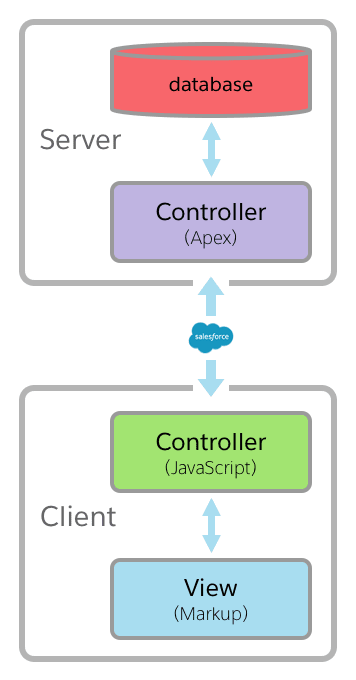 |
The largest difference between Visualforce in Lightning Experience and Visualforce in Salesforce Classic is the environment it runs in. In Salesforce Classic, Visualforce “owns” the page, the request, the environment. Visualforce is the application container. But in Lightning Experience, Visualforce runs inside an iframe that’s wrapped inside the larger Lightning Experience container.
Global Value Providers
There is one kind of Lightning component value provider—global value providers—that looks like Visualforce global variables. For example, both Visualforce and Lightning components have $Label and $Resource. There are two potential chutes here.
 Not every global variable available in Visualforce is available as a global value provider in Lightning components.
- Some global variables and global value providers have the same name. Even so, they behave differently. (If you can’t think of reasons why, head back to Lightning Component Core Concepts for a refresher. Before you take the challenge. Hint, hint!)
Don’t try to use a global value provider without reading the documentation for it in the Lightning Components Developer Guide first.
tips:
Apex Controllers
Let’s look at a very simple server-side controller, and talk through a couple points.
public with sharing class SimpleServerSideController {
    @AuraEnabled
    public static String serverEcho(String echoString) {
        return ('Hello from the server, ' + echoString);
    }
}
There are a few things to notice here, including a number of specific differences from a Visualforce controller.
- The most obvious thing that’s new is the @AuraEnabled annotation. If you’ve worked with JavaScript remoting in Visualforce, it’s a lot like the @RemoteAction annotation you use for those methods.
- The similarity with JavaScript remoting continues with the method signature. Lightning components server-side controller methods must be static, and either public or global.
- A consequence of the server-side controller methods being static is that you can’t store any component state on the server side. Keep component state in its client-side attributes, as described in a preceding section.
- Server-side actions return data. They don’t—they can’t—return a PageReference. Implement your navigation logic on the client side, not the server side.
- Something that might not be obvious, but which causes you endless headaches if you miss it, is that parameter names used in the Apex method declaration must match the parameter names you use when creating the action on the client side.
- One more nonobvious constraint: Don’t give a server-side controller method the same name as a client-side action handler function. You’ll run into...weirdness. You should adopt a naming convention for your server-side and client-side methods that makes the distinction clear, and naming collisions impossible.
Let’s repeat those last two bullets. Parameter names must match when passed between client-side and server-side code. However, the method names must not match.
Inner Classes
![]() You can’t use Apex inner classes in Lightning components code. Your server-side Apex code can use them in processing a request, but the response returned to the client can’t be an instance of an inner class.
You can’t use Apex inner classes in Lightning components code. Your server-side Apex code can use them in processing a request, but the response returned to the client can’t be an instance of an inner class.
Inheritance
![]() You can’t use inheritance with custom Apex classes you intend to return in responses to Lightning components.
You can’t use inheritance with custom Apex classes you intend to return in responses to Lightning components.
Handling Server-Side Errors
![]() If your Apex code encounters an error, you can create and throw an AuraHandledException. Catching other exceptions, such as a DML exception, and rethrowing them as an AuraHandledException also results in much better experience on the client side.
If your Apex code encounters an error, you can create and throw an AuraHandledException. Catching other exceptions, such as a DML exception, and rethrowing them as an AuraHandledException also results in much better experience on the client side.
Enable Debug Mode for Lightning Components
To enable debug mode for users in your org:
- From Setup, enter Debug Mode in the Quick Find box, then select Debug Mode Users.
Users with debug mode enabled have a check mark in the Debug Mode column.
- In the user list, locate any users who need debug mode enabled. If necessary, use the standard list view controls to filter your org’s users.
- Enable the selection checkbox next to users for whom you want to enable debug mode.
- Click Enable.
To disable debug mode for a user, follow the preceding steps and click Disable instead of Enable.
Tips: Debug mode has a significant performance impact. Salesforce is slower for any user who has debug mode enabled. For this reason, we recommend using it only when actively debugging JavaScript code, and only for users involved in debugging activity. Don’t leave debug mode on permanently. Users who have debug mode enabled see a banner notification once a week while it’s enabled.
自己发现的问题<aura:method>:
今天在写method方法的时候,发现一直取不到子组件的返回值,后来debug发现问题在使用<aura:method>方法的时候有类似于函数签名的机制,需要父controller调用子组件方法的时候参数顺序与子组件定义<aura:attribute>的顺序一致,废话不多说,上代码:
tips:代码红色部分分别是父controller的传参,以及子component接收的参数定义的属性,他们的顺序需要保持一直,否则子controller获取的参数会出现混淆。
parent component:
<aura:component description="workPicklist" access="public">
    <aura:handler name="init" value="{!this}" action="{!c.doInit}"/>
    <aura:attribute name="picklistValues" type="Object"/>
    <aura:attribute name="objectName" type="Object" default="Account"/>
    <aura:attribute name="fieldName" type="String" default="SLA__c"/>
    <aura:attribute name="value" type="String"/>

    <lightning:select label="accountSLAPicklist" aura:id="accountSLAPicklist"
                      name="accountSLAPicklist" value="{!v.value}">
        <aura:iteration items="{!v.picklistValues}" var="item">
            <option value="{!item}">{!item}</option>
        </aura:iteration>
    </lightning:select>
    <p>{!v.value}</p>


    <c:workPicklistValue aura:id="picklist-service"/>
</aura:component>
parent controller:
/**
 * Created by zhezhana on 8/17/2018.
 */
({
    doInit: function (component, event, helper) {
        var objectName = component.get("v.objectName");
        var fieldName = component.get("v.fieldName");
        console.log("objectName:::" + objectName + "----fieldName:::" + fieldName);
        var picklistValues = component.find("picklist-service");
        //console.log("----------$$--------" + JSON.stringify(picklistValues.pickListMethod(objectName, fieldName)));
        // picklistValues.pickListMethod(objectName, fieldName);
        //component.set("v.picklistValues", picklistValues.pickListMethod(objectName, fieldName));

        picklistValues.pickListMethod(function (result) {
            console.log("----------$$--------" + result);
            component.set("v.picklistValues", result);
        }, objectName, fieldName);

    },
    onChange: function (component, event, helper) {
        var pickList = component.get("v.picklistValues");
        console.log("====" + JSON.stringify(pickList));
        alert(JSON.stringify(pickList));
        //  var selectedListValue = component.find("picklistValues").get("v.value");
        //  component.set("v.selectedListValue", selectedListValue);
    }
})
child component:
<!--
 - Created by zhezhana on 8/17/2018.
 -->

<aura:component description="workPicklistValue" controller="WorkPicklistController" access="public">

    <aura:method name="pickListMethod" action="{!c.getPickListMethod}">
        <aura:attribute name="callback" type="Function"/>
        <aura:attribute name="objectName" type="Object"/>
        <aura:attribute name="fieldName" type="String"/>
    </aura:method>
</aura:component>
child controller:
/**
 * Created by zhezhana on 8/17/2018.
 */
({
    getPickListMethod: function (component, event, helper) {
        var action = component.get("c.getPicklistValue");
        var params = event.getParam("arguments");
        var callback;
        var objectNames;
        var fieldName;
        var list;
        if (params) {
            callback = params.callback;
            objectNames = params.objectName;
            fieldName = params.fieldName;
        }

        console.log("-----callback-----" + callback);
        console.log("---objectName---" + objectNames);
        console.log("----fieldName----" + fieldName);
        action.setParams({
            objectName: objectNames,
            selectedField: fieldName
        });
        action.setCallback(this, function (response) {
            var state = response.getState();
            if (state === "SUCCESS") {
                list = response.getReturnValue();
                console.log("===getReturnValue=" + JSON.stringify(list));
                if (callback) {
                    console.log("===come into call back=");
                    callback(response.getReturnValue());
                }
                //component.set("v.picklistValues", list);
            } else {
                console.log(state);
            }
        })
        $A.enqueueAction(action);
        //TODO: invoke the server-side action, return a picklist entity array
    }
})
打印的结果如图:

lightning page调用visual force page的url 的方法,在JS操作:
javascript:(function(){
var pageName = prompt('Visualforce page name:');
$A.get("e.force:navigateToURL").setParams(
{"url": "/apex/" + pageName}).fire();}
)();
如需在浏览器控制台调用可以使用此方法,注意需要在lightning环境,不是classic环境,:
$A.get("e.force:navigateToURL").setParams( {"url": "/apex/pageName"}).fire();
Tips:The standardStylesheets attribute of <apex:page>, which determines whether to include or suppress the standard Salesforce Classic stylesheets, is unaffected by Lightning Experience. That is, it defaults to true in Lightning Experience, but you’re able to change it.
Detecting and Responding to the User Experience Context in Visualforce Markup
Use the $User.UITheme and $User.UIThemeDisplayed global variables to determine the current user experience context. You can use these variables in Visualforce expressions to adapt your pages to Lightning Experience, Salesforce Classic, and the Salesforce app.
These global variables return a string that uniquely identifies the current user interface context. The possible values for $User.UITheme and $User.UIThemeDisplayed are the same:
- Theme1—Obsolete Salesforce theme
- Theme2—Salesforce Classic 2005 user interface theme
- Theme3—Salesforce Classic 2010 user interface theme
- Theme4d—Modern “Lightning Experience” Salesforce theme
- Theme4t—Salesforce mobile app theme
- Theme4u—Lightning Console theme
- PortalDefault—Salesforce Customer Portal theme
- Webstore—Salesforce AppExchange theme
The difference between the two variables is that $User.UITheme returns the look and feel the user is supposed to see, while $User.UIThemeDisplayed returns the look and feel the user actually sees. For example, a user may have the preference and permissions to see the Lightning Experience look and feel, but if they are using a browser that doesn’t support that look and feel, for example, older versions of Internet Explorer, $User.UIThemeDisplayed returns a different value. In general, your code should use $User.UIThemeDisplayed.The simplest way to use these theme globals is to use one in a Boolean expression, like {! $User.UIThemeDisplayed == "Theme3" }, in the rendered attribute of a component. The component will only display if the page appears in the desired user interface context.
<apex:outputText value="This is Salesforce Classic."
    rendered="{! $User.UIThemeDisplayed == 'Theme3' }"/>
Although you can use this technique on individual user interface elements, it’s usually more efficient if you wrap larger chunks of markup into an <apex:outputPanel> or similar block-level component, and then create separate blocks for each different UI you want to present. Then place the theme test on the rendered attribute of the blocks, rather than the individual components. Not only should this perform better, your code will be less complicated.
<apex:outputPanel rendered="{! $User.UIThemeDisplayed == 'Theme3' }">
    <apex:outputText value="This is Salesforce Classic."/>
    <apex:outputText value="These are multiple components wrapped by an outputPanel."/>
</apex:outputPanel>
<apex:outputPanel rendered="{! $User.UIThemeDisplayed == 'Theme4d' }">
    <apex:outputText value="Everything is simpler in Lightning Experience."/>
</apex:outputPanel>
Another strategy you can use this with is to dynamically select a stylesheet to include on your page, and provide a different stylesheet for each theme. This is a bit trickier than you might think, because the <apex:stylesheet> tag doesn’t have a rendered attribute of its own. In this case, you must wrap the stylesheet components within another component that does have a rendered attribute. Here’s an example of how to provide a different stylesheet for each of the three modern themes supported by Salesforce.
<apex:page standardController="Account">
    <!-- Salesforce Classic "Aloha" theme -->
    <apex:variable var="uiTheme" value="classic2010Theme"
        rendered="{!$User.UIThemeDisplayed == 'Theme3'}">
        <apex:stylesheet value="{!URLFOR($Resource.AppStyles,
                                         'classic-styling.css')}" />
    </apex:variable>

    <!-- Lightning Desktop theme -->
    <apex:variable var="uiTheme" value="lightningDesktop"
        rendered="{!$User.UIThemeDisplayed == 'Theme4d'}">
        <apex:stylesheet value="{!URLFOR($Resource.AppStyles,
                                         'lightning-styling.css')}" />
    </apex:variable>

    <!-- Salesforce mobile theme -->
    <apex:variable var="uiTheme" value="SalesforceApp"
        rendered="{!$User.UIThemeDisplayed == 'Theme4t'}">
        <apex:stylesheet value="{!URLFOR($Resource.AppStyles,
                                         'mobile-styling.css')}" />
    </apex:variable>
    <!-- Rest of your page -->

    <p>
        Value of $User.UIThemeDisplayed: {! $User.UIThemeDisplayed }
    </p>
</apex:page>
Beyond the Basics
This is an unusual way to use <apex:variable>, because we’re not actually interested in the value of the variable created. Instead we just want a component that doesn’t render any output of its own to wrap the <apex:stylesheet>component. You can think of this as <apex:variable> “lending” its rendered attribute to the wrapped <apex:stylesheet> component.
It’s a good thing we don’t care about the variable itself, because another unusual aspect of wrapping the <apex:variable> component around something else is that the variable isn’t actually created! Feature or bug? Let’s call it...undefined behavior, and avoid using the uiTheme variable elsewhere.
Detecting and Responding to the User Experience Context in JavaScript
Detecting the current user experience context in JavaScript code is important if you’re using JavaScript heavily in your pages and apps. It’s especially important for using the right technique to manage navigation in your JavaScript code.
To detect what the user sees in JavaScript, we use a similar method to determining the current user experience context in Visualforce. Call the UITheme.getUITheme() global variable to return a value that identifies the current user interface theme.
Here the code checks if the current user experience context is the Lightning Experience theme.
function isLightningDesktop() {
  return UITheme.getUITheme === "Theme4d";
}
Determining the User Experience Context in Apex
Use the UserInfo.getUiTheme() and UserInfo.getUiThemeDisplayed() system methods to determine the current user experience context in Apex code. You can use them when your controller action methods or properties need to behave differently in different contexts.
The following example illustrates how to use these methods by making them available via getter methods in a controller extension.
public with sharing class ForceUIExtension {
    // Empty constructor, required for Visualforce controller extension
    public ForceUIExtension(ApexPages.StandardController controller) { }

    // Simple accessors for the System.UserInfo theme methods
    public String getContextUserUiTheme() {
        return UserInfo.getUiTheme();
    }
    public String getContextUserUiThemeDisplayed() {
        return UserInfo.getUiThemeDisplayed();
    }
}
You could of course work with the values in your Apex code, rather than directly returning the method call results.These Apex system methods return a string that uniquely identifies the current user interface context. The possible values returned by these methods are the same as those returned by the $User.UITheme and $User.UIThemeDisplayed global variables.
- Theme1—Obsolete Salesforce theme
- Theme2—Salesforce Classic 2005 user interface theme
- Theme3—Salesforce Classic 2010 user interface theme
- Theme4d—Modern “Lightning Experience” Salesforce theme
- Theme4t—Salesforce mobile app theme
- Theme4u—Lightning Console theme
- PortalDefault—Salesforce Customer Portal theme
- Webstore—Salesforce AppExchange theme
Using these methods in server-side controller code should be rare, at least compared to providing different Visualforce markup or JavaScript code. It’s a best practice for your controller and controller extension code to be neutral in terms of the UX context. Let your front end code, whether Visualforce or JavaScript, handle the user interface differences.
Querying for Lightning Experience via SOQL and API Access
Although we don’t recommend this technique, you can query for the current user’s preferred user experience directly using SOQL.
The basic SOQL query is the following.
SELECT UserPreferencesLightningExperiencePreferred FROM User WHERE Id = 'CurrentUserId'The result is a raw preference value, which you need to convert into something useable.Here’s just about the simplest possible Visualforce page that runs the above SOQL query and displays the result on the page.
<apex:page>
<script src="/soap/ajax/36.0/connection.js" type="text/javascript"></script>
<script type="text/javascript">
    // Query for the preference value
    sforce.connection.sessionId = '{! $Api.Session_ID }';
    var uiPrefQuery = "SELECT Id, UserPreferencesLightningExperiencePreferred " +
                      "FROM User WHERE Id = '{! $User.Id }'";
    var userThemePreferenceResult = sforce.connection.query(uiPrefQuery);

    // Display the returned result on the page
    document.addEventListener('DOMContentLoaded', function(event){
        document.getElementById('userThemePreferenceResult').innerHTML =
            userThemePreferenceResult;
    });
</script>
<h1>userThemePreferenceResult (JSON)</h1>
<pre><span id="userThemePreferenceResult"/></pre>
</apex:page>
Querying for the user’s Lightning Experience preference directly is discouraged. The result tells you what the user’s current preference setting is, not what user experience actually is on their screen. There are several use cases where the preference value might not reflect the user experience that’s actually being delivered. To determine the actual user experience being delivered in the current request, use $User.UIThemeDisplayed or UserInfo.getUiThemeDisplayed().
Salesforce.one
The sforce.one object provides the following functions. Reference the function using dotted notation from the sforce.one object. For example: sforce.one.navigateToSObject(...).
| Function | Description |
|---|---|
| back([refresh]) | Navigates to the previous state that’s saved in the sforce.one history. It’s equivalent to clicking a browser’s Back button. |
| navigateToSObject(recordId[, view]) | Navigates to an sObject record, specified by recordId. |
| navigateToURL(url[, isredirect]) | Navigates to the specified URL. |
| navigateToFeed(subjectId, type) | Navigates to the feed of the specified type, scoped to the subjectId. |
| navigateToFeedItemDetail(feedItemId) | Navigates to the specific feed item, feedItemId, and any associated comments. |
| navigateToRelatedList(relatedListId,parentRecordId) | Navigates to a related list for the parentRecordId. |
| navigateToList(listViewId,listViewName, scope) | Navigates to the list view that’s specified by the listViewId, which is the ID of the list view to be displayed. |
| createRecord(entityName[,recordTypeId]) | Opens the page to create a new record for the specified entityName, for example, “Account” or “MyObject__c”. |
| editRecord(recordId) | Opens the page to edit the record specified by recordId. |
For additional details about using these functions, and the parameters they accept, see Navigation with the sforce.one Object in this unit’s Resources.
| JavaScript Button Top Use Cases | Lightning Alternatives | Declarative/Programmatic |
|---|---|---|
| Validate fields (presave) | Quick actions (using default values and/or formulas) | D |
| Apex triggers | P | |
| Create records with prepopulated values | Quick actions (using default values and/or formulas) | D |
| Redirect to a record page | Custom URL buttons | D |
| Redirect to a Visualforce page | Visualforce quick actions | P |
| Lightning actions | P | |
| Prefill values based on inputs | Lightning actions | P |
| Confirmation pop-up screens | Lightning actions | P |
| API calls (Salesforce and third-party) | Lightning actions | P |
| Feedback pop-up screens | Lightning actions | P |
| Third-party integration | Lightning actions | P |
| Mass actions on list view records | Custom Visualforce buttons on list views | P |
Tips in superbadges:
<lightning:select label="Boat Type" aura:id="boatTypeForm"
                  name="chooseBoatType" variant="label-hidden">
    <aura:iteration items="{!v.boatType}" var="item">
        <option value="{!item.label}">{!item.label}</option>
    </aura:iteration>
</lightning:select>
variant="label-hidden"想要有效果,label必须有值,不能为空。