有关flume的高级文章:美团官网
https://tech.meituan.com/tag/Flume
Flume 的概述:
Flume是一个分布式、可靠、和高可用的海量日志采集、聚合和传输的系统。
Flume可以采集文件,socket数据包等各种形式源数据,又可以将采集到的数据输出到HDFS、hbase、hive、kafka等众多外部存储系统中
一般的采集需求,通过对flume的简单配置即可实现
Flume针对特殊场景也具备良好的自定义扩展能力,因此,flume可以适用于大部分的日常数据采集场景
Flume的运行机制
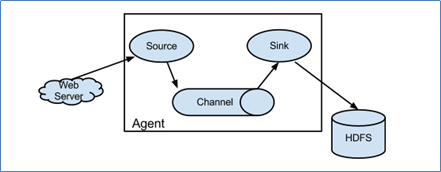
1.Flume分布式系统中最核心的角色就是agent,flume系统就是由一个个agent所连接起来的。
2.每一个agent相当于是一个数据传递员,内部有三个组件:
- Source:数据源,用于跟数据源对接,以获取数据
- Sink:下沉地,采集数据的传送目的,用于往下一级agent传递数据或者往最终存储系统传递数据
- Channel : agent内部的数据传输通道,用于source将数据传递sink。
Flume 采集系统结构:
1.简单结构:单个agent

2.复杂结构:多级agent之间串联

Flume的安装
1、Flume的安装非常简单,只需要解压即可,当然,前提是已有hadoop环境
上传安装包到数据源所在节点上
然后解压 tar -zxvf apache-flume-1.6.0-bin.tar.gz
2、根据数据采集的需求配置采集方案,描述在配置文件中(文件名可任意自定义)
3、指定采集方案配置文件,在相应的节点上启动flume agent
所有的配置文件都写在conf里面
1.先来一个最简单的:
从网络端口接受数据,下沉到logger
vi netcat-logger.cnf
这个配置文件的名字是可以随便写的,启动的时候要指定这个配置文件就行
# Name the components on this agent
#给那三个组件取个名字
a1.sources = r1
a1.sinks = k1
a1.channels = c1

# Describe/configure the source
#类型, 从网络端口接收数据,在本机启动, 所以localhost, type=spoolDir采集目录源,目录里有就采
a1.sources.r1.type = netcat
a1.sources.r1.bind = localhost
a1.sources.r1.port = 44444

# Describe the sink
a1.sinks.k1.type = logger

# Use a channel which buffers events in memory
#下沉的时候是一批一批的, 下沉的时候是一个个eventChannel参数解释:
#capacity:默认该通道中最大的可以存储的event数量
#trasactionCapacity:每次最大可以从source中拿到或者送到sink中的event数量
a1.channels.c1.type = memory
a1.channels.c1.capacity = 1000
a1.channels.c1.transactionCapacity = 100

# Bind the source and sink to the channel
a1.sources.r1.channels = c1
a1.sinks.k1.channel = c1
启动命令:
$ bin/flume-ng agent --conf conf --conf-file conf/netcat-logger.conf --name a1
-Dflume.root.logger=INFO,console
-c conf   指定flume自身的配置文件所在目录
-f conf/netcat-logger.con  指定我们所描述的采集方案
-n a1  指定我们这个agent的名字
接受到的数据就会打印在控制台

由于你配置的是localhost
你可以再开一个窗口,使用ternet ip 端口号 用来传输数据
ternet localhost 44444
然后往里面传输数据就行。
但是如果你还想采集别的机器上的日志,那么你的名字就不能配置成localhost,而应该配置成hostname,并且另一台机器必须在host文件有这台机器的主机名。
此时这台机器使用ternet localhost 44444 是无法连接的。也得使用主机名。
监控一个文件夹:
配置文件:
vi spool-logger.conf
# Name the components on this agent
a1.sources = r1
a1.sinks = k1
a1.channels = c1

# Describe/configure the source
#监听目录,spoolDir指定目录, fileHeader要不要给文件夹前坠名
a1.sources.r1.type = spooldir
a1.sources.r1.spoolDir = /home/hadoop/flumespool
a1.sources.r1.fileHeader = true

# Describe the sink
a1.sinks.k1.type = logger

# Use a channel which buffers events in memory
a1.channels.c1.type = memory
a1.channels.c1.capacity = 1000
a1.channels.c1.transactionCapacity = 100

# Bind the source and sink to the channel
a1.sources.r1.channels = c1
a1.sinks.k1.channel = c1
注意在启动的时候,应该保证监控的这个文件夹是存在的。
启动命令:
bin/flume-ng agent -c ./conf -f ./conf/spool-logger.conf -n a1 -Dflume.root.logger=INFO,console
此时在这个文件夹里面新增数据就会采集到
将数据下沉到hdfs
vi tail-hdfs.conf
配置文件:下面的配置数值是为了测试看出效果才写的,实际配置的数值是要改的
# Name the components on this agent
a1.sources = r1
a1.sinks = k1
a1.channels = c1

# Describe/configure the source
a1.sources.r1.type = exec
a1.sources.r1.command = tail -F /home/hadoop/log/test.log
a1.sources.r1.channels = c1

# Describe the sink
a1.sinks.k1.type = hdfs
a1.sinks.k1.channel = c1
a1.sinks.k1.hdfs.path = /flume/events/%y-%m-%d/%H%M/
a1.sinks.k1.hdfs.filePrefix = events-
a1.sinks.k1.hdfs.round = true
a1.sinks.k1.hdfs.roundValue = 10
a1.sinks.k1.hdfs.roundUnit = minute
a1.sinks.k1.hdfs.rollInterval = 3
a1.sinks.k1.hdfs.rollSize = 20
a1.sinks.k1.hdfs.rollCount = 5
a1.sinks.k1.hdfs.batchSize = 1
a1.sinks.k1.hdfs.useLocalTimeStamp = true
#生成的文件类型,默认是Sequencefile,可用DataStream,则为普通文本
a1.sinks.k1.hdfs.fileType = DataStream


# Use a channel which buffers events in memory
a1.channels.c1.type = memory
a1.channels.c1.capacity = 1000
a1.channels.c1.transactionCapacity = 100

# Bind the source and sink to the channel
a1.sources.r1.channels = c1
a1.sinks.k1.channel = c1
在 /home/hadoop/log 里面生成日志:
不断生成模拟日志的shell
while true; do echo 1111111 >> test.log ; sleep 1; done
启动命令:
bin/flume-ng agent -c conf -f conf/tail-hdfs.conf -n a1
观察效果:

绑定了0.0.0.0 就是绑定了这台机器host文件里面配置的所有的主机名。
串联组合:
我们测试使用简单的,在bd3上发送数据给bd4,数据是在bd3上产生测,传输到bd4之后,再将数据下城到bd4上打印出来,也可以使用hdfs
bd3:配置文件:
vi tail-avro-avro-logger.conf
从tail命令获取数据发送到avro端口
另一个节点可配置一个avro源来中继数据,发送外部存储


##################
# Name the components on this agent
a1.sources = r1
a1.sinks = k1
a1.channels = c1

# Describe/configure the source
a1.sources.r1.type = exec
a1.sources.r1.command = tail -F /home/hadoop/log/test.log
a1.sources.r1.channels = c1

# Describe the sink
a1.sinks = k1
a1.sinks.k1.type = avro
a1.sinks.k1.channel = c1
a1.sinks.k1.hostname = hadoop01
a1.sinks.k1.port = 4141
a1.sinks.k1.batch-size = 2


# Use a channel which buffers events in memory
a1.channels.c1.type = memory
a1.channels.c1.capacity = 1000
a1.channels.c1.transactionCapacity = 100

# Bind the source and sink to the channel
a1.sources.r1.channels = c1
a1.sinks.k1.channel = c1
启动命令:
bin/flume-ng agent -c conf -f conf/tail-avro-avro-logger.conf -n a1
bd4上的配置文件:
vi avro-logger.conf
从avro端口接收数据,下沉到logger


采集配置文件,avro-hdfs.conf

# Name the components on this agent
a1.sources = r1
a1.sinks = k1
a1.channels = c1

# Describe/configure the source
a1.sources.r1.type = avro
a1.sources.r1.channels = c1
a1.sources.r1.bind = 0.0.0.0
a1.sources.r1.port = 4141

# Describe the sink
a1.sinks.k1.type = logger

# Use a channel which buffers events in memory
a1.channels.c1.type = memory
a1.channels.c1.capacity = 1000
a1.channels.c1.transactionCapacity = 100

# Bind the source and sink to the channel
a1.sources.r1.channels = c1
a1.sinks.k1.channel = c1
bd4的启动命令:
bin/flume-ng agent -c conf -f conf/avro-logger.conf -n a1 -Dflume.root.logger=INFO,console
先启动bd4 ,bd4是接受数据下沉数据的。