flume安装配置
一:下载
下载地址:http://www.apache.org/dyn/closer.lua/flume/1.8.0/apache-flume-1.8.0-bin.tar.gz

二:解压
[root@s100 ~]# tar -zxvf apache-flume-1.8.0-bin.tar.gz -C /usr/local/
改名为flume方便以后操作
[root@s100 local]# pwd
/usr/local
[root@s100 local]# ls
apache-flume-1.8.0-bin  etc    hadoop  hive      include  lib    libexec  share
bin                     games  hbase   hive.bak  java     lib64  sbin     src
[root@s100 local]# mv apache-flume-1.8.0-bin flume
三:配置环境变量
[root@s100 conf]# vim /etc/profile
 #flume
 export FLUME_HOME=/usr/local/flume
 export PATH=$PATH:$FLUME_HOME/bin
执行:
[root@s100 conf]# source /etc/profile
四:配置flume
[root@s100 conf]# pwd
/usr/local/flume/conf
[root@s100 conf]# ls
flume-conf.properties.template  flume-env.sh.template
flume-env.ps1.template          log4j.properties
在flume的配置文件下有一个 flume-conf.properties.template 文件,里面是关于flume配置的模板
根据模板文件,我们配置一个netcat并使用flume收集日志
[root@s100 conf]# vim r_nc.conf
根据模板内容,配置信息如下:
# The configuration file needs to define the sources,
# the channels and the sinks.
# Sources, channels and sinks are defined per agent,
# in this case called 'agent'

#声明三类组件
agent.sources = r1
agent.channels = c1
agent.sinks = k1

#配置source-r1组件
agent.sources.r1.type = netcat
agent.sources.r1.bind = localhost
agent.sources.r1.port = 10000#端口号,启动成功有提示

#配置channel-c1组件
agent.channels.c1.type = memory

#配置sink-k1组件
agent.sinks.k1.type = logger

#绑定:注意r1和k1后面的s
agent.sources.r1.channels = c1
agent.sinks.k1.channel = c1
五:flume启动
[root@s100 conf]# flume-ng agent -f r_nv.conf -n agent -Dflume.root.logger=INFO.console
格式:flume-ng agent -f 指定文件名称(地址,这里因为r_nv.conf是在conf下,所以是跟的r_nv.conf) -n 名称(就是agent.sources = r1中的agent)-Dflume.root.logger=INFO.consloe
...
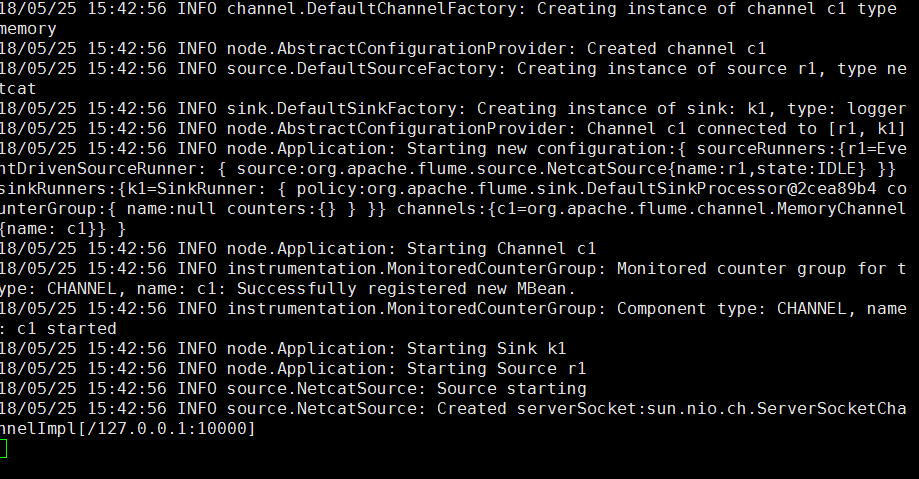
18/05/25 15:42:56 INFO node.Application: Starting Sink k1 18/05/25 15:42:56 INFO node.Application: Starting Source r1 18/05/25 15:42:56 INFO source.NetcatSource: Source starting 18/05/25 15:42:56 INFO source.NetcatSource: Created serverSocket:sun.nio.ch.ServerSocketChannelImpl[/127.0.0.1:10000]
这里有127.0.0.1:10000表示启动成功
六:本机的flume端口查询和flume的结果
扫描二维码关注公众号,回复:
1092169 查看本文章

打开一个新的shell窗口(不要关闭原来的flume,因为我们将数据校验过程打印在console中)
[root@s100 ~]# netstat -anpt | grep 1000
tcp        0      0 ::ffff:127.0.0.1:10000      :::*                        LISTEN      59845/java
端口存在
flume日志监控结果查询
注意:Ubuntu下安装netcat:apt-get -y install netcat-traditional
在netcat服务存在的情况下执行:[root@s100 ~]# nc localhost 10000
本文版权声明:
本文作者:魁·帝小仙
博文主页地址:http://www.cnblogs.com/dxxblog/
欢迎对小博主的博客内容批评指点,如果问题,可评论或邮件联([email protected])
欢迎转载,转载请在文章页面明显位置给出原文链接,谢谢