1、参考博客
https://blog.csdn.net/moqiang02/article/details/42846221
2、使用第一种方式注意点
在主备切换的方式下需要指定备用节点
upstream mysvr {
	server 192.168.0.104:8080;
	server 192.168.0.104:8081 backup;
    }
location /examples {
           # root   html;
            index  index.html index.htm;
	    proxy_pass  http://mysvr;
        }
proxy_connect_timeout 、proxy_read_timeout、max_fails=1 fail_timeout=10s可以根据具体情况设置
3、使用第二种方式需要安装第三方模块
安装nginx的命令:
yum -y install make zlib zlib-devel gcc-c++ libtool openssl openssl-devel
[root@luculent src]# wget http://downloads.sourceforge.net/project/pcre/pcre/8.35/pcre-8.35.tar.gz[root@luculent src]# tar zxvf pcre-8.35.tar.gz[root@luculent src]# cd pcre-8.35
[root@luculent pcre-8.35]# ./configure
[root@luculent pcre-8.35]# make && make install
[root@luculent pcre-8.35]# pcre-config --version[root@luculent src]# wget http://nginx.org/download/nginx-1.6.2.tar.gz
[root@luculent src]# tar zxvf nginx-1.6.2.tar.gz[root@luculent src]# cd nginx-1.6.2[root@luculent nginx-1.6.2]# ./configure --prefix=/usr/local/webserver/nginx --with-http_stub_status_module --with-http_ssl_module --with-pcre=/usr/local/src/pcre-8.35
[root@luculent nginx-1.6.2]# make
[root@luculent nginx-1.6.2]# make install[root@bogon nginx-1.6.2]# /usr/local/webserver/nginx/sbin/nginx -v安装 nginx_upstream_check_module模块
[root@luculent ~]# cd /usr/local/src
[root@luculent src]# wget https://codeload.github.com/yaoweibin/nginx_upstream_check_module/zip/master
[root@luculent src]# unzip master
[root@luculent src]# ll -d nginx_upstream_check_module-master
drwxr-xr-x. 6 root root 4096 Dec  1 02:28 nginx_upstream_check_module-master
为nginx打补丁
[root@luculent /usr/local/src]# cd nginx-1.6.2 # 进入nginx的源码目录
[root@luculent nginx-1.6.2]# patch -p1 < ../nginx_upstream_check_module-master/check_1.5.12+.patch
[root@luculent nginx-1.6.2]# ./configure --prefix=/usr/local/webserver/nginx --with-http_stub_status_module --with-http_ssl_module --with-pcre=/usr/local/src/pcre-8.35 --add-module=../nginx_upstream_check_module-master/(编译参数需要和之前的一样)
[root@luculent nginx-1.6.2]make (注意:此处只make)
[root@luculent nginx-1.6.2]# ps -ef|grep nginx(查看nginx进程)
[root@luculent nginx-1.6.2]# kill -9 1523(上面进程)
[root@luculent nginx-1.6.2]# cp ./objs/nginx /usr/local/webserver/nginx/sbin/
修改/usr/local/webserver/nginx/conf/nginx.conf
upstream mysvr {
server 192.168.0.104:8080;
server 192.168.0.104:8081 backup;
check interval=3000 rise=2 fall=5 timeout=1000 type=http;
}
location /examples {
# root html;
index index.html index.htm;
proxy_pass http://mysvr;
}
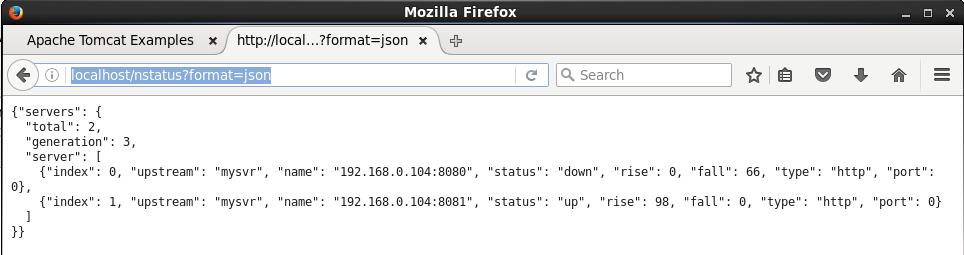
location /nstatus {
check_status;
access_log off;
#allow IP;
# #deny all;
#
}
[root@luculent nginx-1.6.2]# /usr/local/webserver/nginx/sbin/nginx -s reload访问
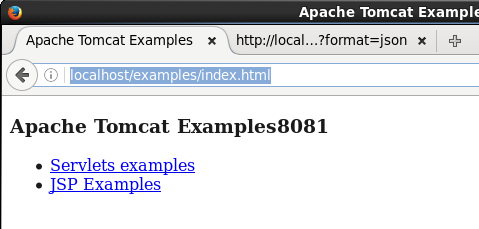
http://localhost/examples/index.html

关闭8080tomcat再次访问
访问http://localhost/nstatus?format=json
注意:
1、主要定义好type。由于默认的type是tcp类型,因此假设你服务启动,不管是否初始化完毕,它的端口都会起来,所以此时前段负载均衡器为认为该服务已经可用,其实是不可用状态。
2、注意check_http_send值的设定。由于它的默认值是"GET / HTTP/1.0\r\n\r\n"。假设你的应用是通过http://ip/name访问的,那么这里你的check_http_send值就需要更改为"GET /name HTTP/1.0\r\n\r\n"才可以。针对采用长连接进行检查的,这里增加keep-alive请求头,即"HEAD /name HTTP/1.1\r\nConnection: keep-alive\r\n\r\n"。如果你后端的tomcat是基于域名的多虚拟机,此时你需要通过check_http_send定义host,不然每次访问都是失败,范例:check_http_send "GET /mobileapi HTTP/1.0\r\n HOST www.redhat.sx\r\n\r\n";