HyperLeger Fabric开发(九)——HyperLeger Fabric部署实战(单机)
系统环境:RHEL 7.3操作系统Fabric release 1.3
一、crypto-config.yaml文件
1、Orderer节点组织
(1)单节点
OrdererOrgs:
  - Name: Orderer
    Domain: example.com
    Specs:
      - Hostname: orderer
(2)多节点
OrdererOrgs:
  - Name: Orderer
    Domain: example.com
    Specs:
      - Hostname: orderer1
      - Hostname: orderer2
      - Hostname: orderer3
排序组织节点全限定域名为Hostname + Domain
(3)重写全限定域名
# CommonName
# 默认值为 {{.Hostname}}.{{.Domain}}
OrdererOrgs:
  - Name: Orderer
    Domain: example.com
    Specs:
      - Hostname: orderer
        CommonName: myorderer.example.com
(4)替换Specs为Template配置式
# Template 使用模板定义节点
# Count 节点总数
# Start 节点下标起始值
# Hostname 全限定域名 命名格式
# Prefix 默认 peer
# Index 取Start值 无配置从1开始自增
OrdererOrgs:
  - Name: Orderer
    Domain: example.com
    Template:
      Count: 2
      # Start: 5
      # Hostname: {{.Prefix}}{{.Index}} # default
2、Peer节点组织
# Domain 参考OrdererOrgs
# EnableNodeOUs 允许节点 OUS -> out of service
# Template 参考OrdererOrgs 可替换为Specs配置式
# Users -> Count 添加到管理员的用户帐户数
PeerOrgs:
  - Name: Org1
    Domain: org1.example.com
    EnableNodeOUs: true
    Template:
      Count: 2
    Users:
      Count: 1
  - Name: Org2
    Domain: org2.example.com
    EnableNodeOUs: true
    Template:
      Count: 2
    Users:
      Count: 1
四个节点的全限定域名为
peer0.org1.example.com
peer1.org1.example.com
peer0.org2.example.com
peer1.org2.example.com
Template Count=2表示为组织生成2套公私钥和证书。Users Count=1表示每个Template包含的普通User(Admin不包含在计数中)数量为1,即普通用户[email protected]。
二、公私钥、证书生成
1、公私钥、证书简介
Fabric中有两种类型的公私钥和证书,一种是给节点之前通讯安全而准备的TLS证书,另一种是用户登录和权限控制的用户证书。证书本来应该是由CA来颁发,但目前只有两个社区,所以目前暂时没有启用CA节点,但Fabric提供了一个crytogen工具来生成证书。
2、crypto-config.yaml文件编写
HyperLedger官方在fabric-samples/first-network目录下提供了一份供cryptogen工具使用的配置文件crypto-config.yaml,文件包含需要生成证书和公私钥的Orderer组织与Peer组织配置。配置文件内容如下:
# 管理排序节点的组织
OrdererOrgs:
  # 定义第一个排序节点组织
  - Name: Orderer
    Domain: example.com
    Specs:
      - Hostname: orderer

# 管理Peer节点的组织
PeerOrgs:
  # 定义第一个组织
  - Name: Org1
    Domain: org1.example.com
    EnableNodeOUs: true
    Template:
      Count: 2
    Users:
      Count: 1
  # 定义第二个组织
  - Name: Org2
    Domain: org2.example.com
    EnableNodeOUs: true
    Template:
      Count: 2
    Users:
      Count: 1
crypto-config.yaml文件包含Orderer组织配置(包含1个Orderer)和Peer组织的配置(包含2个Peer组织org1、org2)。
Name:定义名称
Domain与Hostname:组合构成节点的名称,即生成的目录名称。
Template Count:用来指定每个org下所拥有的节点数,本例配置每个org各2个Peer。
Users Count:用来指定添加进节点的默认用户数
使用cryptogen可以生成crypto-config.yaml文件模板,命令如下:
cryptogen showtemplate > crypto-config.yaml3、公私钥、证书生成
公私钥、证书生成命令如下:cryptogen generate --config=./crypto-config.yaml
生成的目录路径为fabric-samples/first-network/crypto-config
证书代表身份,用来在实体间进行通信以及交易的时候进行签名与验证身份。
查看证书文件(数字证书是经过CA认证过的公钥)的标准为X.509,编码格式为pem,以-----BEGIN开头,以-----END结尾。X.509数字证书不但包括用户名和公共密钥,而且还包括有关该用户的其它信息。数字证书除了扩展名为PEM,也可以是CRT、KEY。
CRT:Certificate缩写,PEM编码格式。
KEY:用来存放一个公钥或私钥,并非X.509证书,PEM格式。
证书的默认签名算法为ECDSA,Hash算法为SHA-256。Fabric中设计了三种类型证书:
登记证书(ECert):颁发给提供了注册凭证的用户或节点实体,长期有效。(主要就是通ECert对实体身份检验)
通信证书(TLSCert):TLS证书用来保障通信链路安全,控制对网络层的接入访问,可以对远端实体身份校验,防止窃听。
交易证书(TCert):颁发给用户,控制每个交易的权限,一般针对某个交易,短期有效。(此功能Fabric还暂未启用)
在ChainCode里可以通过shim API的GetCreator函数提取调用当前交易的客户端的×××书,使用GO语言的pem包将证书解码,然后使用x.509包解析证书中的信息。
生成crypto-config目录如下:
├── ordererOrganizations
│   └── example.com
│       ├── ca
│       │   ├── 705338b2bb55ab5ea4045260ec511cdd4adea4b268be0764e7608934ecc656d8_sk
│       │   └── ca.example.com-cert.pem
│       ├── msp
│       │   ├── admincerts
│       │   │   └── [email protected]
│       │   ├── cacerts
│       │   │   └── ca.example.com-cert.pem
│       │   └── tlscacerts
│       │       └── tlsca.example.com-cert.pem
│       ├── orderers
│       │   └── orderer.example.com
│       │       ├── msp
│       │       │   ├── admincerts
│       │       │   │   └── [email protected]
│       │       │   ├── cacerts
│       │       │   │   └── ca.example.com-cert.pem
│       │       │   ├── keystore
│       │       │   │   └── 2f0b6bbf98dd6336af2aac04066f58635a46a1d9442a5b68b84c3dce177afa10_sk
│       │       │   ├── signcerts
│       │       │   │   └── orderer.example.com-cert.pem
│       │       │   └── tlscacerts
│       │       │       └── tlsca.example.com-cert.pem
│       │       └── tls
│       │           ├── ca.crt
│       │           ├── server.crt
│       │           └── server.key
│       ├── tlsca
│       │   ├── eb30f77a962408e9d068452478556ff937941ac737d354871cf464a8e7986842_sk
│       │   └── tlsca.example.com-cert.pem
│       └── users
│           └── [email protected]
│               ├── msp
│               │   ├── admincerts
│               │   │   └── [email protected]
│               │   ├── cacerts
│               │   │   └── ca.example.com-cert.pem
│               │   ├── keystore
│               │   │   └── ef96219b1fd2fb9f5e35ef0e78395bd5b7d6658c0f42676905f2bca21a3f57d4_sk
│               │   ├── signcerts
│               │   │   └── [email protected]
│               │   └── tlscacerts
│               │       └── tlsca.example.com-cert.pem
│               └── tls
│                   ├── ca.crt
│                   ├── client.crt
│                   └── client.key
└── peerOrganizations
├── org1.example.com
│   ├── ca
│   │   ├── 9bdc3eb7bf1c0c8ca37ef2308bf3ba4279f6c6434bc6f75feedc66c7d8ceffb4_sk
│   │   └── ca.org1.example.com-cert.pem
│   ├── msp
│   │   ├── admincerts
│   │   │   └── [email protected]
│   │   ├── cacerts
│   │   │   └── ca.org1.example.com-cert.pem
│   │   ├── config.yaml
│   │   └── tlscacerts
│   │       └── tlsca.org1.example.com-cert.pem
│   ├── peers
│   │   ├── peer0.org1.example.com
│   │   │   ├── msp
│   │   │   │   ├── admincerts
│   │   │   │   │   └── [email protected]
│   │   │   │   ├── cacerts
│   │   │   │   │   └── ca.org1.example.com-cert.pem
│   │   │   │   ├── config.yaml
│   │   │   │   ├── keystore
│   │   │   │   │   └── b5549b156ed07dd8484234a1247c83dd03b5f0711f5c287eb9412780e244c59c_sk
│   │   │   │   ├── signcerts
│   │   │   │   │   └── peer0.org1.example.com-cert.pem
│   │   │   │   └── tlscacerts
│   │   │   │       └── tlsca.org1.example.com-cert.pem
│   │   │   └── tls
│   │   │       ├── ca.crt
│   │   │       ├── server.crt
│   │   │       └── server.key
│   │   └── peer1.org1.example.com
│   │       ├── msp
│   │       │   ├── admincerts
│   │       │   │   └── [email protected]
│   │       │   ├── cacerts
│   │       │   │   └── ca.org1.example.com-cert.pem
│   │       │   ├── config.yaml
│   │       │   ├── keystore
│   │       │   │   └── 8fd0ffd3b475955a61de020f3174f31edd509749ee01a1caf4565e99d515dc08_sk
│   │       │   ├── signcerts
│   │       │   │   └── peer1.org1.example.com-cert.pem
│   │       │   └── tlscacerts
│   │       │       └── tlsca.org1.example.com-cert.pem
│   │       └── tls
│   │           ├── ca.crt
│   │           ├── server.crt
│   │           └── server.key
│   ├── tlsca
│   │   ├── 9a4a1c0f9bb06e6f4f08e94bddc6a69adf2426de9d0c19c1f0d5223d69e5b9a5_sk
│   │   └── tlsca.org1.example.com-cert.pem
│   └── users
│       ├── [email protected]
│       │   ├── msp
│       │   │   ├── admincerts
│       │   │   │   └── [email protected]
│       │   │   ├── cacerts
│       │   │   │   └── ca.org1.example.com-cert.pem
│       │   │   ├── keystore
│       │   │   │   └── f97f63bb97d902e3a444b28cd344f9196d0a03793e380162bc1e415fc7dba64c_sk
│       │   │   ├── signcerts
│       │   │   │   └── [email protected]
│       │   │   └── tlscacerts
│       │   │       └── tlsca.org1.example.com-cert.pem
│       │   └── tls
│       │       ├── ca.crt
│       │       ├── client.crt
│       │       └── client.key
│       └── [email protected]
│           ├── msp
│           │   ├── admincerts
│           │   │   └── [email protected]
│           │   ├── cacerts
│           │   │   └── ca.org1.example.com-cert.pem
│           │   ├── keystore
│           │   │   └── 88e6d225882f7d162f48108c0a7181d6f56984764a990618a0dd2607f2a18488_sk
│           │   ├── signcerts
│           │   │   └── [email protected]
│           │   └── tlscacerts
│           │       └── tlsca.org1.example.com-cert.pem
│           └── tls
│               ├── ca.crt
│               ├── client.crt
│               └── client.key
└── org2.example.com
├── ca
│   ├── b5116bb58cd2927a0e2d64c40646f26bd5759ea96e65e30473c92aecadabd868_sk
│   └── ca.org2.example.com-cert.pem
├── msp
│   ├── admincerts
│   │   └── [email protected]
│   ├── cacerts
│   │   └── ca.org2.example.com-cert.pem
│   ├── config.yaml
│   └── tlscacerts
│       └── tlsca.org2.example.com-cert.pem
├── peers
│   ├── peer0.org2.example.com
│   │   ├── msp
│   │   │   ├── admincerts
│   │   │   │   └── [email protected]
│   │   │   ├── cacerts
│   │   │   │   └── ca.org2.example.com-cert.pem
│   │   │   ├── config.yaml
│   │   │   ├── keystore
│   │   │   │   └── 1afc87575ab9ea9a55d245c6635a4282ce3f190d05ebb2aac4826723321b792b_sk
│   │   │   ├── signcerts
│   │   │   │   └── peer0.org2.example.com-cert.pem
│   │   │   └── tlscacerts
│   │   │       └── tlsca.org2.example.com-cert.pem
│   │   └── tls
│   │       ├── ca.crt
│   │       ├── server.crt
│   │       └── server.key
│   └── peer1.org2.example.com
│       ├── msp
│       │   ├── admincerts
│       │   │   └── [email protected]
│       │   ├── cacerts
│       │   │   └── ca.org2.example.com-cert.pem
│       │   ├── config.yaml
│       │   ├── keystore
│       │   │   └── 73ebe67ce05bcd196850adc3b8d8396d61574e5668005f932d26073d6bde8bf5_sk
│       │   ├── signcerts
│       │   │   └── peer1.org2.example.com-cert.pem
│       │   └── tlscacerts
│       │       └── tlsca.org2.example.com-cert.pem
│       └── tls
│           ├── ca.crt
│           ├── server.crt
│           └── server.key
├── tlsca
│   ├── b9c54fa6859f886073a928786d541b7a885c5238b0d117d3aafb7989a1172471_sk
│   └── tlsca.org2.example.com-cert.pem
└── users
├── [email protected]
│   ├── msp
│   │   ├── admincerts
│   │   │   └── [email protected]
│   │   ├── cacerts
│   │   │   └── ca.org2.example.com-cert.pem
│   │   ├── keystore
│   │   │   └── c52eab0380ac1bc6918893403c5ba9c076634f82b1af161740ae9cb05ff2fada_sk
│   │   ├── signcerts
│   │   │   └── [email protected]
│   │   └── tlscacerts
│   │       └── tlsca.org2.example.com-cert.pem
│   └── tls
│       ├── ca.crt
│       ├── client.crt
│       └── client.key
└── [email protected]
  ├── msp
  │   ├── admincerts
  │   │   └── [email protected]
  │   ├── cacerts
  │   │   └── ca.org2.example.com-cert.pem
  │   ├── keystore
  │   │   └── 919400ca0386ba0d44ff8d01c1636325d0c96f03766b35e4fdec3940e02e97e5_sk
  │   ├── signcerts
  │   │   └── [email protected]
  │   └── tlscacerts
  │       └── tlsca.org2.example.com-cert.pem
  └── tls
      ├── ca.crt
      ├── client.crt
      └── client.key
三、证书的结构
1、组织的证书结构
每个组织都会生成单独的根证书。
(1)ca
ca目录存放组织的根证书和对应的私钥文件,采用EC算法,证书为自签名(自已签发自己的公钥)。组织内的实体将基于该证书作为根证书。
(2)msp
msp目录存放代表该组织的身份信息。
A、admincerts:存放被根证书签名的组织管理员的身份验证证书。
B、cacerts:存放组织的根证书,与ca目录下的根证书文件相同。
C、tlscacerts:用于TLS的ca证数,证书为自签名。
(3)peers(orders)
每个Orderer或Peer节点的证书结构都是相同的,包括msp和tls目录。
(4)tlsca
存放组织的TLS证书。
(5)users
用于存放属于该组织的用户实体。
2、Peer节点的证书结构
每个Orderer或Peer节点的证书结构都是相同的,包括msp和tls目录。
(1)、msp:
admincerts:存放组织管理员的身份验证证书,用于验证交易签名者是否为管理员身份。
cacerts:存放组织的根证书。
keystore:本节点的身份私钥,用来签名。
signcerts:验证本节点签名的证书,被组织根证书签名。
tlscacerts:TLS连接用的×××书,即组织的TLS证书。
(2)、tls
存放tls相关的证书和私钥。
ca.crt:组织的根证书。
server.crt:验证本节点签名的证书,被组织根证书签名。
server.key:本节点的身份私钥,用来签名。
3、用户实体的证书结构
(1)[email protected]br/>A、msp
admincerts:存放管理员×××书[email protected]。
cacerts:存放组织的根证书ca.org1.example.com-cert.pem。br/>keystore:存放本用户的身份私钥,用来签名。
signcerts:存放管理员用户的身份验证证书[email protected],由组织根证书签名,要放到Peer节点的msp/admincerts下才会被Peer节点认可。
tlscacerts:TLS连接用的×××书,即组织TLS证书tlsca.org1.example.com-cert.pem。
B、tls
ca.crt:组织的根证书。
client.crt: 管理员用户的身份验证证书,由组织根证书签名。br/>client.key:管理员的身份私钥,用来签名。
(2)[email protected]
A、mspbr/>admincerts:用户×××书[email protected]。
cacerts:存放组织的根证书ca.org1.example.com-cert.pem。br/>keystore:本用户的身份私钥,用来签名。
signcerts:用户的身份验证证书[email protected],由组织根证书签名。
tlscacerts:TLS连接用的×××书,即组织TLS证书tlsca.org1.example.com-cert.pem。
B、tls
ca.crt:组织的根证书。
client.crt: 用户的身份验证证书,由组织根证书签名。
client.key:用户身份私钥,用来签名。
四、configtx.yaml文件
1、configtx.yaml文件简介
configtx.yaml文件定义了将要创建通道的配置信息,通常包括以下部分:
A、Profiles:包含了通道的配置模板,通过configtxgen工具的参数 -profile来指定使用哪个模板。
B、Organizations: 定义了组织以及相应的MSP。
C、Orderer: 定义系统通道的相关配置,如排序节点地址、共识算法。
D、Application: 定义应用通道相关配置,被Profiles引用。
2、Organization
Organizations主要定义一系列的组织结构,根据服务对象类型的不同,分为Orderer 组织和普通应用组织,Orderer类型组织包括名称、ID、MSP目录路径、管理员策略等,应用类型组织还会配置锚节点信息。Organizations所定义的组织会被Profiles部分使用。
Organizations:
    - &OrdererOrg
        Name: OrdererOrg
        ID: OrdererMSP
        MSPDir: crypto-config/ordererOrganizations/example.com/msp
    - &Org1
        Name: Org1MSP
        ID: Org1MSP
        MSPDir: crypto-config/peerOrganizations/org1.example.com/msp
        AnchorPeers:
            - Host: peer0.org1.example.com
              Port: 7051
    - &Org2
        Name: Org2MSP
        ID: Org2MSP
        MSPDir: crypto-config/peerOrganizations/org2.example.com/msp
        AnchorPeers:
            - Host: peer0.org2.example.com
              Port: 7051
3、Orderer
Orderer部分定义Orderer系统通道自身的配置信息,包括Orderer类型、地址、批处理限制、Kafka信息、最大应用通道数目等,参与到此Orderer的组织信息。
Orderer: &OrdererDefaults
    OrdererType: solo
    Addresses:
        - orderer.example.com:7050
    BatchTimeout: 2s
    BatchSize:
        MaxMessageCount: 10
        AbsoluteMaxBytes: 99 MB
        PreferredMaxBytes: 512 KB
    Kafka:
        Brokers:
            - 127.0.0.1:9092
    Organizations:
4、Application
Application定义应用通道相关配置,被Profiles引用。
Application: &ApplicationDefaults
    Organizations:
5、Profiles
Profiles定义了系统通道和应用通道两种不同类型的通道。系统通道必须定义Orderer和Consortiums两部分,应用通道必须定义Application和Consortium两部分。
Profiles:
    TwoOrgsOrdererGenesis:
        Orderer:
            <<: *OrdererDefaults
            Organizations:
                - *OrdererOrg
        Consortiums:
            SampleConsortium:
                Organizations:
                    - *Org1
                    - *Org2
    TwoOrgsChannel:
        Consortium: SampleConsortium
        Application:
            <<: *ApplicationDefaults
            Organizations:
                - *Org1
                - *Org2
应用通道模板中必须包括Orderer和Consortiums信息。
Orderer:指定Orderer系统通道自身的配置信息,通常引用Orderer部分的定义以及Organizations部分的定义。网络启动时,必须首先创Orderer系统通道。
Consortiums: Orderer所服务的联盟列表。每个联盟中组织彼此使用相同的通道创建策略,可以彼此创建应用通道。
应用通道模板中必须包括Application、Consortium信息:
Application:指定属于某应用通道的信息,主要包括属于通道的组织信息。
Consortium:应用通道所关联的联盟的名称。
6、configtx.yaml实例
Organizations:
    - &OrdererOrg
        Name: OrdererOrg
        ID: OrdererMSP # MSP ID
        MSPDir: crypto-config/ordererOrganizations/example.com/msp #MSP相关文件本地路径
    - &Org1
        Name: Org1MSP
        ID: Org1MSP
        MSPDir: crypto-config/peerOrganizations/org1.example.com/msp
        AnchorPeers: #锚节点地址,用于跨组织的Gossip通信
            - Host: peer0.org1.example.com
              Port: 7051
    - &Org2
        Name: Org2MSP
        ID: Org2MSP
        MSPDir: crypto-config/peerOrganizations/org2.example.com/msp
        AnchorPeers: #锚节点地址,用于跨组织的Gossip通信
            - Host: peer0.org2.example.com
              Port: 7051
Orderer: &OrdererDefaults
    OrdererType: solo # Orderer共识插件类型,分solo或kafka
    Addresses:
        - orderer.example.com:7050 #服务地址
    BatchTimeout: 2s #出块间隔
    BatchSize: #写入区块内的交易个数
        MaxMessageCount: 10 #一批消息的最大个数
        AbsoluteMaxBytes: 98 MB #一批交易的最大字节数,任何时候均不能超过
        PreferredMaxBytes: 512 KB #批量交易的建议字节数
    Kafka:
        Brokers: #Kafka端口
            - 127.0.0.1:9092
    Organizations: #参与维护Orderer的组织,默认空

Application: &ApplicationDefaults
    Organizations: #加入到通道的组织信息,此处为不包括任何组织

Profiles:
    TwoOrgsOrdererGenesis: #Orderer系统通道配置
        Orderer:
            <<: *OrdererDefaults #引用OrdererDefaults并合并到当前
            Organizations: #属于Orderer通道的组织
                - *OrdererOrg
        Consortiums: #Orderer所服务的联盟列表
            SampleConsortium:
                Organizations:
                    - *Org1
                    - *Org2
    TwoOrgsChannel: #应用通道配置
        Consortium: SampleConsortium #应用通道关联的联盟
        Application:
            <<: *ApplicationDefaults #引用ApplicationDefaults并合并到当前
            Organizations: #初始加入应用通道的组织
                - *Org1
                - *Org2
configtx.yaml配置文件一般包括Profiles、Organizations、Orderer和Application四个部分。
Profiles用于配置联盟,包括Orderer系统通道模板和应用通道模板,其中TwoOrgsOrdererGenesi为系统通道模板,TwoOrgsChannel为应用通道模板。
五、configtxgen工具
1、configtxgen主要功能
configtxgen是Fabric提供的工具,用于生成通道所需要的配置文件。configtxgen工具以一个yaml文件作为输入,一般为configtx.yaml。
configtxgen主要功能如下:
A、生成启动orderer需要的创世区块,并支持检查区块内容
B、生成创建应用通道需要的配置交易,并支持检查交易内容
C、生成锚点Peer的更新配置交易
2、configtxgen命令使用
配置选项:
-profile string:从configtx.yaml中查找到指定的profile来生成配置,默认使用Sample-InsecureSolo
-channelID string:指定操作的通道名称,默认是mychannel
生成选项:
-outputBlock string:将初始区块写入指定文件
-outputCreateChannelTx string:将通道创建交易写入指定文件
-outputAnchorPeersUpdate string:创建更新锚点Peer的配置更新请求,需要同时使用-asOrg来指明组织身份
-asOrg string:以指明的组织身份执行更新配置交易(入更新锚节点)的生成,意味着写集合中包含了该组织有权限操作的键值
查看选项:
-inspectBlock string:打印指定区块文件中的配置信息
-inspectChannelCreateTx:打印通道创建交易文件中的配置更新信息
3、Configtxgen示例
定义好configtx.yml文件后,需要把configtxgen工具以及msp目录都拷贝到yaml文件的所在的目录下,configtxgen默认会读取当前目录的configtx.yaml作为输入:
A、创建排序节点的初始区块:configtxgen -profile Genesis -outputBlock genesis.block
通过profile参数来指定生成yaml文件中Profile.Genesis的配置,通过 -outputBlock参数来将区块写入genesis.block文件。
B、创建应用通道mychannel的初始区块的交易文件channel.tx:configtxgen -profile Channel -outputCreateChannelTx channel.tx -channelID mychannel
通过-outputCreateChannelTx参数将生成的交易写入channel.tx文件,通过-channelID来指定创建通道的名称为mychannel。
C、创建配置区块的交易文件Org1MSPanchors.tx以更新mychannel中PeerOrg1的锚节点:configtxgen -profile Channel -outputAnchorPeersUpdate Org1MSPanchors.tx -channelID mychannel -asOrg PeerOrg1MSP
通过-asOrg来指定使用PeerOrg1MSP身份创建配置区块,并且通过-outputAnchorPeersUpdate参数将配置区块写入到文件Org1MSPanchors.tx中。
创建配置区块的交易文件Org2MSPanchors.tx以更新mychannel中 PeerOrg2的锚节点:configtxgen -profile Channel -outputAnchorPeersUpdate Org2MSPanchors.tx -channelID mychannel -asOrg PeerOrg2MSP
六、Fabric网络部署
1、生成创世区块
生成Orderer节点启动所需的创世区块configtxgen -profile TwoOrgsOrdererGenesis -outputBlock ./channel-artifacts/orderer.genesis.block
通过profile参数来指定生成yaml文件中Profile.Genesis的配置,通过 -outputBlock参数来将区块写入genesis.block文件。
查看通道配置configtxgen -profile TwoOrgsOrdererGenesis -inspectBlock ./channel-artifacts/orderer.genesis.block
2、生成业务通道交易配置文件
生成创建应用通道的交易配置文件configtxgen -profile TwoOrgsChannel -channelID assetchannel -outputCreateChannelTx ./channel-artifacts/assetchannel.tx
通过-outputCreateChannelTx参数将生成的交易写入channel.tx文件,通过-channelID来指定创建通道的名称为assetchannel。
查看配置文件内容configtxgen -profile TwoOrgsChannel -inspectChannelCreateTx ./channel-artifacts/assetchannel.tx
3、生成更新组织锚节点配置文件
生成更新组织锚节点的配置信息文件configtxgen -profile TwoOrgsChannel -outputAnchorPeersUpdate ./channel-artifacts/Org1MSPanchors.tx -channelID assetchannel -asOrg Org1MSP
通过-asOrg来指定使用Org1MSP身份创建配置区块,并且通过-outputAnchorPeersUpdate参数将配置区块写入到文件Org1MSPanchors.tx中。configtxgen -profile TwoOrgsChannel -outputAnchorPeersUpdate ./channel-artifacts/Org2MSPanchors.tx -channelID assetchannel -asOrg Org2MSP
通过-asOrg来指定使用Org2MSP身份创建配置区块,并且通过-outputAnchorPeersUpdate参数将配置区块写入到文件Org2MSPanchors.tx中。
4、docker-compose.yaml文件编写
version: '2'

services:
  orderer.example.com:
    container_name: orderer.example.com
    image: hyperledger/fabric-orderer
    environment:
      - ORDERER_GENERAL_LOGLEVEL=debug
      - ORDERER_GENERAL_LISTENADDRESS=0.0.0.0
      - ORDERER_GENERAL_GENESISMETHOD=file
      - ORDERER_GENERAL_GENESISFILE=orderer.genesis.block
      - ORDERER_GENERAL_LOCALMSPID=OrdererMSP
      - ORDERER_GENERAL_LOCALMSPDIR=/etc/hyperledger/orderer/msp
    working_dir: /opt/gopath/src/github.com/hyperledger/fabric/orderer
    command: orderer
    volumes:
      - ./crypto-config/ordererOrganizations/example.com/orderers/orderer.example.com/:/etc/hyperledger/orderer
      - ./channel-artifacts/orderer.genesis.block:/etc/hyperledger/fabric/orderer.genesis.block
    ports:
      - 7050:7050

  peer:
    container_name: peer
    image: hyperledger/fabric-peer
    environment:
      - CORE_VM_ENDPOINT=unix:///host/var/run/docker.sock # docker的服务端注入
      - CORE_LOGGING_PEER=debug
      - CORE_CHAINCODE_LOGGING_LEVEL=DEBUG
      - CORE_PEER_MSPCONFIGPATH=/etc/hyperledger/peer/msp # msp证书(节点证书)
      - CORE_LEDGER_STATE_STATEDATABASE=goleveldb # 状态数据库的存储引擎(or CouchDB)
      - CORE_VM_DOCKER_HOSTCONFIG_NETWORKMODE=deploy_default# 链码与Peer节点使用同一网络
    working_dir: /opt/gopath/src/github.com/hyperledger/fabric
    command: peer node start

  peer0.org1.example.com:
    extends:
      service: peer
    container_name: peer0.org1.example.com
    environment:
      - CORE_VM_ENDPOINT=unix:///host/var/run/docker.sock
      - CORE_PEER_ID=peer0.org1.example.com
      - CORE_PEER_LOCALMSPID=Org1MSP
      - CORE_PEER_ADDRESS=peer0.org1.example.com:7051
    ports:
      - 17051:7051 # grpc服务端口
      - 17053:7053 # eventhup端口
    volumes:
      - /var/run/:/host/var/run/
      - ./crypto-config/peerOrganizations/org1.example.com/peers/peer0.org1.example.com:/etc/hyperledger/peer
    depends_on:
      - orderer.example.com

  peer1.org1.example.com:
    extends:
      service: peer
    container_name: peer1.org1.example.com
    environment:
      - CORE_VM_ENDPOINT=unix:///host/var/run/docker.sock
      - CORE_PEER_ID=peer1.org1.example.com
      - CORE_PEER_LOCALMSPID=Org1MSP
      - CORE_PEER_ADDRESS=peer1.org1.example.com:7051
    ports:
      - 27051:7051 # grpc服务端口
      - 27053:7053 # eventhup端口
    volumes:
      - /var/run/:/host/var/run/
      - ./crypto-config/peerOrganizations/org1.example.com/peers/peer1.org1.example.com:/etc/hyperledger/peer
    depends_on:
      - orderer.example.com

  peer0.org2.example.com:
    extends:
      service: peer
    container_name: peer0.org2.example.com
    environment:
      - CORE_VM_ENDPOINT=unix:///host/var/run/docker.sock
      - CORE_PEER_ID=peer0.org2.example.com
      - CORE_PEER_LOCALMSPID=Org2MSP
      - CORE_PEER_ADDRESS=peer0.org2.example.com:7051
    ports:
      - 37051:7051 # grpc服务端口
      - 37053:7053 # eventhup端口
    volumes:
      - /var/run/:/host/var/run/
      - ./crypto-config/peerOrganizations/org2.example.com/peers/peer0.org2.example.com:/etc/hyperledger/peer
    depends_on:
      - orderer.example.com

  peer1.org2.example.com:
    extends:
      service: peer
    container_name: peer1.org2.example.com
    environment:
      - CORE_VM_ENDPOINT=unix:///host/var/run/docker.sock
      - CORE_PEER_ID=peer1.org2.example.com
      - CORE_PEER_LOCALMSPID=Org2MSP
      - CORE_PEER_ADDRESS=peer1.org2.example.com:7051
    ports:
      - 47051:7051 # grpc服务端口
      - 47053:7053 # eventhup端口
    volumes:
      - /var/run/:/host/var/run/
      - ./crypto-config/peerOrganizations/org2.example.com/peers/peer1.org2.example.com:/etc/hyperledger/peer
    depends_on:
      - orderer.example.com

  cli:
    container_name: cli
    image: hyperledger/fabric-tools
    tty: true
    environment:
      - GOPATH=/opt/gopath
      - CORE_LOGGING_LEVEL=DEBUG
      - CORE_PEER_ID=cli
      - CORE_PEER_ADDRESS=peer0.org1.example.com:7051
      - CORE_PEER_LOCALMSPID=Org1MSP
      - CORE_PEER_MSPCONFIGPATH=/etc/hyperledger/peer/users/[email protected]/msp
    working_dir: /opt/gopath/src/github.com/hyperledger/fabric/
    command: /bin/bash
    volumes:
        - ./channel-artifacts:/etc/hyperledger/channel-artifacts
        - ./chaincode:/opt/gopath/src/github.com/chaincode # 链码路径注入
        - ./crypto-config/peerOrganizations/org1.example.com/:/etc/hyperledger/peer
5、启动Fabric网络
使用docker-compose启动Fabric网络docker-compose -f docker-compose.yaml up
如果Fabric网络启动失败,查看日志信息,确定错误原因。修改docker-compose.yaml文件后重新启动。在启动前需要先关闭网络,清除网络缓存。
关闭所有的Docker容器docker rm -f $(docker ps -aq)
清除网络缓存docker network prune
七、Fabric区块链部署
1、创建业务通道
进入cli容器:docker exec -it cli bash
进入/etc/hyperledger/channel-artifacts目录:cd /etc/hyperledger/channel-artifacts
创建业务通道:peer channel create -o orderer.example.com:7050 -c assetchannel -f assetchannel.tx
在当前目录下会生成assetchannel.block区块
2、加入通道
peer channel join -b assetchannel.block
3、设置主节点
peer channel update -o orderer.example.com:7050 -c assetchannel -f Org1MSPanchors.tx
4、链码安装
安装sacc链码:peer chaincode install -n sacc -v 1.0.0 -l golang -p github.com/chaincode/sacc
5、链码实例化
peer chaincode instantiate -o orderer.example.com:7050 -C assetchannel -n sacc -l golang -v 1.0.0 -c '{"Args":["user1","100"]}'
6、链码查询
查询用户余额:peer chaincode query -n sacc -c '{"Args":["get","user1"]}' -C assetchannel
设置用户余额:peer chaincode invoke -n sacc -c '{"Args":["set", "user1", "1000"]}' -C assetchannel
八、Fabric区块链部署的问题
1、工程示例
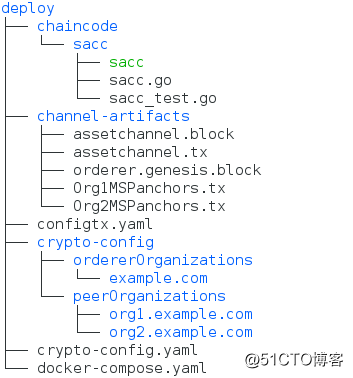
上述工程位于deploy目录下。
2、网络名称问题
Error: Error endorsing chaincode: rpc error: code = Unknown desc = Error starting container: API error (404): {“message”:“network deploy_default not found”}
docker–compose启动网络时会创建一个默认网络名:[directory]_default。CORE_VM_DOCKER_HOSTCONFIG_NETWORKMODE=deploy_default环境变量用于指定创建的网络名称。网络名称在关闭网络后,清除网络缓存时看到。