1 Cobbler 介绍
Cobbler 是一个 Linux 服务器安装的服务,可以通过网络启动(PXE)的方式来快速安装、重装物理服务器和虚拟机,同时还可以管理 DHCP,DNS 等。
Cobbler 可以使用命令行方式管理,也提供了基于 Web 的界面管理工具(cobbler-web),还提供了API 接口,可以方便二次开发使用。
Cobbler 是较早前的 kickstart 的升级版,优点是比较容易配置,还自带 web 界面比较易于管理。
Cobbler 内置了一个轻量级配置管理系统,但它也支持和其它配置管理系统集成,如 Puppet,暂时不支持 SaltStack。
Cobbler 官网:https://fedorahosted.org/cobbler/
1.1 Cobbler 集成的服务
PXE 服务支持
DHCP 服务管理
DNS 服务管理(可选 bind,dnsmasq)
电源管理
Kickstart 服务支持
YUM 仓库管理
TFTP(PXE 启动时需要)
Apache(提供 kickstart 的安装源,并提供定制化的 kickstart 配置)
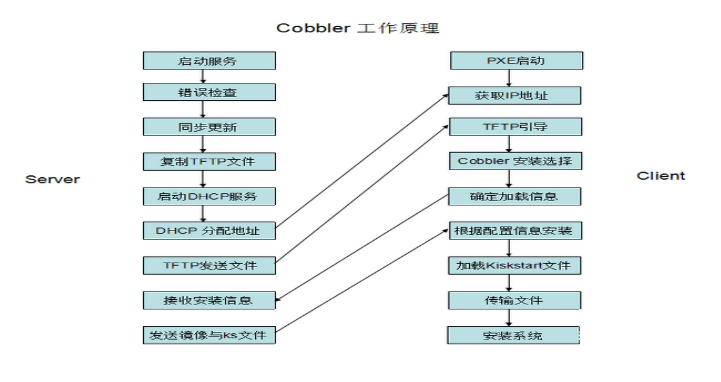
1.2 Cobbler的工作流程
2 Cobbler安装
#必要服务
(1)cobbler (cobbler 的核心)
(2)httpd (提供 cobbler 的 web 界面)
(3)dhcpd (为自动安装系统分配 IP 地址)
(4)epel-release (为之提供 yum 源)
(5)rsync (cobbler 需要同步信息)
(6)cobbler-web (cobbler 的一个 web 插件)
(7)xinetd (为 rsync 和 tftp 的守护进程)
(8)tftp (传送安装的一些文件的类似 ftp)
1. 关闭防火墙和 selinux
/etc/init.d/iptables stop
chkconfig iptables off
getenforce
sed -i '/SELINUX/s/enforcing/disabled/' /etc/selinux/config
2.开始安装cobbler
#1. 安装第三方源:
wget -O /etc/yum.repos.d/epel.repo http://mirrors.aliyun.com/repo/epel-6.repo
yum repolist
升级Django大于1.4版本否则安装cobbler-web时报以下错(如果不用可以先忽略):
Error: Package: cobbler-web-2.6.11-7.git95749a6.el6.noarch (epel)
Requires: Django >= 1.4
升级Django方法如下:
wget "https://pypi.python.org/packages/source/p/pip/pip-1.5.4.tar.gz#md5=834b2904f92d46aaa333267fb1c922bb" --no-check-certificat
tar -xf pip-1.5.4.tar.gz
cd pip-1.5.4
python setup.py install
pip install Django==1.5.1
#2.cobbler安装相关服务
yum -y install cobbler dhcp tftp-server pykickstart httpd xinetd
#3.检查
rpm -qa cobbler dhcp tftp-server pykickstart httpd xinetd
#4.查看cobbler配置文件
rpm -ql cobbler
/etc/cobbler # 配置文件目录
/etc/cobbler/settings # cobbler 主配置文件,这个文件是 YAML 格式,Cobbler 是 python 写的程序。
/etc/cobbler/dhcp.template # DHCP 服务的配置模板
/etc/cobbler/tftpd.template # tftp 服务的配置模板
/etc/cobbler/rsync.template # rsync 服务的配置模板
/etc/cobbler/iso # iso 模板配置文件目录
/etc/cobbler/pxe # pxe 模板文件目录
/etc/cobbler/power # 电源的配置文件目录
/etc/cobbler/users.conf # Web 服务授权配置文件
/etc/cobbler/users.digest #用于 web 访问的用户名密码配置文件
/etc/cobbler/dnsmasq.template #DNS 服务的配置模板
/etc/cobbler/modules.conf # Cobbler 模块配置文件
/var/lib/cobbler # Cobbler 数据目录
/var/lib/cobbler/config #配置文件
/var/lib/cobbler/kickstarts # 默认存放 kickstart 文件
/var/lib/cobbler/loaders # 存放的各种引导程序
/var/www/cobbler # 系统安装镜像目录
/var/www/cobbler/ks_mirror # 导入的系统镜像列表
/var/www/cobbler/images # 导入的系统镜像启动文件
/var/www/cobbler/repo_mirror # yum 源存储目录
/var/log/cobbler # 日志目录
/var/log/cobbler/install.log # 客户端系统安装日志
/var/log/cobbler/cobbler.log # cobbler 日志
#启动相关服务

/etc/init.d/httpd restart
/etc/init.d/cobblerd restart
/etc/init.d/xinetd restart
#4. 检查cobbler配置会列出存在的问题,我们只要把问题都解决都ok了
#cobbler check的检查命令
[root@localhost ~]# cobbler check
The following are potential configuration items that you may want to fix:

1 : The 'server' field in /etc/cobbler/settings must be set to something other than localhost, or kickstarting features will not work.  This should be a resolvable hostname or IP for the boot server as reachable by all machines that will use it.
2 : For PXE to be functional, the 'next_server' field in /etc/cobbler/settings must be set to something other than 127.0.0.1, and should match the IP of the boot server on the PXE network.
3 : change 'disable' to 'no' in /etc/xinetd.d/tftp
4 : some network boot-loaders are missing from /var/lib/cobbler/loaders, you may run 'cobbler get-loaders' to download them, or, if you only want to handle x86/x86_64 netbooting, you may ensure that you have installed a *recent* version of the syslinux package installed and can ignore this message entirely.  Files in this directory, should you want to support all architectures, should include pxelinux.0, menu.c32, elilo.efi, and yaboot. The 'cobbler get-loaders' command is the easiest way to resolve these requirements.
5 : change 'disable' to 'no' in /etc/xinetd.d/rsync
6 : debmirror package is not installed, it will be required to manage debian deployments and repositories
7 : The default password used by the sample templates for newly installed machines (default_password_crypted in /etc/cobbler/settings) is still set to 'cobbler' and should be changed, try: "openssl passwd -1 -salt 'random-phrase-here' 'your-password-here'" to generate new one
8 : fencing tools were not found, and are required to use the (optional) power management features. install cman or fence-agents to use them
Restart cobblerd and then run 'cobbler sync' to apply changes.
#解决方法
1. /etc/cobbler/settings 中'server'配置成具体的服务器 ip 地址,我这修改为内网的
2. /etc/cobbler/settings 中'next_server'也修改为具体的 ip 地址
3. /etc/xinetd.d/tftp 中把'disable' 从'yes' 'no'
4. 运行'cobbler get-loaders'网络引导加载程序
5. 开启 rsync 服务并设置为开机启动,systemctl start rsyncd、systemctl enable rsyncd
6. debian 系统需要安装 debmirror 包,我们这里是 centos 所以不用安装
7. "openssl passwd -1 -salt 'random-phrase-here' 'your-password-here'"生成新密码并修改配置/etc/cobbler/settings 中'default_password_crypted'字段
8. 应用修改后运行service restart cobblerd、cobbler sync
针对以上问题进行整改:
cp /etc/cobbler/settings{,.ori} && ll /etc/cobbler/settings{,.ori}
sed -i 's/server: 127.0.0.1/server: 192.168.247.141/' /etc/cobbler/settings && grep "server: 192.168.247.141" /etc/cobbler/settings
sed -i 's/next_server: 127.0.0.1/next_server: 192.168.247.141/' /etc/cobbler/settings
sed -i 's/manage_dhcp: 0/manage_dhcp: 1/' /etc/cobbler/settings && grep 'manage_dhcp: 1' /etc/cobbler/settings
sed -i 's/pxe_just_once: 0/pxe_just_once: 1/' /etc/cobbler/settings && grep 'pxe_just_once: 1' /etc/cobbler/settings
vim /etc/cobbler/settings
或者手动修改如下地方:
manage_dhcp: 1
manage_rsync: 1

#生成新密码并修改配置/etc/cobbler/settings 中'default_password_crypted'字段

hejianlai=`openssl passwd -1 -salt 'hejianlai' '123456'`
echo $hejianlai
#注意: "default_password_crypted: "后面有一个空格的,如果不留空格会报错
sed -i "/default_password_crypted/c\default_password_crypted: \"$hejianlai"\" /etc/cobbler/settings
#网络引导加载程序会从官网自动下载
[root@localhost ~]# cobbler get-loaders
task started: 2018-11-21_005408_get_loaders
task started (id=Download Bootloader Content, time=Wed Nov 21 00:54:08 2018)
path /var/lib/cobbler/loaders/README already exists, not overwriting existing content, use --force if you wish to update
path /var/lib/cobbler/loaders/COPYING.elilo already exists, not overwriting existing content, use --force if you wish to update
path /var/lib/cobbler/loaders/COPYING.yaboot already exists, not overwriting existing content, use --force if you wish to update
path /var/lib/cobbler/loaders/COPYING.syslinux already exists, not overwriting existing content, use --force if you wish to update
path /var/lib/cobbler/loaders/elilo-ia64.efi already exists, not overwriting existing content, use --force if you wish to update
path /var/lib/cobbler/loaders/yaboot already exists, not overwriting existing content, use --force if you wish to update
path /var/lib/cobbler/loaders/pxelinux.0 already exists, not overwriting existing content, use --force if you wish to update
path /var/lib/cobbler/loaders/menu.c32 already exists, not overwriting existing content, use --force if you wish to update
path /var/lib/cobbler/loaders/grub-x86.efi already exists, not overwriting existing content, use --force if you wish to update
downloading http://cobbler.github.io/loaders/grub-0.97-x86_64.efi to /var/lib/cobbler/loaders/grub-x86_64.efi
#下载的内容
ll /var/lib/cobbler/loaders/
#修改rsync、tftp的配置文件
[root@localhost ~]# vim /etc/xinetd.d/rsync
disable = no
[root@localhost ~]# vim /etc/xinetd.d/tftp
disable = no
#重启
[root@localhost loaders]# /etc/init.d/xinetd restart
Stopping xinetd:                                           [FAILED]
Starting xinetd:                                           [  OK  ]
[root@localhost loaders]# /etc/init.d/cobblerd restart
Stopping cobbler daemon:                                   [  OK  ]
Starting cobbler daemon:                                   [  OK  ]
#再检查
[root@localhost loaders]# cobbler check
# 修改cobbler的 dhcp 模版,不要直接修改 dhcp 本身的配置文件,因为 cobbler 会覆盖,下面只列出修改的部分
vim /etc/cobbler/dhcp.template
...
subnet 192.168.247.0 netmask 255.255.255.0 {
     option routers             192.168.247.5;
     option domain-name-servers 192.168.247.5;
     option subnet-mask         255.255.255.0;
     range dynamic-bootp        192.168.247.100 192.168.247.254;
...
5 同步cobbler配置出现TASK COMPLETE表示成功
# 同步最新 cobbler 配置,它会根据配置自动修改 dhcp 等服务。
[root@localhost ~]# cobbler sync
...
*** TASK COMPLETE ***
#设置开机自启动
chkconfig httpd on
chkconfig xinetd on
chkconfig cobblerd on
chkconfig dhcpd on
#重启所有服务
/etc/init.d/httpd restart
/etc/init.d/xinetd restart
/etc/init.d/cobblerd restart
/etc/init.d/dhcpd restart
6 挂载光盘让 cobbler 处理生成
#1.挂载光盘或者导入系统镜像的方式,导入系统镜像请看下面部署多个系统部分内容。
mount /dev/cdrom /mnt/
# 导入系统镜像
[root@localhost ~]# cobbler import --path=/mnt/ --name=CentOS-6.8-x86_64 --arch=x86_64
# --path 镜像路径
# --name 为安装源定义一个名字
# --arch 指定安装源是 32 位、64 位、ia64, 目前支持的选项有: x86│x86_64│ia64
# 安装源的唯一标示就是根据 name 参数来定义,本例导入成功后,安装源的唯一标示就是
# 查看镜像列表
[root@localhost ~]# cobbler distro list
   CentOS-6.8-x86_64
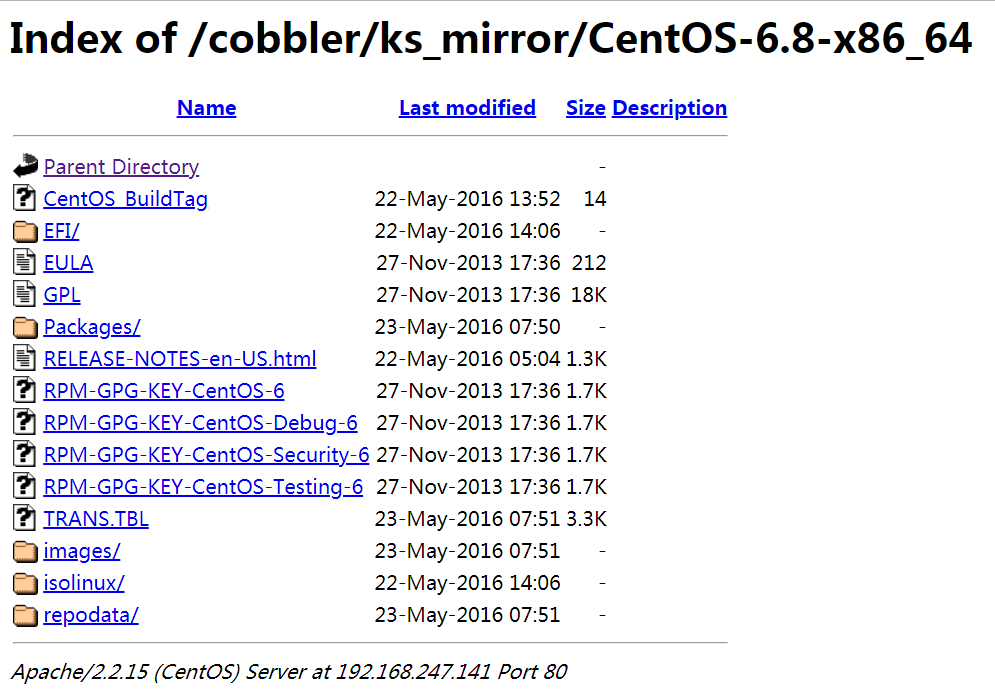
# 镜像存放目录,cobbler 会将镜像中的所有安装文件拷贝到本地一份,放在/var/www/cobbler/ks_mirror 下的 CentOS-6.8-x86_64 目录下。因此/var/www/cobbler目录必须具有足够容纳安装文件的空间
[root@localhost ~]# ll /var/www/cobbler/ks_mirror/CentOS-6.8-x86_64
total 276
-r--r--r-- 1 root root     14 May 22  2016 CentOS_BuildTag
dr-xr-xr-x 3 root root   4096 May 22  2016 EFI
-r--r--r-- 1 root root    212 Nov 27  2013 EULA
-r--r--r-- 1 root root  18009 Nov 27  2013 GPL
dr-xr-xr-x 3 root root   4096 May 23  2016 images
dr-xr-xr-x 2 root root   4096 May 22  2016 isolinux
dr-xr-xr-x 2 root root 212992 May 23  2016 Packages
-r--r--r-- 1 root root   1359 May 22  2016 RELEASE-NOTES-en-US.html
dr-xr-xr-x 2 root root   4096 May 23  2016 repodata
-r--r--r-- 1 root root   1706 Nov 27  2013 RPM-GPG-KEY-CentOS-6
-r--r--r-- 1 root root   1730 Nov 27  2013 RPM-GPG-KEY-CentOS-Debug-6
-r--r--r-- 1 root root   1730 Nov 27  2013 RPM-GPG-KEY-CentOS-Security-6
-r--r--r-- 1 root root   1734 Nov 27  2013 RPM-GPG-KEY-CentOS-Testing-6
-r--r--r-- 1 root root   3380 May 23  2016 TRANS.TBL
打开浏览器输入 http://192.168.247.141/cobbler/ks_mirror/CentOS-6.8-x86_64/
7 指定ks.cfg文件及调整内核参数
# Cobbler 的 ks.cfg 文件存放位置
[root@localhost ~]# cd  /var/lib/cobbler/kickstarts/
[root@localhost kickstarts]# ll
total 60
-rw-r--r-- 1 root root  115 Nov 21 01:59 default.ks
-rw-r--r-- 1 root root   22 Nov 21 01:59 esxi4-ks.cfg
-rw-r--r-- 1 root root   22 Jul 14  2016 esxi5-ks.cfg
drwxr-xr-x 2 root root 4096 Nov 21 00:37 install_profiles
-rw-r--r-- 1 root root 1424 Jul 14  2016 legacy.ks
-rw-r--r-- 1 root root  292 Jul 14  2016 pxerescue.ks
-rw-r--r-- 1 root root 2916 Jul 14  2016 sample_autoyast.xml
-rw-r--r-- 1 root root 1825 Nov 21 01:59 sample_end.ks
-rw-r--r-- 1 root root    0 Jul 14  2016 sample_esx4.ks
-rw-r--r-- 1 root root  324 Jul 14  2016 sample_esxi4.ks
-rw-r--r-- 1 root root  386 Jul 14  2016 sample_esxi5.ks
-rw-r--r-- 1 root root 1784 Jul 14  2016 sample.ks
-rw-r--r-- 1 root root 3419 Jul 14  2016 sample_old.seed
-rw-r--r-- 1 root root 5879 Jul 14  2016 sample.seed
# 在第一次导入系统镜像后,Cobbler 会给镜像指定一个默认的 kickstart 自动安装文件在/var/lib/cobbler/kickstarts 下的 sample_end.ks。
默认用sample_end.ks文件,以下是新建的一个名字为CentOS-6.8-x86_64.cfg:
# kickstart template for Fedora 8 and later.
# (includes %end blocks)
# do not use with earlier distros

#platform=x86, AMD64, or Intel EM64T
# System authorization information
#auth  --useshadow  --enablemd5
authconfig --enableshadow --passalgo=sha512
# System bootloader configuration
bootloader --location=mbr --driveorder=sda --append="nomodeset crashkernel=auto rhgb quiet"
# Partition clearing information
clearpart --all --initlabel
# Use text mode install
text
# Firewall configuration
firewall --disabled
# Run the Setup Agent on first boot
firstboot --disable
# System keyboard
keyboard us
# System language
lang en_US
# Use network installation
url --url=$tree
# If any cobbler repo definitions were referenced in the kickstart profile, include them here.
$yum_repo_stanza
# Network information
$SNIPPET('network_config')
# Reboot after installation
reboot
logging --level=info

#Root password
rootpw --iscrypted $default_password_crypted
# SELinux configuration
selinux --disabled
# Do not configure the X Window System
skipx
# System timezone
timezone  Asia/Shanghai
# Install OS instead of upgrade
install
# Clear the Master Boot Record
zerombr
# Allow anaconda to partition the system as needed
#autopart
part /boot --fstype=ext4 --asprimary --size=500
part swap --asprimary --size=1024
part / --fstype=ext4 --grow --asprimary --size=20480

%pre
$SNIPPET('log_ks_pre')
$SNIPPET('kickstart_start')
$SNIPPET('pre_install_network_config')
# Enable installation monitoring
$SNIPPET('pre_anamon')
%end

%packages
@base
@compat-libraries
@core
@debugging
@development
@dial-up
@hardware-monitoring
@performance
@server-policy
sgpio
device-mapper-persistent-data
systemtap-client
tree
lrzsz
telnet
nmap
dos2unix
%end

%post --nochroot
$SNIPPET('log_ks_post_nochroot')
%end

%post
$SNIPPET('log_ks_post')
# Start yum configuration
$yum_config_stanza
# End yum configuration
$SNIPPET('post_install_kernel_options')
$SNIPPET('post_install_network_config')
$SNIPPET('func_register_if_enabled')
$SNIPPET('download_config_files')
$SNIPPET('koan_environment')
$SNIPPET('redhat_register')
$SNIPPET('cobbler_register')
# Enable post-install boot notification
$SNIPPET('post_anamon')
# Start final steps
$SNIPPET('kickstart_done')
# End final steps
%end
# 查看安装镜像文件信息
cobbler distro report --name=CentOS-6.8-x86_64
# 查看指定的 profile 设置
cobbler profile report --name=CentOS-6.8-x86_64
# 编辑profile,修改关联的ks文件
cobbler profile edit --name=CentOS-6.8-x86_64 --kickstart=/var/lib/cobbler/kickstarts/CentOS-6.8-x86_64.cfg
# 每次修改完都要同步一次
cobbler sync
ok,这时我们新建虚拟机配置分配高点就能成功自动安装系统了!!
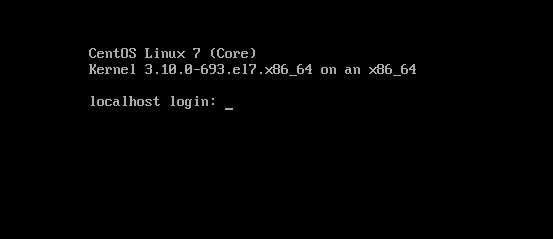
安装中。。。
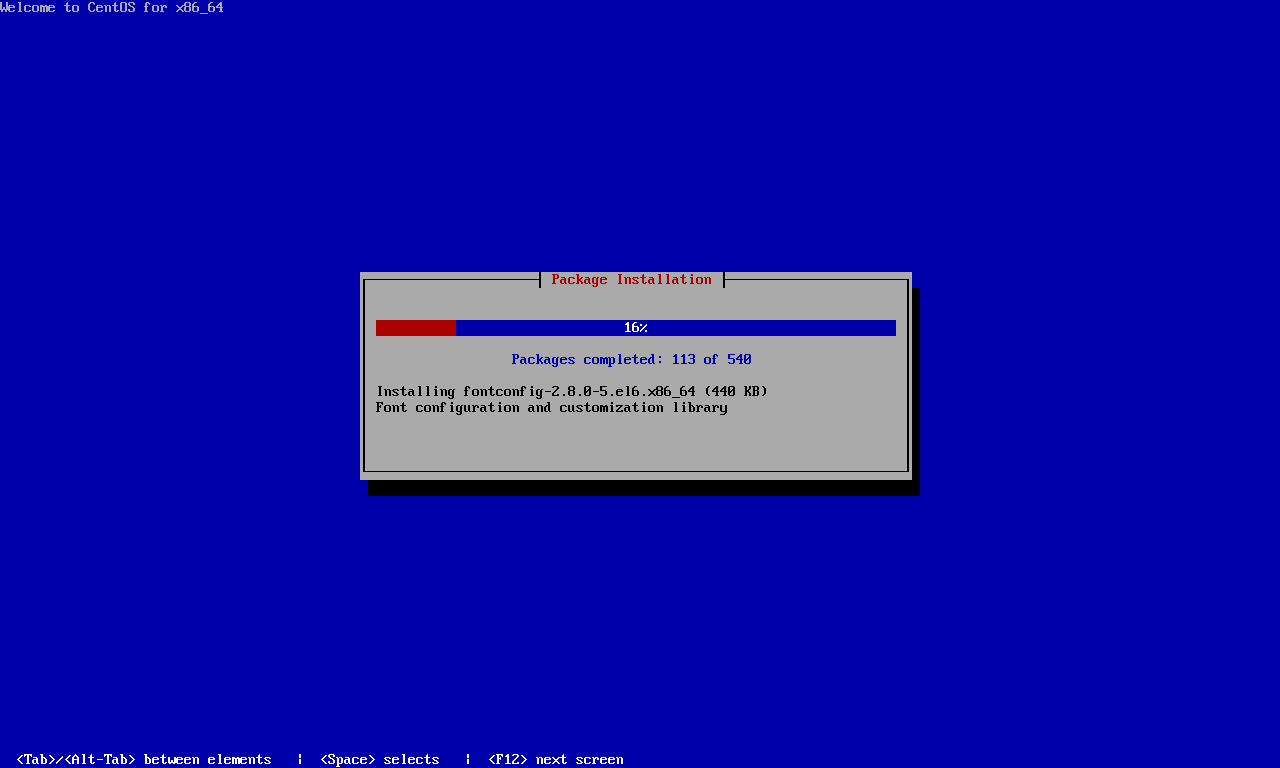
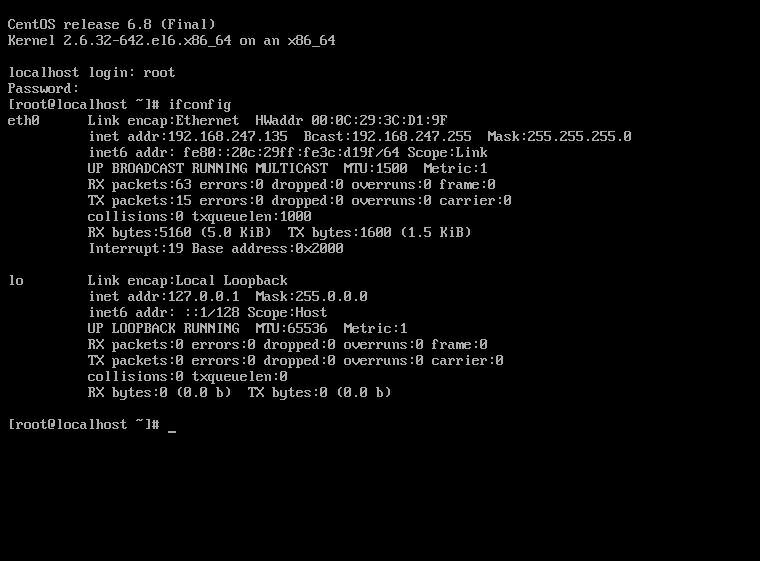
安装完毕默认密码:root/123456,IP地址会自动分配。耶。。。
3 部署多版本系统
1. 导入光盘
(1)挂载光盘
给虚拟机配置两个光盘,分别挂载CentOS6和CentOS7的光盘,注意如果/mnt有挂载要先umonut。
挂载光盘到目录:
mkdir /mnt/centos6
mkdir /mnt/centos7
mount /dev/sr0 /mnt/centos6
mount /dev/sr1 /mnt/centos7
如果是拷贝的iso文件到服务器,可以mount iso到目录:
mkdir /mnt/centos6
mkdir /mnt/centos7
mount -o loop CentOS-6.9-x86_64-minimal.iso /mnt/centos6
mount -o loop CentOS-7-x86_64-Minimal-1708.iso /mnt/centos6
(2)cobbler import导入光盘
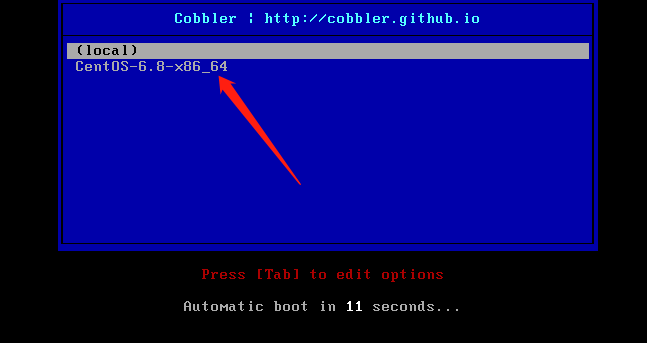
cobbler import --name=CentOS6.9 --path=/mnt/centos6 && cobbler import --name=CentOS7.4 --path=/mnt/centos7

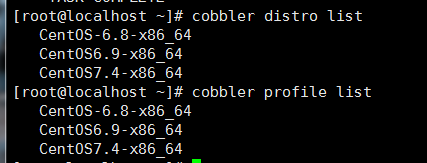
如图可以看到,我们添加了两个发行版本到distros,也创建了两个profile(使用的是sample的ks文件),名字都是CentOSx.x-x86_64,是cobblerd自动侦测了是x86_64的版本,自动添加到上面import命令的name后面。
#查看发行版文件
cobbler distro list
cobbler profile list
#查看导入的发行版操作系统信息(distro):
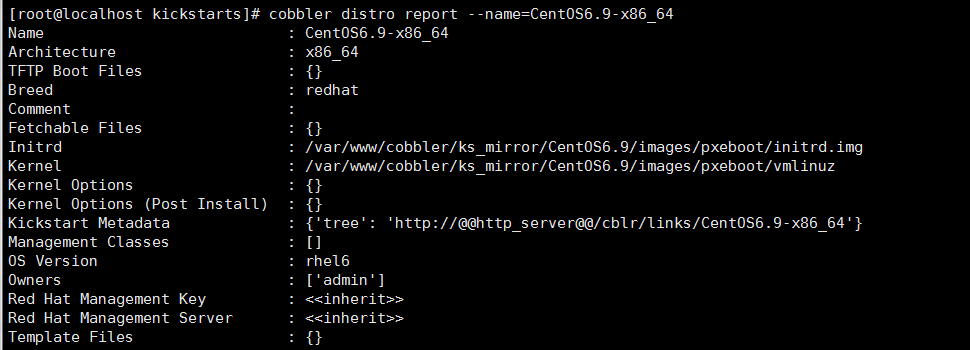
cobbler distro report --name=CentOS6.9-x86_64
#编写ks文件
放到/var/lib/cobbler/kickstarts目录下:
ks-centos6-mini.cfg模板;
# kickstart template for Fedora 8 and later.
# (includes %end blocks)
# do not use with earlier distros

#platform=x86, AMD64, or Intel EM64T
# System authorization information
#auth  --useshadow  --enablemd5
authconfig --enableshadow --passalgo=sha512
# System bootloader configuration
bootloader --location=mbr --driveorder=sda --append="nomodeset crashkernel=auto rhgb quiet"
# Partition clearing information
clearpart --all --initlabel
# Use text mode install
text
# Firewall configuration
firewall --disabled
# Run the Setup Agent on first boot
firstboot --disable
# System keyboard
keyboard us
# System language
lang en_US
# Use network installation
url --url=$tree
# If any cobbler repo definitions were referenced in the kickstart profile, include them here.
$yum_repo_stanza
# Network information
$SNIPPET('network_config')
# Reboot after installation
reboot
logging --level=info

#Root password
rootpw --iscrypted $default_password_crypted
# SELinux configuration
selinux --disabled
# Do not configure the X Window System
skipx
# System timezone
timezone  Asia/Shanghai
# Install OS instead of upgrade
install
# Clear the Master Boot Record
zerombr
# Allow anaconda to partition the system as needed
#autopart
part /boot --fstype=ext4 --asprimary --size=500
part swap --asprimary --size=1024
part / --fstype=ext4 --grow --asprimary --size=20480

%pre
$SNIPPET('log_ks_pre')
$SNIPPET('kickstart_start')
$SNIPPET('pre_install_network_config')
# Enable installation monitoring
$SNIPPET('pre_anamon')
%end

%packages
@base
@compat-libraries
@core
@debugging
@development
@dial-up
@hardware-monitoring
@performance
@server-policy
sgpio
device-mapper-persistent-data
systemtap-client
tree
telnet
nmap
dos2unix
%end

%post --nochroot
$SNIPPET('log_ks_post_nochroot')
%end

%post
$SNIPPET('log_ks_post')
# Start yum configuration
$yum_config_stanza
# End yum configuration
$SNIPPET('post_install_kernel_options')
$SNIPPET('post_install_network_config')
$SNIPPET('func_register_if_enabled')
$SNIPPET('download_config_files')
$SNIPPET('koan_environment')
$SNIPPET('redhat_register')
$SNIPPET('cobbler_register')
# Enable post-install boot notification
$SNIPPET('post_anamon')
# Start final steps
$SNIPPET('kickstart_done')
# End final steps
%end
ks-centos7-mini.cfg模板:
#platform=x86, AMD64, or Intel EM64T
#version=DEVEL
# System authorization information
auth --enableshadow --passalgo=sha512
# Install OS instead of upgrade
install
# Use Cobbler's network installation
url --url=$tree
# Root password
# Use graphical install
text
# ignore other disk
ignoredisk --only-use=sda
# Keyboard layouts
keyboard --vckeymap=us --xlayouts='us'
# System language
lang en_US.UTF-8 --addsupport=zh_CN.UTF-8
# SELinux configuration
selinux --disabled
# Firewall configuration
firewall --disabled
# Do not configure the X Window System
skipx
# Reboot after installation
reboot
# Network information
network  --bootproto=dhcp --device=eth0 --onboot=on  --ipv6=auto --activate
# Root password
rootpw --plaintext hejianlai
# Add User
# System services
services --disabled="chronyd"
# System timezone
timezone Asia/Shanghai --nontp
# System bootloader configuration
bootloader --append=" crashkernel=auto" --location=mbr
# Clear the Master Boot Record
zerombr
# Partition clearing information
clearpart --all
# Disk partitioning information
part /boot --fstype="xfs" --ondisk=sda --size=1024
part swap --fstype="swap" --ondisk=sda --size=4096
part / --fstype="xfs" --ondisk=sda --grow --size=1
# Agree EULA
eula --agreed

%post
# config local yum

%end

%packages
@^minimal
@core
kexec-tools

%end

%addon com_redhat_kdump --enable --reserve-mb='auto'

%end

%anaconda
pwpolicy root --minlen=6 --minquality=50 --notstrict --nochanges --notempty
pwpolicy user --minlen=6 --minquality=50 --notstrict --nochanges --notempty
pwpolicy luks --minlen=6 --minquality=50 --notstrict --nochanges --notempty
%end
删掉默认例子,来重新添加新的kickstart文件对应关系:
cobbler profile remove --name="CentOS6.9-x86_64"
cobbler profile remove --name="CentOS7.4-x86_64"
cobbler profile add --name=CentOS6.9-Mini-x86_64 --kickstart=/var/lib/cobbler/kickstarts/ks-centos6-mini.cfg --distro=CentOS6.9-x86_64
cobbler profile add --name=CentOS7.4-Mini-x86_64 --kickstart=/var/lib/cobbler/kickstarts/ks-centos7-mini.cfg --distro=CentOS7.4-x86_64
查看pxelinux.cfg/default文件就能看到菜单选项也跟着变。
cat /var/lib/tftpboot/pxelinux.cfg/default

重新同步数据:
cobbler sync
新建虚拟机:

安装完成后: