一、cobbler
快速网络安装linux操作系统的服务,支持众多的Linux发行版:Red Hat、Fedora、CentOS、Debian、Ubuntu和SuSE,也可以支持网络安装windows。PXE的二次封装,将多种安装参数封装到一个菜单。
cobbler 服务集成PXE,DHCP,rsync,Http,DNS,Kickstart,IPMI 电源管理
二、工作原理
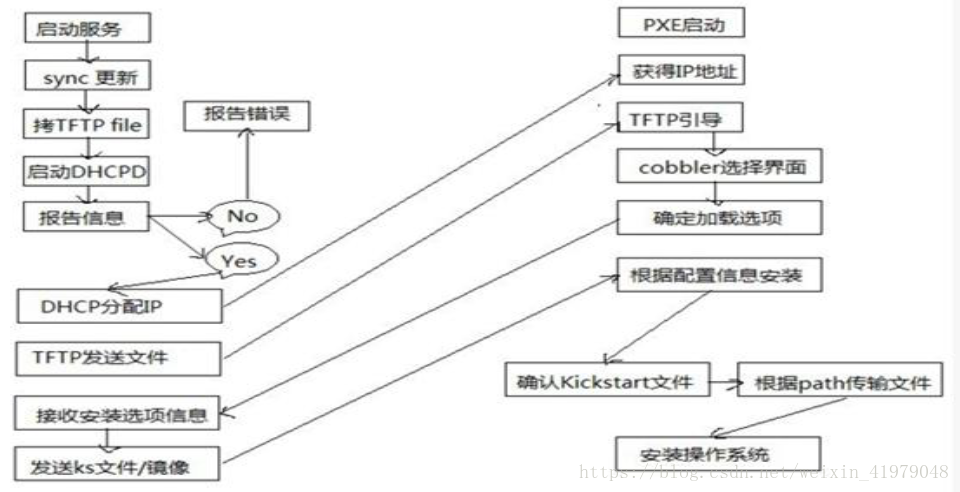
1.client裸机配置了从网络启动后,开机后会广播包请求DHCP服务器(cobbler server)发送其分配好的一个IP
2.DHCP服务器(cobbler server)收到请求后发送responese,包括其ip地址
3.client裸机拿到ip后再向cobblerserver发送请求OS引导文件的请求
4.cobblerserver告诉裸机OS引导文件的名字和TFTPserver的ip和port
5.client裸机通过上面告知的TFTP server地址通信,下载引导文件
6.client裸机执行执行该引导文件,确定加载信息,选择要安装的os,期间会再向cobblerserver请求kickstart文件和os image
cobbler server发送请求的kickstart和os iamge
6.client裸机加载kickstart文件
7.client裸机接收os image,安装该os image
三、cobbler实现步骤
安装包,并设置服务
检查配置
根据上面提示修改配置
下载启动相关文件菜单
配置DHCP服务
分别导入centos的安装源,并查看
准备kickstart文件并导入cobbler
测试
关闭防火墙
[root@CentOS7 ~]systemctl stop firewalld.service  关闭防火墙
[root@CentOS7 ~]systemctl disable  firewalld.service 禁止防火墙开机自启动
关闭SELINUX
[root@CentOS7 ~]sed -i "s/SELINUX=enforcing/SELINUX=disabled/"  /etc/selinux/config   关闭selinux策略
[root@CentOS7 ~]getenforce  获取linux当前状态
1.安装相应软件包启动服务
[root@CentOS7 ~]yum install cobbler dhcp
[root@CentOS7 ~]systemctl enable cobblerd dhcpd httpd tftp  #开机自启
[root@CentOS7 ~]systemctl start cobblerd httpd tftp  #启动各项服务
2.cobbler check
[root@CentOS7 ~]#cobbler check
The following are potential configuration items that you may want to fix:

1 : The 'server' field in /etc/cobbler/settings must be set to something other than localhost, or kickstarting features will not work.  This should be a resolvable hostname or IP for the boot server as reachable by all machines that will use it.

2 : For PXE to be functional, the 'next_server' field in /etc/cobbler/settings must be set to something other than 127.0.0.1, and should match the IP of the boot server on the PXE network.
//报错1报错2需要修改配置文件将server,nextserver修改成本机地址
3 : change 'disable' to 'no' in /etc/xinetd.d/tftp
4 : Some network boot-loaders are missing from /var/lib/cobbler/loaders, you may run 'cobbler get-loaders' to download them, or, if you only want to handle x86/x86_64 netbooting, you may ensure that you have installed a *recent* version of the syslinux package installed and can ignore this message entirely.  Files in this directory, should you want to support all architectures, should include pxelinux.0, menu.c32, elilo.efi, and yaboot. The 'cobbler get-loaders' command is the easiest way to resolve these requirements.//提示缺少一些网络引导程序
5 : enable and start rsyncd.service with systemctl
6 : debmirror package is not installed, it will be required to manage debian deployments and repositories
7 : The default password used by the sample templates for newly installed machines (default_password_crypted in /etc/cobbler/settings) is still set to 'cobbler' and should be changed, try: "openssl passwd -1 -salt 'random-phrase-here' 'your-password-here'" to generate new one   //生成口令
8 : fencing tools were not found, and are required to use the (optional) power management features. install cman or fence-agents to use them
执行Cobbler check报错解决方式
修改/etc/cobbler/settings文件中的server参数的值为提供cobbler服务的主机相应的IP地址或主机名
修改/etc/cobbler/settings文件中的next_server参数的值为提供PXE服务的主机相应的IP地址
如果当前节点可以访问互联网,执行“cobblerget-loaders”命令即可;否则,需要安装syslinux程序包,而后复制/usr/share/syslinux/{pxelinux.0,memu.c32}等文件至/var/lib/cobbler/loaders/目录中
执行“chkconfig rsyncon”命令即可
执行“openssl passwd-1 生成密码,并用其替换/etc/cobbler/settings文件中default_password_crypted参数的值
3 . 修改 cobbler 配置文件
	[root@CentOS7 ~]vim /etc/cobbler/settings
	server:cobberserverip
	next_server:cobberserverip
	defaut_password_cryptd: "xxxxxxxxxx"   #openssl passwd -1 生成口令
	manage_dhcp:1  //开启cobbler的dhcp模块
4.配置DHCP服务
[root@CentOS7 ~]vim /etc/cobbler/dhcp.template
subnet 192.168.138.10 netmask 255.255.255.0 {
     option routers             192.168.138.5;
     option domain-name-servers 192.168.138.1;
     option subnet-mask         255.255.255.0;
     range dynamic-bootp        192.168.138.100 192.168.138.254;
     default-lease-time         21600;
     max-lease-time             43200;
     next-server                192.168.138.130;

[root@CentOS7 ~]cobbler sync  #同步服务
[root@CentOS7 ~]systemctl restart dhcpd #重启dhcp服务[root@CentOS7 ~]cobbler get-loaders #联网下载必要文件
[root@CentOS7 ~]cobbler sync #同步必要文件到/var/lib/tftpboot 下
同步后的目录结构如下
[root@CentOS7 tftpboot]#tree
.
├── boot
│ └── grub
│ └── menu.lst
├── etc
├── grub
│ ├── efidefault
│ ├── grub-x86_64.efi
│ ├── grub-x86.efi
│ └── images -> ../images
├── images
├── memdisk
├── menu.c32
├── ppc
├── pxelinux.0
├── pxelinux.cfg
│ └── default
├── s390x
│ └── profile_list
└── yaboot
9 directories, 10 files6. 导入 centos 的安装源
[root@CentOS7 ~]mkdir  /mnt/cdrom{6,7}
[root@CentOS7 ~]mount /dev/sr0  /mnt/cdrom6
[root@CentOS7 ~]mount /dev/sr1 /mnt/cdrom7
[root@CentOS7 ~]mount -a

[root@CentOS7 ~]cobbler import --path=/mnt/cdrom7 --name=CentOS-7.4-x86_64 --arch=x86_64
[root@CentOS7 ~]cobbler import --path=/mnt/cdrom6 --name=CentOS-6.9-x86_64 --arch=x86_64
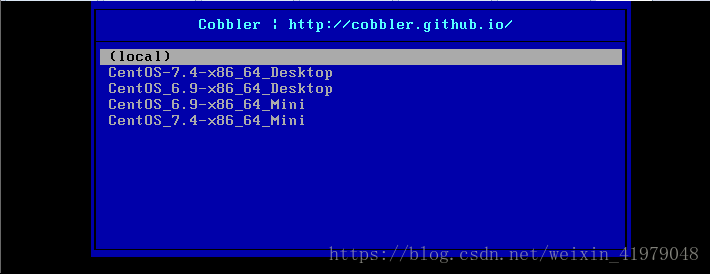
[root@CentOS7 ~]cobbler distro list #系统列表
[root@CentOS7 ~]cobbler profile list #应答文件列表[root@CentOS7 ~]cp ks7_desktop.cfg ks6_mini.cfg /var/lib/cobbler/kicstarts/
[root@CentOS7 ~]cobbler profile add --name=CentOS-7.4-x86_64_Desktop --distro=CentOS-7.4-x86_64 --kickstart=/var/lib/cobbler/kickstarts/ks7_desktop.cfg
[root@CentOS7 ~]cobbler profile add --name=CentOS_7.4-x86_64_Mini --distro=CentOS-7.4-x86_64 --kickstart=/var/lib/cobbler/kickstarts/ks7_mini.cfg
[root@CentOS7 ~]cobbler profile add --name=CentOS_6.9-x86_64_Desktop --distro=CentOS-6.9-x86_64 --kickstart=/var/lib/cobbler/kickstarts/ks6_desktop.cfg
[root@CentOS7 ~]cobbler profile add --name=CentOS_6.9-x86_64_Mini --distro=CentOS-6.9-x86_64 --kickstart=/var/lib/cobbler/kickstarts/ks6_mini.cfg
#应答文件中的url地址改为$tree cobbler可以自动识别