1.磁盘配额
磁盘配额:针对于设备
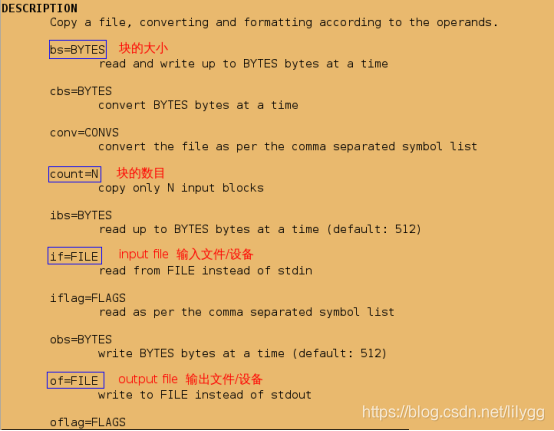
dd命令:
dd if=/dev/zero of=/mnt/studentfile bs=1M count=21
具体参数的含义:
dd #截取
if #input file 输入文件
of #out of file 输出文件
/dev/zero #无限零字节(设备)
bs #块的大小(block size)
count #块的个数
##查看dd命令帮助
[root@localhost ~]# man dd
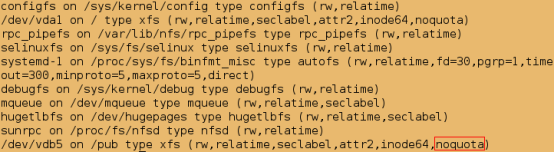
未设定磁盘配额时,截取多大输出文件便有多大,直到将超出内存,才会无法截取;这样很不合理。
[root@localhost ~]# su - student
[student@localhost ~]$ dd if=/dev/zero of=/pub/file bs=1M count=50

[student@localhost ~]$ du -sh /pub/file

[student@localhost ~]$ dd if=/dev/zero of=/pub/file bs=1M count=51
[student@localhost ~]$ du -sh /pub/file

[student@localhost ~]$ dd if=/dev/zero of=/pub/file bs=1M count=70
[student@localhost ~]$ du -sh /pub/file

[student@localhost ~]$ dd if=/dev/zero of=/pub/file bs=1M count=100
[student@localhost ~]$ du -sh /pub/file

[student@localhost ~]$ rm -rf /pub/file
[student@localhost ~]$ exit
logout
设定磁盘配额:
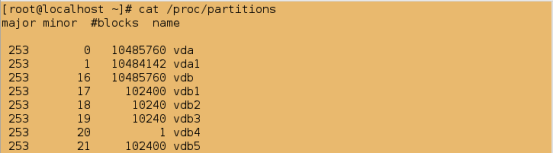
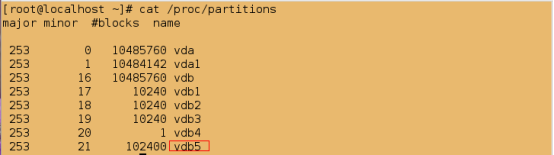
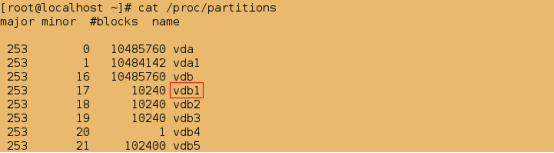
[root@localhost ~]# cat /proc/partitions
##1.格式化
[root@localhost ~]# mkfs.xfs /dev/vdb5
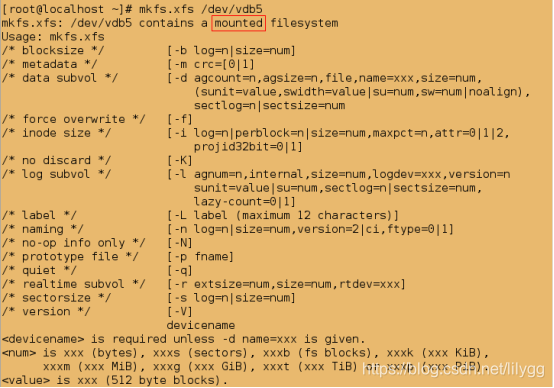
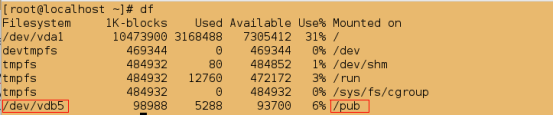
[root@localhost ~]# df
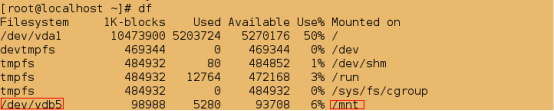
[root@localhost ~]# umount /mnt
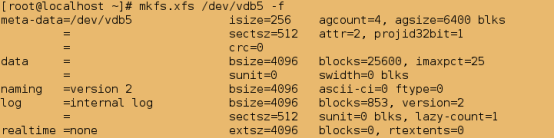
[root@localhost ~]# mkfs.xfs /dev/vdb5

[root@localhost ~]# mkfs.xfs /dev/vdb5 -f
[root@localhost ~]# mkdir /pub
##2.挂载
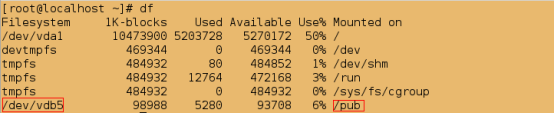
[root@localhost ~]# mount /dev/vdb5 /pub
[root@localhost ~]# df -H
##3.更改权限;必须是先挂载再更改权限
[root@localhost ~]# chmod 777 /pub
[root@localhost ~]# ll -d /pub

[root@localhost ~]# mount
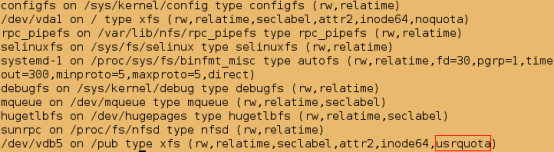
##4.以usrquota方式挂载
##必须先卸载,再挂载。不能直接remount
[root@localhost ~]# umount /pub
[root@localhost ~]# mount -o usrquota /dev/vdb5
##查看是否激活配额参数
[root@localhost ~]# mount
[root@localhost ~]# quotaon /dev/vdb5

##5.设定配额
[root@localhost ~]# cd /pub
[root@localhost pub]# edquota -u student
#################
Disk quotas for user student (uid 1000):
  Filesystem          blocks       soft       hard     inodes   soft     hard
  /dev/vdb5            0            0         20480      1        0        0

测试:
[root@localhost ~]# su - student
[student@localhost ~]$ dd if=/dev/zero of=/pub/file bs=1M count=10

[student@localhost ~]$ du -sh /pub/file

[student@localhost ~]$ dd if=/dev/zero of=/pub/file bs=1M count=20
[student@localhost ~]$ du -sh /pub/file

[student@localhost ~]$ dd if=/dev/zero of=/pub/file bs=1M count=21
[student@localhost ~]$ du -sh /pub/file

2.磁盘加密
luks加密:文件系统层在加密层之上  。如果你想要恶意破解密码,
那么即使密码最后被破解,也无法读取设备中存储的数据。这就起到了很好的保护作用
(1)磁盘设备的加密
[root@localhost ~]# cat /proc/partitions
[root@localhost ~]# df
[root@localhost ~]# umount /pub/
##1.设备加密
[root@localhost ~]# cryptsetup luksFormat /dev/vdb5
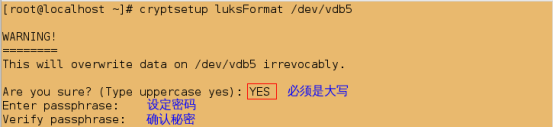
#LUKS表明设备已经被加密,不能直接挂载
[root@localhost ~]# mount /dev/vdb5 /mnt
mount: unknown filesystem type 'crypto_LUKS'

##2.设备解密;westos为解密后的虚拟设备/解密形态(名字任意)
[root@localhost ~]# cryptsetup open /dev/vdb5 westos
Enter passphrase for /dev/vdb5:

#查看系统中的虚拟设备
[root@localhost ~]# ll /dev/mapper/
total 0
crw-------. 1 root root 10, 236 Nov  9 19:47 control
lrwxrwxrwx. 1 root root       7 Nov  9 20:28 westos -> ../dm-0

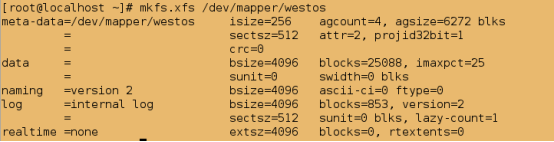
#格式化;必须先格式化,才能挂载
[root@localhost ~]# mkfs.xfs /dev/mapper/westos
#挂载;必须用解密形态挂载
[root@localhost ~]# mount /dev/mapper/westos  /mnt
[root@localhost ~]# df

[root@localhost ~]# cd /mnt
[root@localhost mnt]# ls
#建立文件
[root@localhost mnt]# touch file{1..10}
[root@localhost mnt]# ls
file1  file10  file2  file3  file4  file5  file6  file7  file8  file9
[root@localhost mnt]# cd
#卸载
[root@localhost ~]# umount /mnt
[root@localhost mnt]# cd
[root@localhost ~]# df

[root@localhost ~]# cd /mnt
#此时便无法再查看到刚建立的文件
[root@localhost mnt]# ls
##3.关闭解密
[root@localhost ~]# cryptsetup close westos
#此时便无法挂载
[root@localhost ~]# mount /dev/vdb5 /mnt
mount: unknown filesystem type 'crypto_LUKS'
#并且虚拟设备westos消失
[root@localhost ~]# ll /dev/mapper/
total 0
crw-------. 1 root root 10, 236 Nov  9 19:47 control

直观感受什么叫加密:
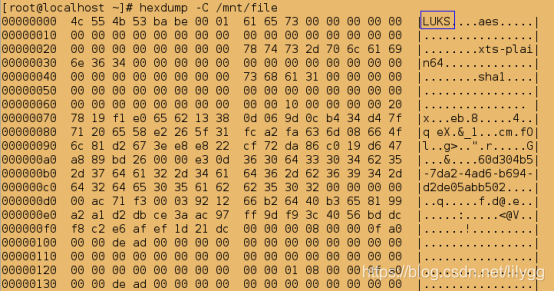
##截取;/dev/vdb5设备已经被加密
[root@localhost ~]# dd if=/dev/vdb5 of=/mnt/file bs=512 count=1

##LUKS表示加密
[root@localhost ~]# hexdump -C /mnt/file
[root@localhost ~]# cat /proc/partitions
##格式化;/dev/vdb1设备未被加密
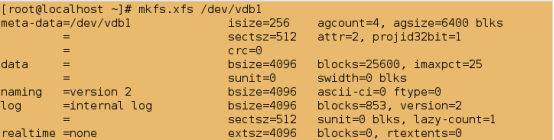
[root@localhost ~]# mkfs.xfs /dev/vdb1
##挂载
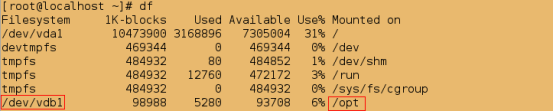
[root@localhost ~]# mount /dev/vdb1 /opt
[root@localhost ~]# df
[root@localhost ~]# cd /opt/
[root@localhost opt]# ls
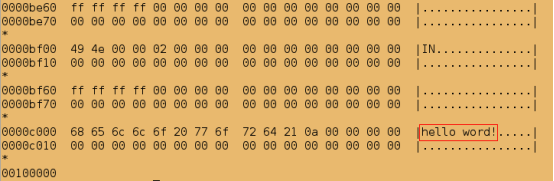
[root@localhost opt]# vim file
#################
hello word!
[root@localhost opt]# dd if=/dev/vdb1 of=/mnt/files bs=1M count=1

##在未加密的可设备中以查看到刚编写的文件的内容
[root@localhost opt]# hexdump -C /mnt/files
[root@localhost ~]# umount /dev/vdb1
(2).加密磁盘开机自动挂载
##1.开机自动挂载
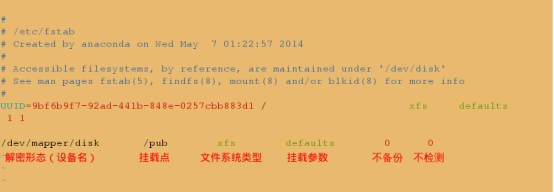
[root@localhost ~]# vim /etc/fstab
###############
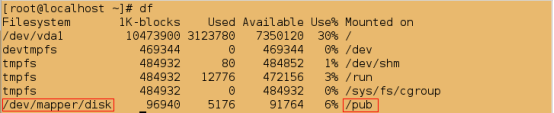
/dev/mapper/disk /pub xfs defaults 0 0
设备名(解密形态) 挂载点 文件系统类型 挂载参数 不备份 不检测
##2.开机自动解密,生成虚拟设备disk
[root@localhost ~]# vim /etc/crypttab
################
disk                             /dev/vdb5              /root/vdb5pass
解密形态(虚拟设备:名字任意)   真实设备              加密文件(名字任意)

##3.编写加密文件,设定密码;此密码需要与之前加密磁盘的密码相同,才能实现解密
[root@localhost ~]# vim /root/vdb5pass
###############
westos111

##密码文件一般不允许其他人可见
[root@localhost ~]# chmod 600 /root/vdb5pass
##4.关联设备与加密文件;注意/dev/vdb5设备必须为加密设备,加密了的设备才需要解密
[root@localhost ~]# cryptsetup luksAddKey /dev/vdb5 /root/vdb5pass
Enter any passphrase:
[root@localhost ~]# df

测试:
[root@localhost ~]# reboot
[root@localhost ~]# df

(3).删除加密磁盘开机自动挂载并永久性解密
##1.删除刚编写的所有文件的内容
[root@localhost ~]# vim  /etc/fstab
###############
删除:/dev/mapper/disk       /pub        xfs        defaults        0      0
[root@localhost ~]# vim /etc/crypttab
###############
删除:disk           /dev/vdb5          /root/vdb5pass
[root@localhost ~]# vim /root/vdb5pass
################
删除:westos111
[root@localhost ~]# df
##2.卸载
[root@localhost ~]# umount /pub
##3.关闭解密态(虚拟设备)
[root@localhost ~]# cryptsetup close disk
##4.重新格式化;
[root@localhost ~]# mkfs.xfs /dev/vdb5
mkfs.xfs: /dev/vdb5 appears to contain an existing filesystem (crypto_LUKS).
mkfs.xfs: Use the -f option to force overwrite.
[root@localhost ~]# mkfs.xfs /dev/vdb5 -f

测试:
##此时/dev/vdb5设备恢复为非加密设备,即挂载时便不用再需要解密
[root@localhost ~]# mount /dev/vdb5 /mnt
[root@localhost ~]# df

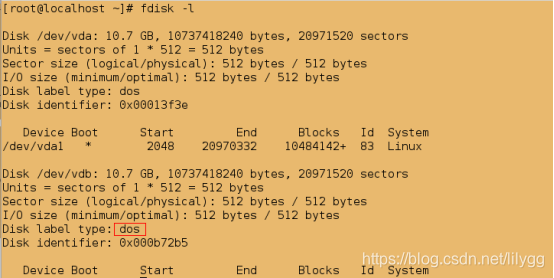
3.磁盘的两种类型
mbr   #分为主分区p(primary共有四个分区)和扩展分区e(expended容器;逻辑分区)最多只能划分4个主分区。
为了存储更多的数据,所以将第4个分区化分为扩展分区(容器),可将容纳不下的数据放到这个扩展分区中。
在linux中扩展分区最多划分16个逻辑分区,并且每个不超过2t

gpt   #不分主分区和扩展分区,最多可划分128个分区,相对于mbr 分区方式来说,
它可以存储更多的数据,但它的兼容性较差。
(1)mbr------>gpt
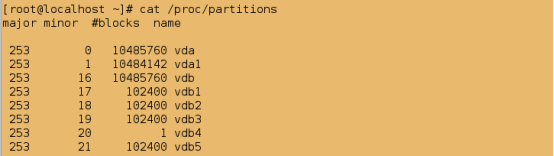
[root@localhost ~]# cat /proc/partitions
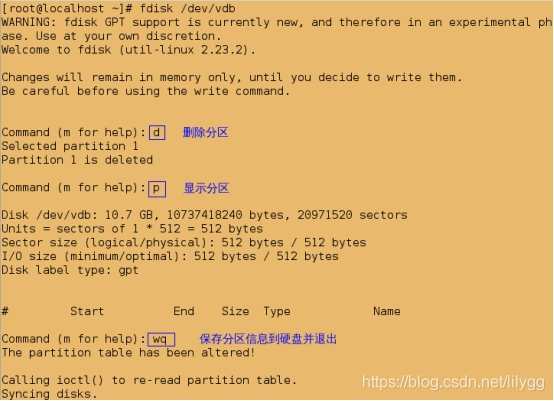
##1.删除所有分区
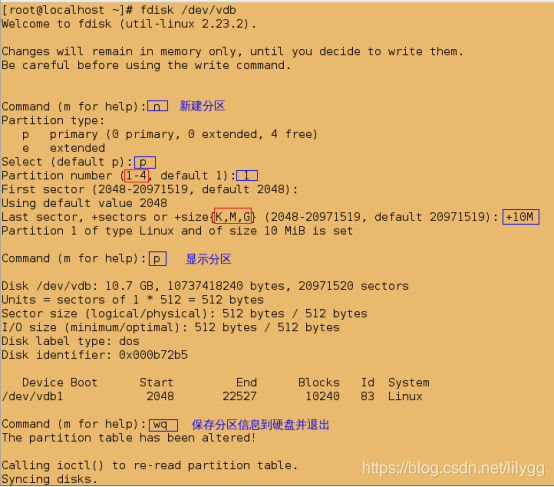
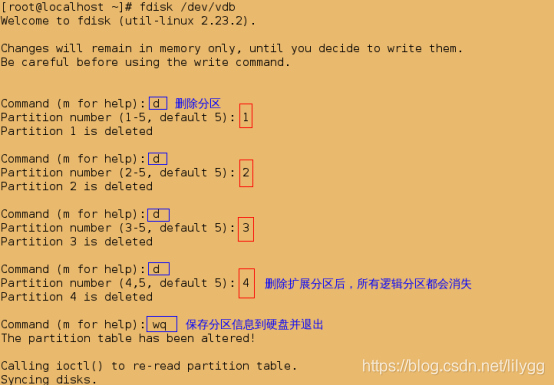
[root@localhost ~]# fdisk /dev/vdb
[root@localhost ~]# partprobe
[root@localhost ~]# cat /proc/partitions

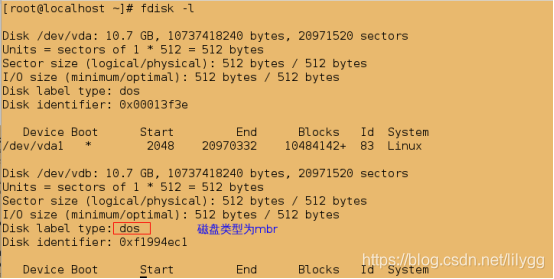
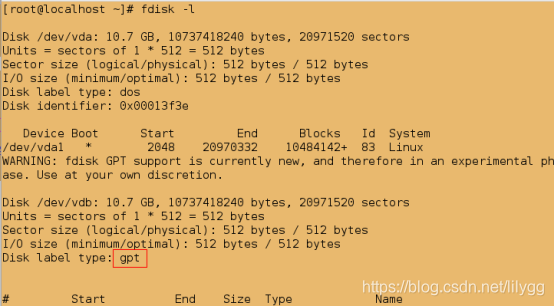
[root@localhost ~]# fdisk -l
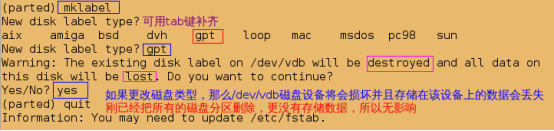
##2.更改磁盘类型为gpt
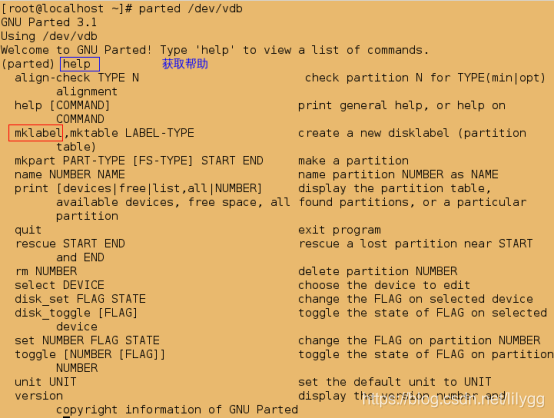
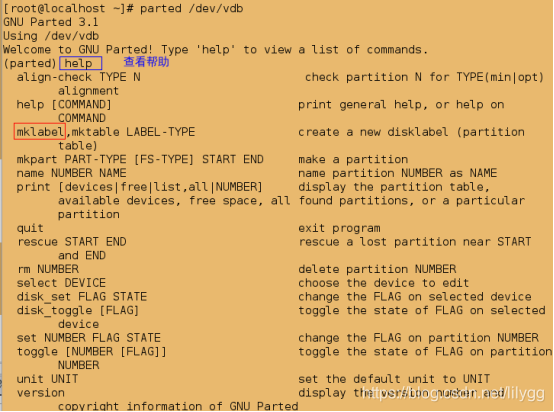
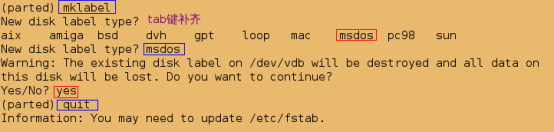
[root@localhost ~]# parted /dev/vdb
测试:
[root@localhost ~]# fdisk -l
##添加分区
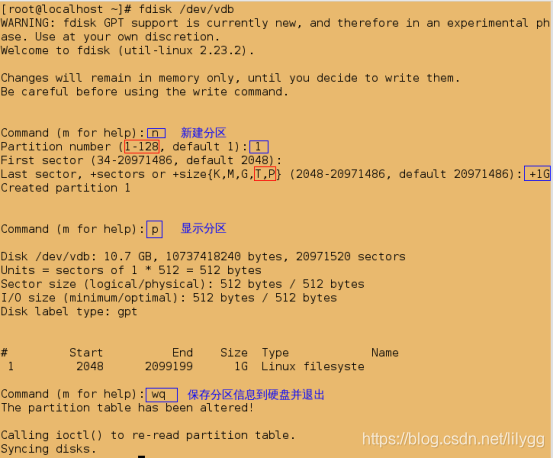
[root@localhost ~]# fdisk /dev/vdb
(2) gpt------>mbr
##1.删除所有分区
[root@localhost ~]# fdisk /dev/vdb
##同步分区表
[root@localhost ~]# partprobe
[root@localhost ~]# cat /proc/partitions

##2.更改磁盘类型为mbr
[root@localhost ~]# parted /dev/vdb
测试:
[root@localhost ~]# fdisk -l