模块,用一砣代码实现了某个功能的代码集合。
类似于函数式编程和面向过程编程,函数式编程则完成一个功能,其他代码用来调用即可,提供了代码的重用性和代码间的耦合。而对于一个复杂的功能来,可能需要多个函数才能完成(函数又可以在不同的.py文件中),n个 .py 文件组成的代码集合就称为模块。
如:os 是系统相关的模块;file是文件操作相关的模块
模块分为三种:
- 自定义模块
- 第三方模块
- 内置模块
自定义模块
1、定义模块
情景一:

情景二:

情景三:

2、导入模块
Python之所以应用越来越广泛,在一定程度上也依赖于其为程序员提供了大量的模块以供使用,如果想要使用模块,则需要导入。导入模块有一下几种方法:
|
1
2
3
4
|
import
module
from
module.xx.xx
import
xx
from
module.xx.xx
import
xx as rename
from
module.xx.xx
import
*
|
导入模块其实就是告诉Python解释器去解释那个py文件
- 导入一个py文件,解释器解释该py文件
- 导入一个包,解释器解释该包下的 __init__.py 文件 【py2.7】
那么问题来了,导入模块时是根据那个路径作为基准来进行的呢?即:sys.path
|
1
2
3
4
5
|
import
sys
print
sys.path
结果:
[
'/Users/wupeiqi/PycharmProjects/calculator/p1/pp1'
,
'/usr/local/lib/python2.7/site-packages/setuptools-15.2-py2.7.egg'
,
'/usr/local/lib/python2.7/site-packages/distribute-0.6.28-py2.7.egg'
,
'/usr/local/lib/python2.7/site-packages/MySQL_python-1.2.4b4-py2.7-macosx-10.10-x86_64.egg'
,
'/usr/local/lib/python2.7/site-packages/xlutils-1.7.1-py2.7.egg'
,
'/usr/local/lib/python2.7/site-packages/xlwt-1.0.0-py2.7.egg'
,
'/usr/local/lib/python2.7/site-packages/xlrd-0.9.3-py2.7.egg'
,
'/usr/local/lib/python2.7/site-packages/tornado-4.1-py2.7-macosx-10.10-x86_64.egg'
,
'/usr/local/lib/python2.7/site-packages/backports.ssl_match_hostname-3.4.0.2-py2.7.egg'
,
'/usr/local/lib/python2.7/site-packages/certifi-2015.4.28-py2.7.egg'
,
'/usr/local/lib/python2.7/site-packages/pyOpenSSL-0.15.1-py2.7.egg'
,
'/usr/local/lib/python2.7/site-packages/six-1.9.0-py2.7.egg'
,
'/usr/local/lib/python2.7/site-packages/cryptography-0.9.1-py2.7-macosx-10.10-x86_64.egg'
,
'/usr/local/lib/python2.7/site-packages/cffi-1.1.1-py2.7-macosx-10.10-x86_64.egg'
,
'/usr/local/lib/python2.7/site-packages/ipaddress-1.0.7-py2.7.egg'
,
'/usr/local/lib/python2.7/site-packages/enum34-1.0.4-py2.7.egg'
,
'/usr/local/lib/python2.7/site-packages/pyasn1-0.1.7-py2.7.egg'
,
'/usr/local/lib/python2.7/site-packages/idna-2.0-py2.7.egg'
,
'/usr/local/lib/python2.7/site-packages/pycparser-2.13-py2.7.egg'
,
'/usr/local/lib/python2.7/site-packages/Django-1.7.8-py2.7.egg'
,
'/usr/local/lib/python2.7/site-packages/paramiko-1.10.1-py2.7.egg'
,
'/usr/local/lib/python2.7/site-packages/gevent-1.0.2-py2.7-macosx-10.10-x86_64.egg'
,
'/usr/local/lib/python2.7/site-packages/greenlet-0.4.7-py2.7-macosx-10.10-x86_64.egg'
,
'/Users/wupeiqi/PycharmProjects/calculator'
,
'/usr/local/Cellar/python/2.7.9/Frameworks/Python.framework/Versions/2.7/lib/python27.zip'
,
'/usr/local/Cellar/python/2.7.9/Frameworks/Python.framework/Versions/2.7/lib/python2.7'
,
'/usr/local/Cellar/python/2.7.9/Frameworks/Python.framework/Versions/2.7/lib/python2.7/plat-darwin'
,
'/usr/local/Cellar/python/2.7.9/Frameworks/Python.framework/Versions/2.7/lib/python2.7/plat-mac'
,
'/usr/local/Cellar/python/2.7.9/Frameworks/Python.framework/Versions/2.7/lib/python2.7/plat-mac/lib-scriptpackages'
,
'/usr/local/Cellar/python/2.7.9/Frameworks/Python.framework/Versions/2.7/lib/python2.7/lib-tk'
,
'/usr/local/Cellar/python/2.7.9/Frameworks/Python.framework/Versions/2.7/lib/python2.7/lib-old'
,
'/usr/local/Cellar/python/2.7.9/Frameworks/Python.framework/Versions/2.7/lib/python2.7/lib-dynload'
,
'/usr/local/lib/python2.7/site-packages'
,
'/Library/Python/2.7/site-packages'
]
|
如果sys.path路径列表没有你想要的路径,可以通过 sys.path.append('路径') 添加。
|
1
2
3
4
|
import
sys
import
os
project_path
=
os.path.dirname(os.path.dirname(os.path.abspath(__file__)))
sys.path.append(project_path)
|
模块
内置模块是Python自带的功能,在使用内置模块相应的功能时,需要【先导入】再【使用】
一、sys
用于提供对Python解释器相关的操作:
|
1
2
3
4
5
6
7
8
9
|
sys.argv 命令行参数
List
,第一个元素是程序本身路径
sys.exit(n) 退出程序,正常退出时exit(
0
)
sys.version 获取Python解释程序的版本信息
sys.maxint 最大的
Int
值
sys.path 返回模块的搜索路径,初始化时使用PYTHONPATH环境变量的值
sys.platform 返回操作系统平台名称
sys.stdin 输入相关
sys.stdout 输出相关
sys.stderror 错误相关
|
 进度百分比
进度百分比
二、os
用于提供系统级别的操作:
|
1
2
3
4
5
6
7
8
9
10
11
12
13
14
15
16
17
18
19
20
21
22
23
24
25
26
27
28
29
|
os.getcwd() 获取当前工作目录,即当前python脚本工作的目录路径
os.chdir(
"dirname"
) 改变当前脚本工作目录;相当于shell下cd
os.curdir 返回当前目录: (
'.'
)
os.pardir 获取当前目录的父目录字符串名:(
'..'
)
os.makedirs(
'dir1/dir2'
) 可生成多层递归目录
os.removedirs(
'dirname1'
) 若目录为空,则删除,并递归到上一级目录,如若也为空,则删除,依此类推
os.mkdir(
'dirname'
) 生成单级目录;相当于shell中mkdir dirname
os.rmdir(
'dirname'
) 删除单级空目录,若目录不为空则无法删除,报错;相当于shell中rmdir dirname
os.listdir(
'dirname'
) 列出指定目录下的所有文件和子目录,包括隐藏文件,并以列表方式打印
os.remove() 删除一个文件
os.rename(
"oldname"
,
"new"
) 重命名文件
/
目录
os.stat(
'path/filename'
) 获取文件
/
目录信息
os.sep 操作系统特定的路径分隔符,win下为
"\\",Linux下为"
/
"
os.linesep 当前平台使用的行终止符,win下为
"\t\n"
,Linux下为
"\n"
os.pathsep 用于分割文件路径的字符串
os.name 字符串指示当前使用平台。win
-
>
'nt'
; Linux
-
>
'posix'
os.system(
"bash command"
) 运行shell命令,直接显示
os.environ 获取系统环境变量
os.path.abspath(path) 返回path规范化的绝对路径
os.path.split(path) 将path分割成目录和文件名二元组返回
os.path.dirname(path) 返回path的目录。其实就是os.path.split(path)的第一个元素
os.path.basename(path) 返回path最后的文件名。如何path以/或\结尾,那么就会返回空值。即os.path.split(path)的第二个元素
os.path.exists(path) 如果path存在,返回
True
;如果path不存在,返回
False
os.path.isabs(path) 如果path是绝对路径,返回
True
os.path.isfile(path) 如果path是一个存在的文件,返回
True
。否则返回
False
os.path.isdir(path) 如果path是一个存在的目录,则返回
True
。否则返回
False
os.path.join(path1[, path2[, ...]]) 将多个路径组合后返回,第一个绝对路径之前的参数将被忽略
os.path.getatime(path) 返回path所指向的文件或者目录的最后存取时间
os.path.getmtime(path) 返回path所指向的文件或者目录的最后修改时间
|
三、hashlib
用于加密相关的操作,代替了md5模块和sha模块,主要提供 SHA1, SHA224, SHA256, SHA384, SHA512 ,MD5 算法
|
1
2
3
4
5
6
7
8
9
10
11
12
13
14
15
16
17
18
19
20
21
22
23
24
25
26
27
28
29
30
31
32
33
34
|
import
hashlib
# ######## md5 ########
hash
=
hashlib.md5()
# help(hash.update)
hash
.update(bytes(
'admin'
, encoding
=
'utf-8'
))
print
(
hash
.hexdigest())
print
(
hash
.digest())
######## sha1 ########
hash
=
hashlib.sha1()
hash
.update(bytes(
'admin'
, encoding
=
'utf-8'
))
print
(
hash
.hexdigest())
# ######## sha256 ########
hash
=
hashlib.sha256()
hash
.update(bytes(
'admin'
, encoding
=
'utf-8'
))
print
(
hash
.hexdigest())
# ######## sha384 ########
hash
=
hashlib.sha384()
hash
.update(bytes(
'admin'
, encoding
=
'utf-8'
))
print
(
hash
.hexdigest())
# ######## sha512 ########
hash
=
hashlib.sha512()
hash
.update(bytes(
'admin'
, encoding
=
'utf-8'
))
print
(
hash
.hexdigest())
|
以上加密算法虽然依然非常厉害,但时候存在缺陷,即:通过撞库可以反解。所以,有必要对加密算法中添加自定义key再来做加密。
|
1
2
3
4
5
6
7
|
import
hashlib
# ######## md5 ########
hash
=
hashlib.md5(bytes(
'898oaFs09f'
,encoding
=
"utf-8"
))
hash
.update(bytes(
'admin'
,encoding
=
"utf-8"
))
print
(
hash
.hexdigest())
|
python内置还有一个 hmac 模块,它内部对我们创建 key 和 内容 进行进一步的处理然后再加密
|
1
2
3
4
5
|
import
hmac
h
=
hmac.new(bytes(
'898oaFs09f'
,encoding
=
"utf-8"
))
h.update(bytes(
'admin'
,encoding
=
"utf-8"
))
print
(h.hexdigest())
|
四、random
|
1
2
3
4
5
|
import
random
print
(random.random())
print
(random.randint(
1
,
2
))
print
(random.randrange(
1
,
10
))
|
随机验证码
五、re
python中re模块提供了正则表达式相关操作
字符:
. 匹配除换行符以外的任意字符
\w 匹配字母或数字或下划线或汉字
\s 匹配任意的空白符
\d 匹配数字
\b 匹配单词的开始或结束
^ 匹配字符串的开始
$ 匹配字符串的结束
次数:
* 重复零次或更多次
+ 重复一次或更多次
? 重复零次或一次
{n} 重复n次
{n,} 重复n次或更多次
{n,m} 重复n到m次
match
|
1
2
3
4
5
6
7
8
9
10
11
12
13
14
15
16
17
18
19
20
21
22
23
24
25
|
# match,从起始位置开始匹配,匹配成功返回一个对象,未匹配成功返回None
match(pattern, string, flags
=
0
)
# pattern: 正则模型
# string : 要匹配的字符串
# falgs : 匹配模式
X VERBOSE Ignore whitespace
and
comments
for
nicer looking RE's.
I IGNORECASE Perform case
-
insensitive matching.
M MULTILINE
"^"
matches the beginning of lines (after a newline)
as well as the string.
"$"
matches the end of lines (before a newline) as well
as the end of the string.
S DOTALL
"."
matches
any
character at
all
, including the newline.
A ASCII For string patterns, make \w, \W, \b, \B, \d, \D
match the corresponding ASCII character categories
(rather than the whole
Unicode
categories, which
is
the
default).
For bytes patterns, this flag
is
the only available
behaviour
and
needn't be specified.
L LOCALE Make \w, \W, \b, \B, dependent on the current locale.
U
UNICODE
For compatibility only. Ignored
for
string patterns (it
is
the default),
and
forbidden
for
bytes patterns.
|
Demo
search
|
1
2
|
# search,浏览整个字符串去匹配第一个,未匹配成功返回None
# search(pattern, string, flags=0)
|
demo
findall
|
1
2
3
|
# findall,获取非重复的匹配列表;如果有一个组则以列表形式返回,且每一个匹配均是字符串;如果模型中有多个组,则以列表形式返回,且每一个匹配均是元祖;
# 空的匹配也会包含在结果中
#findall(pattern, string, flags=0)
|
Demo
sub
|
1
2
3
4
5
6
7
8
|
# sub,替换匹配成功的指定位置字符串
sub(pattern, repl, string, count
=
0
, flags
=
0
)
# pattern: 正则模型
# repl : 要替换的字符串或可执行对象
# string : 要匹配的字符串
# count : 指定匹配个数
# flags : 匹配模式
|
Demo
split
|
1
2
3
4
5
6
7
|
# split,根据正则匹配分割字符串
split(pattern, string, maxsplit
=
0
, flags
=
0
)
# pattern: 正则模型
# string : 要匹配的字符串
# maxsplit:指定分割个数
# flags : 匹配模式
|
Demo
常用正则表达式
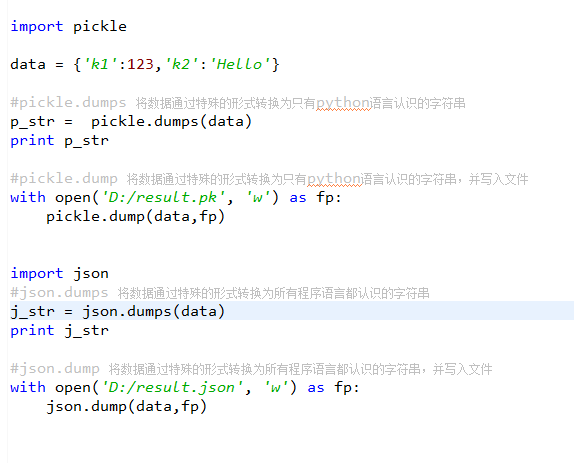
六、序列化
Python中用于序列化的两个模块
- json 用于【字符串】和 【python基本数据类型】 间进行转换
- pickle 用于【python特有的类型】 和 【python基本数据类型】间进行转换
Json模块提供了四个功能:dumps、dump、loads、load
pickle模块提供了四个功能:dumps、dump、loads、load
七、configparser
configparser用于处理特定格式的文件,其本质上是利用open来操作文件。
指定格式
1、获取所有节点
|
1
2
3
4
5
6
|
import
configparser
config
=
configparser.ConfigParser()
config.read(
'xxxooo'
, encoding
=
'utf-8'
)
ret
=
config.sections()
print
(ret)
|
2、获取指定节点下所有的键值对
|
1
2
3
4
5
6
|
import
configparser
config
=
configparser.ConfigParser()
config.read(
'xxxooo'
, encoding
=
'utf-8'
)
ret
=
config.items(
'section1'
)
print
(ret)
|
3、获取指定节点下所有的建
|
1
2
3
4
5
6
|
import
configparser
config
=
configparser.ConfigParser()
config.read(
'xxxooo'
, encoding
=
'utf-8'
)
ret
=
config.options(
'section1'
)
print
(ret)
|
4、获取指定节点下指定key的值
|
1
2
3
4
5
6
7
8
9
10
11
12
|
import
configparser
config
=
configparser.ConfigParser()
config.read(
'xxxooo'
, encoding
=
'utf-8'
)
v
=
config.get(
'section1'
,
'k1'
)
# v = config.getint('section1', 'k1')
# v = config.getfloat('section1', 'k1')
# v = config.getboolean('section1', 'k1')
print
(v)
|
5、检查、删除、添加节点
|
1
2
3
4
5
6
7
8
9
10
11
12
13
14
15
16
17
|
import
configparser
config
=
configparser.ConfigParser()
config.read(
'xxxooo'
, encoding
=
'utf-8'
)
# 检查
has_sec
=
config.has_section(
'section1'
)
print
(has_sec)
# 添加节点
config.add_section(
"SEC_1"
)
config.write(
open
(
'xxxooo'
,
'w'
))
# 删除节点
config.remove_section(
"SEC_1"
)
config.write(
open
(
'xxxooo'
,
'w'
))
|
6、检查、删除、设置指定组内的键值对
|
1
2
3
4
5
6
7
8
9
10
11
12
13
14
15
16
|
import
configparser
config
=
configparser.ConfigParser()
config.read(
'xxxooo'
, encoding
=
'utf-8'
)
# 检查
has_opt
=
config.has_option(
'section1'
,
'k1'
)
print
(has_opt)
# 删除
config.remove_option(
'section1'
,
'k1'
)
config.write(
open
(
'xxxooo'
,
'w'
))
# 设置
config.
set
(
'section1'
,
'k10'
,
"123"
)
config.write(
open
(
'xxxooo'
,
'w'
))
|
八、XML
XML是实现不同语言或程序之间进行数据交换的协议,XML文件格式如下:

<data>
    <country name="Liechtenstein">
        <rank updated="yes">2</rank>
        <year>2023</year>
        <gdppc>141100</gdppc>
        <neighbor direction="E" name="Austria" />
        <neighbor direction="W" name="Switzerland" />
    </country>
    <country name="Singapore">
        <rank updated="yes">5</rank>
        <year>2026</year>
        <gdppc>59900</gdppc>
        <neighbor direction="N" name="Malaysia" />
    </country>
    <country name="Panama">
        <rank updated="yes">69</rank>
        <year>2026</year>
        <gdppc>13600</gdppc>
        <neighbor direction="W" name="Costa Rica" />
        <neighbor direction="E" name="Colombia" />
    </country>
</data>
1、解析XML
利用ElementTree.XML将字符串解析成xml对象
利用ElementTree.parse将文件直接解析成xml对象
2、操作XML
XML格式类型是节点嵌套节点,对于每一个节点均有以下功能,以便对当前节点进行操作:
节点功能一览表
由于 每个节点 都具有以上的方法,并且在上一步骤中解析时均得到了root(xml文件的根节点),so 可以利用以上方法进行操作xml文件。
a. 遍历XML文档的所有内容
b、遍历XML中指定的节点
c、修改节点内容
由于修改的节点时,均是在内存中进行,其不会影响文件中的内容。所以,如果想要修改,则需要重新将内存中的内容写到文件。
d、删除节点
3、创建XML文档
创建方式(一)
创建方式(二)
创建方式(三)
由于原生保存的XML时默认无缩进,如果想要设置缩进的话, 需要修改保存方式:
View Code
4、命名空间
详细介绍,猛击这里
命名空间
九、requests
Python标准库中提供了:urllib等模块以供Http请求,但是,它的 API 太渣了。它是为另一个时代、另一个互联网所创建的。它需要巨量的工作,甚至包括各种方法覆盖,来完成最简单的任务。
发送GET请求
发送携带请求头的GET请求
注:更多见Python官方文档:https://docs.python.org/3.5/library/urllib.request.html#module-urllib.request
Requests 是使用 Apache2 Licensed 许可证的 基于Python开发的HTTP 库,其在Python内置模块的基础上进行了高度的封装,从而使得Pythoner进行网络请求时,变得美好了许多,使用Requests可以轻而易举的完成浏览器可有的任何操作。
1、安装模块
|
1
|
pip3 install requests
|
2、使用模块
GET请求
POST请求
其他请求
更多requests模块相关的文档见:http://cn.python-requests.org/zh_CN/latest/
3、Http请求和XML实例
实例:检测QQ账号是否在线
View Code
实例:查看火车停靠信息
View Code
注:更多接口猛击这里
十、logging
用于便捷记录日志且线程安全的模块
1、单文件日志
|
1
2
3
4
5
6
7
8
9
10
11
12
13
14
|
import
logging
logging.basicConfig(filename
=
'log.log'
,
format
=
'%(asctime)s - %(name)s - %(levelname)s -%(module)s: %(message)s'
,
datefmt
=
'%Y-%m-%d %H:%M:%S %p'
,
level
=
10
)
logging.debug(
'debug'
)
logging.info(
'info'
)
logging.warning(
'warning'
)
logging.error(
'error'
)
logging.critical(
'critical'
)
logging.log(
10
,
'log'
)
|
日志等级:
CRITICAL = 50
FATAL = CRITICAL
ERROR = 40
WARNING = 30
WARN = WARNING
INFO = 20
DEBUG = 10
NOTSET = 0
注:只有【当前写等级】大于【日志等级】时,日志文件才被记录。
日志记录格式:
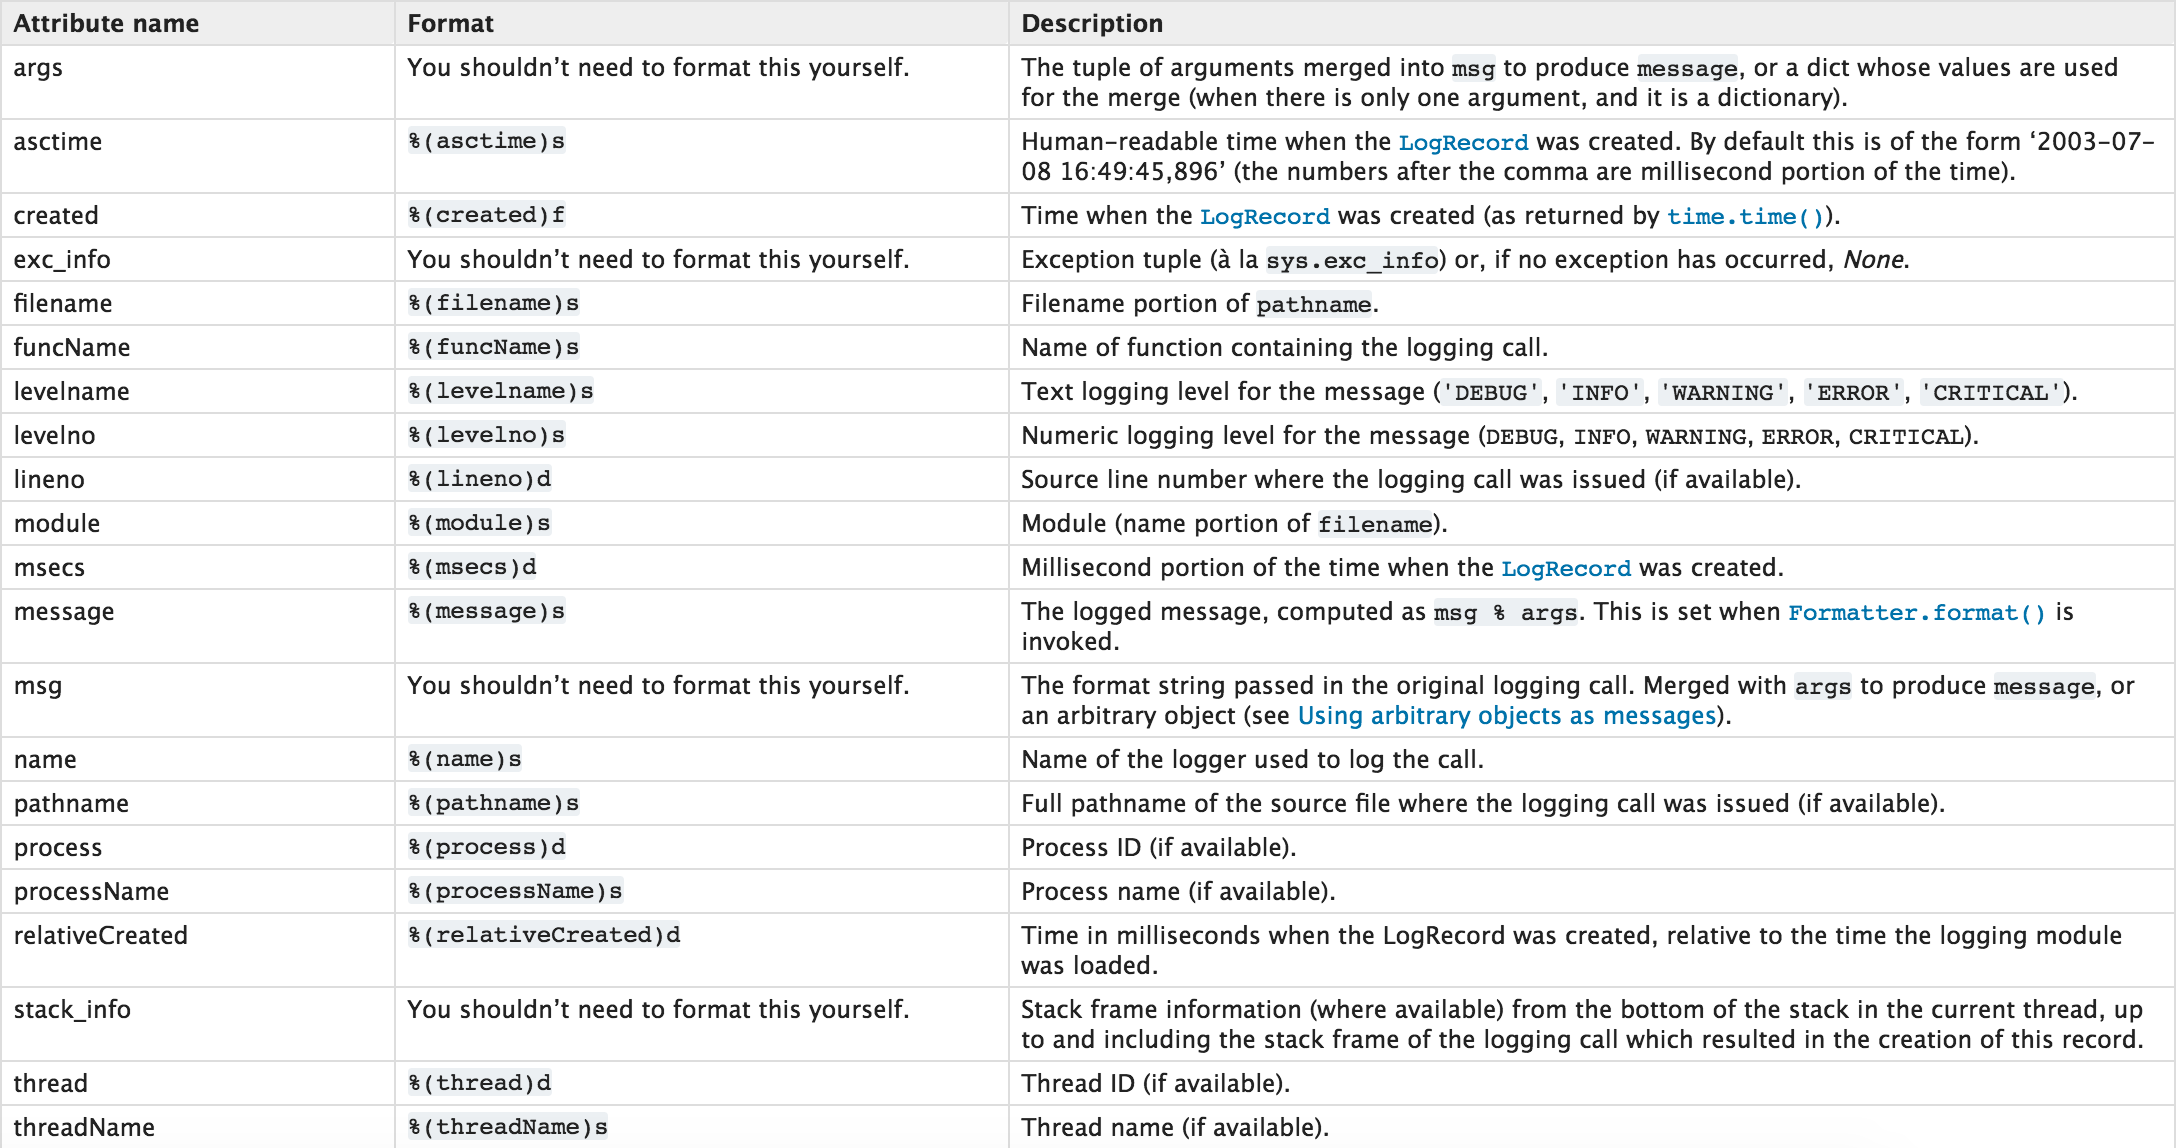
2、多文件日志
对于上述记录日志的功能,只能将日志记录在单文件中,如果想要设置多个日志文件,logging.basicConfig将无法完成,需要自定义文件和日志操作对象。
日志一
日志(二)
如上述创建的两个日志对象
- 当使用【logger1】写日志时,会将相应的内容写入 l1_1.log 和 l1_2.log 文件中
- 当使用【logger2】写日志时,会将相应的内容写入 l2_1.log 文件中
十一、系统命令
可以执行shell命令的相关模块和函数有:
- os.system
- os.spawn*
- os.popen* --废弃
- popen2.* --废弃
- commands.* --废弃,3.x中被移除
commands
以上执行shell命令的相关的模块和函数的功能均在 subprocess 模块中实现,并提供了更丰富的功能。
call
执行命令,返回状态码
|
1
2
|
ret
=
subprocess.call([
"ls"
,
"-l"
], shell
=
False
)
ret
=
subprocess.call(
"ls -l"
, shell
=
True
)
|
check_call
执行命令,如果执行状态码是 0 ,则返回0,否则抛异常
|
1
2
|
subprocess.check_call([
"ls"
,
"-l"
])
subprocess.check_call(
"exit 1"
, shell
=
True
)
|
check_output
执行命令,如果状态码是 0 ,则返回执行结果,否则抛异常
|
1
2
|
subprocess.check_output([
"echo"
,
"Hello World!"
])
subprocess.check_output(
"exit 1"
, shell
=
True
)
|
subprocess.Popen(...)
用于执行复杂的系统命令
参数:
- args:shell命令,可以是字符串或者序列类型(如:list,元组)
- bufsize:指定缓冲。0 无缓冲,1 行缓冲,其他 缓冲区大小,负值 系统缓冲
- stdin, stdout, stderr:分别表示程序的标准输入、输出、错误句柄
- preexec_fn:只在Unix平台下有效,用于指定一个可执行对象(callable object),它将在子进程运行之前被调用
- close_sfs:在windows平台下,如果close_fds被设置为True,则新创建的子进程将不会继承父进程的输入、输出、错误管道。
所以不能将close_fds设置为True同时重定向子进程的标准输入、输出与错误(stdin, stdout, stderr)。 - shell:同上
- cwd:用于设置子进程的当前目录
- env:用于指定子进程的环境变量。如果env = None,子进程的环境变量将从父进程中继承。
- universal_newlines:不同系统的换行符不同,True -> 同意使用 \n
- startupinfo与createionflags只在windows下有效
将被传递给底层的CreateProcess()函数,用于设置子进程的一些属性,如:主窗口的外观,进程的优先级等等
执行普通命令
终端输入的命令分为两种:
- 输入即可得到输出,如:ifconfig
- 输入进行某环境,依赖再输入,如:python
View Code
View Code
View Code
View Code
十二、shutil
高级的 文件、文件夹、压缩包 处理模块
shutil.copyfileobj(fsrc, fdst[, length])
将文件内容拷贝到另一个文件中
|
1
2
3
|
import
shutil
shutil.copyfileobj(
open
(
'old.xml'
,
'r'
),
open
(
'new.xml'
,
'w'
))
|
shutil.copyfile(src, dst)
拷贝文件
|
1
|
shutil.copyfile(
'f1.log'
,
'f2.log'
)
|
shutil.copymode(src, dst)
仅拷贝权限。内容、组、用户均不变
|
1
|
shutil.copymode(
'f1.log'
,
'f2.log'
)
|
shutil.copystat(src, dst)
仅拷贝状态的信息,包括:mode bits, atime, mtime, flags
|
1
|
shutil.copystat(
'f1.log'
,
'f2.log'
)
|
shutil.copy(src, dst)
拷贝文件和权限
|
1
2
3
|
import
shutil
shutil.copy(
'f1.log'
,
'f2.log'
)
|
shutil.copy2(src, dst)
拷贝文件和状态信息
|
1
2
3
|
import
shutil
shutil.copy2(
'f1.log'
,
'f2.log'
)
|
shutil.ignore_patterns(*patterns)
shutil.copytree(src, dst, symlinks=False, ignore=None)
递归的去拷贝文件夹
|
1
2
3
|
import
shutil
shutil.copytree(
'folder1'
,
'folder2'
, ignore
=
shutil.ignore_patterns(
'*.pyc'
,
'tmp*'
))
|
View Code
shutil.rmtree(path[, ignore_errors[, onerror]])
递归的去删除文件
|
1
2
3
|
import
shutil
shutil.rmtree(
'folder1'
)
|
shutil.move(src, dst)
递归的去移动文件,它类似mv命令,其实就是重命名。
|
1
2
3
|
import
shutil
shutil.move(
'folder1'
,
'folder3'
)
|
shutil.make_archive(base_name, format,...)
创建压缩包并返回文件路径,例如:zip、tar
创建压缩包并返回文件路径,例如:zip、tar
- base_name: 压缩包的文件名,也可以是压缩包的路径。只是文件名时,则保存至当前目录,否则保存至指定路径,
如:www =>保存至当前路径
如:/Users/wupeiqi/www =>保存至/Users/wupeiqi/ - format: 压缩包种类,“zip”, “tar”, “bztar”,“gztar”
- root_dir: 要压缩的文件夹路径(默认当前目录)
- owner: 用户,默认当前用户
- group: 组,默认当前组
- logger: 用于记录日志,通常是logging.Logger对象
|
1
2
3
4
5
6
7
8
|
#将 /Users/wupeiqi/Downloads/test 下的文件打包放置当前程序目录
import
shutil
ret
=
shutil.make_archive(
"wwwwwwwwww"
,
'gztar'
, root_dir
=
'/Users/wupeiqi/Downloads/test'
)
#将 /Users/wupeiqi/Downloads/test 下的文件打包放置 /Users/wupeiqi/目录
import
shutil
ret
=
shutil.make_archive(
"/Users/wupeiqi/wwwwwwwwww"
,
'gztar'
, root_dir
=
'/Users/wupeiqi/Downloads/test'
)
|
shutil 对压缩包的处理是调用 ZipFile 和 TarFile 两个模块来进行的,详细:
zipfile解压缩
tarfile解压缩
十三、paramiko
paramiko是一个用于做远程控制的模块,使用该模块可以对远程服务器进行命令或文件操作,值得一说的是,fabric和ansible内部的远程管理就是使用的paramiko来现实。
1、下载安装
|
1
2
3
|
pycrypto,由于 paramiko 模块内部依赖pycrypto,所以先下载安装pycrypto
pip3 install pycrypto
pip3 install paramiko
|
2、模块使用
执行命令 - 用户名+密码
执行命令 - 密钥
上传或下载文件 - 用户名+密码
上传或下载文件 - 密钥
十四、time
时间相关的操作,时间有三种表示方式:
- 时间戳 1970年1月1日之后的秒,即:time.time()
- 格式化的字符串 2014-11-11 11:11, 即:time.strftime('%Y-%m-%d')
- 结构化时间 元组包含了:年、日、星期等... time.struct_time 即:time.localtime()
|
1
2
3
4
5
6
7
8
9
10
11
12
13
14
15
16
17
18
19
20
21
22
23
24
25
|
print
time.time()
print
time.mktime(time.localtime())
print
time.gmtime()
#可加时间戳参数
print
time.localtime()
#可加时间戳参数
print
time.strptime(
'2014-11-11'
,
'%Y-%m-%d'
)
print
time.strftime(
'%Y-%m-%d'
)
#默认当前时间
print
time.strftime(
'%Y-%m-%d'
,time.localtime())
#默认当前时间
print
time.asctime()
print
time.asctime(time.localtime())
print
time.ctime(time.time())
import
datetime
'''
datetime.date:表示日期的类。常用的属性有year, month, day
datetime.time:表示时间的类。常用的属性有hour, minute, second, microsecond
datetime.datetime:表示日期时间
datetime.timedelta:表示时间间隔,即两个时间点之间的长度
timedelta([days[, seconds[, microseconds[, milliseconds[, minutes[, hours[, weeks]]]]]]])
strftime("%Y-%m-%d")
'''
import
datetime
print
datetime.datetime.now()
print
datetime.datetime.now()
-
datetime.timedelta(days
=
5
)
|
格式化占位符
练习题:
1、通过HTTP请求和XML实现获取电视节目
API:http://www.webxml.com.cn/webservices/ChinaTVprogramWebService.asmx
2、通过HTTP请求和JSON实现获取天气状况
API:http://wthrcdn.etouch.cn/weather_mini?city=北京