1、mvc 框架图
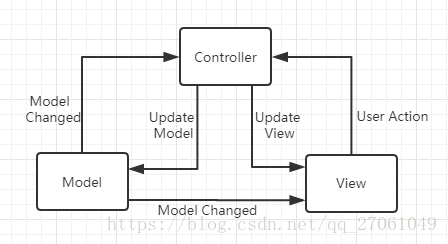
经典的mvc 模式如图所示
1)Model (模型层) 在 MVC 中 Model 一般用来保存数据的状态,比如数据存储,网络请求。同时还与View 存在一定的耦合,通过某种事件机制(比如观察者模式) 通知 View 状态的改变来让view 更新。
2)View (视图层)一般由一些GUI 组建组成,同时响应用户的交互行为并触发 Controller 的逻辑,View 还有可能修改Model 的状态 以使其与 Model 同步,View 还会在model 中注册 model 事件的改变。以此来刷新自己并展示给用户。
3)Control (控制层)控制器由View 根据用户行为触发并响应来自view 的用户交互,然后根据view 的事件逻辑来修改对应的Model, Control 并不关心 View 如何展示 相关数据或状态,而是通过修改 Model 来实现view 的数据的刷新。
2、MVC 在Android 模式里的实现
在Android 中 MVC 模式运用的特别多,大的方面。我们可以把一个xml 看作一个 View, Activity 看作一个 Control , Model 则是由相关的数据操作类来承担。
我们以一个图爿的加载和清除为例:
-
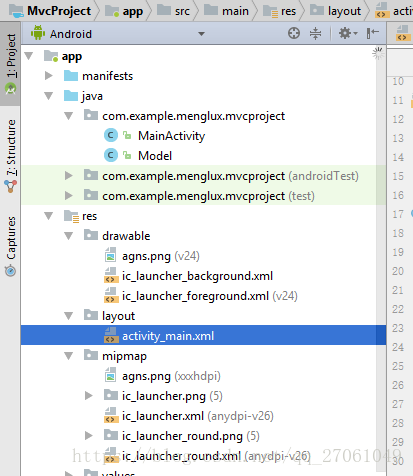
代码架构:
-
Model 类,用于数据的运算 存储
package com.example.menglux.mvcproject;


import android.content.Context;
import android.graphics.Bitmap;
import android.graphics.BitmapFactory;
import android.os.Handler;

/**
 * Created by menglux on 15/10/2018.
 */

public class Model {
    private final Handler mHandler = new Handler() ;
    private OnStateChangeListener mListener;  //Model 状态改变监听器

    private Bitmap mBitmap;   //展示的图片
    private Context mContext;


    public interface  OnStateChangeListener {  //设置监听Model 状态改变的接口
        void OnStateChanged(Bitmap image);   //设置图片
    }

    public Model (Context context) {
        mContext = context;
        //初始化时 预加载一个图片 作为默认图爿

        mBitmap = BitmapFactory.decodeResource(context.getResources(),R.mipmap.ic_launcher);
    }

    //设置监听对象
    public void setOnStateChangeListener(OnStateChangeListener listener) {
        mListener = listener;
    }

    public void loadImage() {
        new Thread(new Runnable() {
            @Override
            public void run() {
                try {
                    //模拟耗时操作
                    Thread.sleep(3000);

                    //获取图像
                    mBitmap = BitmapFactory.decodeResource(mContext.getResources(),R.mipmap.agns);

                    //回传给 View
                    if (null != mListener) {
                        mHandler.post(new Runnable() {
                            @Override
                            public void run() {
                                mListener.OnStateChanged(mBitmap); //将监听的对象状态改变
                            }
                        });
                    }
                } catch (InterruptedException e) {
                    e.printStackTrace();
                }
            }
        }).start();
    }


    public void clear () {
        //清楚图像
        mBitmap = null;

        //回传给View
        if (null != mListener) {
            mHandler.post(new Runnable() {
                @Override
                public void run() {
                    mListener.OnStateChanged(mBitmap); //将监听的对象状态改变
                }
            });
        }
    }

    public  Bitmap getImage() {
        return  mBitmap;
    }
}
3) 充当 view 的 xml 布局
<?xml version="1.0" encoding="utf-8"?>
<LinearLayout xmlns:android="http://schemas.android.com/apk/res/android"
    xmlns:app="http://schemas.android.com/apk/res-auto"
    xmlns:tools="http://schemas.android.com/tools"
    android:layout_width="match_parent"
    android:layout_height="match_parent"
    android:orientation="vertical"
    tools:context="com.example.menglux.mvcproject.MainActivity">


    <ImageView
        android:id="@+id/main_image_iv"
        android:layout_width="match_parent"
        android:layout_height="wrap_content"
        android:layout_weight="1"/>

    <LinearLayout
        android:layout_width="wrap_content"
        android:layout_height="wrap_content"
        android:orientation="horizontal">


        <Button
            android:id="@+id/main_load_btn"
            android:layout_width="wrap_content"
            android:layout_height="wrap_content"
            android:onClick="onClick"
            android:text="load"/>

        <Button
            android:id="@+id/main_clear_btn"
            android:layout_width="wrap_content"
            android:layout_height="wrap_content"
            android:onClick="onClick"
            android:text="clear"/>
    </LinearLayout>


</LinearLayout>
4) Activity 作为 Controller 角色的类
package com.example.menglux.mvcproject;

import android.graphics.Bitmap;
import android.support.v7.app.AppCompatActivity;
import android.os.Bundle;
import android.view.View;
import android.widget.ImageView;

import com.example.menglux.mvcproject.Model.OnStateChangeListener;

public class MainActivity extends AppCompatActivity implements OnStateChangeListener {

    private ImageView mImageVew;
    private Model mModel;

    @Override
    protected void onCreate(Bundle savedInstanceState) {
        super.onCreate(savedInstanceState);
        setContentView(R.layout.activity_main);

        mModel  = new Model(this);
        mModel.setOnStateChangeListener(this);  //传递监听对象

        mImageVew = (ImageView) findViewById(R.id.main_image_iv);
        mImageVew.setImageBitmap(mModel.getImage());
    }

    public void onClick(View view) {
        switch (view.getId()) {
            case R.id.main_load_btn:
                mModel.loadImage();
                break;
            case R.id.main_clear_btn:
                mModel.clear();
                break;
        }
    }

    @Override
    public void OnStateChanged(Bitmap image) {
        mImageVew.setImageBitmap(image);
    }
}
4、小结
mvc 作为一种框架模式,本事例是设定一个监听接口,通过传递 传递 接口对象 this,来实现数据的传递,并不是通过直接调用类来实现。
文献参考:
Android 源码设计模式解析与实战 第二版
本人郑重声明,本博客所编文章、图片版权归权利人持有,本博只做学习交流分享所用,不做任何商业用途。访问者可將本博提供的內容或服务用于个人学习、研究或欣赏,不得用于商业使用。同時,访问者应遵守著作权法及其他相关法律的规定,不得侵犯相关权利人的合法权利;如果用于商业用途,须征得相关权利人的书面授权。若文章、图片的原作者不愿意在此展示內容,请及时通知在下,將及时予以刪除。