Handler使用简单功能强大,常被用作线程间传递消息的组件,而且还可以用于跨进程。
消息机制背后有包括Looper ,MessageQueue管理和分发消息的实现,同时在Native层也单独实现了一套类似的机制,接收和处理Native层的消息。Java层和Native层的消息循环是独立运行的,彼此的Message并不会互通,Native使用epoll机制来实现监听及触发,并向JAVA层提供了接口。
这里从Java层开始深入探究下Handler和消息机制背后实现的原理。
初探Handler
本章只作为入口,先从宏观上去了解其中的架构,之后再做深入分析。
代码架构
Handler本身只负责发送和处理接收到的消息,其背后有一个消息循环为它管理和提供消息。
MessageQueue是管理着Message链表;而Looper是消息循环的主体,负责循环从MessageQueue中获取需要处理的新消息并向Handler输送。
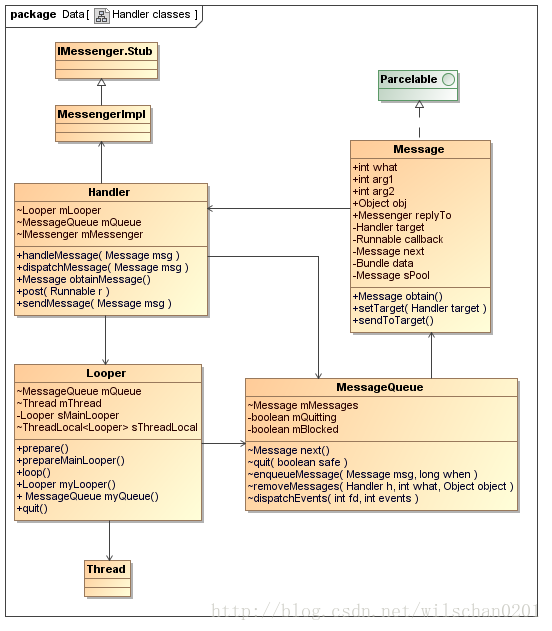
其中MessageQueue有部分核心实现在native层(后续会讲到)。
MessageQueue.java
   private native static long nativeInit();
   private native static void nativeDestroy(long ptr);
   private native void nativePollOnce(long ptr, int timeoutMillis); /*non-static for callbacks*/
   private native static void nativeWake(long ptr);
   private native static boolean nativeIsPolling(long ptr);
private native static void nativeSetFileDescriptorEvents(long ptr, int fd, int events);- 1
- 2
- 3
- 4
- 5
- 6
- 7
native方法实现在JNI层的android_os_MessageQueue.cpp:
android_os_MessageQueue.cpp
static const JNINativeMethod gMessageQueueMethods[] = {
    /* name, signature, funcPtr */
    { "nativeInit", "()J", (void*)android_os_MessageQueue_nativeInit },
    { "nativeDestroy", "(J)V", (void*)android_os_MessageQueue_nativeDestroy },
    { "nativePollOnce", "(JI)V", (void*)android_os_MessageQueue_nativePollOnce },
    { "nativeWake", "(J)V", (void*)android_os_MessageQueue_nativeWake },
    { "nativeIsPolling", "(J)Z", (void*)android_os_MessageQueue_nativeIsPolling },
    { "nativeSetFileDescriptorEvents", "(JII)V",
            (void*)android_os_MessageQueue_nativeSetFileDescriptorEvents },
};- 1
- 2
- 3
- 4
- 5
- 6
- 7
- 8
- 9
- 10
- 11
什么是Handler?
打开Handler.java,先看下googler留给开发者留的一段说明:
/**
 * A Handler allows you to send and process {@link Message} and Runnable
 * objects associated with a thread's {@link MessageQueue}.  Each Handler
 * instance is associated with a single thread and that thread's message
 * queue.  When you create a new Handler, it is bound to the thread /
 * message queue of the thread that is creating it -- from that point on,
 * it will deliver messages and runnables to that message queue and execute
 * them as they come out of the message queue.
 *
 * <p>There are two main uses for a Handler: (1) to schedule messages and
 * runnables to be executed as some point in the future; and (2) to enqueue
 * an action to be performed on a different thread than your own.
 *
 * <p>Scheduling messages is accomplished with the
 * {@link #post}, {@link #postAtTime(Runnable, long)},
 * {@link #postDelayed}, {@link #sendEmptyMessage},
 * {@link #sendMessage}, {@link #sendMessageAtTime}, and
 * {@link #sendMessageDelayed} methods.  The <em>post</em> versions allow
 * you to enqueue Runnable objects to be called by the message queue when
 * they are received; the <em>sendMessage</em> versions allow you to enqueue
 * a {@link Message} object containing a bundle of data that will be
 * processed by the Handler's {@link #handleMessage} method (requiring that
 * you implement a subclass of Handler).
 *
 * <p>When posting or sending to a Handler, you can either
 * allow the item to be processed as soon as the message queue is ready
 * to do so, or specify a delay before it gets processed or absolute time for
 * it to be processed.  The latter two allow you to implement timeouts,
 * ticks, and other timing-based behavior.
 *
 * <p>When a
 * process is created for your application, its main thread is dedicated to
 * running a message queue that takes care of managing the top-level
 * application objects (activities, broadcast receivers, etc) and any windows
 * they create.  You can create your own threads, and communicate back with
 * the main application thread through a Handler.  This is done by calling
 * the same <em>post</em> or <em>sendMessage</em> methods as before, but from
 * your new thread.  The given Runnable or Message will then be scheduled
 * in the Handler's message queue and processed when appropriate.
*/- 1
- 2
- 3
- 4
- 5
- 6
- 7
- 8
- 9
- 10
- 11
- 12
- 13
- 14
- 15
- 16
- 17
- 18
- 19
- 20
- 21
- 22
- 23
- 24
- 25
- 26
- 27
- 28
- 29
- 30
- 31
- 32
- 33
- 34
- 35
- 36
- 37
- 38
- 39
- 40
既然决定来了就不能放过每个细节,记录下重点。
运作方式:
每一个Handler实例只与一个单独的Thread和这个Thread的MessageQueue关联;
当我们在Thread中创建一个新的Handler时,会绑定这个Thread和Thread的MessageQueue,之后Handler允许我们向MessageQueue发送Message和Runnable,并在消息出列时处理它们。
Handler的2个主要用途:
1. 让Message和Runnable可以延迟执行;
2. 在另外一个线程中执行处理。
用法:
通过Post开头和sendMessage开头的方法可以发送消息到MessageQueue。
1. post开头的方法可以向队列插入Runnable;
2. sendMessage开头的方法则用于来送Message,Message将在handleMessage方法中被处理。
3. post和send方法既可以让消息“实时”被处理(相对于延时),也可以设置特定的时延,延时去处理。

建议:
应用进程中的的主线程是专门用于管理顶层的数据的,例如activity/广播/窗口等,不宜处理其他我们定义的耗时操作,因此我们应该创建自己的工作线程,通过Handler来向线程的MessageQueue发送要执行的任务。
三个需要理解的问题
看完上面这段话,有3个疑问需要探究:
1. Handler如何与Thread关联?
2. Thread和MessageQueue的关系是?
3. MessageQueue如何运作?它如何管理Runnable和Message?
后面对这些问题一一破解。
从如何使用Handler开始
怎么样才能使Handler正常运作?
例子1——定义在子线程的Handler
public class MainActivity extends AppCompatActivity {

    Handler mHandler;
    @Override
    protected void onCreate(Bundle savedInstanceState) {
        super.onCreate(savedInstanceState);
        setContentView(R.layout.activity_main);

        Log.i("handler.demo", "Main Thread:" + Thread.currentThread().toString());
        new MyThread().start();
        //确保Handler已经在子线程中实例化
        try {
            Thread.sleep(500);
        } catch (InterruptedException e) {
            e.printStackTrace();
        }
        mHandler.post(new Runnable() {
            @Override
            public void run() {
                Log.i("handler.demo", "Running in Thread:" + Thread.currentThread().toString());
            }
        });
    }

    class MyThread extends  Thread{

        @Override
        public void run() {
            Looper.prepare();
            mHandler = new Handler();
            Looper.loop();
        }
    }
}- 1
- 2
- 3
- 4
- 5
- 6
- 7
- 8
- 9
- 10
- 11
- 12
- 13
- 14
- 15
- 16
- 17
- 18
- 19
- 20
- 21
- 22
- 23
- 24
- 25
- 26
- 27
- 28
- 29
- 30
- 31
- 32
- 33
- 34
Log输出,runnable的run被调用,而且运行在子线程Thread-4中:
06-10 16:48:51.077 17181-17181/? I/handler.demo: Main Thread:Thread[main,5,main]
06-10 16:48:52.078 17181-17199/com.example.willis.myapplication I/handler.demo: Running in Thread:Thread[Thread-4,5,main]- 1
- 2
例子2——定义在主线程中的Handler
将上面的例子稍作修改,就可以改成子线程向主线程Handler发送消息:
public class MainActivity extends AppCompatActivity {

    Handler mHandler = null;
    Object mLock = new Object();
    @Override
    protected void onCreate(Bundle savedInstanceState) {
        super.onCreate(savedInstanceState);
        setContentView(R.layout.activity_main);
        Log.i("handler.demo", "Main Thread:" + Thread.currentThread().toString());
        mHandler = new Handler();
        new MyThread().start();
    }

    class MyThread extends  Thread{
        @Override
        public void run() {
            mHandler.post(new Runnable() {
                @Override
                public void run() {
                    Log.i("handler.demo", "Running in Thread:" + Thread.currentThread().toString());
                }
            });
        }
    }
}
- 1
- 2
- 3
- 4
- 5
- 6
- 7
- 8
- 9
- 10
- 11
- 12
- 13
- 14
- 15
- 16
- 17
- 18
- 19
- 20
- 21
- 22
- 23
- 24
- 25
- 26
Log输出看到Runnable.run()就在主线程执行:
06-10 17:00:24.073 17526-17526/com.example.willis.myapplication I/handler.demo: Main Thread:Thread[main,5,main]
06-10 17:00:24.095 17526-17526/com.example.willis.myapplication I/handler.demo: Running in Thread:Thread[main,5,main]- 1
- 2
例子3——跨进程传递消息
除了在线程间使用外,Handler还可以通过IMessenger和Message来实现进程间的消息传递。
因为Message本身实现了Parcelable接口支持跨进程,Handler中定义了继承IMessenger.Stub的MessengerImpl类作为跨进程传入Message的入口。进程外通过Handler.getIMessenger()方法获得此Handler的IMessenger即可向它发送消息。
Handler.java
IMessenger mMessenger;

final IMessenger getIMessenger() {
    synchronized (mQueue) {
        if (mMessenger != null) {
            return mMessenger;
    }
    mMessenger = new MessengerImpl();
    return mMessenger;
   }
}

private final class MessengerImpl extends IMessenger.Stub {
    public void send(Message msg) {
        msg.sendingUid = Binder.getCallingUid();
        Handler.this.sendMessage(msg);
    }
}- 1
- 2
- 3
- 4
- 5
- 6
- 7
- 8
- 9
- 10
- 11
- 12
- 13
- 14
- 15
- 16
- 17
- 18
- 19
Android framework中实现了一个叫AsyncChannel的类,利用Handler夸进程特性,支持2个进程间的Handler互通消息,有兴趣可以看一下: /frameworks/base/core/java/com/android/internal/util/AsyncChannel.java
第四个问题
例子1中,Looper.prepare()和Looper.loop()方法调用顺序是固定的,必须在handler创建前执行Looper.prepare(),在Handler创建后执行Looper.loop(),这样Handler才能正常运行在线程中。
但例子2中并没有看到Looper的身影,这是为什么?
第四个问题:
Looper是什么?为什么例子中2个Looper方法要按这样的顺序调用?
Handler和Looper的关系
通过第一个例子可以猜测,Looper应该就是维护消息循环的地方,且Handler的构造方法中一定有某些东西关联到Looper,于是先从Handler的构造方法入手。
Handler构造方法
Handler有6个有参构造方法,另外还有1个个无参构造方法:
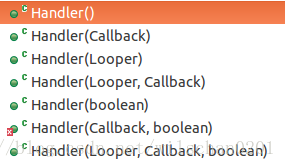
这是其中一个Handler的有参构造方法,保存了Looper,MessageQueue等实例,可以说明Handler是直接依赖于Looper的:
Handler.java

final Looper mLooper;
final MessageQueue mQueue;
final Callback mCallback;
final boolean mAsynchronous;

public Handler(Looper looper, Callback callback, boolean async) {
    mLooper = looper;
    mQueue = looper.mQueue;
    mCallback = callback;
    mAsynchronous = async;
}- 1
- 2
- 3
- 4
- 5
- 6
- 7
- 8
- 9
- 10
- 11
- 12
- 13
而Handler无参构造方法内部调用了另一个有参构造方法,最后在该方法中还是通过Looper.myLooper()方法获取到了Looper实例:
Handler.java
public Handler() {
    this(null, false);
}
public Handler(Callback callback, boolean async) {
    //实际上还是获取到了Looper
    mLooper = Looper.myLooper();
    if (mLooper == null) {
        throw new RuntimeException(
                "Can't create handler inside thread that has not called Looper.prepare()");
    }
    mQueue = mLooper.mQueue;
    mCallback = callback;
    mAsynchronous = async;
}- 1
- 2
- 3
- 4
- 5
- 6
- 7
- 8
- 9
- 10
- 11
- 12
- 13
- 14
- 15
Looper.myLooper()方法中调用ThreadLocal.get()返回一个Looper实例:
Looper.java
public static @Nullable Looper myLooper() {
    return sThreadLocal.get();
}- 1
- 2
- 3
- 4
既然能get到一个Looper,那么继续寻找sThreadLocal在何处去set这个Looper。
结果找上了Looper.prepare()方法:
Looper.java
static final ThreadLocal<Looper> sThreadLocal = new ThreadLocal<Looper>();

private static void prepare(boolean quitAllowed) {
    if (sThreadLocal.get() != null) {
        throw new RuntimeException("Only one Looper may be created per thread");
    }
    sThreadLocal.set(new Looper(quitAllowed));
}

//唯一构造方法是private的,创建了MessageQueue,并保存了当前的Thread实例
private Looper(boolean quitAllowed) {
    mQueue = new MessageQueue(quitAllowed);//创建MessageQueue,参数指定了这个queue是否能被退出
    mThread = Thread.currentThread();//本线程
}- 1
- 2
- 3
- 4
- 5
- 6
- 7
- 8
- 9
- 10
- 11
- 12
- 13
- 14
- 15
Looper.prepare()内部新建了Looper实例,并set到sThreadLocal,那么,就足以解释为什么在new Handler()之前必须调用Looper.prepare()。
——因为Handler需要获取到Looper实例,而Looper.prepare()就是创建Looper的地方。
那么Looper.loop()为什么要在最后执行呢?
Looper.java
public static void loop() {
        final Looper me = myLooper();
        final MessageQueue queue = me.mQueue;
        ...
        for (;;) {
            //获取下一个消息
            Message msg = queue.next(); // might block
            if (msg == null) {
                //退出循环
                return;
            }

            try {
                //向Handler分发消息
                msg.target.dispatchMessage(msg);
            } finally {
                ...
            }

            // Make sure that during the course of dispatching the
            // identity of the thread wasn't corrupted.
            final long newIdent = Binder.clearCallingIdentity();
            msg.recycleUnchecked();
        }
}- 1
- 2
- 3
- 4
- 5
- 6
- 7
- 8
- 9
- 10
- 11
- 12
- 13
- 14
- 15
- 16
- 17
- 18
- 19
- 20
- 21
- 22
- 23
- 24
- 25
- 26
明显Looper.loop()方法内部是个死循环,循环从MessageQueue中获取消息并分发给Handler,因此loop()方法必须是最后执行的。
最后,来看为什么第二个例子中,主线程创建Handler时不用显式地初始化Looper?
根据上面2个问题的答案思考下,Handler初始化是必须获得Looper的,而Looper只有在Looper.prepare()方法中创建。顺藤摸瓜,在Looper.java中找到了一个叫prepareMainLooper的方法,不仅创建了Looper对象,而且将它保存到了sMainLooper变量中。
Looper.java

    private static Looper sMainLooper;  //主线程的Looper

    public static void prepareMainLooper() {
        prepare(false);//新建Looper,指定
        synchronized (Looper.class) {
            if (sMainLooper != null) {
                throw new IllegalStateException("The main Looper has already been prepared.");
            }
            //复值到sMainLooper
            sMainLooper = myLooper();
        }
    }

    //quitAllowed参数指定了MessageQueue是否允许退出
    private Looper(boolean quitAllowed) {
        mQueue = new MessageQueue(quitAllowed);
        mThread = Thread.currentThread();
}- 1
- 2
- 3
- 4
- 5
- 6
- 7
- 8
- 9
- 10
- 11
- 12
- 13
- 14
- 15
- 16
- 17
- 18
- 19
- 20
搜索下Looper.prepareMainLooper()的调用者,竟然是ActivityThread.main()方法。就是说,在Activity创建的时候,主线程创建了自己的main looper,并同样地开启了无限循环模式!这侧面映证了Android应用运行是靠消息驱动的。
ActivityThread.java
public static void main(String[] args) {
        ...
        Process.setArgV0("<pre-initialized>");
        //创建主线程Looper
        Looper.prepareMainLooper();
        ActivityThread thread = new ActivityThread();
        thread.attach(false);
        if (sMainThreadHandler == null) {
            sMainThreadHandler = thread.getHandler();
        }
        //主线程的Event loop开始循环
        Looper.loop();

        throw new RuntimeException("Main thread loop unexpectedly exited");
}- 1
- 2
- 3
- 4
- 5
- 6
- 7
- 8
- 9
- 10
- 11
- 12
- 13
- 14
- 15
- 16
本章小结
至此,前面提出的4个大问题已经解决了3个:
1. Handler如何与Thread关联?
——这里需要加入Looper的概念。
Handler在线程中创建时获取到looper实例,而Looper在线程中运行消息循环,并分发给Handler。
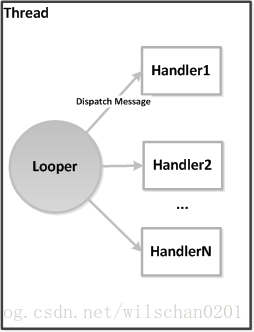
另外:Looper的消息循环是死循环,因此一个Thread中只能运行一个Looper。而Handler作为消息的发送和处理者,与Looper的关系是多对一的。
因此它们3者的关系是: 1 Looper - 1 Thread - N Handler
2. Thread和MessageQueue的关系是?
——MessageQueue在Thread对应的Looper中创建,用于存储消息,消息最后会分发给Handler处理。
- MessageQueue如何运作?它如何管理Runnable和Message?
——待下一章分析
4. Looper是什么?为什么例子中2个Looper方法要按固定的顺序调用?
分为3个小问题:
当Handler被定义在子线程中时,为什么在new Handler之前必须先Looper.prepare()?
——因为Handler需要获取到Looper实例,而Looper.prepare()就是创建Looper的地方。
为什么Looper.loop()要最后执行?
——因为内部实现了一个死循环,用作消息的读取和分发,在Looper.quit()被调用之前,loop循环会一直进行。
在主线程中实现的Handler,为什么无需显式地调用Looper的初始化方法?
——Activity主线程启动时,已经创建好了Looper,我们在Activity中新建的Handler默认绑定这个主线程Looper。
接下来深入分析流程。
消息发送及分发流程
接下来具体讨论消息如何插入,以及如何分发。
Message的组成和消息池
首先来了解下Message是什么。
通过文章开头的类图可以看到,Message是一个数据类,包含用户定义的数据,Runnable实例,关联的Handler。
同时,下一个Message的实例保存在next变量中,可见Message将以链的形式保存。
    //相当于消息的ID,用于在处理时识别消息
    public int what;
    //arg1和arg2用于存储int类型的数据
    public int arg1;
    public int arg2;

    //保存Object类型的参数,如果在跨进程使用时只支持framework实现的可跨进程的对象
    public Object obj;

    //保存Bundle形式的数据参数
    /*package*/ Bundle data;

    //Messenger形式的消息接受者
    public Messenger replyTo;

    //关联的Handler(消息接收者)
    /*package*/ Handler target;

    //将被执行的runnable
    /*package*/ Runnable callback;

    //下一个消息
    /*package*/ Message next;

    //消息池,Message的重用管理,通过obtain()方法获取可重用的消息
private static Message sPool;- 1
- 2
- 3
- 4
- 5
- 6
- 7
- 8
- 9
- 10
- 11
- 12
- 13
- 14
- 15
- 16
- 17
- 18
- 19
- 20
- 21
- 22
- 23
- 24
- 25
- 26
Message中还实现了消息重用,如果使用Message.obtain()方法获取Message,将返回可重用的Message。
    private static Message sPool;

    public static Message obtain() {
        synchronized (sPoolSync) {
            //如果pool中有可重用的message则直接返回
            if (sPool != null) {
                Message m = sPool;
                sPool = m.next;
                m.next = null;
                m.flags = 0; // clear in-use flag
                sPoolSize--;
                return m;
            }
        }
        return new Message();
    }

    //Looper.loop()处理完一个消息后,会调用此方法去“回收”Message实例
    //实际上Message将被重置并放入“消息池”中。
    void recycleUnchecked() {
        flags = FLAG_IN_USE;
        what = 0;
        arg1 = 0;
        arg2 = 0;
        obj = null;
        replyTo = null;
        sendingUid = -1;
        when = 0;
        target = null;
        callback = null;
        data = null;

        synchronized (sPoolSync) {
            if (sPoolSize < MAX_POOL_SIZE) {
                next = sPool;
                sPool = this;
                sPoolSize++;
            }
        }
}- 1
- 2
- 3
- 4
- 5
- 6
- 7
- 8
- 9
- 10
- 11
- 12
- 13
- 14
- 15
- 16
- 17
- 18
- 19
- 20
- 21
- 22
- 23
- 24
- 25
- 26
- 27
- 28
- 29
- 30
- 31
- 32
- 33
- 34
- 35
- 36
- 37
- 38
- 39
- 40
Looper中的消息循环和消息分发
正如前文看到Looper.loop()开启了一个死循环,从MessageQueue的next方法获取消息后,分发给Handler处理。这里先快速地看下消息如何分发,然后来重点看MessageQueue的next方法。
Looper.java
/**
     * Run the message queue in this thread. Be sure to call
     * {@link #quit()} to end the loop.
     */
    public static void loop() {
        final Looper me = myLooper();
        ...
        final MessageQueue queue = me.mQueue;
        ...

        for (;;) {
            //获取下一个Message,没有消息时可能会阻塞
            Message msg = queue.next(); // might block
            ...
            try {
                //执行runnable,或者分发消息给handleMessage()或callback
                msg.target.dispatchMessage(msg);
            } finally {

            }
            ...
            msg.recycleUnchecked();
        }
}- 1
- 2
- 3
- 4
- 5
- 6
- 7
- 8
- 9
- 10
- 11
- 12
- 13
- 14
- 15
- 16
- 17
- 18
- 19
- 20
- 21
- 22
- 23
- 24
- 25
循环从MessageQueue.next()中获取消息,这里先来看消息的分发:Handler.dispatchMessage():
1. 如果通过post(Runnable)发送的Message,那么只执行Runnable.run()。
2. 如果如果实现了Handler.Callback接口,则消息分发给Callback.handleMessage()方法处理,返回ture就不会执行第三步
3. 由Handler.handleMessage()处理
    /**
     * Handle system messages here.
     */
    public void dispatchMessage(Message msg) {
        if (msg.callback != null) {
            //执行runnable
            handleCallback(msg);
        } else {
            if (mCallback != null) {
                //分发给Handler.Callback处理
                //如果实现了Handler.Callback接口,则消息可以在这里被处理
                //如果执行完Callback.handleMessage后返回true,则不再分发给Handler.handleMessage()处理
                if (mCallback.handleMessage(msg)) {
                    return;
                }
            }
            //直接在handleMessage中处理
            handleMessage(msg);
        }
    }

    private static void handleCallback(Message message) {
        message.callback.run();
    }

    public interface Callback {
        public boolean handleMessage(Message msg);
    }

    /**
     * Subclasses must implement this to receive messages.
     */
    public void handleMessage(Message msg) {
}- 1
- 2
- 3
- 4
- 5
- 6
- 7
- 8
- 9
- 10
- 11
- 12
- 13
- 14
- 15
- 16
- 17
- 18
- 19
- 20
- 21
- 22
- 23
- 24
- 25
- 26
- 27
- 28
- 29
- 30
- 31
- 32
- 33
- 34
获取消息:MessageQueue.next()方法
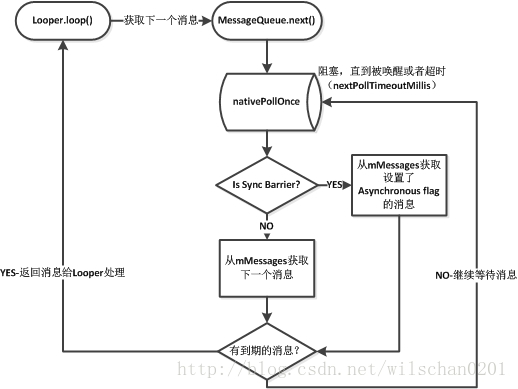
MessageQueue的next方法也是一个循环,主要目的是获取下一个要被处理的Message,其中的几个要点:
1. nativePollOnce是阻塞的,中间执行了epoll_wait等待,通过nativeWake主动唤醒或者到达超时时间后唤醒。
2. 如果插入了SyncBarrier消息(handler为null的消息),则只会处理“异步”的消息(设置了Asynchronous flag的消息,详看后文)
3. 如果当前消息没有到达when设定的时间,则会重新进入nativePollOnce,设置具体的超时时间
4. 到达设定时间的Message会被返回,由Looper分发处理。
5. 如果进入next()时没有消息要被马上处理,则会执行IdleHandler的处理。
Message next() {
        final long ptr = mPtr;
        ...

        int pendingIdleHandlerCount = -1; // -1 only during first iteration
        int nextPollTimeoutMillis = 0;
        for (;;) {
            ...
            //没有消息需要被处理时会阻塞
            nativePollOnce(ptr, nextPollTimeoutMillis);
            synchronized (this) {
                // Try to retrieve the next message.  Return if found.
                final long now = SystemClock.uptimeMillis();
                Message prevMsg = null;
                Message msg = mMessages;
                //msg.target == null则该消息为SyncBarrier消息
                //排在SyncBarrier之后的Message中,只有设置了Asynchronous的Message会被处理
                //SyncBarrier的概念需要展开来讲。
                if (msg != null && msg.target == null) {
                    do {
                        prevMsg = msg;
                        msg = msg.next;
                    } while (msg != null && !msg.isAsynchronous());
                }
                if (msg != null) {
                    //消息设置了delay时间(when是将来执行的时间)。
                    //还没到时间去处理,计算nextPollTimeoutMillis值,由nativePollOnce决定唤醒阻塞的时间
                    if (now < msg.when) {
                        nextPollTimeoutMillis = (int) Math.min(msg.when - now, Integer.MAX_VALUE);
                    } else {
                        //返回需要被处理的消息,并删除链节点
                        mBlocked = false;
                        if (prevMsg != null) {
                            prevMsg.next = msg.next;
                        } else {
                            mMessages = msg.next;
                        }
                        msg.next = null;
                        msg.markInUse();
                        return msg;
                    }
                } else {
                    //没有任何消息,nextPollTimeoutMillis置成-1
                    nextPollTimeoutMillis = -1;
                }

                //quit()被调用后,退出循环
                if (mQuitting) {
                    dispose();
                    return null;
                }

                //获取IdleHandler——列表中没有消息或者正等待超时期间会通知IdleHandler
                if (pendingIdleHandlerCount < 0
                        && (mMessages == null || now < mMessages.when)) {
                    pendingIdleHandlerCount = mIdleHandlers.size();
                }
                if (pendingIdleHandlerCount <= 0) {
                    // No idle handlers to run.  Loop and wait some more.
                    mBlocked = true;
                    continue;
                }

                if (mPendingIdleHandlers == null) {
                    mPendingIdleHandlers = new IdleHandler[Math.max(pendingIdleHandlerCount, 4)];
                }
                mPendingIdleHandlers = mIdleHandlers.toArray(mPendingIdleHandlers);
            }

            //执行IdleHandler.queueIdle()
            //只有当第一次循环没有返回Message时执行,就是说当前所有Message已经处理完
            //或者还没到时间处理的时候。
            for (int i = 0; i < pendingIdleHandlerCount; i++) {
                final IdleHandler idler = mPendingIdleHandlers[i];
                mPendingIdleHandlers[i] = null; // release the reference to the handler
                boolean keep = false;
                try {
                    //通过返回值决定IdleHandler是否保留
                    keep = idler.queueIdle();
                } catch (Throwable t) {
                    Log.wtf(TAG, "IdleHandler threw exception", t);
                }

                if (!keep) {
                    synchronized (this) {
                        mIdleHandlers.remove(idler);
                    }
                }
            }

            //不再执行IdleHandler.queueIdle()
            pendingIdleHandlerCount = 0;

            //执行IdleHandler期间可能有消息插入,因此回头需要马上唤醒nativePollOnce
            nextPollTimeoutMillis = 0;
        }
}- 1
- 2
- 3
- 4
- 5
- 6
- 7
- 8
- 9
- 10
- 11
- 12
- 13
- 14
- 15
- 16
- 17
- 18
- 19
- 20
- 21
- 22
- 23
- 24
- 25
- 26
- 27
- 28
- 29
- 30
- 31
- 32
- 33
- 34
- 35
- 36
- 37
- 38
- 39
- 40
- 41
- 42
- 43
- 44
- 45
- 46
- 47
- 48
- 49
- 50
- 51
- 52
- 53
- 54
- 55
- 56
- 57
- 58
- 59
- 60
- 61
- 62
- 63
- 64
- 65
- 66
- 67
- 68
- 69
- 70
- 71
- 72
- 73
- 74
- 75
- 76
- 77
- 78
- 79
- 80
- 81
- 82
- 83
- 84
- 85
- 86
- 87
- 88
- 89
- 90
- 91
- 92
- 93
- 94
- 95
- 96
- 97
忽略IdleHandler和nextPollTimeoutMillis值的影响,大概流程如下:
nativePollOnce
nativePollOnce名字上理解应该是轮询一次的意思,代码如下:
android_os_MessageQueue.cpp在nativePollOnce方法中,调用了Looper的pollOnce方法:
/frameworks/base/core/jni/android_os_MessageQueue.cpp
static void android_os_MessageQueue_nativePollOnce(JNIEnv* env, jobject obj,
        jlong ptr, jint timeoutMillis) {
    NativeMessageQueue* nativeMessageQueue = reinterpret_cast<NativeMessageQueue*>(ptr);
    nativeMessageQueue->pollOnce(env, obj, timeoutMillis);
}

void NativeMessageQueue::pollOnce(JNIEnv* env, jobject pollObj, int timeoutMillis) {
    mPollEnv = env;
    mPollObj = pollObj;
    mLooper->pollOnce(timeoutMillis);
    mPollObj = NULL;
    mPollEnv = NULL;

    if (mExceptionObj) {
        env->Throw(mExceptionObj);
        env->DeleteLocalRef(mExceptionObj);
        mExceptionObj = NULL;
    }
}- 1
- 2
- 3
- 4
- 5
- 6
- 7
- 8
- 9
- 10
- 11
- 12
- 13
- 14
- 15
- 16
- 17
- 18
- 19
- 20
流程进入到Looper,那么先来从头了解下它。
Native looper
在java层初始化MessageQueue的时候调用了nativeInit():
MessageQueue.java
    MessageQueue(boolean quitAllowed) {
        mQuitAllowed = quitAllowed;
        mPtr = nativeInit();
}- 1
- 2
- 3
- 4
- 5
nativeInit()初始化了NativeMessageQueue和Looper:
android_os_MessageQueue.cpp
static jlong android_os_MessageQueue_nativeInit(JNIEnv* env, jclass clazz) {
    //创建NativeMessageQueue
    NativeMessageQueue* nativeMessageQueue = new NativeMessageQueue();
    if (!nativeMessageQueue) {
        jniThrowRuntimeException(env, "Unable to allocate native queue");
        return 0;
    }

    nativeMessageQueue->incStrong(env);
    return reinterpret_cast<jlong>(nativeMessageQueue);
}

NativeMessageQueue::NativeMessageQueue() :
        mPollEnv(NULL), mPollObj(NULL), mExceptionObj(NULL) {
    mLooper = Looper::getForThread();
    if (mLooper == NULL) {
        //创建looper
        mLooper = new Looper(false);
        Looper::setForThread(mLooper);
    }
}- 1
- 2
- 3
- 4
- 5
- 6
- 7
- 8
- 9
- 10
- 11
- 12
- 13
- 14
- 15
- 16
- 17
- 18
- 19
- 20
- 21
- 22
在Looper的构造函数中调用了rebuildEpollLocked():
1)初始化了epoll实例mEpollFd;
2)注册fd监听——mWakeEventFd。
Looper::Looper(bool allowNonCallbacks) :
        mAllowNonCallbacks(allowNonCallbacks), mSendingMessage(false),
        mPolling(false), mEpollFd(-1), mEpollRebuildRequired(false),
        mNextRequestSeq(0), mResponseIndex(0), mNextMessageUptime(LLONG_MAX) {
    mWakeEventFd = eventfd(0, EFD_NONBLOCK | EFD_CLOEXEC);

    AutoMutex _l(mLock);
    rebuildEpollLocked();
}

void Looper::rebuildEpollLocked() {
    // Close old epoll instance if we have one.
    if (mEpollFd >= 0) {
        close(mEpollFd);
    }

    //初始化了epoll实例
    mEpollFd = epoll_create(EPOLL_SIZE_HINT);

    struct epoll_event eventItem;
    memset(& eventItem, 0, sizeof(epoll_event)); // zero out unused members of data field union
    eventItem.events = EPOLLIN;
    eventItem.data.fd = mWakeEventFd;
    //注册fd用于唤醒——mWakeEventFd
    int result = epoll_ctl(mEpollFd, EPOLL_CTL_ADD, mWakeEventFd, & eventItem);

    //注册其他fd
    for (size_t i = 0; i < mRequests.size(); i++) {
        const Request& request = mRequests.valueAt(i);
        struct epoll_event eventItem;
        request.initEventItem(&eventItem);

        int epollResult = epoll_ctl(mEpollFd, EPOLL_CTL_ADD, request.fd, & eventItem);
        ...
    }
}- 1
- 2
- 3
- 4
- 5
- 6
- 7
- 8
- 9
- 10
- 11
- 12
- 13
- 14
- 15
- 16
- 17
- 18
- 19
- 20
- 21
- 22
- 23
- 24
- 25
- 26
- 27
- 28
- 29
- 30
- 31
- 32
- 33
- 34
- 35
- 36
马上回到pollOnce函数,它调用的pollInner函数中执行了epoll_wait,等待mWakeEventFd和其他注册的fd被唤醒,然后分发Native消息,等到函数返回后,Java层的MessageQueue.next()才继续执行。
/system/core/libutils/Looper.cpp

int Looper::pollOnce(int timeoutMillis, int* outFd, int* outEvents, void** outData) {
    ...
    result = pollInner(timeoutMillis);
}

int Looper::pollInner(int timeoutMillis) {
    //调整timeout时间
    if (timeoutMillis != 0 && mNextMessageUptime != LLONG_MAX) {
        nsecs_t now = systemTime(SYSTEM_TIME_MONOTONIC);
        int messageTimeoutMillis = toMillisecondTimeoutDelay(now, mNextMessageUptime);
        if (messageTimeoutMillis >= 0
                && (timeoutMillis < 0 || messageTimeoutMillis < timeoutMillis)) {
            timeoutMillis = messageTimeoutMillis;
        }

    }

    ...
    //epoll_wait,等待唤醒或超时
    struct epoll_event eventItems[EPOLL_MAX_EVENTS];
    int eventCount = epoll_wait(mEpollFd, eventItems, EPOLL_MAX_EVENTS, timeoutMillis);

    ...

    for (int i = 0; i < eventCount; i++) {
        int fd = eventItems[i].data.fd;
        uint32_t epollEvents = eventItems[i].events;
        if (fd == mWakeEventFd) {
            if (epollEvents & EPOLLIN) {
                //清空mWakeEventFd管道
                awoken();
            } else {
                ALOGW("Ignoring unexpected epoll events 0x%x on wake event fd.", epollEvents);
            }
        } else {
            ...
        }
    }
Done: ;

    //Native层消息的分发
    ...
    return result;
}

//清空mWakeEventFd管道
void Looper::awoken() {

    uint64_t counter;
    TEMP_FAILURE_RETRY(read(mWakeEventFd, &counter, sizeof(uint64_t)));
}- 1
- 2
- 3
- 4
- 5
- 6
- 7
- 8
- 9
- 10
- 11
- 12
- 13
- 14
- 15
- 16
- 17
- 18
- 19
- 20
- 21
- 22
- 23
- 24
- 25
- 26
- 27
- 28
- 29
- 30
- 31
- 32
- 33
- 34
- 35
- 36
- 37
- 38
- 39
- 40
- 41
- 42
- 43
- 44
- 45
- 46
- 47
- 48
- 49
- 50
- 51
- 52
- 53
那么唤醒这个epoll_wait的地方在哪?
nativeWake
android_os_MessageQueue.cpp的nativeWake函数,调用了Looper.cpp的wake()函数,向mWakeEventFd管道写入了数据,epoll_wait被唤醒。
Looper.cpp
void Looper::wake() {
    uint64_t inc = 1;
    //向mWakeEventFd管道写入数据
    ssize_t nWrite = TEMP_FAILURE_RETRY(write(mWakeEventFd, &inc, sizeof(uint64_t)));
    ...
}- 1
- 2
- 3
- 4
- 5
- 6
- 7
那么问题又来了,何时去唤醒这个epoll? 答案在java层插入新消息时,调用的MessageQueue.enqueueMessage()。
插入新的Message
Handler通过post和sendMessage方法向MessageQueue发送Runnable或者Message,实际上最后都会被封装成Message,通过MessageQueue.enqueueMessage()方法加入到消息链表。
Handler.java
private boolean enqueueMessage(MessageQueue queue, Message msg, long uptimeMillis) {
        msg.target = this;
        if (mAsynchronous) {
            msg.setAsynchronous(true);
        }
        return queue.enqueueMessage(msg, uptimeMillis);
}- 1
- 2
- 3
- 4
- 5
- 6
- 7
- 8
MessageQueue.enqueueMessage方法接收新的消息,通过消息延迟的时间将其插入到正确的位置。
MessageQueue.java

Message mMessages;
boolean enqueueMessage(Message msg, long when) {
        ...
        synchronized (this) {
            if (mQuitting) {
                msg.recycle();
                return false;
            }

            msg.markInUse();
            msg.when = when;
            Message p = mMessages;
            boolean needWake;
            if (p == null || when == 0 || when < p.when) {
                //新消息作为链表头
                msg.next = p;
                mMessages = msg;
                needWake = mBlocked;
            } else {
                //如果找到sync barrier,且当前消息是“异步”的,那么需要重新调整唤醒时间
                needWake = mBlocked && p.target == null && msg.isAsynchronous();
                Message prev;
                //按照when取值将Message插入对应的位置
                for (;;) {
                    prev = p;
                    p = p.next;
                    if (p == null || when < p.when) {
                        break;
                    }
                    //下一个是没有设置handler的“异步”消息,无需唤醒native looper
                    if (needWake && p.isAsynchronous()) {
                        needWake = false;
                    }
                }
                msg.next = p; // invariant: p == prev.next
                prev.next = msg;
            }

            //唤醒native looper
            if (needWake) {
                nativeWake(mPtr);
            }
        }
        return true;
}- 1
- 2
- 3
- 4
- 5
- 6
- 7
- 8
- 9
- 10
- 11
- 12
- 13
- 14
- 15
- 16
- 17
- 18
- 19
- 20
- 21
- 22
- 23
- 24
- 25
- 26
- 27
- 28
- 29
- 30
- 31
- 32
- 33
- 34
- 35
- 36
- 37
- 38
- 39
- 40
- 41
- 42
- 43
- 44
- 45
- 46
- 47
插入消息后,有条件地执行nativeWake去唤醒epoll。needWake的值依赖mBlocked——当进入next()方法时没有待处理的消息,mBlock为true,有消息并返回到looper时,mBlock为false。
结合next()和enqueueMessage()方法,得知nativeWake被调用的条件为:
1. next()方法在等待新消息,且新插入消息的为链表头时。needWake为true
2. 设置了Sync Barrier,且插入的消息是“异步”的。needWake为true
核心流程大概分析完成:
1. java层的looper循环调用MessageQueue.next()获取下一个消息来处理;
2. next()方法进入native层nativePollOnce方法,Looper.cpp进入epoll_wait等待fd被唤醒
3. Handler向MessageQueue插入消息后,有条件地唤醒native looper,使next()方法返回
4. Looper在获取到新消息后分发处理。
关于SyncBarrier
首先,Message中有“同步”和“异步”的概念(貌似实际上只是个状态的区分,主要作用时配合SyncBarrier,并没有同步性上的区别),使用setAsynchronous方法设置:
Message.java
    public void setAsynchronous(boolean async) {
        if (async) {
            flags |= FLAG_ASYNCHRONOUS;
        } else {
            flags &= ~FLAG_ASYNCHRONOUS;
        }
}- 1
- 2
- 3
- 4
- 5
- 6
- 7
- 8
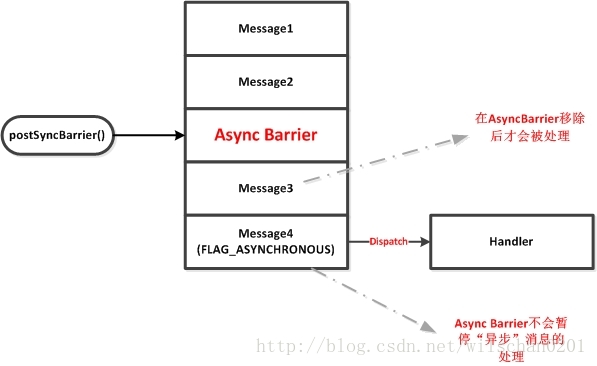
而通过postSyncBarrier()方法,可以发送一个synchronization barrier(就直译称为“同步栏”吧)到Message链表中,用来暂停在同步栏之后发送的“同步”消息的处理,此时只有“异步”的消息能被继续处理。 设置同步栏后必须在条件准备好后移除它(调用removeSyncBarrier()方法)。
这个机制的作用在于可以马上暂停执行“同步”消息,直到条件允许后通过移除同步栏来恢复“同步”消息的处理。例如在View.invalidate需要执行时,将会设置同步栏挂起所有“同步”消息,直到下一帧准备好显示后移除同步栏。
而设置“异步”消息则可以免受同步栏的影响,用于接收输入等需要持续的工作,具体如下面这段注释:
/**
* Asynchronous messages are exempt from synchronization barriers. They typically
* represent interrupts, input events, and other signals that must be handled
* independently even while other work has been suspended.
* */
工作流程大致如图:
设置同步栏就是插入一个不指定handler的Message,通过一个token值来标记:
MessageQueue.java
    /**
     * @hide
     */
    //设置同步栏
    //postSyncBarrier不是公开的API,只供系统内部调用
    public int postSyncBarrier() {
        return postSyncBarrier(SystemClock.uptimeMillis());
    }

    private int postSyncBarrier(long when) {
        synchronized (this) {
            final int token = mNextBarrierToken++;
            //消息没有设置handler,以此来识别这是个sync barrier
            final Message msg = Message.obtain();
            msg.markInUse();
            msg.when = when;
            msg.arg1 = token;
            //插入到正确的位置
            Message prev = null;
            Message p = mMessages;
            if (when != 0) {
                while (p != null && p.when <= when) {
                    prev = p;
                    p = p.next;
                }
            }
            if (prev != null) { // invariant: p == prev.next
                msg.next = p;
                prev.next = msg;
            } else {
                msg.next = p;
                mMessages = msg;
            }
            return token;
        }
}- 1
- 2
- 3
- 4
- 5
- 6
- 7
- 8
- 9
- 10
- 11
- 12
- 13
- 14
- 15
- 16
- 17
- 18
- 19
- 20
- 21
- 22
- 23
- 24
- 25
- 26
- 27
- 28
- 29
- 30
- 31
- 32
- 33
- 34
- 35
- 36
- 37
移除同步栏时通过token值匹配并删除该Message:
    /**
     * @hide
     */
    //移除同步栏同样是hide的方法
    public void removeSyncBarrier(int token) {
        // Remove a sync barrier token from the queue.
        // If the queue is no longer stalled by a barrier then wake it.
        synchronized (this) {
            Message prev = null;
            Message p = mMessages;
            while (p != null && (p.target != null || p.arg1 != token)) {
                prev = p;
                p = p.next;
            }
            if (p == null) {
                throw new IllegalStateException("The specified message queue synchronization "
                        + " barrier token has not been posted or has already been removed.");
            }
            final boolean needWake;
            if (prev != null) {
                prev.next = p.next;
                needWake = false;
            } else {
                mMessages = p.next;
                needWake = mMessages == null || mMessages.target != null;
            }
            p.recycleUnchecked();

            // If the loop is quitting then it is already awake.
            // We can assume mPtr != 0 when mQuitting is false.
            if (needWake && !mQuitting) {
                nativeWake(mPtr);
            }
        }
}- 1
- 2
- 3
- 4
- 5
- 6
- 7
- 8
- 9
- 10
- 11
- 12
- 13
- 14
- 15
- 16
- 17
- 18
- 19
- 20
- 21
- 22
- 23
- 24
- 25
- 26
- 27
- 28
- 29
- 30
- 31
- 32
- 33
- 34
- 35
关于IdleHandler
- 只有当前所有Message已经处理完或者待处理的Message还没到时间处理的时候,才会执行IdleHandler处理一次。
- 使用IdleHandler必须定义实现了IdleHandler接口的类,并在queueIdle()定义需要执行的操作(通常是释放资源),返回值决定这个Handler是否一直保留,并在将来空闲时再次执行。
- 通过MessageQueue.addIdleHandler 添加IdleHandler
MessageQueue.java
    private final ArrayList<IdleHandler> mIdleHandlers = new ArrayList<IdleHandler>();
    private SparseArray<FileDescriptorRecord> mFileDescriptorRecords;
    private IdleHandler[] mPendingIdleHandlers;

    public static interface IdleHandler {
        boolean queueIdle();
    }

    public void addIdleHandler(@NonNull IdleHandler handler) {
        if (handler == null) {
            throw new NullPointerException("Can't add a null IdleHandler");
        }
        synchronized (this) {
            mIdleHandlers.add(handler);
        }
}- 1
- 2
- 3
- 4
- 5
- 6
- 7
- 8
- 9
- 10
- 11
- 12
- 13
- 14
- 15
- 16
- 17
一个例子:
ActivityThread中定义了一个IdleHandler,用于执行GC回收垃圾:
ActivityThread.java
    final class GcIdler implements MessageQueue.IdleHandler {
        @Override
        public final boolean queueIdle() {
            doGcIfNeeded();
            return false;
        }
}- 1
- 2
- 3
- 4
- 5
- 6
- 7
- 8
END
写得有点杂乱,以后有时间再来优化下。
在分析过程中,参考了下面几篇文章,写的比较清晰易懂:
《聊一聊Android的消息机制》
《Looper中的睡眠等待与唤醒机制》