SpringSecurity入门 一 的基础上进行配置:https://www.cnblogs.com/Cyan-W/p/9938723.html
请看SpringSecurity的依赖,和web.xml
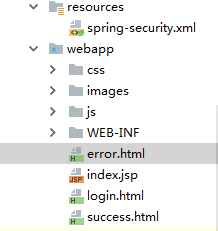
下载一个登录模板:复制到webapp下面
- 把index.html页面命名为login.html页面,并修改form表单
<form method="post" action="/login"> 提交路径必须为/login
- 用户名 name = "username"
- 密码 name="password"
-
    <form method="post" action="/login">
            <li>
                <input type="text" class="text" name="username" value="Username" onfocus="this.value = '';" onblur="if (this.value == '') {this.value = 'Username';}"><a href="#" class=" icon user"></a>
            </li>
                <div class="clear"> </div>
            <li>
                <input type="password" value="Password" name="password" onfocus="this.value = '';" onblur="if (this.value == '') {this.value = 'Password';}"> <a href="#" class="icon lock"></a>
            </li>
            <div class="clear"> </div>
            <div class="submit">
                <input type="submit" onclick="myFunction()" value="Sign in" >
                <h4><a href="#">Lost your Password ?</a></h4>
                          <div class="clear">  </div>
            </div>

        </form>
- 编写一个success.html页面
- 编写一个error.html页面

二 修改Spring-security.xml 配置文件
<?xml version="1.0" encoding="UTF-8"?>
<beans xmlns="http://www.springframework.org/schema/beans"
       xmlns:xsi="http://www.w3.org/2001/XMLSchema-instance"
       xmlns:security="http://www.springframework.org/schema/security"
       xsi:schemaLocation="http://www.springframework.org/schema/beans
       http://www.springframework.org/schema/beans/spring-beans.xsd
        http://www.springframework.org/schema/security
        http://www.springframework.org/schema/security/spring-security.xsd">
    <!--配置资源不拦截-->
    <security:http pattern="/css/**" security="none"></security:http>
    <security:http pattern="/js/**" security="none"></security:http>
    <security:http pattern="/images/**" security="none"></security:http>
    <!--谷歌浏览器:请求被拦截会自动访问favicon.ico-->
    <security:http pattern="/favicon.ico" security="none"></security:http>


    <!--配置页面不拦截
    pattern="" : 拦截的路径表达式
    security="none":不拦截-->
    <security:http pattern="/login.html" security="none"></security:http>
    <security:http pattern="/error.html" security="none"></security:http>

    <!--
       配置拦截的规则
       auto-config="使用自带的页面"
       use-expressions="是否使用spel表达式",如果使用表达式:hasRole('ROLE_USER')
   -->
    <security:http auto-config="true" use-expressions="false">
        <!-- 配置拦截的请求地址,任何请求地址都必须有ROLE_USER的权限 -->
        <security:intercept-url pattern="/**" access="ROLE_USER"/>
        <!--配置自定义登录界面
        login-page :指定登录界面
        login-processing-url="login" 登录请求路径,登录表单必须提交到login
        default-target-url: ,登录成功后默认指向页面,如果有上一次请求,则执行上一次请求
        authentication-failure-url: 认证失败的页面-->
        <security:form-login login-page="/login.html"
                             login-processing-url="/login"
                             default-target-url="/success.html"
                             authentication-failure-url="/error.html"></security:form-login>
        <!--关闭跨站请求伪造-->
        <security:csrf disabled="true"></security:csrf>
        <!--security:logout 指定退出的信息
       logout-success-url="" 退出成功后的跳转页面

       logout-url: 退出请求路径
       invalidate-session:是否会清空session
   -->
        <security:logout logout-url="/logout" logout-success-url="/login.html" invalidate-session="true"></security:logout>
    </security:http>

    <!-- 配置认证信息 -->
    <!--认证管理器-->
    <security:authentication-manager>
        <!--认证提供者-->
        <security:authentication-provider>
            <!--认证业务-->
            <security:user-service>
                <!--临时的账号和密码
                    {noop}:不使用加密方式
                     authorities="ROLE_USER" :认证的角色-->
                <security:user name="admin" password="{noop}admin" authorities="ROLE_USER"/>
            </security:user-service>
        </security:authentication-provider>
    </security:authentication-manager>
</beans>
配置完就OK了,可以访问 http://localhost/