源码
1、安装node环境
具体安装教程请参考http://nodejs.cn/
2、塔建Vue前端项目
使用Vue官网提供的vue-cli脚手架vue-cli命令行工具
# 全局安装 vue-cli
$ npm install --global vue-cli
# 创建一个基于 webpack 模板的新项目
$ vue init webpack nevem
# 安装依赖,走你
$ cd nevem
$ npm install
$ npm run dev
注意:
npm install --global vue-cli
全局安装 vue-cli。
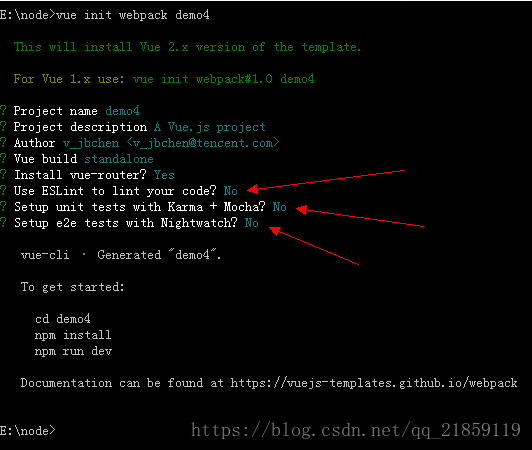
vue init webpack nevem
创建一个基于 webpack 模板的新项目。在这一步时,下图的这几个单元测试和代码检验工具建议填写no,不然会增加项目的体积和写代码时因为不规范产生一大堆报错。
cd nevem
安装vue-resource和element-ui依赖: cd nevem进入前端项目后,找到package.json文件对应的地方,确保有添加如下代码:
"dependencies": {
    "element-ui": "^1.3.2",
    "vue": "^2.2.6",
    "vue-resource": "^1.0.3",
    "vue-router": "^2.3.1"
  },
npm install
安装所有的依赖,包括上一步骤的elementUI和vue-resource。

执行npm install安装时间会长一点,所以建议使用淘宝cnpm镜像(自行google),公司的网络已墙的请忽略。
npm run dev后页面自动弹出http://localhost:8080/#/这个页面,表明基于webpack的vue项目成功创建。
3、引入Element组件
修改src/main.js为如下代码,引入element和resource
import Vue from 'vue'
import App from './App'
import router from './router'
import VueResource from 'vue-resource'
import ElementUI from 'element-ui'
import 'element-ui/lib/theme-default/index.css'

Vue.config.productionTip = false
Vue.use(VueResource)
Vue.use(ElementUI)
/* eslint-disable no-new */
new Vue({
  el: '#app',
  router,
  template: '<App/>',
  components: { App },
  render:h => h(App)
})
修改src/componentsHello.vue文件为如下代码,调整首页的内容
<template>
  <div class="hello">
    <h1>{{ msg }}</h1>
    <p>{{el}}</p>
    <form>
        <el-input v-model="name" placeholder="名称" style="width:200px"></el-input>
        <el-input v-model="price" placeholder="价格" style="width:200px"></el-input>
        <el-button type="primary" @click="addUser">提交</el-button>
    </form>
  </div>
</template>

<script>
export default {
  name: 'hello',
  data () {
    return {
      msg: 'Welcome to Your Vue.js App',
      name: '',
      price: '',
      el:''
    }
  },
  methods: {
    addUser() {
      var name = this.name;
      var price = this.price;
      this.$http.post('/api/user/addUser', {
        name: name,
        price: price
      },{}).then((response) => {
        console.log(response);
      })
    },
    aaa(){
      this.el="成功引入element";
    }
  }
}
</script>
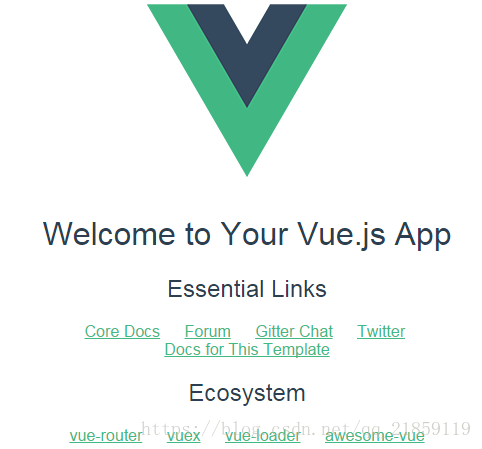
保存以上文件之后,在nevem目录再次运行npm run dev,页面变成如下效果,则表示成功引入element组件。

4、安装Mysql
安装mysql的形式有很多种,这里我使用的是WampServer建立一个数据库,具体如果安装和使用,依旧自行google。
这里我新增了一个Database数据库,名称为mbvr_live,然后在数据库里创建一张表goods并插入了两条记录,具体sql代码如下:
CREATE TABLE IF NOT EXISTS `goods` (
  `id` int(11) NOT NULL AUTO_INCREMENT,
  `name` varchar(100) NOT NULL,
  `price` float(10,2) NOT NULL,
  `creat_time` timestamp NOT NULL DEFAULT CURRENT_TIMESTAMP ON UPDATE CURRENT_TIMESTAMP,
  PRIMARY KEY (`id`),
  UNIQUE KEY `id` (`id`)
) ENGINE=InnoDB  DEFAULT CHARSET=latin1 AUTO_INCREMENT=6 ;

INSERT INTO `goods` (`id`, `name`, `price`, `creat_time`) VALUES
(1, 'apple', 5.00, '2017-05-11 00:22:10'),
(2, 'banner', 5.00, '2017-05-11 01:37:37');
5、安装Express
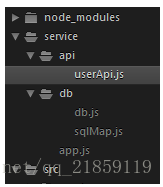
在目录nevem下新建一个文件service,用于做服务器。在里面创建如下4个文件,结构如下:
db.js,用来配置mysql连接数据:
module.exports = {
    mysql: {
        host: 'localhost',
        user: 'root',
        password: '',
        database:'mbvr_live'
    }
}
app.js,Express服务器入口文件:
// node 后端服务器入口
const userApi = require('./api/userApi');
const fs = require('fs');
const path = require('path');
const bodyParser = require('body-parser');
const express = require('express');
const app = express();

app.use(bodyParser.json());
app.use(bodyParser.urlencoded({extended: false}));

//注册api路由
app.use('/api/user', userApi);

// 监听端口
app.listen(3000);
console.log('success listen at port:3000......');
sqlMap.js,SQL语句映射文件,以供api逻辑调用:
// sql语句
var sqlMap = {
    // 用户
    user: {
        add: 'insert into goods(id, name, price) values (0, ?, ?)'
    }
}
module.exports = sqlMap;
userApi.js,测试示例:
var models = require('../db/db');
var express = require('express');
var router = express.Router();
var mysql = require('mysql');
var $sql = require('../db/sqlMap');

// 连接数据库
var conn = mysql.createConnection(models.mysql);

conn.connect();
var jsonWrite = function(res, ret) {
    if(typeof ret === 'undefined') {
        res.json({
            code: '1',
            msg: '操作失败'
        });
    } else {
        res.json(ret);
    }
};

// 增加用户接口
router.post('/addUser', (req, res) => {
    var sql = $sql.user.add;
    var params = req.body;
    console.log(params);
    conn.query(sql, [params.name, params.price], function(err, result) {
        if (err) {
            console.log(err);
        }
        if (result) {
            jsonWrite(res, result);
        }
    })
});
// 增加用户接口
router.get('/addUser', (req, res) => {
     res.send('retrunJson');
});

module.exports = router;
编写完成之后,就可以在service项目下安装相关的依赖npm install express mysql body-parser;
此时在service文件夹下执行node app如看到success listen at port:3000,即服务端启动成功。
6、测试
这时候,返回http://localhost:8080/#/页面输入名称和价格后并提交,发现报http://localhost:8080/api/use… 的404错误,这是因为后端8080和前端3000是两个不同的端口,跨域了。这时候,找到文件configindex.js,在开发配置dev里面的地址映射表proxyTable内容为空,这里修改为:
proxyTable: {
        '/api': {
            target: 'http://127.0.0.1:3000/api/',//不要写localhost
            changeOrigin: true,//true允许跨域
            pathRewrite: {
                '^/api': ''  //需要rewrite重写的, 如果在服务器端做了处理则可以不要这段
            }
        }
    },