版权声明:本文为博主原创文章,未经博主允许不得转载。 https://blog.csdn.net/chyuanrufeng/article/details/80328895
QML提供一个和HTML5中一样的Canvas画布。这里介绍一个Canvas的使用网站。
1.实现一个小球的自由落体
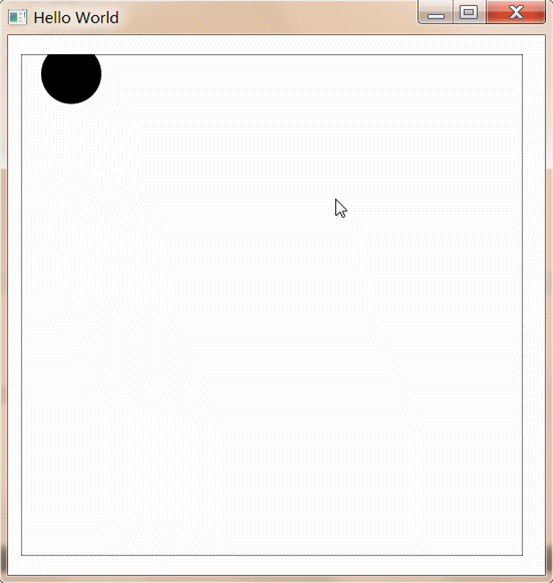
//自由落体
Canvas{
    id : canvas
    width: 500; height: 500
    property real gravity: 9.8  //重力加速度
    property real droptime: 0;      //下落时间
    property real dropheigth: 0

    onPaint: {
        var ctx = getContext("2d");
        ctx.clearRect(0,0,width,height);
        ctx.beginPath()
        ctx.strokeRect(0,0,width,height)
        ctx.arc(50,dropheigth,30,0,Math.PI*2, false);
        ctx.closePath();
        ctx.fill();

    }

    Timer{
        interval: 100; running: true; repeat: true
         onTriggered: {
             canvas.requestPaint();
             droptime += 0.5;
             canvas.dropheigth = 0.5*gravity*droptime*droptime;
             if (canvas.dropheigth > canvas.height)
                 droptime = 0;
         }
    }
}
2.利用阴影实现发光体的效果,使用阴影的使用。
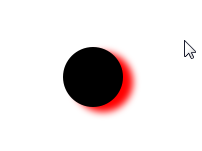
//阴影 shadowBlur不能设置太大,太大的会卡的会很严重
//动画效果,利用阴影实现发光体的效果
Canvas{
    id : canvas
    width: 100; height: 100;
    property real xoffset: 19
    property real voffset: -1

    onPaint: {
        var ctx = getContext("2d");
        ctx.clearRect(0,0,width,height);

        ctx.shadowColor = "rgb(255, 0, 0)"; // Red
        ctx.shadowBlur = 5;
        ctx.shadowOffsetX = xoffset;
        ctx.shadowOffsetY = 5;

        ctx.font = " 30px 微软雅黑"
        //ctx.fillText("cehsi",20,20);

        ctx.beginPath()
        //ctx.strokeRect(0,0,width,height)
        ctx.arc(50,50,30,0,Math.PI*2, false);
        ctx.closePath();
        ctx.fill();
    }

    Timer{
        interval: 500; running: true; repeat: true
         onTriggered: {
             canvas.requestPaint();
             if (canvas.xoffset == -19) canvas.voffset = 1;
             if (canvas.xoffset == 19) canvas.voffset = -1;
             canvas.xoffset+= canvas.voffset;
         }
    }
}
//渐进色测试

Canvas{
    //anchors.fill: parent
    width: 100; height: 100

    onPaint: {
        var ctx = getContext("2d");
        ctx.clearRect(0,0,width,height);
        var px = width/2;
        var py = width/2;
        var r = Math.min(px,py);
        var col = ctx.createRadialGradient(px, py, 0, px, py, r);
        col.addColorStop(0, "darkRed");
        col.addColorStop(0.6, Qt.rgba(1, 0, 0, 0.5));
        col.addColorStop(1, Qt.rgba(1, 0, 0, 0));
        ctx.fillStyle = col;
        //ctx.strokeStyle=Qt.rgba(1, 0, 0, 1)
        ctx.ellipse(0, 0, width, height);
        //ctx.stroke();
        ctx.fill();
    }
}