这个是我以前网上看到的一篇文章,原文地址是:Building a Metro UI with WPF,这篇文章一步步的介绍了如何实现一个Metro样式的窗口,并且效果非常好。今天看到OSChina上有这篇文章的译文:使用WPF来创建 Metro UI,翻译得非常好,这里推荐一下。
值得一提的是,除了这种一步步来的方式外,现在Codeplex中也有不少比较好的metro风格的wpf框架,可以帮助我们快速实现Metro样式的Wpf程序。
亲们用过 Zune 嘛? 应该吧,可是 4.7.1404.0 版本才是我的第一次Zune体验,因为这个版本有非常显著的变化: 支持Windows Phone 7 并 整合了 Windows Live Essentials 2011.
当我第一次运行它的时候,我被他的界面深深地震撼到了,“不!这一定不是WPF!一定不是!”。 再细细的看下去, 文字是那么的清晰可见, 界面响应是如此的酣畅淋漓! 我顺便去看了一下维基百科, 原来Zune的早期版本早在2006年就已经发布。与此同时,WPF 正要随着 .NET 3.0 一起发布 (发布日期是2006年11月)。

roger37
翻译于 2012/12/26 17:47
当我第一次运行Zune时,我为这些美丽的UI所折服。当时就说这肯定不是用WPF做的,因为这些字体是如此的清晰而且UI反映的也非常快速。。而且我从维基百科上也了解到Zune的第一个版本是2006年发布的,而WPF与.NET 3.0却是 2006 年11月发布的。
那么问题来了,如果它不是WPF做的,那它是用什么技术做到的呢?为了找到答案,我使用Process Explorer工具来看看Zune是如何启动的,默认情况下,.NET应用程序都是被用黄色高亮显示的。

很好,这说明Zune肯定是.net 应用程序了,然后我们可以看到Zune需要如下库
然后用 Reflector一看:
如你所见,根名空间是 Microsoft.Iris. 我在Google上搜到这玩意看上去就像某种原始的WPF组件 -- MCML

王振威
翻译于 2012/11/27 17:12
WPF能创造出类似的UI吗?
第一个难点就是就是设定WindowStyle为None。因为这有这有才能让标题栏以及边框不可见

王振威
翻译于 2012/11/27 17:13
那该如何移动窗体呢?
首先添加一个Shape(Rectangle),然后为它订阅PreviewMouseDown事件处理。
// Is this a double-click?
if (DateTime.Now.Subtract(m_headerLastClicked) <= s_doubleClick)
{
  // Execute the code inside the event handler for the
  // restore button click passing null for the sender
  // and null for the event args.
  HandleRestoreClick(null, null); } m_headerLastClicked = DateTime.Now; if (Mouse.LeftButton == MouseButtonState.Pressed) { DragMove(); }
王振威
翻译于 2012/11/27 17:12
该如何任意改变窗体大小?
在主窗体的四个角分别添加一个Shape(比如Rectangle)然后为它们都订阅PreviewMouseDown事件处理:
Rectangle clickedRectangle = (Rectangle)sender;

switch (clickedRectangle.Name)
{
  case "top":
      Cursor = Cursors.SizeNS;
      ResizeWindow(ResizeDirection.Top);
      break;
  case "bottom": Cursor = Cursors.SizeNS; ResizeWindow(ResizeDirection.Bottom); break; // ... }
下面就是用鼠标重新调整窗体大小的代码
/// <summary>
/// Resizes the window.
/// </summary> /// <param name="direction">The direction.</param> private void ResizeWindow(ResizeDirection direction) { NativeMethods.SendMessage(m_hwndSource.Handle, WM_SYSCOMMAND, (IntPtr)(61440 + direction), IntPtr.Zero); } [DllImport("user32.dll", CharSet = CharSet.Auto)] internal static extern IntPtr SendMessage( IntPtr hWnd, UInt32 msg, IntPtr wParam, IntPtr lParam);
王振威
翻译于 2012/11/27 17:13
如何为窗体添加阴影效果。
实际上有两种做法:
第一种就是试用DWM API。这个方法需要订阅SourceInitialized事件。
/// <summary>
/// Raises the <see cref="FrameworkElement.Initialized"/> event. /// This method is invoked whenever /// <see cref="P:FrameworkElement.IsInitialized"/> /// is set to true internally. /// </summary> /// <param name="e">The <see cref="T:RoutedEventArgs"/> /// that contains the event data.</param> protected override void OnInitialized(EventArgs e) { AllowsTransparency = false; ResizeMode = ResizeMode.NoResize; Height = 480; Width = 852; WindowStartupLocation = WindowStartupLocation.CenterScreen; WindowStyle = WindowStyle.None; SourceInitialized += HandleSourceInitialized; base.OnInitialized(e); } /// <summary> /// Handles the source initialized. /// </summary> /// <param name="sender">The sender.</param> /// <param name="e">The <see cref="System.EventArgs"/> /// instance containing the event data.</param> private void HandleSourceInitialized(Object sender, EventArgs e) { m_hwndSource = (HwndSource)PresentationSource.FromVisual(this); // Returns the HwndSource object for the window // which presents WPF content in a Win32 window. HwndSource.FromHwnd(m_hwndSource.Handle).AddHook( new HwndSourceHook(NativeMethods.WindowProc)); // http://msdn.microsoft.com/en-us/library/aa969524(VS.85).aspx Int32 DWMWA_NCRENDERING_POLICY = 2; NativeMethods.DwmSetWindowAttribute( m_hwndSource.Handle, DWMWA_NCRENDERING_POLICY, ref DWMWA_NCRENDERING_POLICY, 4); // http://msdn.microsoft.com/en-us/library/aa969512(VS.85).aspx NativeMethods.ShowShadowUnderWindow(m_hwndSource.Handle); }
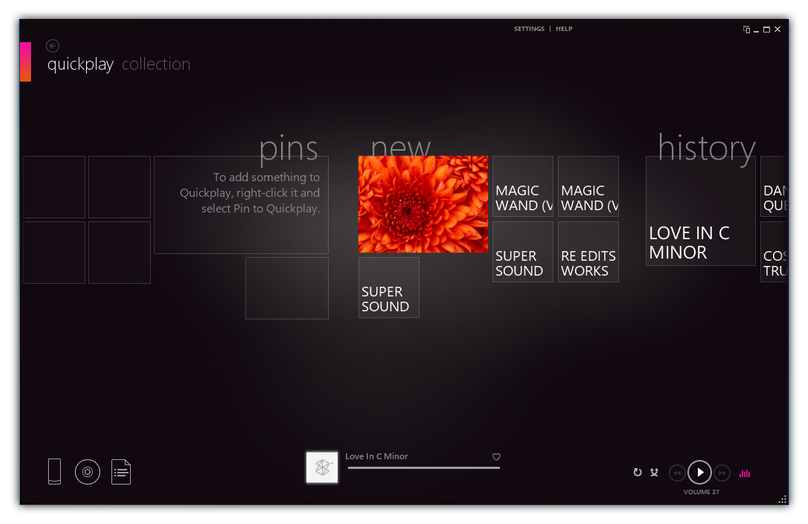
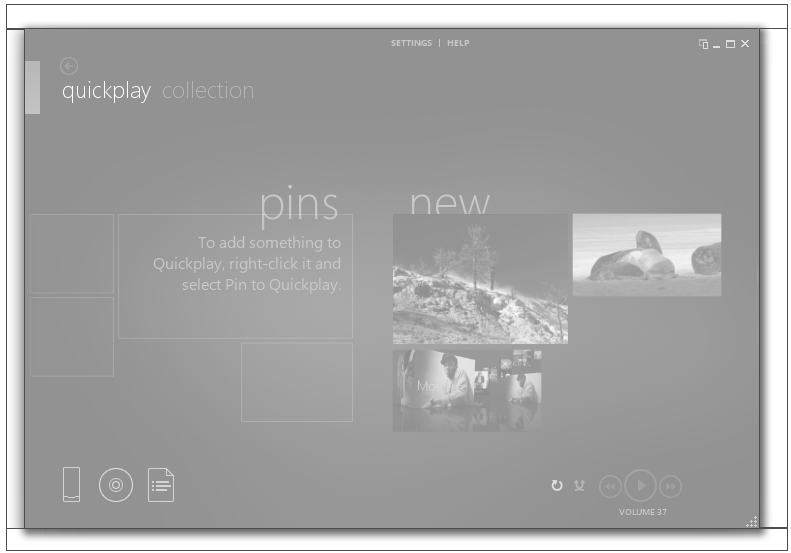
无阴影的窗体

有阴影的窗体

王振威
翻译于 2012/11/27 17:17
第二种方法就是使用四个外部的透明窗体来制造了阴影的假象,如下图所示
1,用代码的方式创建一个透明的窗体
2,找到Main Window 在屏幕上的坐标,尤其是左上角
3,计算4个透明窗口的坐标
4,当我们移动Main Window时,4个边框透明窗口也需要跟着移动
5,当我们重新设定 Main Window大小时,4个边框透明窗口也要跟着变化大小。
说这么多看上去好像很难,来让我们看看实现的代码吧。
创建透明窗体的代码
/// <summary>
/// Initializes the surrounding windows.
/// </summary> private void InitializeSurrounds() { // Top. m_wndT = CreateTransparentWindow(); // Left. m_wndL = CreateTransparentWindow(); // Bottom. m_wndB = CreateTransparentWindow(); // Right. m_wndR = CreateTransparentWindow(); SetSurroundShadows(); } /// <summary> /// Creates an empty window. /// </summary> /// <returns></returns> private static Window CreateTransparentWindow() { Window wnd = new Window(); wnd.AllowsTransparency = true; wnd.ShowInTaskbar = false; wnd.WindowStyle = WindowStyle.None; wnd.Background = null; return wnd; } /// <summary> /// Sets the artificial drop shadow. /// </summary> /// <param name="active">if set to <c>true</c> [active].</param> private void SetSurroundShadows(Boolean active = true) { if (active) { Double cornerRadius = 1.75; m_wndT.Content = GetDecorator( "Images/ACTIVESHADOWTOP.PNG"); m_wndL.Content = GetDecorator( "Images/ACTIVESHADOWLEFT.PNG", cornerRadius); m_wndB.Content = GetDecorator( "Images/ACTIVESHADOWBOTTOM.PNG"); m_wndR.Content = GetDecorator( "Images/ACTIVESHADOWRIGHT.PNG", cornerRadius); } else { m_wndT.Content = GetDecorator( "Images/INACTIVESHADOWTOP.PNG"); m_wndL.Content = GetDecorator( "Images/INACTIVESHADOWLEFT.PNG"); m_wndB.Content = GetDecorator( "Images/INACTIVESHADOWBOTTOM.PNG"); m_wndR.Content = GetDecorator( "Images/INACTIVESHADOWRIGHT.PNG"); } } [DebuggerStepThrough] private Decorator GetDecorator(String imageUri, Double radius = 0) { Border border = new Border(); border.CornerRadius = new CornerRadius(radius); border.Background = new ImageBrush( new BitmapImage( new Uri(BaseUriHelper.GetBaseUri(this), imageUri))); return border; }
计算位置高度的代码
/// <summary>
/// Raises the <see cref="FrameworkElement.Initialized"/> event. /// This method is invoked whenever /// <see cref="FrameworkElement.IsInitialized"/> /// is set to true internally. /// </summary> /// <param name="e">The <see cref="T:RoutedEventArgs"/> /// that contains the event data.</param> protected override void OnInitialized(EventArgs e) { // ... LocationChanged += HandleLocationChanged; SizeChanged += HandleLocationChanged; StateChanged += HandleWndStateChanged; InitializeSurrounds(); ShowSurrounds(); base.OnInitialized(e); } /// <summary> /// Handles the location changed. /// </summary> /// <param name="sender">The sender.</param> /// <param name="e">The <see cref="System.EventArgs"/> /// instance containing the event data.</param> private void HandleLocationChanged(Object sender, EventArgs e) { m_wndT.Left = Left - c_edgeWndSize; m_wndT.Top = Top - m_wndT.Height; m_wndT.Width = Width + c_edgeWndSize * 2; m_wndT.Height = c_edgeWndSize; m_wndL.Left = Left - m_wndL.Width; m_wndL.Top = Top; m_wndL.Width = c_edgeWndSize; m_wndL.Height = Height; m_wndB.Left = Left - c_edgeWndSize; m_wndB.Top = Top + Height; m_wndB.Width = Width + c_edgeWndSize * 2; m_wndB.Height = c_edgeWndSize; m_wndR.Left = Left + Width; m_wndR.Top = Top; m_wndR.Width = c_edgeWndSize; m_wndR.Height = Height; } /// <summary> /// Handles the windows state changed. /// </summary> /// <param name="sender">The sender.</param> /// <param name="e">The <see cref="System.EventArgs"/> /// instance containing the event data.</param> private void HandleWndStateChanged(Object sender, EventArgs e) { if (WindowState == WindowState.Normal) { ShowSurrounds(); } else { HideSurrounds(); } }