
入职第一天,负责PC端商城项目,这也是人生第一个真正的项目。刚做了一天,就遇到不少问题,在这里列出自己的问题与解决办法,与大家交流,提升自己,希望以后不会掉进同一个坑里。文章持续更新到项目完善,yeah~
(本文只列项目问题与解决方法,不会讲到核心理念之类,暂不作深入研究)
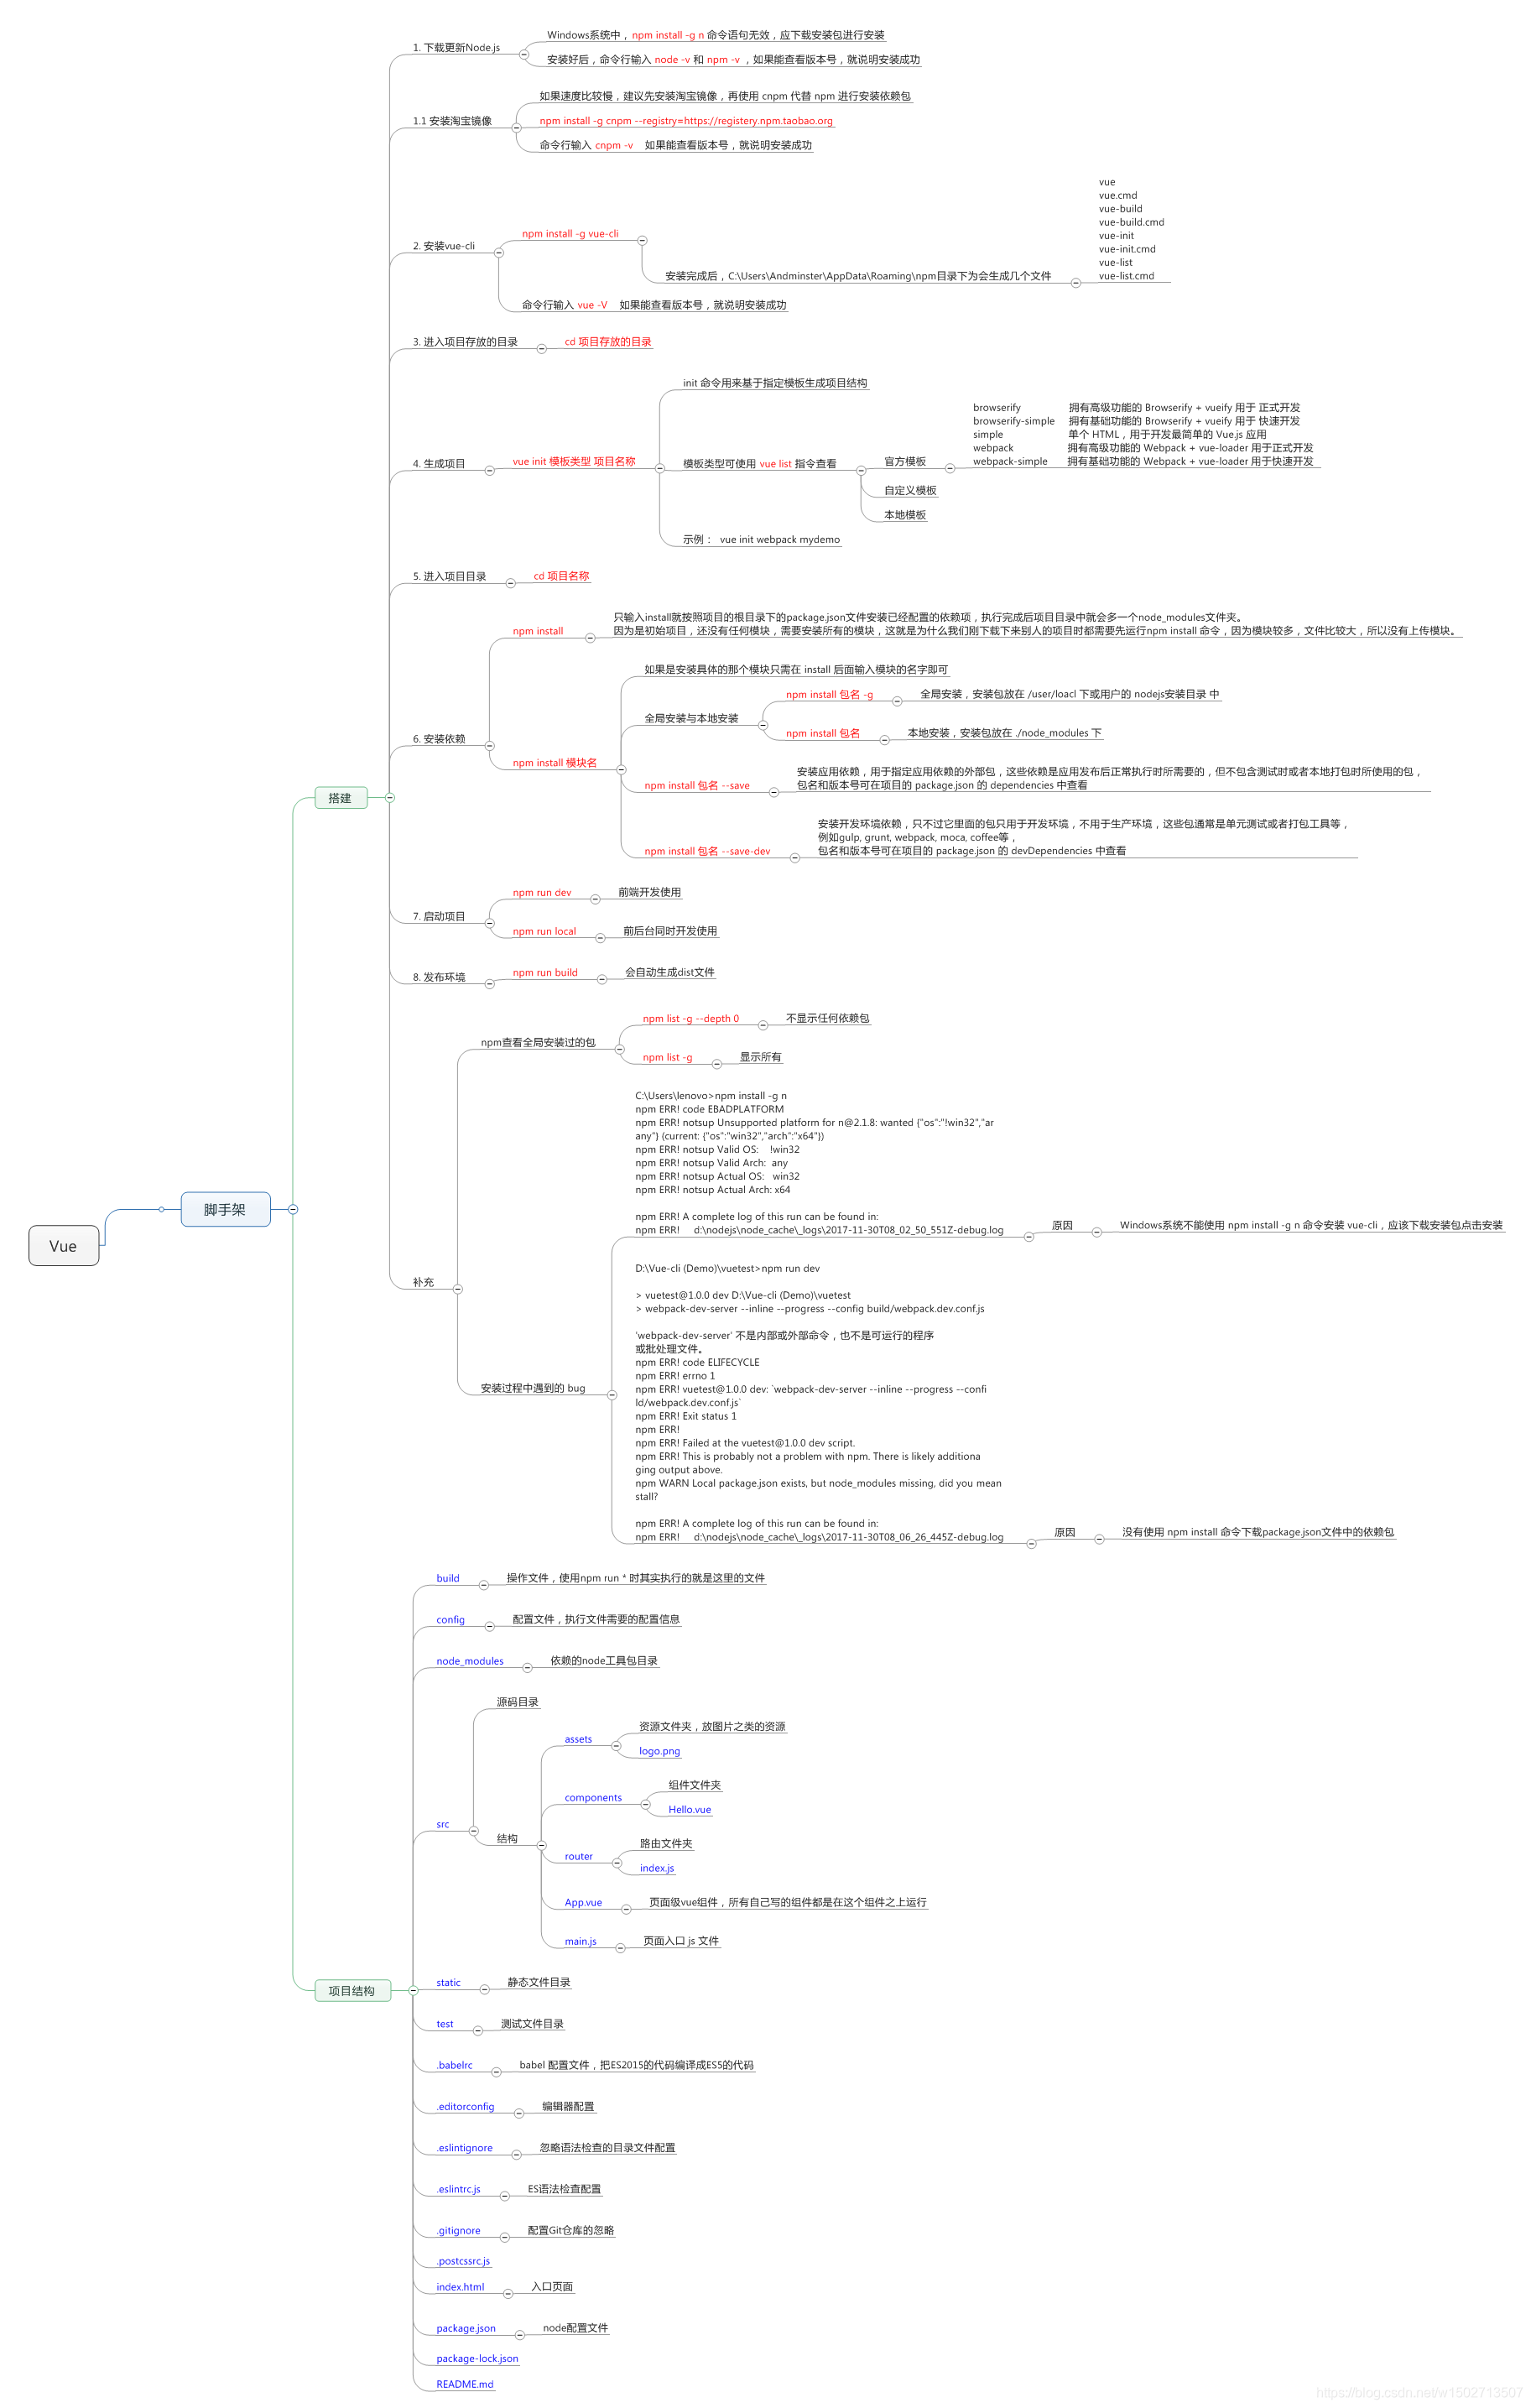
一、使用vue-cli创建项目
上次逛论坛遇到一张图,出处忘记了,借送给大家,从搭建到项目结构,一张图解决好多疑问,好优秀
二、Element-ui安装应用
1.安装到项目 $ cnpm install element-ui -S
2.main.js中写入以下内容
import Vue from 'vue';
import ElementUI from 'element-ui';
import 'element-ui/lib/theme-chalk/index.css';
import App from './App.vue';

Vue.use(ElementUI);

new Vue({
  el: '#app',
  render: h => h(App)
});
3.后期简洁代码,做到只引用需要组件
三、Swiper安装应用
此处slide组件单独引用
1.安装Swiper
$ cnpm install swiper -S
$ cnpm install vue-awesome-swiper -S
(这个地方,先这样,安装swiper有用)
2.使用
<template>
  <div>
    <swiper :options="swiperOption" ref="mySwiper">
        <!-- slides -->
        <swiper-slide>
          <a href="javascript:;">
            <img src="../assets/images/首页_slices/[email protected]" height="460" width="1024"/>
          </a>
        </swiper-slide>
        <swiper-slide>
          <a href="javascript:;">
            <img src="../assets/images/首页_slices/[email protected]" height="460" width="1024"/>
          </a>
        </swiper-slide>
        <swiper-slide>
          <a href="javascript:;">
            <img src="../assets/images/首页_slices/[email protected]" height="460" width="1024"/>
          </a>
        </swiper-slide>
        <!-- Optional controls -->
        <div class="swiper-pagination" slot="pagination"></div>
        <div class="swiper-button-prev" slot="button-prev"></div>
        <div class="swiper-button-next" slot="button-next"></div>
        <div class="swiper-scrollbar"   slot="scrollbar"></div>
      </swiper>
  </div>
</template>

<script>

  import {swiper, swiperSlide} from 'vue-awesome-swiper';

  require('swiper/dist/css/swiper.css');

  export default {
    name: 'slide',
    data() {
      return {
        swiperOption: {
            // 配置选项
        }
     },
    components: {
      swiper,
      swiperSlide
    }
  }
</script>

<style scoped>

</style>
四、问题整合
1.使用axios调用后台数据
(1).安装 $ cnpm install axios -S
(2).main.js 引入以下内容
import Vue from 'vue';
import ElementUI from 'element-ui';
import 'element-ui/lib/theme-chalk/index.css';
import axios from 'axios'; // this
import App from './App';
import router from './router';

Vue.config.productionTip = false
/* eslint-disable no-new */

Vue.use(ElementUI);
Vue.prototype.$axios = axios; //and this

new Vue({
  el: '#app',
  components: {App},
  template: '<App/>'
})
(3).从后台获取数据(POST)
export default {
    name: "footer",
    data() {
      return {
        recommends: ''
      }
    },
    methods: {
      post() {
        this.$axios.post('url', {params1: 'data', params2: 'data'})
          .then((response) => {
            this.recommends = response.data.data.goodsList;
            console.log('成功');
          })
          .catch((error) => {
            console.log('失败' + error);
          });
      }
    },
    mounted() {
      this.post()
    }
  }
2.npm run build 页面空白或缺失元素
(1).修改config/index.js
build: {
    // Template for index.html
    index: path.resolve(__dirname, '../dist/index.html'),

    // Paths
    assetsRoot: path.resolve(__dirname, '../dist'),
    assetsSubDirectory: 'static',
    // assetsPublicPath: '/', //************原始
    assetsPublicPath: './',  //********修改后,资源生成目录

    /**
     * Source Maps
     */

    productionSourceMap: true,
    // https://webpack.js.org/configuration/devtool/#production
    devtool: '#source-map',

    // Gzip off by default as many popular static hosts such as
    // Surge or Netlify already gzip all static assets for you.
    // Before setting to `true`, make sure to:
    // npm install --save-dev compression-webpack-plugin
    productionGzip: false,
    productionGzipExtensions: ['js', 'css'],

    // Run the build command with an extra argument to
    // View the bundle analyzer report after build finishes:
    // `npm run build --report`
    // Set to `true` or `false` to always turn it on or off
    bundleAnalyzerReport: process.env.npm_config_report
  }
(2).设置了路由的mode:'history',(地址栏http:aa.com/#/index 去除#号),注释掉
(3).如果mode为history,解决方法如下:(router/index.js)
export default [{
path: '/box',
component: App, //顶层路由,对应index.html
children: [ //二级路由。对应App.vue
//地址为空时跳转home页面
{
path: '',
redirect: '/box/page1'
},
{
path: '/box/page2',
component: page2
},
{
path: '/box/page3',
component: page3
},
{
path: '/box/page4',
component: page4
}

]
}]

//作者:Qaye
//原文:https://blog.csdn.net/fanrenmuchangqian/article/details/79897932