Vries的教程是我看过的最好的可编程管线OpenGL教程,没有之一,其原地址如下,https://learnopengl-cn.github.io/04%20Advanced%20OpenGL/03%20Blending/ 关于混合的详细知识了解请看原教程,本篇旨在对Vires基于visual studio平台的编程思想与c++代码做纯Qt平台的移植,代码移植顺序基本按照原教程顺序,并附加一些学习心得,重在记录自身学习之用
Tip:这节的内容非常有趣,我强烈建议大家阅读完原教程的知识细节。
程序源代码链接:https://pan.baidu.com/s/1iO3tP1CCtfAIM0g6DdbI0g 提取码:wxjh
编译环境:Qt5.9.4
编译器:Desktop Qt5.9.4 MSVC2017 64bit
IDE:QtCreator
一,混合
单纯的颜色渲染已经不能满足我们了,我们现在要追求带有透明度的颜色。也就是OpenGL颜色分量中的alpha分量,当alpha = 1.0f时,表示该颜色不透明;alpha = 0.4f时,片段的颜色有40%来自物体自身的颜色,60%来自物体背后的颜色。如图1所示。
二,丢弃片段
混合分为两种,一种是纹理中,透明部分与不透明部分泾渭分明,我们只需要不透明的部分,如图2的草。
Tip: 不带csdn水印的照片在源代码里。

在Vries的代码里,因为引入的是独立image库,所以需要修改纹理载入过程的两部分参数代码,如下所述:
......
//表明以RGBA的四分量颜色向量载入纹理

glTexImage2D(GL_TEXTURE_2D, 0, GL_RGBA, width, height, 0, GL_RGBA, GL_UNSIGNED_BYTE, data);

......
//修改纹理的扩张方式,由重复改为边扩展
glTexParameteri( GL_TEXTURE_2D, GL_TEXTURE_WRAP_S, GL_CLAMP_TO_EDGE);
glTexParameteri( GL_TEXTURE_2D, GL_TEXTURE_WRAP_T, GL_CLAMP_TO_EDGE);

......

/*
在Qt里,我们需要修改Vries三行代码对应的三个参数,如何使用见下文
*/
  QOpenGLTexture::RGBAFormat;
  QOpenGLTexture::ClampToBorder; //在纹理的边界部分,按照Vries思想进行边扩展。
  QOpenGLTexture::ClampToBorder;
将代码移植到Qt时,因为Qt自带的QOpenGLTexture类参数的可控性,所以为方便控制,我们自设一个Texture2D类,方便对纹理进行管理。
Texture2D.h :将纹理常用的参数,如颜色格式,扩展方式独立出来,源文件里有解释如何在Qt里确立与Vries所用的纹理函数等价的函数。
#include <QOpenGLTexture>

class Texture2D
{
  friend class ResourceManager;
public:
  Texture2D();
  ~Texture2D();
  void generate(const QString& file);
  void bind() const;

  QOpenGLTexture::TextureFormat internal_format;//Format of texture object
  QOpenGLTexture::WrapMode wrap_s;
  QOpenGLTexture::WrapMode wrap_t;
  QOpenGLTexture::Filter filter_min;
  QOpenGLTexture::Filter filter_max;
private:
  QOpenGLTexture *texture;
};
Texture2D.cpp源文件
#include "texture2d.h"

Texture2D::Texture2D():texture(NULL), internal_format(QOpenGLTexture::RGBFormat),
    wrap_s(QOpenGLTexture::Repeat), wrap_t(QOpenGLTexture::Repeat), filter_min(QOpenGLTexture::Linear),
    filter_max(QOpenGLTexture::Linear)
{

}

Texture2D::~Texture2D()
{
    //一样的析构问题,不会解决 擦,在ResourceManager里
//  if(texture)
//    delete texture;

}

void Texture2D::generate(const QString &file)
{
  texture = new QOpenGLTexture(QOpenGLTexture::Target2D); //直接生成绑定一个2d纹理, 并生成多级纹理MipMaps
  texture->setFormat(internal_format);
  texture->setData(QImage(file).mirrored(), QOpenGLTexture::GenerateMipMaps);

  texture->setWrapMode(QOpenGLTexture::DirectionS, wrap_s);// 等于glTexParameteri(GL_TEXTURE_2D, GL_TEXTURE_WRAP_S, GL_REPEAT);
  texture->setWrapMode(QOpenGLTexture::DirectionT, wrap_t);//    glTexParameteri(GL_TEXTURE_2D, GL_TEXTURE_WRAP_T, GL_REPEAT);

  texture->setMinificationFilter(filter_min);   //等价于glTexParameteri(GL_TEXTURE_2D, GL_TEXTURE_MIN_FILTER, GL_LINEAR);
  texture->setMagnificationFilter(filter_max);  //     glTexParameteri(GL_TEXTURE_2D, GL_TEXTURE_MAG_FILTER, GL_LINEAR);
}

void Texture2D::bind() const
{
  texture->bind();
}
有了这个Texture2D类,我们就可以很方便的在ResourceManager类里对纹理进行管理,在函数列表里设计alpha参数决定要在如的纹理是否为透明纹理。(ResouceManager类的相关信息在博客编程(八)里)
Texture2D ResourceManager::loadTexture(const QString&  name, const QString& file, GLboolean alpha){
  Texture2D texture;

  if(alpha){
    texture.internal_format = QOpenGLTexture::RGBAFormat;
    texture.wrap_s = QOpenGLTexture::ClampToBorder; //在纹理的边界部分,按照Vries思想进行边扩展。
    texture.wrap_t = QOpenGLTexture::ClampToBorder;
  }

  texture.generate(file);
  map_Textures[name] = texture;
  return texture;
}等做完这一切工作,在编程(十八)深度测试的场景上,将草的纹理映射到一个plane平面上(littlething.h里有这个类),并像Vries所做的那样,放在这五个位置。
  grassOffset.push_back(QVector3D(-1.5f,  0.0f, -0.48f));
  grassOffset.push_back(QVector3D( 1.5f,  0.0f,  0.51f));
  grassOffset.push_back(QVector3D( 0.0f,  0.0f,  0.7f));
  grassOffset.push_back(QVector3D(-0.3f,  0.0f, -2.3f));
  grassOffset.push_back(QVector3D( 0.5f,  0.0f, -0.6f));
直接用plane的着色器对草进行渲染。
plane.vert
#version 330 core
layout (location = 0) in vec3 aPos;
layout (location = 1) in vec2 aTex;

uniform mat4 model;
uniform mat4 view;
uniform mat4 projection;

out vec2 TexCoords;

void main(){
  gl_Position = projection * view * model * vec4(aPos, 1.0f);
  TexCoords = aTex;
}
plane.frag
#version 330 core
out vec4 FragColor;
in vec2 TexCoords;

uniform sampler2D ambientMap;

void main(){
  FragColor = texture2D(ambientMap, TexCoords);
}
因为plane的着色器不识别透明纹理,所以效果如图

针对这种情况,在着色器里,GLSL给了一个特别棒的指令,“discard”,允许我们在着色器里根据某种条件丢弃片段。因为png格式的图片里每个像素颜色已经附带了透明信息,所以在片段着色器里,我们设计判断条件,当alpha值小于0.1时,丢弃片段。
grass.frag
#version 330 core
out vec4 FragColor;
in vec2 TexCoords;

uniform sampler2D ambientMap;

void main(){
  vec4 texColor = texture2D(ambientMap, TexCoords);
  if(texColor.a < 0.1f)
    discard;

  FragColor = texColor;
}
再看程序效果:
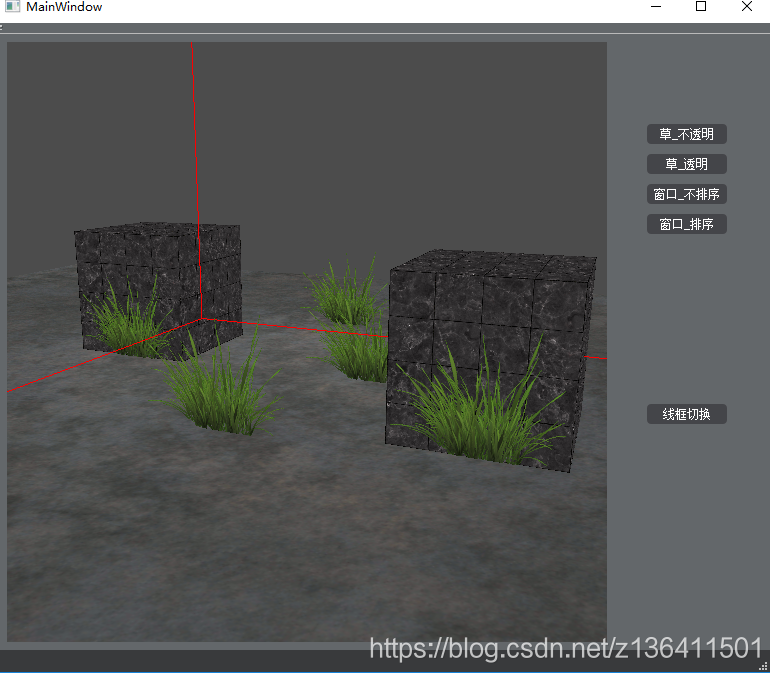
这次正确识别出了透明纹理。
三,渲染半透明纹理
这是混合的第二种形式,要求整张纹理都呈半透明状态,还是Vries的例子,将小草纹理替换成窗户的纹理。
这时我们不能再丢弃片段了。而是开启OpenGL的混合模式。指定透明纹理自带的alpha为源影响因子,1-alpha为目标影响因子。
    ............

    core->glEnable(GL_BLEND);
    core->glBlendFunc(GL_SRC_ALPHA, GL_ONE_MINUS_SRC_ALPHA);

    ............
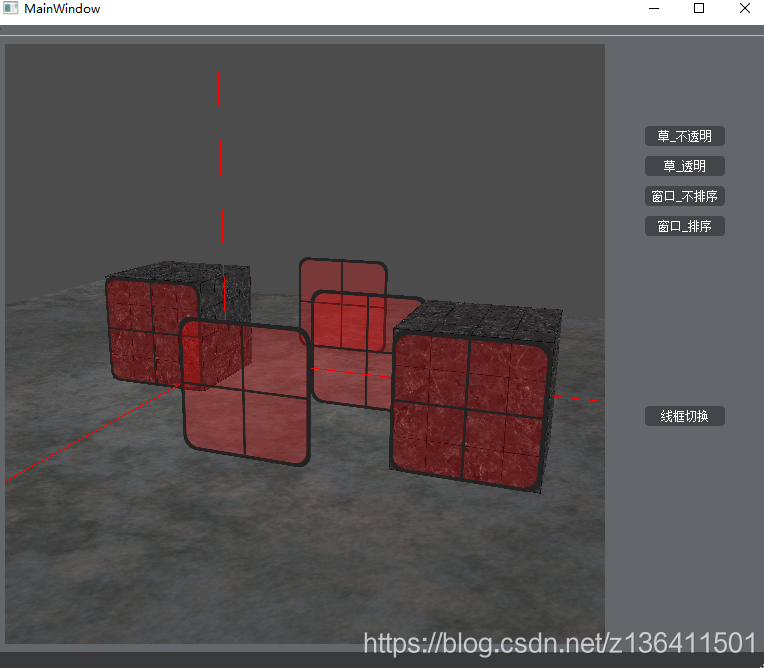
待GL_BLEND测试开启后,使用普通的plane着色器进行渲染,不再discard。很明显,我们有了半透明的纹理效果,同理开启混合测试后,不discard片段,直接渲染草的效果,也是透明的。但是这里有个缺陷。混合测试与深度测试冲突,深度测试不管纹理是否透明,都会按照纹理绘制的顺序,将纹理写进深度缓冲,所以会出现图6蓝框出现的问题。
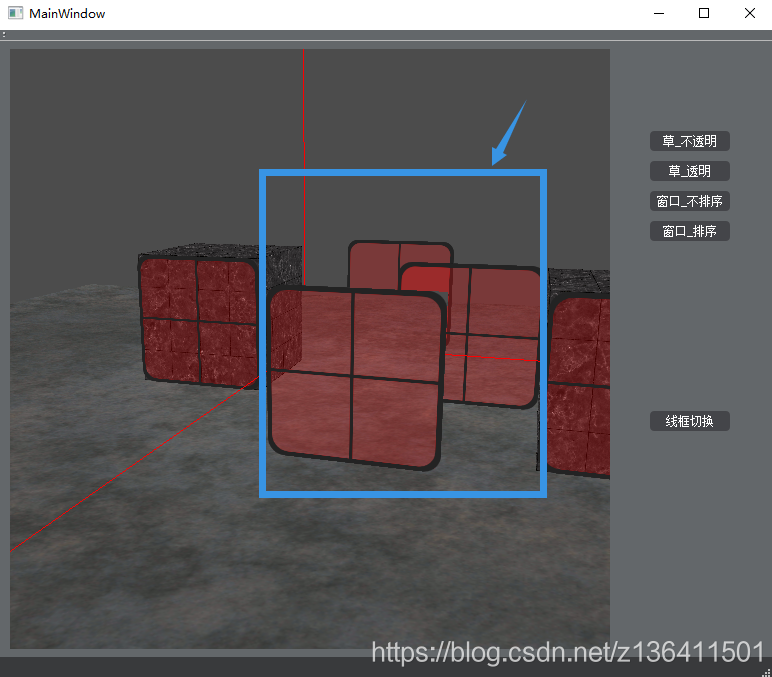
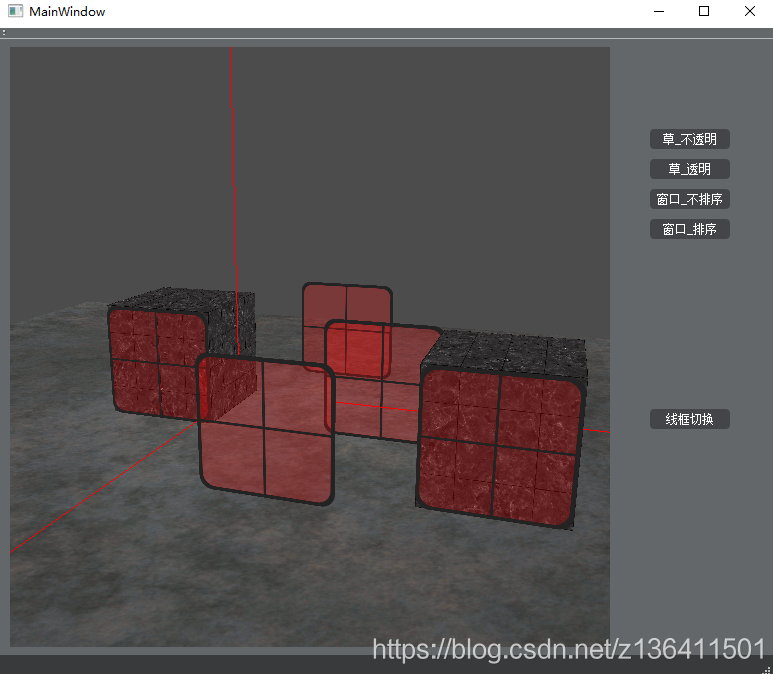
为解决这个问题,我们需要在渲染前对这些窗户进行排序,按照各窗户据视角位置由远到近的顺序,依次绘制窗户。Vries使用了std::map容器,可以自动的按“key”值大小进行排序,同理,我们就使用QMap进行排序。但有一个问题,QMap是按照“key”的升序排序的,且没有反转迭代器,而我们需要的是窗户据视角位置距离的降序,即由大到小进行排序。所以我们迫不得已,为方便起见,将QMap排好的距离倒置写进另一个容器存储。
  /*************** 计算 排序后的窗户偏移量 *****************/
  QMap<float, QVector3D> sorted;
  for(int i = 0; i < grassOffset.size(); ++i){
    float dist = (camera->position - grassOffset[i]).length();
    sorted[dist] = grassOffset[i];
  }

  sortedOffset.clear();       //QVector<QVector3D> sortedOffset
  for(QMap<float, QVector3D>::iterator iter = sorted.begin(); iter != sorted.end(); ++iter)
    sortedOffset.push_front(iter.value());
当然,我们可以想到,这个窗户的绘制顺序是随着视角位置的改变而改变的,所以需要不断的进行计算,故我们将这个窗户排序函数放在不断进行计算的函数中,我就放在updateGL()函数中,这个函数每10ms调用一次。最终效果如下图。