主要步骤如下:
1、系统环境设置
2、安装docker-ce
3、master节点安装kubelet,kubeadm,kubectl
4、work节点安装kubelet,kubeadm,kubectl,并加入master节点
1、系统环境设置
查看系统信息,
$ lsb_release -a输出:
No LSB modules are available.
Distributor ID:	Ubuntu
Description:	Ubuntu 16.04.2 LTS
Release:	16.04
Codename:	xenial
禁用swap,并设置网关,禁用SELINUX
$ swapoff -a
$ systemctl stop firewalld
输出,
Failed to stop firewalld.service: Unit firewalld.service not loaded.执行,
$ systemctl disable firewalld输出,
Failed to execute operation: No such file or directory执行,
$ setenforce 0输出,
The program 'setenforce' is currently not installed. You can install it by typing:
apt install selinux-utils
执行,
$ apt install selinux-utils输出,
Reading package lists... Done
Building dependency tree
Reading state information... Done
The following NEW packages will be installed:
  selinux-utils
0 upgraded, 1 newly installed, 0 to remove and 218 not upgraded.
Need to get 54.0 kB of archives.
After this operation, 270 kB of additional disk space will be used.
Get:1 http://apt.ksyun.cn/ubuntu xenial/universe amd64 selinux-utils amd64 2.4-3build2 [54.0 kB]
Fetched 54.0 kB in 0s (3,631 kB/s)
Selecting previously unselected package selinux-utils.
(Reading database ... 62379 files and directories currently installed.)
Preparing to unpack .../selinux-utils_2.4-3build2_amd64.deb ...
Unpacking selinux-utils (2.4-3build2) ...#####...........................................................................................................................................]
Processing triggers for man-db (2.7.5-1) ...##########################################################...................................................................................]
Setting up selinux-utils (2.4-3build2) ...
执行,
$ vim /etc/selinux/config
写入如下内容,
SELINUX=disabled
2、安装Docker ce for ubuntu16.04:
$ sudo apt-get remove docker docker-engine docker.io
$ sudo apt-get update
$ sudo apt-get install \
    apt-transport-https \
    ca-certificates \
    curl \
    software-properties-common
$ curl -fsSL https://download.docker.com/linux/ubuntu/gpg | sudo apt-key add -
$ sudo add-apt-repository \
   "deb [arch=amd64] https://download.docker.com/linux/ubuntu \
   $(lsb_release -cs) \
   stable"
$ sudo apt-get update
$ sudo apt-get install docker-ce


$ sudo docker version
输出:
Client:
 Version:           18.06.1-ce
 API version:       1.38
 Go version:        go1.10.3
 Git commit:        e68fc7a
 Built:             Tue Aug 21 17:24:56 2018
 OS/Arch:           linux/amd64
 Experimental:      false

Server:
 Engine:
  Version:          18.06.1-ce
  API version:      1.38 (minimum version 1.12)
  Go version:       go1.10.3
  Git commit:       e68fc7a
  Built:            Tue Aug 21 17:23:21 2018
  OS/Arch:          linux/amd64
  Experimental:     false
3、master节点安装kubelet,kubeadm,kubectl:
安装kubelet kubeadm kubectl
$ apt-get update && apt-get install -y apt-transport-https curl
$ curl -s https://packages.cloud.google.com/apt/doc/apt-key.gpg | apt-key add -
$ cat <<EOF >/etc/apt/sources.list.d/kubernetes.list
deb https://apt.kubernetes.io/ kubernetes-xenial main
EOF
$ apt-get update
$ apt-get install -y kubelet kubeadm kubectl
$ apt-mark hold kubelet kubeadm kubectl
设置网桥
$ sudo sysctl net.bridge.bridge-nf-call-iptables=1输出:
net.bridge.bridge-nf-call-iptables = 1重启kubelet:
$ sudo systemctl daemon-reload
$ sudo systemctl restart kubelet
查看当前kubeadm版本号和所需组件:
$ sudo kubeadm version输出:
kubeadm version: &version.Info{Major:"1", Minor:"12", GitVersion:"v1.12.1", GitCommit:"4ed3216f3ec431b140b1d899130a69fc671678f4", GitTreeState:"clean", BuildDate:"2018-10-05T16:43:08Z", GoVersion:"go1.10.4", Compiler:"gc", Platform:"linux/amd64"}查看kubeadm镜像信息
$ sudo kubeadm config images list --kubernetes-version=v1.12.1输出:
k8s.gcr.io/kube-apiserver:v1.12.1
k8s.gcr.io/kube-controller-manager:v1.12.1
k8s.gcr.io/kube-scheduler:v1.12.1
k8s.gcr.io/kube-proxy:v1.12.1
k8s.gcr.io/pause:3.1
k8s.gcr.io/etcd:3.2.24
k8s.gcr.io/coredns:1.2.2
初始化kubeadm开始部署
kubeadm init \
  --kubernetes-version=v1.12.1 \
  --pod-network-cidr=10.244.0.0/16 \
  --apiserver-advertise-address=0.0.0.0
输出:
[init] using Kubernetes version: v1.12.1
[preflight] running pre-flight checks
[preflight/images] Pulling images required for setting up a Kubernetes cluster
[preflight/images] This might take a minute or two, depending on the speed of your internet connection
[preflight/images] You can also perform this action in beforehand using 'kubeadm config images pull'
[kubelet] Writing kubelet environment file with flags to file "/var/lib/kubelet/kubeadm-flags.env"
[kubelet] Writing kubelet configuration to file "/var/lib/kubelet/config.yaml"
[preflight] Activating the kubelet service
[certificates] Generated ca certificate and key.
[certificates] Generated apiserver certificate and key.
[certificates] apiserver serving cert is signed for DNS names [vm172-31-0-19.ksc.com kubernetes kubernetes.default kubernetes.default.svc kubernetes.default.svc.cluster.local] and IPs [10.96.0.1 172.31.0.19]
[certificates] Generated apiserver-kubelet-client certificate and key.
[certificates] Generated front-proxy-ca certificate and key.
[certificates] Generated front-proxy-client certificate and key.
[certificates] Generated etcd/ca certificate and key.
[certificates] Generated etcd/server certificate and key.
[certificates] etcd/server serving cert is signed for DNS names [vm172-31-0-19.ksc.com localhost] and IPs [127.0.0.1 ::1]
[certificates] Generated etcd/healthcheck-client certificate and key.
[certificates] Generated apiserver-etcd-client certificate and key.
[certificates] Generated etcd/peer certificate and key.
[certificates] etcd/peer serving cert is signed for DNS names [vm172-31-0-19.ksc.com localhost] and IPs [172.31.0.19 127.0.0.1 ::1]
[certificates] valid certificates and keys now exist in "/etc/kubernetes/pki"
[certificates] Generated sa key and public key.
[kubeconfig] Wrote KubeConfig file to disk: "/etc/kubernetes/admin.conf"
[kubeconfig] Wrote KubeConfig file to disk: "/etc/kubernetes/kubelet.conf"
[kubeconfig] Wrote KubeConfig file to disk: "/etc/kubernetes/controller-manager.conf"
[kubeconfig] Wrote KubeConfig file to disk: "/etc/kubernetes/scheduler.conf"
[controlplane] wrote Static Pod manifest for component kube-apiserver to "/etc/kubernetes/manifests/kube-apiserver.yaml"
[controlplane] wrote Static Pod manifest for component kube-controller-manager to "/etc/kubernetes/manifests/kube-controller-manager.yaml"
[controlplane] wrote Static Pod manifest for component kube-scheduler to "/etc/kubernetes/manifests/kube-scheduler.yaml"
[etcd] Wrote Static Pod manifest for a local etcd instance to "/etc/kubernetes/manifests/etcd.yaml"
[init] waiting for the kubelet to boot up the control plane as Static Pods from directory "/etc/kubernetes/manifests"
[init] this might take a minute or longer if the control plane images have to be pulled
[apiclient] All control plane components are healthy after 20.503556 seconds
[uploadconfig] storing the configuration used in ConfigMap "kubeadm-config" in the "kube-system" Namespace
[kubelet] Creating a ConfigMap "kubelet-config-1.12" in namespace kube-system with the configuration for the kubelets in the cluster
[markmaster] Marking the node vm172-31-0-19.ksc.com as master by adding the label "node-role.kubernetes.io/master=''"
[markmaster] Marking the node vm172-31-0-19.ksc.com as master by adding the taints [node-role.kubernetes.io/master:NoSchedule]
[patchnode] Uploading the CRI Socket information "/var/run/dockershim.sock" to the Node API object "vm172-31-0-19.ksc.com" as an annotation
[bootstraptoken] using token: nbhes8.jee7ycsi165tvrh6
[bootstraptoken] configured RBAC rules to allow Node Bootstrap tokens to post CSRs in order for nodes to get long term certificate credentials
[bootstraptoken] configured RBAC rules to allow the csrapprover controller automatically approve CSRs from a Node Bootstrap Token
[bootstraptoken] configured RBAC rules to allow certificate rotation for all node client certificates in the cluster
[bootstraptoken] creating the "cluster-info" ConfigMap in the "kube-public" namespace
[addons] Applied essential addon: CoreDNS
[addons] Applied essential addon: kube-proxy

Your Kubernetes master has initialized successfully!

To start using your cluster, you need to run the following as a regular user:

  mkdir -p $HOME/.kube
  sudo cp -i /etc/kubernetes/admin.conf $HOME/.kube/config
  sudo chown $(id -u):$(id -g) $HOME/.kube/config

You should now deploy a pod network to the cluster.
Run "kubectl apply -f [podnetwork].yaml" with one of the options listed at:
  https://kubernetes.io/docs/concepts/cluster-administration/addons/

You can now join any number of machines by running the following on each node
as root:

  kubeadm join 172.31.0.19:6443 --token nbhes8.jee7ycsi165tvrh6 --discovery-token-ca-cert-hash sha256:e7186a74b68b8eb5d8ef8856b77c3d50efc353489798fe79a31cb7de304b1957
如果错误:
[init] using Kubernetes version: v1.12.1
[preflight] running pre-flight checks
[preflight] Some fatal errors occurred:
[ERROR FileContent--proc-sys-net-ipv4-ip_forward]: /proc/sys/net/ipv4/ip_forward contents are not set to 1
[preflight] If you know what you are doing, you can make a check non-fatal with `--ignore-preflight-errors=...`
解决:
$ echo 1 > /proc/sys/net/ipv4/ip_forward首先添加api认证
$ sudo mkdir -p $HOME/.kube
$ sudo cp -i /etc/kubernetes/admin.conf $HOME/.kube/config
$ sudo chown $(id -u):$(id -g) $HOME/.kube/config
查看集群状态:
$ sudo kubectl get cs输出:
NAME                 STATUS    MESSAGE              ERROR
controller-manager   Healthy   ok
scheduler            Healthy   ok
etcd-0               Healthy   {"health": "true"}
确认个组件都处于healthy状态。如果集群初始化如果遇到问题,可以使用下面的命令进行清理:
$ sudo kubeadm reset然后重新进行上文的第三步中kubeadm init步骤初始化部署
安装flannel network add-on:
kubectl apply -f https://raw.githubusercontent.com/coreos/flannel/master/Documentation/kube-flannel.yml输出:
clusterrole.rbac.authorization.k8s.io/flannel created
clusterrolebinding.rbac.authorization.k8s.io/flannel created
serviceaccount/flannel created
configmap/kube-flannel-cfg created
daemonset.extensions/kube-flannel-ds-amd64 created
daemonset.extensions/kube-flannel-ds-arm64 created
daemonset.extensions/kube-flannel-ds-arm created
daemonset.extensions/kube-flannel-ds-ppc64le created
daemonset.extensions/kube-flannel-ds-s390x created
查看pod信息:
$ sudo kubectl get pod --all-namespaces输出:
kube-system   coredns-576cbf47c7-6k5p9                        0/1     ContainerCreating   0          2m57s
kube-system   coredns-576cbf47c7-pzbnm                        0/1     ContainerCreating   0          2m57s
kube-system   etcd-vm172-31-0-19.ksc.com                      1/1     Running             0          2m16s
kube-system   kube-apiserver-vm172-31-0-19.ksc.com            1/1     Running             0          2m7s
kube-system   kube-controller-manager-vm172-31-0-19.ksc.com   1/1     Running             0          115s
kube-system   kube-flannel-ds-amd64-ntqcm                     1/1     Running             0          47s
kube-system   kube-proxy-4rg4p                                1/1     Running             0          2m57s
kube-system   kube-scheduler-vm172-31-0-19.ksc.com            1/1     Running             0          2m17s
发现2个coredns都有问题,
先看第一个的错误
$ sudo kubectl describe pod coredns-576cbf47c7-6k5p9 -n kube-system输出:
network for pod "coredns-576cbf47c7-6k5p9": NetworkPlugin cni failed to set up pod "coredns-576cbf47c7-6k5p9_kube-system" network: open /proc/sys/net/ipv6/conf/eth0/accept_dad: no such file or directory, failed to clean up sandbox container "4e333803248668ba5aba5a9d8209124e467dc0ef238ca62b2daa7cc7eac89515" network for pod "coredns-576cbf47c7-6k5p9": NetworkPlugin cni failed to teardown pod "coredns-576cbf47c7-6k5p9_kube-system" network: failed to get IP addresses for "eth0": <nil>]
再看第二个错误,
$ sudo kubectl describe pod coredns-576cbf47c7-pzbnm -n kube-system输出:
network: open /proc/sys/net/ipv6/conf/eth0/accept_dad: no such file or directory, failed to clean up sandbox container "8bfd214b3eb5cbf8b9f9ac7a299af21e1aceac70ee9fe02c8b1fdf92105092df" network for pod "coredns-576cbf47c7-pzbnm": NetworkPlugin cni failed to teardown pod "coredns-576cbf47c7-pzbnm_kube-system" network: failed to get IP addresses for "eth0": <nil>]
解决,
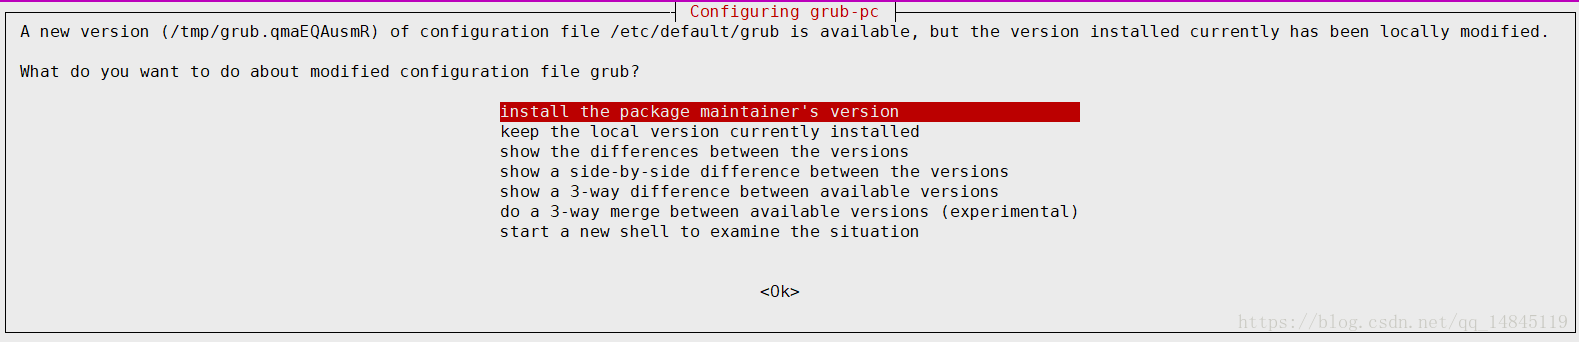
$ vim /etc/default/grub
修改为,GRUB_CMDLINE_LINUX="true ipv6.disable=0"
$ apt-get install grub-common注意,默认是第二个,要选择第一个,install the package maintainer’s version
重启机器,
$ reboot然后继续查看pod信息,
$ sudo kubectl get pod --all-namespaces输出,
NAMESPACE     NAME                                            READY   STATUS    RESTARTS   AGE
kube-system   coredns-576cbf47c7-6k5p9                        1/1     Running   0          12m
kube-system   coredns-576cbf47c7-pzbnm                        1/1     Running   0          12m
kube-system   etcd-vm172-31-0-19.ksc.com                      1/1     Running   1          11m
kube-system   kube-apiserver-vm172-31-0-19.ksc.com            1/1     Running   1          11m
kube-system   kube-controller-manager-vm172-31-0-19.ksc.com   1/1     Running   1          11m
kube-system   kube-flannel-ds-amd64-ntqcm                     1/1     Running   1          9m54s
kube-system   kube-proxy-4rg4p                                1/1     Running   1          12m
kube-system   kube-scheduler-vm172-31-0-19.ksc.com            1/1     Running   1          11m
查看节点信息
$ kubectl get nodes输出,
NAME                    STATUS   ROLES    AGE   VERSION
vm172-31-0-19             Ready    master   27m   v1.12.1
到此所有pod都处于running状态
4、work节点安装kubelet,kubeadm,kubectl,并加入master节点
按照上文第三步中第一步安装kubelet kubeadm kubectl,不进行任何设置。
加入node节点,在节点主机执行,
$ kubeadm join 172.31.0.19:6443 --token nbhes8.jee7ycsi165tvrh6 --discovery-token-ca-cert-hash sha256:e7186a74b68b8eb5d8ef8856b77c3d50efc353489798fe79a31cb7de304b1957输出,
[preflight] running pre-flight checks
	[WARNING Hostname]: hostname "ksai-p4-7" could not be reached
	[WARNING Hostname]: hostname "ksai-p4-7" lookup ksai-p4-7 on 198.18.254.30:53: no such host
[discovery] Trying to connect to API Server "172.31.0.19:6443"
[discovery] Created cluster-info discovery client, requesting info from "https://172.31.0.19:6443"
[discovery] Requesting info from "https://172.31.0.19:6443" again to validate TLS against the pinned public key
[discovery] Cluster info signature and contents are valid and TLS certificate validates against pinned roots, will use API Server "172.31.0.19:6443"
[discovery] Successfully established connection with API Server "172.31.0.19:6443"
[kubelet] Downloading configuration for the kubelet from the "kubelet-config-1.12" ConfigMap in the kube-system namespace
[kubelet] Writing kubelet configuration to file "/var/lib/kubelet/config.yaml"
[kubelet] Writing kubelet environment file with flags to file "/var/lib/kubelet/kubeadm-flags.env"
[preflight] Activating the kubelet service
[tlsbootstrap] Waiting for the kubelet to perform the TLS Bootstrap...
[patchnode] Uploading the CRI Socket information "/var/run/dockershim.sock" to the Node API object "ksai-p4-7" as an annotation

This node has joined the cluster:
* Certificate signing request was sent to apiserver and a response was received.
* The Kubelet was informed of the new secure connection details.
Run 'kubectl get nodes' on the master to see this node join the cluster.
在master节点上执行,
$ kubectl get nodes输出,
NAME                    STATUS     ROLES    AGE   VERSION
vm172-31-0-17             Ready      <none>   11m   v1.12.1
vm172-31-0-18             Ready      <none>   7s    v1.12.1
vm172-31-0-19             Ready      master   76m   v1.12.1
证明节点加入完毕。
完!
References:
http://docs.kubernetes.org.cn/
https://kubernetes.io/docs/setup/independent/install-kubeadm/