我们经常会有自定义navigationBar的需求, 通常有两种实现方式.
自定义titleView
_imageViewAvatar = [[UIImageView alloc] initWithFrame:CGRectMake(0, 0, 88, 88)];
_imageViewAvatar.layer.cornerRadius = 44;
_imageViewAvatar.layer.masksToBounds = YES;
_imageViewAvatar.image = [UIImage imageNamed:@"avatar.png"];
_imageViewAvatar.center = CGPointMake(titleView.center.x, 22);
UIView *titleView = [[UIView alloc] init];
[titleView addSubview:_imageViewAvatar];
// titleView会自动被系统设置大小.
// 使用imageViewAvatar的大小需要调整
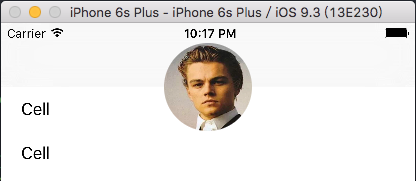
self.navigationItem.titleView = titleView;效果图:
新建UIView覆盖原来的navigationBar
先将原来的navigationBar隐藏, 再自定义一个UIView覆盖在其上.
self.navigationController.navigationBarHidden = YES;

UIView *aView = [[UIView alloc] initWithFrame:CGRectMake(0, 20, CGRectGetWidth(self.view.frame), 44)];
aView.backgroundColor = [UIColor lightGrayColor];
[self.view addSubview:aView];

UILabel *label = [[UILabel alloc] initWithFrame:aView.bounds];
label.text = @"This is new navigation bar";
label.textAlignment = NSTextAlignmentCenter;
[aView addSubview:label];
注意: 状态栏statusBar的高度为20, 导航栏navigationBar的高度为44.
效果图:

Demo
Demo请参考:
DemoNavigationItemAvatar