Nginx 状态信息功能实战:
Nginx status 介绍:
Nginx 软件的功能模块中有一个 http_stub_status_module 模块,这个模块的主要功能是记录 Nginx 的基本访问状态信息,让使用者了解 Nginx 的工作状态,例如连接数等信息。要想使用状态模块,在编译 Nginx 时必须增加该模块,可通过如下方法检查编译安装 Nginx 时是否设定支持上述模块:
[root@lnmp02 conf]# /application/nginx/sbin/nginx -V
nginx version: nginx/1.6.3
built by gcc 4.4.7 20120313 (Red Hat 4.4.7-18) (GCC)
TLS SNI support enabled
configure arguments: --prefix=/application/nginx-1.6.3 --user=nginx --group=nginx --with-http_ssl_module --with-http_stub_status_module
具体配置过程如下:
① 生成状态配置,并增加状态配置参数:
[root@lnmp02 conf]# cat >>/application/nginx/conf/extra/status.conf<<EOF
> ##status
> server {
> listen 80;
> server_name status.etiantian.org;
> location / {
> stub_status on;
> access_log off;
> }
> }
> EOF
[root@lnmp02 conf]# vi nginx.conf
worker_processes 1;
events {
worker_connections 1024;
}
http {
include mime.types;
default_type application/octet-stream;
sendfile on;
keepalive_timeout 65;
# nginx vhosts config
include extra/www.conf;
include extra/bbs.conf;
include extra/blog.conf;
include extra/status.conf; # 此处让它包括。
}
"nginx.conf" 15L, 338C written
在 Windows 配置 hosts 加上该域名:status.etiantian.org;
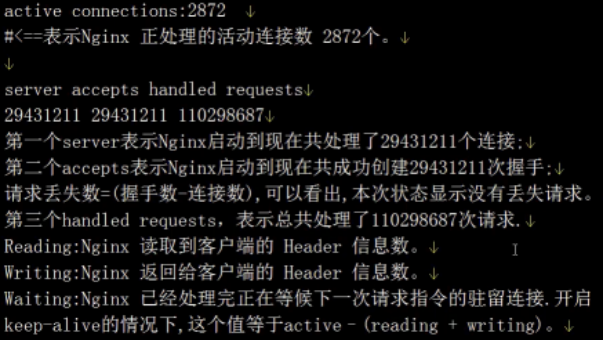
在浏览器上访问该域名会返回 Nginx 的状态信息如下所示:
对上图各个信息的说明:如下所示【略】
提示:为安全起见,这个状态信息要防止外部用户查看。
Nginx 错误日志信息配置:
Nginx 错误日志的介绍:
Nginx 软件会把自身运行的故障信息及用户访问的日志信息记录到指定的日志文件里。
Nginx 的错误信息是调试 Nginx 服务的重要手段,属于核心功能模块(ngx_core_module)的参数,该参数名字为 error_log,可以放在 Main 区块中全局配置,也可以放置不同的虚拟主机中单独记录虚拟主机的错误信息。
error_log 的语法格式及参数语法说明如下:
error_log file level ;
关键字 日志文件 错误日志级别
提示:关键字 error_log 不能改变,日志文件可以指定任意存放日志的目录。
常的错误日志级别:
常的错误日志级别有 [ debug |info |notice |warm |error |crit |alert |emerg ],级别越高记录的信息越少。企业场景一般用 warm |error |crit 这三个级别之一,注意不要配置 debug(级别最低、打的最多)、info 等较低的级别,会消耗大量的磁盘 I/O 。
错误日志 error_log 的默认值:
#default: error_log logs/error.log error;
可以放置的标签段:
#context: main,http,server,location
错误日志的配置:
[root@lnmp02 conf]# vi nginx.conf
worker_processes 1;
error_log logs/error.log error;
events {
worker_connections 1024;
}
http {
include mime.types;
default_type application/octet-stream;
sendfile on;
keepalive_timeout 65;
# nginx vhosts config
include extra/www.conf;
include extra/bbs.conf;
include extra/blog.conf;
include extra/status.conf;
}
"nginx.conf" 16L, 370C written
[root@lnmp02 conf]# ../sbin/nginx -t
[root@lnmp02 conf]# ../sbin/nginx -s reload
[root@lnmp02 conf]# ll ../logs/
total 16
-rw-r--r-- 1 root root 5431 Dec 21 01:16 access.log
-rw-r--r-- 1 root root 2782 Dec 21 03:37 error.log
-rw-r--r-- 1 root root 5 Dec 20 21:36 nginx.pid
[root@lnmp02 conf]# cat ../logs/error.log # 查看 Nginx 错误日志信息。
[root@lnmp02 conf]# > ../logs/error.log # 清空 Nginx 错误日志信息。
[root@lnmp02 conf]# ../sbin/nginx -s reload # 平滑重启。
[root@lnmp02 conf]# cat ../logs/error.log # 查看 Nginx 错误日志信息。
2017/12/21 03:39:17 [notice] 2852#0: signal process started
Nginx 访问日志:
1、Nginx 访问日志的介绍:
Nginx 软件会把每个用户访问网站的日志信息记录到指定的日志文件里(如:用户的浏览器、访问时间、访问的地址等等),供网站提供者分析用户浏览行为等,继而来做推广及提升网站的用户体验和质量。此功能由 ngx_http_log_module 模块负责。
访问日志参数:
Nginx 访问日志主要由下面两个参数控制:
| 参数 |
说明 |
| log_format |
用来定义记录日志的格式(可定义多种日志格式) |
| access_log |
用来指定日志文件的路径及使用何种日志格式记录日志。 |
Nginx 日志格式中默认的参数配置如下:
[root@lnmp02 conf]# cat -n nginx.conf.default
21 #log_format main '$remote_addr - $remote_user [$time_local] "$request" '
22 # '$status $body_bytes_sent "$http_referer" '
23 # '"$http_user_agent" "$http_x_forwarded_for"';
访问日志配置说明:
其配置位置在 http 标签内,其中 log_format 为日志格式关键参数,不能变。main 是为日志格式指定的标签,记录日志时通过这个 main 标签选择指定的格式,其后所接的所有内容都是可以记录的日志信息,具体见下表。注意,所有的日志段以空格分隔,一行可以记录多个,详见下表:
| Nginx 日志变量 |
说明 |
| $remote_addr |
记录访问网站的客户端地址 |
| $remote_user |
远程客户端用户名称 |
| $time_local |
记录访问时间与时区 |
| $request |
用户的 http 请求起始行信息 |
| $status |
http状态码,记录请求返回的状态 |
| $body_bytes_sent |
服务器发送给客户端的响应 body 字节数 |
| $http_referer |
记录此次请求是从哪个链接访问过来的,可根据referer进行防盗链设置 |
| $http_user_agent |
记录客户端访问信息,例如:浏览器、手机客户端等 |
提示:在没有特殊要求的情况下,采用默认的配置即可。更多信息详见官方文档。
2、Nginx 记录日志的默认参数配置如下:
access_log logs/access.log main;
记录日志的 access_log 参数:
一般场景中, access_log 的参数都无需配置。
3、访问日志配置实战:
从主配置文件的备份文件取出默认配置内容:
[root@lnmp02 conf]# sed -n '21,23 s/#//gp' nginx.conf.default
log_format main '$remote_addr - $remote_user [$time_local] "$request" '
'$status $body_bytes_sent "$http_referer" '
'"$http_user_agent" "$http_x_forwarded_for"';
把上述内容放到 nginx.conf 的 http 标签的首部,如下:
[root@lnmp02 conf]# cat -n nginx.conf
1 worker_processes 1;
2 error_log logs/error.log error;
3 events {
4 worker_connections 1024;
5 }
6 http {
7 include mime.types;
8 default_type application/octet-stream;
9 log_format main '$remote_addr - $remote_user [$time_local] "$request" '
10 '$status $body_bytes_sent "$http_referer" '
11 '"$http_user_agent" "$http_x_forwarded_for"';
12 sendfile on;
13 keepalive_timeout 65;
14 # nginx vhosts config
15 include extra/www.conf;
16 include extra/bbs.conf;
17 include extra/blog.conf;
18 include extra/status.conf;
19 }
在每个虚拟主机里进行配置,使其使用上述格式记录用户访问日志,以 www.etiantian.org 例:
[root@lnmp02 conf]# vi extra/www.conf
[root@lnmp02 conf]# cat extra/www.conf
server {
listen 80;
server_name www.etiantian.org etiantian.org;
location / {
root html/www;
index index.html index.htm;
}
# access_log off; # 表示不记录日志。
access_log logs/access_www.log main;
}
提示:如果不指定日志格式就会用默认的 combined 格式记录日志。
检查语法,重新加载配置:
[root@lnmp02 conf]# ../sbin/nginx -t
nginx: the configuration file /application/nginx-1.6.3/conf/nginx.conf syntax is ok
nginx: configuration file /application/nginx-1.6.3/conf/nginx.conf test is successful
[root@lnmp02 conf]# ../sbin/nginx -s reload
[root@lnmp02 conf]# curl www.etiantian.org
www.etiantian.org
[root@lnmp02 conf]# ls -l ../log/access_www.log
ls: cannot access ../log/access_www.log: No such file or directory
[root@lnmp02 conf]# ls -l ../logs/access_www.log
-rw-r--r-- 1 root root 192 Dec 21 17:07 ../logs/access_www.log
[root@lnmp02 conf]# curl www.etiantian.org
www.etiantian.org
[root@lnmp02 conf]# tail -1 ../logs/access_www.log
192.168.136.143 - - [21/Dec/2017:17:08:52 +0800] "GET / HTTP/1.1" 200 18 "-" "curl/7.19.7 (x86_64-redhat-linux-gnu) libcurl/7.19.7 NSS/3.21 Basic ECC zlib/1.2.3 libidn/1.18 libssh2/1.4.2" "-"
提示:黄色内容就是真实的访问日志内容,详细说明见《Web P187~188》。
可以在记录日志参数中加上 buffer 和 flush 选项,这样可以在高并发场景下提升网站访问性能:
[root@lnmp02 conf]# vi extra/www.conf
[root@lnmp02 conf]# cat extra/www.conf
server {
listen 80;
server_name www.etiantian.org etiantian.org;
location / {
root html/www;
index index.html index.htm;
}
# access_log logs/access_www.log main;
access_log logs/access_www.log main gzip buffer=32k flush=5s;
}
[root@lnmp02 conf]# ../sbin/nginx -t
[root@lnmp02 conf]# ../sbin/nginx -s reload
Nginx 访问日志轮询切割:
默认情况 Nginx 会把所有的访问日志生成到一个指定的访问日志文件 access.log 里,但这样一来,时间长了就会导致日志个头很大,不利于日志的分析和处理,因此,有必要对 Nginx 日志按天或按小时进行切割,使其分成不同的文件保存。这里使用按天切割的方法:
具体切割脚本如下:
[root@lnmp02 scripts]# cat cut_nginx_log.sh
#!/bin/sh
Dateformat=`date +%Y%m%d`
Basedir="/application/nginx"
Nginxlogdir="$Basedir/logs"
Logname="access_www"
[ -d $Nginxlogdir ] && cd $Nginxlogdir||exit 1
[ -f ${Logname}.log ]||exit 1
/bin/mv ${Logname}.log ${Dateformat}_${Logname}.log
$Basedir/sbin/nginx -s reload
提示:上面脚本实现切割 Nginx 日志的思想为将正在写入的 Nginx 日志(access_www.log)改名为带日期的格式文件(20171221_access_www.log),然后平滑重新加载 Nginx ,生成新的 Nginx 日志(access_www.log)。
通过定时任务实现每天 00 点定时执行脚本切割日志:(crontb -e)
[root@lnmp02 ~]# cat >>/var/spool/cron/root <<EOF # 把上面脚本放入定时任务。
> #cut nginx access log by zhanglei
> 00 00 * * * * /bin/sh /server/scripts/cut_nginx_log.sh &>/dev/null
> EOF
[root@lnmp02 ~]# crontab -l
#cut nginx access log by zhanglei
00 00 * * * * /bin/sh /server/scripts/cut_nginx_log.sh &>/dev/null
[root@lnmp02 ~]# cd /application/nginx/logs/
[root@lnmp02 logs]# ll
total 20
-rw-r--r-- 1 root root 384 Dec 21 17:08 20171221_access_www.log # 生成的切割访问日志。
-rw-r--r-- 1 root root 5431 Dec 21 01:16 access.log
-rw-r--r-- 1 root root 0 Dec 21 17:36 access_www.log
-rw-r--r-- 1 root root 240 Dec 21 17:36 error.log
-rw-r--r-- 1 root root 5 Dec 21 16:14 nginx.pid
[root@lnmp02 logs]# cat 20171221_access_www.log # 查看切割的访问日志。
192.168.136.143 - - [21/Dec/2017:17:07:48 +0800] "GET / HTTP/1.1" 200 18 "-" "curl/7.19.7 (x86_64-redhat-linux-gnu) libcurl/7.19.7 NSS/3.21 Basic ECC zlib/1.2.3 libidn/1.18 libssh2/1.4.2" "-"
192.168.136.143 - - [21/Dec/2017:17:08:52 +0800] "GET / HTTP/1.1" 200 18 "-" "curl/7.19.7 (x86_64-redhat-linux-gnu) libcurl/7.19.7 NSS/3.21 Basic ECC zlib/1.2.3 libidn/1.18 libssh2/1.4.2" "-"
提示:Nginx 常用的日志收集及分析工具有 rsyslog 、awstats 、flume 、ELK、storm 等。
把另外两个虚拟主机都配置访问日志格式并轮询切割:
[root@lnmp02 conf]# cat extra/bbs.conf
server {
listen 80;
server_name bbs.etiantian.org;
location / {
root html/bbs;
index index.html index.htm;
}
# access_log logs/access_bbs.log main;
access_log logs/access_bbs.log main gzip buffer=32k flush=5s;
# access_log off;
}
[root@lnmp02 conf]# cat extra/blog.conf
server {
listen 80;
server_name blog.etiantian.org;
location / {
root html/blog;
index index.html index.htm;
}
# access_log logs/access_blog.log main;
access_log logs/access_blog.log main gzip buffer=32k flush=5s;
# access_log off;
}
实现的脚本:
[root@lnmp02 scripts]# cat cut_nginx_log.sh
#!/bin/sh
Dateformat=`date +%Y%m%d`
Basedir="/application/nginx"
Nginxlogdir="$Basedir/logs"
Logname="access_www"
[ -d $Nginxlogdir ] && cd $Nginxlogdir||exit 1
[ -f ${Logname}.log ]||exit 1
/bin/mv ${Logname}.log ${Dateformat}_${Logname}.log
/bin/mv access_bbs.log ${Dateformat}_access_bbs.log
/bin/mv access_blog.log ${Dateformat}_access_blog.log
$Basedir/sbin/nginx -s reload
执行脚本并查看结果:
[root@lnmp02 scripts]# /application/nginx/sbin/nginx -t
[root@lnmp02 scripts]# /application/nginx/sbin/nginx -s reload
[root@lnmp02 scripts]# sh cut_nginx_log.sh
[root@lnmp02 conf]# cd /application/nginx/logs/
[root@lnmp02 logs]# ll
total 16
-rw-r--r-- 1 root root 0 Dec 21 15:20 20171221_access_bbs.log
-rw-r--r-- 1 root root 0 Dec 21 15:20 20171221_access_blog.log
-rw-r--r-- 1 root root 0 Dec 21 15:20 20171221_access_www.log
Nginx rewrite
什么是 Nginx rewrite ?
和 Apache 等 Web 软件一样,Nginx rewrite 的主要功能就是实现 URL 地址重写。Nginx 的 rewrite 规则需要 PCRE 软件的支持,即通过 Perl 兼容正则表达式语法进行规则匹配。默认参数编译时,Nginx 就会安装支持 rewrite 的模块,但是也需要 PCRE 软件的支持。
Nginx rewrite 语法:
rewrite 指令语法:rewrite regex replacement [flag]
应用位置:server、location、if
rewrite 是实现 URL 重写的关键指令,根据 regex (正则表达式)部分的内容,重定向到 replacement 部分,结尾是 flag 标记。例如:
rewrite ^/(.*) http://www.etiantian.org/$1 permanent;
在上述指令中,rewrite 为关键字,表示开启一条 rewrite 匹配规则,regex 部分是 ^/(.*) ,这是一个正则表达式,表示匹配所有,匹配成功跳转到http://www.etiantian.org/$1 这里的 $1 是取前面regex 部分括号里的内容,结尾的 permanent; 表示永久 301 重定向标记,即跳转到后面的 http://www.etia ntian.org/$1 地址上。 flag 标记符号
regex 常用正则表达式说明:见 << Web 集群实战 P 195 >>
regex 指令结尾的 flag 标记说明:
| flag 标记符号 |
说明 |
| last |
本条规则匹配完成后,继续向下匹配新的 location URI 规则 。 |
| break |
本条规则匹配完成即终止,不再匹配后面的任何规则。 |
| redirect |
返回 302 临时重定向,浏览器地址栏会显示跳转后的 URL 地址。 |
| permanent |
返回 301 永久重定向,浏览器地址栏会显示跳转后的 URL 地址。 |
配置 Nginx rewrite 301 跳转:
[root@lnmp02 conf]# vi extra/www.conf
[root@lnmp02 conf]# cat extra/www.conf
server {
listen 80;
server_name etiantian.org;
rewrite ^/(.*) http://www.etiantian.org/$1 permanent;
}
server {
listen 80;
server_name www.etiantian.org; # 注意此处域名的别名要取消,避免冲突。
location / {
root html/www;
index index.html index.htm;
}
# access_log logs/access_www.log main;
access_log logs/access_www.log main gzip buffer=32k flush=5s;
# access_log off;
}
[root@lnmp02 conf]# ../sbin/nginx -t # 检查语法。
nginx: the configuration file /application/nginx-1.6.3/conf/nginx.conf syntax is ok
nginx: configuration file /application/nginx-1.6.3/conf/nginx.conf test is successful
[root@lnmp02 conf]# ../sbin/nginx -s reload # 平滑生效。
[root@lnmp02 conf]# curl -I etiantian.org # 访问 etiantian.org ,自动跳转。
HTTP/1.1 301 Moved Permanently # 可以看到 301 跳转。
Server: nginx/1.6.3
Date: Thu, 21 Dec 2017 08:05:07 GMT
Content-Type: text/html
Content-Length: 184
Connection: keep-alive
Location: http://www.etiantian.org/ # 跳转到指定域名。
提示:域名及对应的 IP 需要解析。
Nginx rewrite 的企业应用场景:
① 可以调整用户浏览的 URL,使其看起来更规范,合乎并发及产品人员的需求;
② 为了让搜索引擎收录网站内容,提升用户体验,企业会将动态URL地址伪装成静态地址提供服务;
③ 网站换新域名后,让旧域名的访问跳转到新的域名上,例如:让京东的 360buy 换成 jd.com ;
④ 根据特殊变量、目录、客户端的信息进行 URL 跳转等。
实现不同域名的 URL 跳转:
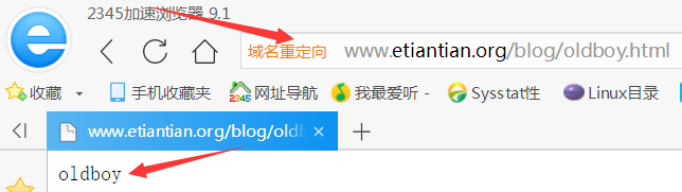
例:实现访问http://blog.etiantian.org时自动跳转到 http://www.etiantian.org/blog/oldboy.html 。
[root@lnmp02 conf]# cat extra/blog.conf
server {
listen 80;
server_name blog.etiantian.org;
location / {
root html/blog;
index index.html index.htm;
}
rewrite ^/(.*) http://www.etiantian.org/blog/oldboy.html break;
# access_log logs/access_blog.log main;
access_log logs/access_blog.log main gzip buffer=32k flush=5s;
# access_log off;
}
[root@lnmp02 conf]# mkdir ../html/www/blog -p
[root@lnmp02 conf]# echo oldboy >../html/www/blog/oldboy.html
[root@lnmp02 conf]# ../sbin/nginx -t
nginx: the configuration file /application/nginx-1.6.3/conf/nginx.conf syntax is ok
nginx: configuration file /application/nginx-1.6.3/conf/nginx.conf test is successful
[root@lnmp02 conf]# ../sbin/nginx -s reload
[root@lnmp02 conf]# curl -I blog.etiantian.org # 302临时重定向,跳转至指定域名。
HTTP/1.1 302 Moved Temporarily
Server: nginx/1.6.3
Date: Thu, 21 Dec 2017 09:32:20 GMT
Content-Type: text/html
Content-Length: 160
Connection: keep-alive
Location: http://www.etiantian.org/blog/oldboy.html
在 Windows 浏览器访问 http://blog.etiantian.org 结果:【如图所示】