Nginx介绍
Nginx是一个开源的,支持高性能,高并发的www服务和代理服务软件,因具有高并发(特别是静态资源),占用系统资源少等特性,且功能丰富而逐渐流行起来。功能应用上,Nginx不但是一个优秀的web服务器软件,还具有反向代理负载均衡功能和缓存服务功能。在反向代理负载均衡功能方面,它类似大名鼎鼎的LVS负载均衡及Haproxy等专业代理软件,而且Ngxin部署起来更为简单,方便;在缓存服务功能方面,它又类似于squid等专业的缓存服务器软件
Nginx软件的主要企业功能应用
1. 作为web服务软件
Nginx是一个支持高性能,高并发的web服务软件,它具有很多优秀的特性,作为web服务器,与apache相比,Nginx能支持更多的并发链接访问,但占用的资源却更少,效率更高,在功能上也强大了很多,不逊色与apache。
2. 反向代理或负载均衡服务
在反向代理或负载均衡服务方面,Nginx可以作为web服务,php等动态服务及Memcached缓存的代理服务器,它具有类似专业反向代理软件(如Haproxy)的功能,同时也是一个优秀的邮件代理服务软件(最早开发增额产品的目的之一就是作为邮件代理服务),但是Nginx的代理功能还是相对简单了些,特别是不支持TCP的代理,不过新版本的nginx1.9.0之后的版本,已经开始慢慢支持TCP代理了。


反向代理
外网用户 -- 通过反向代理proxy -- 访问我们内网的web
代理去请求

正向代理
内网用户 -- 通过正向代理 -- 访问外网web
一般是浏览器
3. 前端业务数据缓存服务
在Web缓存服务方面,Nginx可通过自身的proxy_cache模块实现类Squid等专业缓存软件的功能
Nginx web 服务介绍
Nginx安装简单,配置文件简洁,而且配置灵活
Nginx作为Web服务器的主要的应用场景包括
1. 使用Nginx运行HTML,JS,CSS,小图片等静态数据(此功能类似Lighttpd软件)
2. Nginx结合FastCGI运行PHP等动态程序(例如使用fastcgi_pass方式)

3. Nginx结合Tomcat/Resin等支持Java动态程序(常用proxy_pass方式)
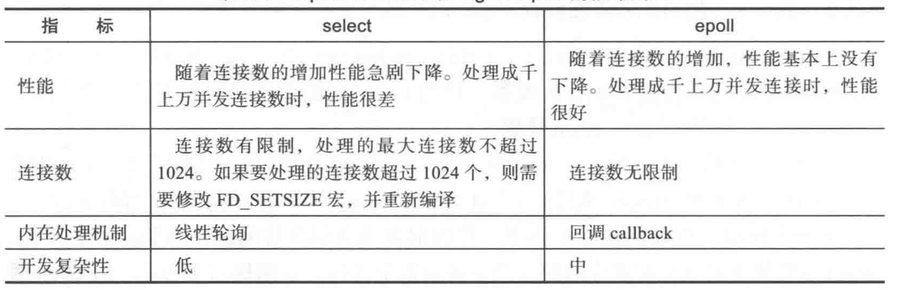
为什么Nginx总体性能比Apache高
nginx采用epoll模型(内核2.6以上)和kququ(freebsd)异步网络i/o模型,而apache则使用传统的select模型
epoll,我把花送到了就好,也不管你拿不拿
select,我把花送到了,我要确认是你拿早了,这件事才结束
如何正确选择Web服务器
1. 静态业务:高并发场景,尽量采用nginx或lighttpd,二者首选nginx
2. 动态业务:理论上采用nginx和apache都可,建议选择nginx,为了避免相同的业务的服务软件多样化,增加额外维护成本。动态业务可以由nginx兼做前端代理,再根据页面元素的类型或目录,转发到后端相应的服务器进行处理。
3. 既有静态业务又有动态业务:采用nginx
静态网站特点:
  1. 静态网站是最初的建站方式,浏览者所看到的每个页面是建站者上传到服务器上的一个 html ( htm )文件,这种网站每增加、删除、修改一个页面,都必须重新对服务器的文件进行一次下载上传。网页内容一经发布到网站服务器上,无论是否有用户访问,每个静态网页的内容都是保存在网站服务器上的,也就是说,静态网页是实实在在保存在服务器上的文件,每个网页都是一个独立的文件;
  2. 静态网页的内容相对稳定,因此容易被搜索引擎检索;
  3. 静态网页没有数据库的支持,在网站制作和维护方面工作量较大,因此当网站信息量很大时完全依靠静态网页制作方式比较困难;
  4. 静态网页的交互性较差,在功能方面有较大的限制。

那么什么是动态网站呢?所谓 “ 动态 ” ,并不是指网页上简单的 GIF 动态图片或是 Flash 动画,动态网站的概念现在还没有统一标准,但都具备以下几个基本特征:
  1. 交互性:网页会根据用户的要求和选择而动态地改变和响应,浏览器作为客户端,成为一个动态交流的桥梁,动态网页的交互性也是今后 Web 发展的潮流。
  2. 自动更新:即无须手动更新 HTML 文档,便会自动生成新页面,可以大大节省工作量。
  3. 因时因人而变:即当不同时间、不同用户访问同一网址时会出现不同页面。


动态网站在页面里嵌套了程序,这种网站对一些框架相同,更新较快的信息页面进行内容与形式的分离,将信息内容以记录的形式存入了网站的数据库中,以便于网 站各处的调用。这样,我们看到的一个页面,可能在服务器上不一一对应某个 html 的文件了,网页框架里套了很多数据库里的记录中的内容。此外动态网页是与静态网页相对应的,也就是说,网页 URL 的后缀不是 .htm 、 .html 、 .shtml 、 .xml 等静态网页的常见形式,而是以 .asp 、 .jsp 、 .php 、 .perl 、 .cgi 等形式为后缀。

  这里说的动态网页,与网页上的各种动画、滚动字幕等视觉上的 “ 动态效果 ” 没有直接关系,动态网页也可以是纯文字内容的,也可以是包含各种动画的内容,这些只是网页具体内容的表现形式,无论网页是否具有动态效果,采用动态网站技术生成的网页都称为动态网页。

  从网站浏览者的角度来看,无论是动态网页还是静态网页,都可以展示基本的文字和图片信息,但从网站开发、管理、维护的角度来看就有很大的差别。网络营销教学网站将动态网页的一般特点简要归纳如下 :
   (1) 动态网页以数据库技术为基础,可以大大降低网站维护的工作量 ;
   (2) 采用动态网页技术的网站可以实现更多的功能,如用户注册、用户登录、在线调查、用户管理、订单管理等等 ;
   (3) 动态网页实际上并不是独立存在于服务器上的网页文件,只有当用户请求时服务器才返回一个完整的网页 ;
    (4) 动态网页中的 “?” 对搜索引擎检索存在一定的问题,搜索引擎一般不可能从一个网站的数据库中访问全部网页,或者出于技术方面的考虑,搜索蜘蛛不去 抓取网址中 “?” 后面的内容,因此采用动态网页的网站在进行搜索引擎推广时需要做一定的技术处理才能适应搜索引擎的要求。


综上所述,您应该会在这两种建站方式中做选择了吧?对于一个业务稳定,页面变化频率不大的公司来说,静态网站是一个很好的选择。因为不用开发后台程序,报 价会便宜很多。对于一个公司规模比较大的公司来说,可能经常会有动态信息要发布给浏览者,可以考虑用动态网站的后台来管理网站信息。
    不管什么样的方式做的网站,不断的更新网站是很有必要的,很多企业网站访问量很低,就是因为它好几年一成不变。不断更新网站对浏览者更有吸引力,也更受到搜索引擎的欢迎。


动态与静态最根本的区别是在网页在服务器端运行状态不同。
下面是图解:

静态网页服务器的运行状态

动态网页服务器运行状态有以下几各情况:
  1 没有数据库的情况

  2 有数据库的情况

  3 有多个数据库的情况

  4 服务器均衡


静态客户端解析
动态服务器解析
Nginx安装
1,rpm -ivh page.rpm有依赖问题,
2,yum安装自动解决rpm安装的依赖问题,安装更简单化
优点:简单,易用,高效
缺点:不能定制
3,编译安装(C语言源码-编译二进制)
.configure(配置),make(编译),make install(安装)
优点:可以定制,参数,路径
缺点:复杂,效率低

中大型企业
1,定制化制作rpm包,搭建yum仓库,把我定制的rpm包放到yum仓库,运行yum安装
优点:结合了2和3的优点
缺点:复杂
1. 安装前提准备工作
安装nginx前提
pcre库 中文是perl兼容正则表达式
安装pcre库是为了使nginx支持具备url重写功能的rewrite模块,这个模块企业几乎应用都必须要使用的

目录规划
软件包一般放在自己的家目录上,例如
/home/joker/service/tools

阿里yum源
http://mirrors.aliyun.com/repo/
http://mirrors.aliyun.com/repo/Centos-6.repo

nginx官网,下载包
http://nginx.org/
nginx.org web软件 三个月以前的稳定版本 mysql数据库软件 六个月以前

额外可安装
centos7 没有下面的2个,故而只安装这2个版本库,开发工具
yum groupinstall "Compatibility Libraries" "Development Tools"
centos6
"Base" "Debugging Tools" 和上面的版本库,开发工具
2. 安装过程
yum install pcre pcre-devel -y
yum install openssl openssl-devel -y
注意:一般安装软件-devel都是必须安装的
useradd www -s /sbin/nologin -M
cd /joker/
mkdir tools
cd tools/
wget -q http://nginx.org/download/nginx-1.6.3.tar.gz
cd nginx-1.6.3
./configure --user=www --group=www --with-http_ssl_module --with-http_stub_status_module --prefix=/application/nginx-1.6.3/
make
make install
cd /application/nginx-1.6.3/
ln -s /application/nginx-1.6.3/ /application/nginx
/application/nginx/sbin/nginx -t      # 检 查语法
/application/nginx/sbin/nginx         # 启动
/application/nginx/sbin/nginx -V      # 版本
/application/nginx/log/error.log      # 错误日志
netstat -ntlp                         # 查看启动是否成功

访问nginx地址ip的过程
浏览器输入的ip地址,不会找localdns,根,授权dns都没有这些过程
直接到请求服务器,三次握手,建立链接,发送报文,get方法,服务器默认监听80端口,读配置文件,按照你要的内容给你
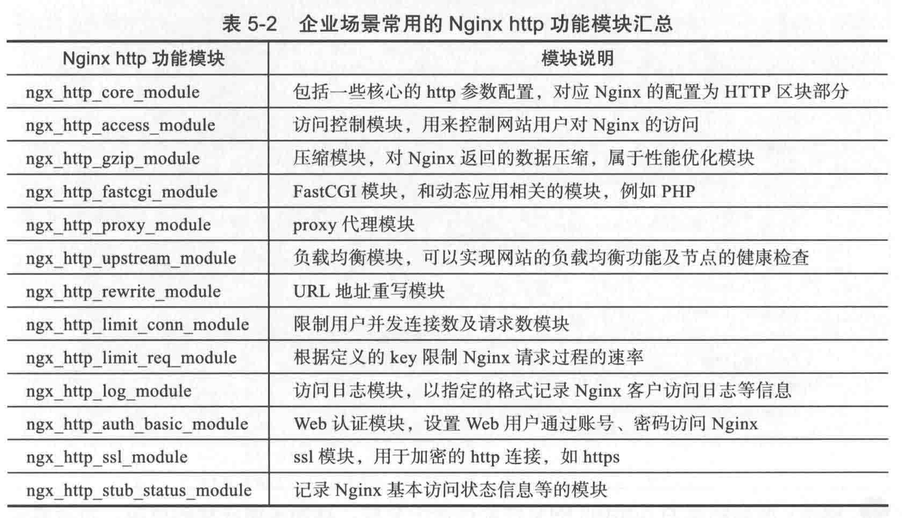
nginx软件模块说明
nginx软件之所为强大,是因为它具有众多的功能模块
1. nginx核心功能模块
nginx核心功能模块负责nginx的全局应用,主要对应主配置文件的main区块和events区块区域
2. 标准的http功能模块集合
这些标准的http功能模块,虽然不是nginx软件必须的,但都是很常用的,因此绝大部分默认情况都会自动安装到nginx软件中
nginx.conf主配置文件
egrep -v "^$|#" conf/nginx.conf.default > conf/nginx.conf
[root@Poppy conf]# cat nginx.conf
     1  worker_processes  1;           # 服务员,有几个工作的,设置应该与服务器的cpu核一样
     2  events {              # 事件区块开始
     3      worker_connections  1024;  # 每个worker最大支持的连接数,总的并发数就相当于worker*events
     4  }                              # 事件区块结束
     5  http {               # http区块开始
     6      include       mime.types;   # 包含的意思,媒体文件
     7      default_type  application/octet-stream;  # 缺省,暂时不用管,默认的媒体类型
     8      sendfile        on;         # 高效的传输模式
     9      keepalive_timeout  65;      # 链接超时时间
    10      server {                    # 对应一个虚拟主机站点
    11          listen       80;             # 提供服务的端口
    12          server_name  www.joker.com;  # 提供服务的域名主机
    13          location / {                 # 没有匹配到走默认的location
    14              root   html;             # 站点的根目录,相当于nginx的安装目录下的html目录
    15              index  index.html index.htm;         # 首页,访问默认展示的页面,会按顺序从左到右
    16          }
    17          error_page   500 502 503 504  /50x.html; # 如果错误了,状态码500,502等找50x.htm页面,也即是匹配到下面的location
    18          location = /50x.html {       # location区块开始,访问50x.html
    19              root   html;             # 指定站点目录
    20          }
    21      }
    22  }                                    # http区块结束
1 main区,还可以包括error_log pid等全局匹配位置
2 - 4 events区
5,22 http区开始,结束
10 - 21 server区
12 -16 location区

咱们改了server_name  www.joker.com;
/application/nginx/sbin/nginx -t
/application/nginx/sbin/nginx -s reload

客户端上hosts文件添加解析
访问域名查看是否访问正确
整个nginx配置文件的核心框架如下
[root@Poppy conf]# cat nginx.conf
worker_processes  1;
events {
    worker_connections  1024;
}
http {
    include       mime.types;
    server {
        listen       80;
        server_name  www.joker.com;
        location / {
            root   html/www;
            index  index.html index.htm;
        }
    }
}
nginx虚拟主机配置
本质就是一个server 标签
1. 基于域名的虚拟主机
[root@Poppy conf]# cat nginx.conf
worker_processes  1;
events {
    worker_connections  1024;
}
http {
    include       mime.types;
    default_type  application/octet-stream;
    sendfile        on;
    keepalive_timeout  65;
    server {
        listen       80;
        server_name  www.joker.com;
        location / {
            root   html/www;
            index  index.html index.htm;
        }
    }
    server {
        listen       80;
        server_name  bbs.joker.com;
        location / {
            root   html/bbs;
            index  index.html index.htm;
        }
    }
}

通过host解析成ip 和 端口
tcp建立链接
http 请求,根据请求头处理,如果没有请求头就给第一个location
如果没有找到index页面就是403

如果加这句,就会在页面显示目录下所有文件,并且可点击就以下载,autoindex on
2. 基于端口的虚拟主机
[root@Poppy conf]# cat nginx.conf
worker_processes  1;
events {
    worker_connections  1024;
}
http {
    include       mime.types;
    default_type  application/octet-stream;
    sendfile        on;
    keepalive_timeout  65;
    server {
        listen       80;
        server_name  www.joker.com;
        location / {
            root   html/www;
            index  index.html index.htm;
        }
    }
    server {
        listen       81;
        server_name  www.joker.com;
        location / {
            root   html/bbs;
            index  index.html index.htm;
        }
    }
}
3. 基于ip的虚拟主机
虚拟网卡标签
ifconfig eth0:0 10.0.0.101/24 up/down 这是相当于给eth0网卡增加一个网卡标签
ip addr add/del 10.10.10.2/24 dev eth0 label eth0:1 跟上面效果是一样的


ifconfig 多出来
eth0:0: flags=4163<UP,BROADCAST,RUNNING,MULTICAST>  mtu 1500
        inet 10.0.0.101  netmask 255.255.255.0  broadcast 10.0.0.255
        ether 00:16:3e:10:d0:eb  txqueuelen 1000  (Ethernet)

eth0:1: flags=4163<UP,BROADCAST,RUNNING,MULTICAST>  mtu 1500
        inet 10.0.0.102  netmask 255.255.255.0  broadcast 0.0.0.0
        ether 00:16:3e:10:d0:eb  txqueuelen 1000  (Ethernet)

[root@Poppy conf]# cat nginx.conf
worker_processes  1;
events {
    worker_connections  1024;
}
http {
    include       mime.types;
    default_type  application/octet-stream;
    sendfile        on;
    keepalive_timeout  65;
    server {
        listen       10.0.0.101:80;
        server_name  www.joker.com;
        location / {
            root   html/www;
            index  index.html index.htm;
        }
    }
    server {
        listen       10.0.0.102:80;
        server_name  bbs.joker.com;
        location / {
            root   html/bbs;
            index  index.html index.htm;
        }
    }
}
配置文件规范
在conf目录创建extra,通过include匹配extra下的conf文件
[root@Poppy conf]# cat nginx.conf
worker_processes  1;
events {
    worker_connections  1024;
}
http {
    include       mime.types;
    default_type  application/octet-stream;
    sendfile        on;
    keepalive_timeout  65;
    # 这里可以使用*代替,这样你就不知道先后了
    # include extra/*.conf
    include extra/www.conf;
    include extra/bbs.conf;
}

[root@Poppy conf]# cat extra/www.conf
    server {
        listen       80;
        server_name  www.joker.com;
        location / {
            root   html/www;
            index  index.html index.htm;
        }
    }

[root@Poppy conf]# cat extra/bbs.conf
    server {
        listen       80;
        server_name  bbs.joker.com;
        location / {
            root   html/bbs;
            index  index.html index.htm;
        }
    }
虚拟主机别名
[root@Poppy conf]# cat nginx.conf
worker_processes  1;
events {
    worker_connections  1024;
}
http {
    include       mime.types;
    default_type  application/octet-stream;
    sendfile        on;
    keepalive_timeout  65;
    # 这里可以使用*代替,这样你就不知道先后了
    # include extra/*.conf
    include extra/www.conf;
    include extra/bbs.conf;
}

[root@Poppy conf]# cat extra/www.conf
    server {
        listen       80;
        server_name  www.joker.com joker.com;
        location / {
            root   html/www;
            index  index.html index.htm;
        }
    }

访问joker.com与www.joker.com效果一样
可以通过别名来监控url是否正常
nginx状态
nginx功能模块中有一个http_stub_status_module模块,这个模块主要功能是记录nginx基本访问状态信息,让使用者了解
nginx的工作状态,例如:连接数等信息,在我们编译安装的时候需要安装此模块,可通过../nginx -V 查看是否编译安装了此模块
[root@Poppy conf]# cat nginx.conf
worker_processes  1;
events {
    worker_connections  1024;
}
http {
    include       mime.types;
    default_type  application/octet-stream;
    sendfile        on;
    keepalive_timeout  65;
    include extra/*.conf;
}

[root@Poppy conf]# cat extra/status.conf
server{
    listen 80;
    server_name status.joker.com;
    location / {
        stub_status on;   # 状态打开
        access_log off;   # 不写日志
        allow 10.0.0.0/24;  # 允许和禁止的ip段访问
        deny all;
   }
}


并发定义:单位时间内服务器正在处理的连接数

[root@joker ~]# curl status.joker.com
Active connections: 1                 # 正在处理的活动链接数,并发连接数,主要关注这项
server accepts handled requests       # server段 启动到现在一共处理的链接 74个
 74 74 74                             # accepts段 启动到现在成功创建多少次握手,与server段一样的话,就是没有失败的访问
                                          # handled requests段 已经处理完毕的请求数
Reading: 0 Writing: 1 Waiting: 0      # Reading: 0 段,nginx读取客户端header的信息数量
                                      # Writing: 1段,nginx返回给客户端header的信息数量
                                      # Waiting: 0段,已经处理完,正在等候下一次请求指令的链接
日志配置
1. nginx错误日志
配置记录nginx的错误信息是调试nginx服务的重要手段,属于核心功能模块(ngx_core_module)的参数,该参数名字为error_log,可以放在Main区块中全局配置,也可以放置不同的虚拟主机中单独记录
为nginx增加错误日志(error_log)配置
可存放在 main(针对所有标签) server(针对域名) location字段里面,logs的位置是nginx安装目录下的logs目录
[root@Poppy nginx]# cat conf/nginx.conf
worker_processes  1;
events {
    worker_connections  1024;
}
# 关键字,日志文件,错误日志级别
error_log logs/error.log error;
http {
    include       mime.types;
    default_type  application/octet-stream;
    sendfile        on;
    keepalive_timeout  65;
    include extra/*.conf;
}

[root@Poppy nginx]# cat conf/extra/www.conf
    server {
        listen       80;
        server_name  www.joker.com joker.com;
        # 关键字,日志文件,错误日志级别
        # error_log logs/error.log error;
        location / {
            root   html/www;
            index  index.html index.htm;
        # 关键字,日志文件,错误日志级别
        # error_log logs/error.log error;
        }
    }

错误日志级别有,debug|info|notice|warn|error|crit|alert|emerg
默认就是error级别,不要设置info等较低级别,会带来巨大i/o消耗
2. nginx访问日志(access_log)
nginx软件会把每个用户访问网站的日志的日志信息记录到指定的日志文件里,供网站提供者分析用户的浏览行为等,此功能由ngx_http_log_module模块负责
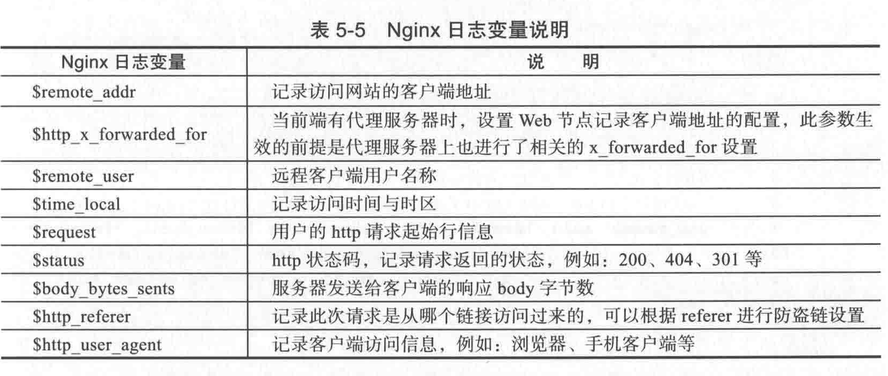
nginx记录日志的默认参数配置如下
[root@Poppy nginx]# cat conf/nginx.conf
worker_processes  1;
events {
    worker_connections  1024;
}
http {
    include       mime.types;
    default_type  application/octet-stream;
    sendfile        on;
    keepalive_timeout  65;
    # 日志变量说明,即使不加,默认也是这个配置
    log_format  main  '$remote_addr - $remote_user [$time_local] "$request" '
                      '$status $body_bytes_sent "$http_referer" '
                      '"$http_user_agent" "$http_x_forwarded_for"';
    # 访问日志,main就是读http里面的main日志变量,还可以多定义main,自定义格式
    access_log logs/www_access.log main;
    # 规范配置文件
    include extra/*.conf;
}

[root@Poppy nginx]# cat conf/extra/www.conf
    server {
        listen       80;
        server_name  www.joker.com joker.com;
        # 关键字,日志文件,错误日志级别
        # error_log logs/error.log error;
        location / {
            root   html/www;
            index  index.html index.htm;
        # 关键字,日志文件,错误日志级别
        # error_log logs/error.log error;
        # 访问日志,main会,main就是读http里面的main日志变量
        # access_log logs/www_access.log main;
        }
    }

可以在日志参数中加上buffer和flush选项,这样做会在高并发场景下提升网站访问性能
buffer缓存区,flush是过多少时间将缓存区的内容压写到硬盘
access_log logs/www_access.log main gzip buffer=32k flush=5s;
客户端访问
[root@joker ~]# curl www.joker.com
www

服务器查看
[root@Poppy nginx]# cat logs/www_access.log
10.0.0. 1 - - [08/Jun/2018:10:32:22 +0800] "GET / HTTP/1.1" 200 4 "-" "curl/7.29.0" "-"
"$http_referer" 可以通过a标签来测试
和上面main对应的变量,查看下面的图片参考
3. nginx轮询切割
默认情况nginx会把所有的访问日志生成到一个指定的访问日志文件access.log里,但这样一来,时间长了就会导致日志个头很大,不利于日志的分析和处理,因此,有必要对nginx日志,按天和按小时进行切割,使其分成不同的文件保存
[root@Poppy joker]# crontab -l
00 00 * * * /bin/sh /joker/scripts/cut_nginx_log.sh > /dev/null 2>&1

[root@Poppy scripts]# cat cut_nginx_log.sh
#!bin/bash
# mv占i/o资源少,-s reload,不会对用户影响,会重新生成空的www_access.log
cd /application/nginx/logs
/bin/mv www_access.log www_access_$(date +%F -d '-1 day').log
/application/nginx/sbin/nginx -s reload

## rsync 是否需要推送到备份服务器

## finde del,是否需要查找多天前的删除
nginx location
location指令的作用是根据用户请求的URL来执行不同的应用,其实就是根据用户请求的网站地址URL进行匹配,匹配成功即进行相关的操作,语法格式如下
location [=|~|~*|^~|@] uri {..}
指令 匹配标识 匹配的网站地址 匹配uri后执行的配置段
[=|~|~*|^~|@]
=:精确匹配
~:区分大小
~*:不区分大小
!:取反
^~:不做正则匹配,匹配字符串
@:内部调用,不常用
1. location简单匹配事例
比如客户端访问 http://www.joker.com/joker/
location匹配到了joker,就会执行下面
location /joker/ {    # joker代表的就是uri
    do something
}

如果上面没有匹配到,就会执行下面,这是默认的
location / {
    do something
}
2. 匹配顺序
第一次访问
[root@Poppy conf]# cat nginx.conf
worker_processes  1;
events {
    worker_connections  1024;
}
# 关键字,日志文件,错误日志级别
error_log logs/error.log error;
http {
    include       mime.types;
    default_type  application/octet-stream;
    sendfile        on;
    keepalive_timeout  65;
    log_format  main  '$remote_addr - $remote_user [$time_local] "$request" '
                      '$status $body_bytes_sent "$http_referer" '
                      '"$http_user_agent" "$http_x_forwarded_for"';
    # 访问日志,main就是读http里面的main日志变量
    access_log logs/www_access.log main;
    include extra/*.conf;
}
[root@Poppy conf]# cat extra/www.conf
    server {
        listen       80;
        server_name  www.joker.com joker.com;
        location / {
            return 401;
        }
        location = / {
            return 402;
        }
        location /documents/ {
            return 403;
        }
        location ^~/images/ {
            return 404;
        }
        location ~* \.(gif|jpg|jpeg)$ {
            return 500;
        }
        access_log logs/www_access.log main;
    }

客户端访问
[root@joker ~]# curl -s -o /dev/null -w "%{http_code}\n" www.joker.com
402
=精确匹配,无论放置的顺序如何都将优先被匹配并执行

第二次访问,我们把精确匹配=去除
[root@Poppy conf]# cat extra/www.conf
    server {
        listen       80;
        server_name  www.joker.com joker.com;
        location / {
            return 401;
        }
        location /documents/ {
            return 403;
        }
        location ^~/images/ {
            return 404;
        }
        location ~* \.(gif|jpg|jpeg)$ {
            return 500;
        }
        access_log logs/www_access.log main;
    }

客户端访问
[root@joker ~]# curl -s -o /dev/null -w "%{http_code}\n" www.joker.com
401
/为默认的匹配,即如果没有匹配上其他的location,则最后匹配“默认匹配”的部分

第三次访问,路径匹配
客户端访问
[root@joker ~]# curl -s -o /dev/null -w "%{http_code}\n" www.joker.com/documents/
403
[root@joker ~]# curl -s -o /dev/null -w "%{http_code}\n" www.joker.com/documents/document.html
403
此部分为路径匹配,即匹配了路径/documents/
路径匹配需要目录上有这个路径
[root@Poppy www]# cat ../../conf/extra/www.conf
    server {
        listen       80;
        server_name  www.joker.com joker.com;
        location /documents/ {
            root html/www;
            index  index.html;
        }
        access_log logs/www_access.log main;
    }

就需要 html目录下有www目录,www目录下有documents目录,里面有index.html
没有找到目录报404错误,没有html文件报403错误
第四次访问,扩展名匹配
[root@joker ~]# curl -s -o /dev/null -w "%{http_code}\n" www.joker.com/documents/1.gif
500
此部分为扩展名匹配,注意后面的/documents/1.jpg,没有匹配此处的/documents/1.jpg路径,而是匹配了结尾的1.jpg

第五次访问,特殊字符路径匹配
客户端访问
[root@joker ~]# curl -s -o /dev/null -w "%{http_code}\n" www.joker.com/images/1.gif
404
此部分为路径匹配,但是前面增加了特殊字符^~,所以优先匹配路径,而没有匹配结尾的1.jpg
3. 匹配顺序总结
location = / {                        # 精确匹配                               精确匹配
location ^~/images/                   # 匹配常规字符串,不做正则匹配              特殊路径匹配
location ~* \.(gif|jpg|jpeg)$         # 正则匹配                               扩展名匹配
location /documents/                  # 匹配常规字符串,如果有正则则有限匹配正则    路径匹配
location / {                          # 所有location都不能匹配后的默认匹配        默认匹配
nginx rewrite
nginx rewrite 的主要功能也是实现URL地址重写,nginx的rewrite规则需要PCRE软件的支持,即通过perl兼容正则表达式语法进行规则匹配
指令语法
rewrite regex replacement[flag]
应用位置: server,location,if
rewrite是实现URL重写的关键指令,根据regex(正则表达式)部分内容,重定向到replacement部分内容,结尾是flag标记
rewrite ^/(.*) http://blog.joker.com/$1 permanent

在上述指令中,rewrite为固定关键字,表示开启一条rewrite匹配规则,^/(.*)这是一个正则表达式,匹配所有,匹配成功后跳转到
http://blog.joker.com/$1,这里的$1是取前面regex部分()里的内容,后项引用,即路径匹配内容,结尾permanent,表示永久301重定向标记,即
跳转到后面的http://blog.joker.com/$1地址上
1. rewrite简单事例
[root@Poppy extra]# cat ../nginx.conf
worker_processes  1;
events {
    worker_connections  1024;
}
# 关键字,日志文件,错误日志级别
error_log logs/error.log error;
http {
    include       mime.types;
    default_type  application/octet-stream;
    sendfile        on;
    keepalive_timeout  65;
    log_format  main  '$remote_addr - $remote_user [$time_local] "$request" '
                      '$status $body_bytes_sent "$http_referer" '
                      '"$http_user_agent" "$http_x_forwarded_for"';
    # 访问日志,main就是读http里面的main日志变量
    # access_log logs/www_access.log main;
    include extra/*.conf;
}
[root@Poppy extra]# cat www.conf
    server {
        listen       80;
        server_name  www.joker.com joker.com;
        location / {
            rewrite ^/(.*) http://blog.joker.com/$1 permanent;   # 重写语句
        }
        access_log logs/www_access.log main;
    }


客户端访问
[root@joker ~]# curl www.joker.com
<html>
<head><title>301 Moved Permanently</title></head>
<body bgcolor="white">
<center><h1>301 Moved Permanently</h1></center>
<hr><center>nginx/1.6.3</center>
</body>
</html>
[root@joker ~]# wget www.joker.com/index.html
--2018-06-10 14:22:01--  http://www.joker.com/index.html
Resolving www.joker.com (www.joker.com)... 60.205.188.107
Connecting to www.joker.com (www.joker.com)|60.205.188.107|:80... connected.
HTTP request sent, awaiting response... 301 Moved Permanently      #### 注意,从这里开始跳转重写url地址下载页面
Location: http://blog.joker.com/index.html [following]
--2018-06-10 14:22:01--  http://blog.joker.com/index.html
Resolving blog.joker.com (blog.joker.com)... 60.205.188.107
Reusing existing connection to www.joker.com:80.
HTTP request sent, awaiting response... 200 OK
Length: 5 [text/html]
Saving to: ‘index.html’

可以和location的匹配顺序来重写地址
[root@Poppy extra]# cat ../nginx.conf
worker_processes  1;
events {
    worker_connections  1024;
}
# 关键字,日志文件,错误日志级别
error_log logs/error.log error;
http {
    include       mime.types;
    default_type  application/octet-stream;
    sendfile        on;
    keepalive_timeout  65;
    log_format  main  '$remote_addr - $remote_user [$time_local] "$request" '
                      '$status $body_bytes_sent "$http_referer" '
                      '"$http_user_agent" "$http_x_forwarded_for"';
    # 访问日志,main就是读http里面的main日志变量
    # access_log logs/www_access.log main;
    include extra/*.conf;
}
[root@Poppy conf]# cat extra/www.conf
    server {
        listen       80;
        server_name  www.joker.com joker.com;
        location / {
            return 401;
        }
        location ^~/images/ {
            rewrite ^/(.*) http://blog.joker.com/$1 permanent;
        }
        access_log logs/www_access.log main;
    }

当访问www.joker.com/images/...的时候301跳转到blog.joker.com
2. regex常用正则表达式说明

3. rewrite指令结尾的flag标记说明
last              本条规则匹配完成后,继续向下匹配新的location url规则
break             本条规则匹配完成即终止,不再匹配后面的任何规则
redirect          返回302临时重定向,浏览器地址栏会显示跳转后的url地址
permanent         返回301永久重定向,浏览器地址会显示跳转后的url地址

last和break用来实现url重写,浏览器地址栏url地址不变,但在服务器端访问的程序及路径发生了变化。
redirect和permanent用来url跳转,浏览器地址栏会显示跳转后的URL地址
nginx反向代理使用proxy_pass指令时要使用break标记
4. nginx rewrite的企业应用场景
旧域名到新域名,之前我们是通过别名方式200,现在我们通过重写地址的方式301
[root@Poppy extra]# cat ../nginx.conf
worker_processes  1;
events {
    worker_connections  1024;
}
# 关键字,日志文件,错误日志级别
error_log logs/error.log error;
http {
    include       mime.types;
    default_type  application/octet-stream;
    sendfile        on;
    keepalive_timeout  65;
    log_format  main  '$remote_addr - $remote_user [$time_local] "$request" '
                      '$status $body_bytes_sent "$http_referer" '
                      '"$http_user_agent" "$http_x_forwarded_for"';
    # 访问日志,main就是读http里面的main日志变量
    # access_log logs/www_access.log main;
    include extra/*.conf;
}
[root@Poppy conf]# cat extra/www.conf
    server {
        listen       80;
        server_name  qq.joker.com;
        location / {
            rewrite ^/(.*) http://www.joker.com/$1 permanent;
        }
    }
    server {
        listen       80;
        server_name  www.joker.com;
        location / {
            root html/www;
                        index index.html index.htm;
        }
            access_log logs/www_access.log main;
    }


跳转的话就是看到新的域名,是301跳转,就是得重新请求,原来一个并发,现在就是二个了
用别名200,效率高,,看不到改过的域名,就是当前域名

[root@Poppy conf]# cat extra/www.conf
    server {
        listen       80;
        server_name  www.joker.com;
        location / {
            root html/www;
            index index.html index.htm;
        }
        rewrite ^(.*)/bbs/ http://bbs.joker.com/$1 break;
    }

如果访问www.joker.com路径里面带bbs就请求 http://bbs.joker.com/bbs/
如果没有,就请求默认的www.joker.com
nginx访问认证
为网站设置访问账号和密码权限,只有拥有账号密码的用户才可以访问网站内容,这种使用账号密码才可以访问网站的功能主要应用在企业内部人员访问的地址上,例如企业的网站后台,mysql客户端phpmyadmin,企业内容的crm,wiki等网站平台
[root@Poppy extra]# cat www.conf
    server {
        listen       80;
        server_name  www.joker.com;
        location / {
            auth_basic "info";                              # 认证的消息
            auth_basic_user_file conf/extra/htpasswd;       # 认证文件位置,通过htpasswd创建
            root html/www;
            index index.html index.htm;
        }
        access_log logs/www_access.log main;
    }
创建htpasswd认证文件
安装htpassw命令
yum install httpd-tools
[root@Poppy extra]# htpasswd -cb /application/nginx/conf/extra/htpasswd joker 123456
Adding password for user joker
[root@Poppy extra]# cat htpasswd
joker:$apr1$qhFfruO6$MbSlxwi.dOae5haOzuuiA1
-c 指定文件 -b 非交互式的输入密码


客户端访问需要401认证了
[root@joker ~]# curl www.joker.com
<html>
<head><title>401 Authorization Required</title></head>
<body bgcolor="white">
<center><h1>401 Authorization Required</h1></center>
<hr><center>nginx/1.6.3</center>
</body>
</html>

认证文件有可能会被其他人看,所以我们可以chmod 400 /application/nginx/conf/extra/htpasswd
删除历史记录等
报错
404的原因
没有目录
403的原因
没有index.html文件,没有权限,没有首页配置
命令参考
wget url下载文件 -q安静的 -o指定输出文件名,就是更改下载的文件名
curl -i webIP 查看响应头 -s安静的 不加参数与-s一样返回网页内容,可以/dev/null -w "{http_code}"
curl -s -o /dev/null -w "%{http_code}\n" www.joker.com  http://qq.com http://jd.com
lsof 命令用于查看你进程开打的文件,打开文件的进程
lsof -i :80 80端口使用情况