1. image loading 框架:
    1.1   Glide
    1.2   Picasso
    1.3   后续更新
    ...
2.网络框架:
    2.1   xUtil3
    2.2   OkHttp3
    2.3   Retrofit
    2.4   后续更新
    ...
3.数据库框架:
    3.1   ormlite
    3.2   后续更新
1.1Glide:
一、Glide-Getting Started
Glide:
Glide就像Picasso,能从许多资源上加载和显示图片,也照顾了缓存和做图片操作的时候保持一个低的内存影响,它已经被官方谷歌应用程序(如Google I / O的应用程序2015)和Picasso一样受欢迎,在本系列中,我们将探索Glide在Picasso的差异和优势。
Why Use Glide?
经验丰富的Android开发人员可以跳过这一节,但对于初学者来说:你可能会问自己为什么要使用Glide代替自己的实现。
在处理图像时Android是非常细致的,因为它会逐个像素加载到内存。手机照相机中的相片平均大小是2592*1936像素(5百万像素)大约占19MB内存。如果你有一个复杂的网络请求去缓存和处理图片,自己写你将花费大量的时间,甚至安全问题会使你头疼,但是如果你使用一个测试好的框架像Glide变将变得安全方便.
Gradle
如同大多数依赖关系一样你的Gradler project的build.gradle增加一行:
compile 'com.github.bumptech.glide:glide:3.7.0' Maven
Glide也支持Maven projects
<dependency>
    <groupId>com.github.bumptech.glide</groupId>
    <artifactId>glide</artifactId>
    <version>3.7.0</version>
    <type>aar</type>
</dependency>
First Loading Image from a URL
就像Picasso,Glide库使用一个连贯接口。Glide的builder至少需要三个参数作为一个完整的方法请求:
with(Context context) :许多Android API调用上下文是必要的。Glide没有区别。Glide很方便因为它还可以传入Activity和Fragment对象
load(String imageUrl) :在这里你指定图像应该被加载。通常这里传入的是一个URL的字符串去加载网络图片
into(ImageView targetImageView) :目标ImageView,你想要显示的ImageView
理论解释总是难以把握,让我们看一个实际的例子:
ImageView targetImageView = (ImageView) findViewById(R.id.imageView);
String internetUrl = "http://i.imgur.com/DvpvklR.png";

Glide
    .with(context)
    .load(internetUrl)
    .into(targetImageView);
二、Glide-Advanced Loading
Loading from Resources
从Android加载资源。而不是给一个字符串URL指向一个互联网,给定int类型资源。
int resourceId = R.mipmap.ic_launcher;

Glide
    .with(context)
    .load(resourceId)
    .into(imageViewResource);
如果你对R.mipmap困惑,它是Android图标处理的新方法。
当然上述你可以直接给ImageView指定一个资源,但是使用Glide是否更加有趣
Loading from File
从文件加载图片
// this file probably does not exist on your device. However, you can use any file path, which points to an image file

File file = new File(Environment.getExternalStoragePublicDirectory(Environment.DIRECTORY_PICTURES), "Running.jpg");

Glide
    .with(context)
    .load(file)
    .into(imageViewFile);
Loading from Uri
最后,您还可以加载图像定义为一个Uri。这个请求不同于前面的操作:
// this could be any Uri. for demonstration purposes we're just creating an Uri pointing to a launcher icon

Uri uri = resourceIdToUri(context, R.mipmap.future_studio_launcher);

Glide
    .with(context)
    .load(uri)
    .into(imageViewUri);
这个帮助函数是一个简单的从resourceId到一个Uri的转变,它可以是任何的Uri
public static final String ANDROID_RESOURCE = "android.resource://";
public static final String FOREWARD_SLASH = "/";

private static Uri resourceIdToUri(Context context, int resourceId) {
    return Uri.parse(ANDROID_RESOURCE + context.getPackageName() + FOREWARD_SLASH + resourceId);
}
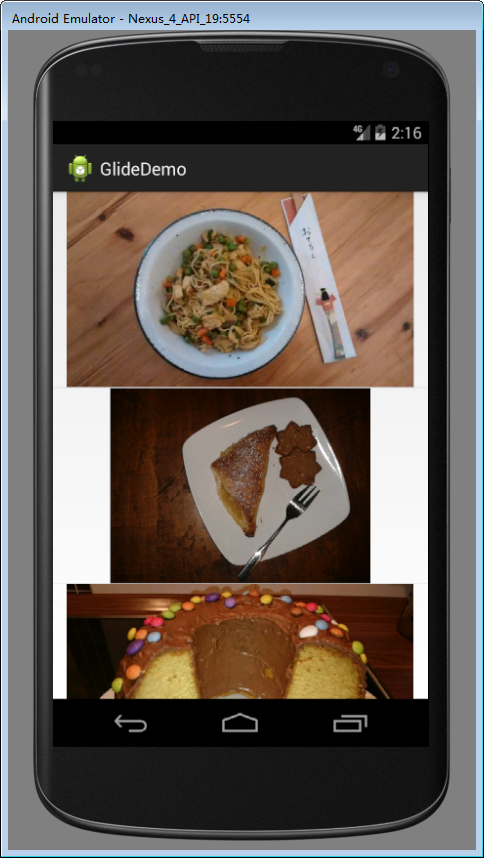
三、Glide-Sample Gallery Implementation: ListView
效果图:
首先添加网络权限:
<uses-permission android:name="android.permission.INTERNET"/>activity_main:
<RelativeLayout xmlns:android="http://schemas.android.com/apk/res/android"
    xmlns:tools="http://schemas.android.com/tools"
    android:layout_width="match_parent"
    android:layout_height="match_parent"
    tools:context="${relativePackage}.${activityClass}" >

    <ListView
        android:id="@+id/listView"
        android:layout_width="wrap_content"
        android:layout_height="wrap_content"
         />

</RelativeLayout>
listview_item_image:
<?xml version="1.0" encoding="utf-8"?>
<ImageView xmlns:android="http://schemas.android.com/apk/res/android"
       android:layout_width="match_parent"
       android:layout_height="200dp"/>
MainActivity:
import com.bumptech.glide.Glide;

import android.app.Activity;
import android.content.Context;
import android.os.Bundle;
import android.view.LayoutInflater;
import android.view.Menu;
import android.view.MenuItem;
import android.view.View;
import android.view.ViewGroup;
import android.widget.ArrayAdapter;
import android.widget.ImageView;
import android.widget.ListView;

public class MainActivity extends Activity {

    ListView listView;
    public static String[] eatFoodyImages = {
            "http://i.imgur.com/rFLNqWI.jpg",
            "http://i.imgur.com/C9pBVt7.jpg",
            "http://i.imgur.com/rT5vXE1.jpg",
            "http://i.imgur.com/aIy5R2k.jpg",
            "http://i.imgur.com/MoJs9pT.jpg",
            "http://i.imgur.com/S963yEM.jpg",
            "http://i.imgur.com/rLR2cyc.jpg",
            "http://i.imgur.com/SEPdUIx.jpg",
            "http://i.imgur.com/aC9OjaM.jpg",
            "http://i.imgur.com/76Jfv9b.jpg",
            "http://i.imgur.com/fUX7EIB.jpg",
            "http://i.imgur.com/syELajx.jpg",
            "http://i.imgur.com/COzBnru.jpg",
            "http://i.imgur.com/Z3QjilA.jpg",
    };
    @Override
    protected void onCreate(Bundle savedInstanceState) {
        super.onCreate(savedInstanceState);
        setContentView(R.layout.activity_main);
        listView=(ListView) findViewById(R.id.listView);
         listView.setAdapter(new ImageListAdapter(MainActivity.this, eatFoodyImages));
    }
    public class ImageListAdapter extends ArrayAdapter {
        private Context context;
        private LayoutInflater inflater;

        private String[] imageUrls;

        public ImageListAdapter(Context context, String[] imageUrls) {
            super(context, R.layout.listview_item_image, imageUrls);

            this.context = context;
            this.imageUrls = imageUrls;

            inflater = LayoutInflater.from(context);
        }

        @Override
        public View getView(int position, View convertView, ViewGroup parent) {
            if (null == convertView) {
                convertView = inflater.inflate(R.layout.listview_item_image, parent, false);
            }

            Glide
                .with(context)
                .load(imageUrls[position])
                .into((ImageView) convertView);

            return convertView;
        }
    }

}
总结:其实不论你加载一张还是多张图片Glide的调用还是一样的
四、Glide-Placeholder & Fade Animations
我们可能甚至不需要解释或讨论:空imageview在任何界面不好看。如果你使用Glide,你最有可能是通过一个网络连接加载图像。根据用户的环境中,这可能要花费大量的时间。一个应用程序的预期行为是显示一个占位符(就是还未加载图片前显示给用户的图片),直到图像加载和处理占位符消失,这样就可以给用户留给一个很好的体验效果。
Glide的封装使得这个很容易做到!只要调用.placeHolder()和一个引用(资源)和,作为一个占位符,直到你的实际图像已经准备好了。
Glide
    .with(context)
    .load(UsageExampleListViewAdapter.eatFoodyImages[0])
    .placeholder(R.mipmap.ic_launcher) // can also be a drawable
    .into(imageViewPlaceholder);
很明显,你不能设置一个互联网url作为占位符,因为那个需要加载。应用resources和drawable是保证是可用的和可访问。
Error Placeholder: .error()
目前,让我们假设我们的程序试图加载一个图像从一个网站,。Glide返回给我们一个错误的回调 ,这时候我们可以使用Glide的连贯接口是与前面的示例相同pre-display占位符,只是用不同的函数调用error():
Glide
    .with(context)
 .load("http://futurestud.io/non_existing_imag e.png")
    .placeholder(R.mipmap.ic_launcher) // can also be a drawable
    .error(R.mipmap.future_studio_launcher) // will be displayed if the image cannot be loaded
    .into(imageViewError);
当我们定义的图片不能加载时,Glide将展示R.mipmap.future_studio_launcher替代,error()参数必定是已经存在的resources和drawable
Use of crossFade()
无论如果你加载图片之前还是错误加载显示一个占位符,改变图像的ImageView UI是一个非常重要的变化。一个简单的选择使这种变化更顺利和容易映入眼帘,是使用crossfase(淡入淡出)动画。Glide附带标准crossfade(淡入淡出)动画,这是默认(当前版本3.6.1)活动。如果你想Glide显示crossfase(淡入淡出)动画,你所要做的就是调用crossFade()方法;
Glide
    .with(context)
    .load(UsageExampleListViewAdapter.eatFoodyImages[0])
    .placeholder(R.mipmap.ic_launcher) // can also be a drawable
    .error(R.mipmap.future_studio_launcher) // will be displayed if the image cannot be loaded
    .crossFade()
    .into(imageViewFade);
crossFade()方法还有另一个重载函数crossFase(int duration),如果你想加速或减速这个动画,你可以通过这个函数添加一个时间,默认是300毫秒
Use of dontAnimate()
使用这个方法表示是没有crossfase(淡入淡出)动画的,直接展现imageView给用户。
Glide
    .with(context)
    .load(UsageExampleListViewAdapter.eatFoodyImages[0])
    .placeholder(R.mipmap.ic_launcher) // can also be a drawable
    .error(R.mipmap.future_studio_launcher) // will be displayed if the image cannot be loaded
    .dontAnimate()
    .into(imageViewFade);
总结:以上的每个函数都是不相关的,比如你可以调用error()而不调用placeholder()等等。
五、Glide-Image Resizing & Scaling
在你的服务器或这API需要合适的尺寸这将是一个完美的解决方式,
相比Picasso,Glide在memory-wise更有效率,Glide自定图像大小范围在缓存和内存中,Picasso有相同的能力,但是需要调用fit().对于Glide,如果图像没有显示在合适的大小,调用override(horizontalSize, verticalSize),之后将重置大小后显示给用户
Glide
    .with(context)
    .load(UsageExampleListViewAdapter.eatFoodyImages[0])
    .override(600, 200) // resizes the image to these dimensions (in pixel). does not respect aspect ratio
    .into(imageViewResize);
Scaling Images
- CenterCrop : 一种尺度图像的裁剪技术,填补了ImageView的要求范围,然后裁减了多余的。ImageView将被完全填满,但图像可能显示不全。
Glide
    .with(context)
    .load(UsageExampleListViewAdapter.eatFoodyImages[0])
    .override(600, 200) // resizes the image to these dimensions (in pixel)
    .centerCrop() // this cropping technique scales the image so that it fills the requested bounds and then crops the extra.
.into(imageViewResizeCenterCrop);- FitCenter :fitCenter()是一种尺度图像的裁剪技术,这样两个尺寸等于或小于请求的ImageView的界限,图像将显示完全,但可能不会填满整个ImageView。
Glide
    .with(context)
    .load(UsageExampleListViewAdapter.eatFoodyImages[0])
    .override(600, 200)
    .fitCenter()
    .into(imageViewResizeFitCenter);
六、Glide — Displaying Gifs & Videos
Displaying Gifs
大多数的图片加载框架只支持加载和显示图片,在Glide中Gif将是一个特殊的功能
String gifUrl = "http://i.kinja-img.com/gawker-media/image/upload/s--B7tUiM5l--/gf2r69yorbdesguga10i.gif";

Glide
    .with( context )
    .load( gifUrl )
    .into( imageViewGif );
在这里你仍然可以调用error()当GIF不能加载时,和placeholder()GIF加载之前
Glide
    .with( context )
    .load( gifUrl )
    .placeholder( R.drawable.cupcake )
    .error( R.drawable.full_cake )
    .into( imageViewGif );
Gif Check
上面的代码存在一个潜在问题,就是如果你的Url不是一个Gif的话,可能就是一个普通的图像,Glide不能自动识别它,所以如果我们期望加载一个GIF还必须做一个声明:
Glide
    .with( context )
    .load( gifUrl )
    .asGif()//声明
    .error( R.drawable.full_cake )
    .into( imageViewGif );
如果gifUrl是gif,没有什么变化。然而,与之前不同的是,如果gifUrl不是一个Gif,Glide会理解加载失败。Glide有优势,error()方法被调用和错误占位符显示,即使gifUrl是一个正确的Url图像(但不是一个Gif)。
Display Gif as Bitmap
在某些情况下可能我们只想显示GIF图像的第一帧,你可以调用asBitmap()方法
Glide
    .with( context )
    .load( gifUrl )
    .asBitmap()
    .into( imageViewGifAsBitmap );
Display of Local Videos
如果gif是视频。Glide也能够显示视频的缩略图,只要他们存储在手机。让我们假设你得到文件路径,让用户选择一个视频:
String filePath = "/storage/emulated/0/Pictures/example_video.mp4";

Glide
    .with( context )
    .load( Uri.fromFile( new File( filePath ) ) )
    .into( imageViewGifAsBitmap );
然而这适用于本地视频,而且只能显示第一帧,如果是网络或者其他的视频将不能显示,你应该使用VideoView
七、Glide — Caching Basics
Using Cache Strategies
Memory Cache:
让我们想象它从一个非常简单的要求:从互联网ImageView加载一张图片:
Glide
    .with( context )
    .load( eatFoodyImages[0] )
    .skipMemoryCache( true )
    .into( imageViewInternet );
你已经注意到我们。skipMemoryCache(true)专门告诉Glide跳过内存缓存。这意味着Glide不会把图像在内存缓存中。重要的是要理解,这只会影响内存缓存!Glide仍将利用磁盘高速缓存,以避免另一个网络请求。
还好知道Glide将所有图像资源默认缓存到内存中。因此,一个特定的调用skipMemoryCache(false)不是必需的。
提示:如果你请求相同的Url和调用.skipMemoryCache( true )方法,资源将会放在内存中缓存,确保你的所有调用相同的资源,当你想要调整缓存行为!
Skipping Disk Cache
当你学到的在上面的部分中,即使你关闭内存缓存,请求图像仍将存储在设备上的磁盘存储。如果你一个图像,在相同的URL,但正在迅速改变,你可能希望禁用磁盘缓存。 你可以改变Glide的磁盘缓存.diskCacheStrategy()方法。与.skipMemoryCache()方法不同的是它接受一个enum,而不是一个简单的布尔。如果你想禁用磁盘缓存请求时,使用DiskCacheStrategy枚举值DiskCacheStrategy.NONE作为参数
Glide
    .with( context )
    .load( eatFoodyImages[0] )
    .diskCacheStrategy( DiskCacheStrategy.NONE )
    .into( imageViewInternet );
这个代码片段的图像将不会保存在磁盘高速缓存。然而,默认情况下它仍然会使用内存缓存!以禁用缓存,将方法调用:
Glide
    .with( context )
    .load( eatFoodyImages[0] )
    .diskCacheStrategy( DiskCacheStrategy.NONE )
    .skipMemoryCache( true )
    .into( imageViewInternet );
Customize Disk Cache Behavior
Glide缓存原始,完全解决图像和另外小版本的图片。举个例子,如果你请求与1000 x1000像素,和500 x500像素两个图像,Glide将两个版本的图像缓存。
. diskCacheStrategy()参数:
DiskCacheStrategy.NONE:禁止缓存
DiskCacheStrategy.SOURCE :缓存只有原来的全分辨率图像。
DiskCacheStrategy.RESULT: 缓存只有最终的图像,在降低分辨率(也可能是转换)(默认行为)
DiskCacheStrategy.ALL :缓存所有版本的图像
八、Glide — Request Priorities
通常我们会从网络加载多个图片,加入我们顶部的是一个大的好看的图片,底部是两张小图片,这时候用户很可能想优先加载大的图片,Glide完美解决了这一个问题,通过调用.priority()传入Priority enum。
Getting to know the Priority enum
enum给你四个不同的选项。这是优先级增加的命令列表
- Priority.LOW
- Priority.NORMAL
- Priority.HIGH
- Priority.IMMEDIATE
Usage Example: Hero Element with Child Images
刚才那个例子,理论上讲我们将大图片的优先级设置为HIGH就应该足够了,但是我们这里还将小图片的优先级设为LOW;
private void loadImageWithHighPriority() {
    Glide
        .with( context )
        .load( UsageExampleListViewAdapter.eatFoodyImages[0] )
        .priority( Priority.HIGH )
        .into( imageViewHero );
}

private void loadImagesWithLowPriority() {
    Glide
        .with( context )
        .load( UsageExampleListViewAdapter.eatFoodyImages[1] )
        .priority( Priority.LOW )
        .into( imageViewLowPrioLeft );

    Glide
        .with( context )
        .load( UsageExampleListViewAdapter.eatFoodyImages[2] )
        .priority( Priority.LOW )
        .into( imageViewLowPrioRight );
}
运行的话大图片将第一显示,但是这也会增加显示时间。
九、Glide — Thumbnails
Advantages of Thumbnails
操作缩略图之前,确保你理解和Glide所有选项缓存和请求的优先级。如果你前面你懂了,然后使用了解缩略图可以帮助你进一步提高你的Android应用程序。
缩略图是不同的比之前的占位符。占位符必须附带的应用程序作为一个捆绑的资源。缩略图是一个动态的占位符,也可以从互联网上加载。缩略图会在显示实际的请求之前加载并处理。如果缩略图,不管出于什么原因,到达原始图像后,它不替换原来的形象。它只是将被销毁。
Simple Thumbnails
Glide为缩略图提供了两种不同的方式。首先是简单的选择,使用原始图像,只是在一个更小的分辨率。这个方法特别有用的组合ListView和detail Views。如果你已经在ListView显示图像,我们假设,在250 x250像素,图像将需要一个更大的分辨率detail Views。然而,从用户的角度来看,他已经看到了一个小版本的形象,为什么会有几秒钟的占位符,直到同样的图像显示(高分辨率)?
在这种情况下,它更多的意义继续显示250 x250像素版本细节视图,在后台加载完整的分辨率。Glide使之成为可能,调用.thumbnail()方法。在这种情况下,参数是一个浮点数大小:
Glide
    .with( context )
    .load( UsageExampleGifAndVideos.gifUrl )
    .thumbnail( 0.1f )
    .into( imageView2 );
例如,如果你通过0.1 f作为参数,Glide将显示原始图像大小的10%。如果原始图像1000 x1000像素,缩略图100 x100像素。自比ImageView图像会小的多,你需要确保ScaleType正确设置。 注意所有请求设置应用到原始请求也应用于缩略图。例如,如果您使用一个转换图像灰度,都会发生同样的缩略图。
Advanced Thumbnails with Complete Different Requests
使用.thumbnail()与一个浮点参数是容易设置,可以非常有效的,它并不总是有意义。如果缩略图需要负载相同的全分辨率图像通过网络,它可能不是更快。因此,Glide提供了另一种选择加载和显示缩略图。 第二个方式是通过一个完整的新的Glide请求参数。让我们来看一个例子:
private void loadImageThumbnailRequest() {
    // setup Glide request without the into() method
    DrawableRequestBuilder<String> thumbnailRequest = Glide
        .with( context )
        .load( eatFoodyImages[2] );

    // pass the request as a a parameter to the thumbnail request
    Glide
        .with( context )
        .load( UsageExampleGifAndVideos.gifUrl )
        .thumbnail( thumbnailRequest )
        .into( imageView3 );
}
所不同的是,第一个缩略图请求完全独立于第二原始请求。缩略图可以是不同的资源或图像的URL,您可以应用不同的转换,等等。
提示,如果你想要更加疯狂,你可以使用递归和应用请求额外的缩略图请求到缩略图…
十、Glide — Callbacks: SimpleTarget and ViewTarget for Custom View Classes
这篇文章中我们将使用Bitmap作为我们的image,而不是ImageView
Callbacks in Glide: Targets:
如果我们想使用Bitmap来显示Image,Glide提供了一个简单的方法来与Targets图像的位图资源的访问。Targets只是一个回调,用来处理Glide加载完成后结果。Glide提供各种各样的Targets,而每个都有一个明确的target。我们从SimpleTarget开始。
SimpleTarget:
代码:
private SimpleTarget target = new SimpleTarget<Bitmap>() {
    @Override
    public void onResourceReady(Bitmap bitmap, GlideAnimation glideAnimation) {
        // do something with the bitmap
        // for demonstration purposes, let's just set it to an ImageView
        imageView1.setImageBitmap( bitmap );
    }
};

private void loadImageSimpleTarget() {
    Glide
        .with( context ) // could be an issue!
        .load( eatFoodyImages[0] )
        .asBitmap()
        .into( target );
}
代码第一部分是声明一个域对象,给图片设置Bitmap,
第二部分是和之前一样将target传入into(),不同的是,这里需要声明asBitmap(),防止URL加载的图片可能是GIF或者Viedo
Pay Attention with Targets
除了知道怎么实现Glide的Taegts之后,你还必须知道两点:
- 首先我们知道Android和java中我们可以直接在into(new
SimpleTarget((){});,但是这也是一个缺陷这可能当加载完图片缺未加载回调时SimpleTarget就被回收了,所以我们必须和我们如上一样,定义成一个域对象
解决办法是:.with( context.getApplicationContext() ),这样仅仅当application停止时Glide请求才会停
止,请记住这一点。最后,如果你的请求需要以外的activity生命周期,使用以下代码片段:
private void loadImageSimpleTargetApplicationContext() {
    Glide
        .with( context.getApplicationContext() ) // safer!
        .load( eatFoodyImages[1]
        .asBitmap()
        .into( target2 );
}
Target with Specific Size
target另一个潜在的问题是他们没有一个特定的大小。如果你通过ImageView .into的参数(),Glide的大小将使用ImageView限制图像的大小。例如,如果加载图片是1000 x1000像素,但是ImageView只有250 x250像素,Glide将使用size较小的图像保存进内存。很明显,target并不能这样做,因为没有已知的大小。然而,如果你有一个特定的大小,您可以增加回调。如果你知道图像应该多大,你应该指定它以便节省内存:
private SimpleTarget target2 = new SimpleTarget<Bitmap>( 250, 250 ) {
    @Override
    public void onResourceReady(Bitmap bitmap, GlideAnimation glideAnimation) {
        imageView2.setImageBitmap( bitmap );
    }
};

private void loadImageSimpleTargetApplicationContext() {
    Glide
        .with( context.getApplicationContext() ) // safer!
        .load( eatFoodyImages[1] )
        .asBitmap()
        .into( target2 );
}
ViewTarget
我们知道Glide不支持加载自定义View的ImageVeiw,但是Glide提供了ViewTarget很好的帮我们解决了这类问题:
public class FutureStudioView extends FrameLayout {
    ImageView iv;
    TextView tv;

    public void initialize(Context context) {
        inflate( context, R.layout.custom_view_futurestudio, this );

        iv = (ImageView) findViewById( R.id.custom_view_image );
        tv = (TextView) findViewById( R.id.custom_view_text );
    }

    public FutureStudioView(Context context, AttributeSet attrs) {
        super( context, attrs );
        initialize( context );
    }

    public FutureStudioView(Context context, AttributeSet attrs, int defStyleAttr) {
        super( context, attrs, defStyleAttr );
        initialize( context );
    }

    public void setImage(Drawable drawable) {
        iv = (ImageView) findViewById( R.id.custom_view_image );

        iv.setImageDrawable( drawable );
    }
}
因为自定义View不是继承ImageView,所以我们不能直接将它传入.into()中,现在我们去创建一个ViewTarget:
private void loadImageViewTarget() {
    FutureStudioView customView = (FutureStudioView) findViewById( R.id.custom_view );

    viewTarget = new ViewTarget<FutureStudioView, GlideDrawable>( customView ) {
        @Override
        public void onResourceReady(GlideDrawable resource, GlideAnimation<? super GlideDrawable> glideAnimation) {
            this.view.setImage( resource.getCurrent() );
        }
    };

    Glide
        .with( context.getApplicationContext() ) // safer!
        .load( eatFoodyImages[2] )
        .into( viewTarget );
}
在target的回调方法,我们使用函数setImage(Drawable drawable)给自定义View的ImageView设置图片。
同时,确保看到ViewTarget的构造函数:new ViewTarget < FutureStudioView GlideDrawable >(customView)。 这个应该覆盖所有你需要自定义视图。你也可以在回调函数中做额外的事情。例如,我们可以分析传入的位图的主要颜色和设置TextView的值。
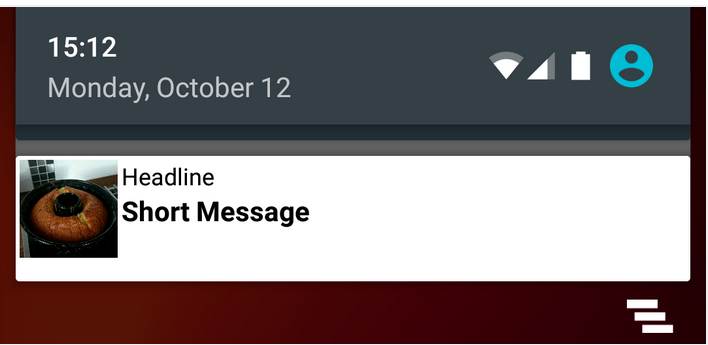
十一、Glide — Loading Images into Notifications and AppWidgets
从以上我们看到是一个NotificationCompat.Builder,我们可以看到通知是有icon的,如果icon是本地的我们可以直接加载,然而如果icon来自网络呢,没关系,Glide提供了一个方便的NotificationTarget.
NotificationTarget
代码:
activity_main:
<?xml version="1.0" encoding="utf-8"?>
<LinearLayout
    xmlns:android="http://schemas.android.com/apk/res/android"
    android:layout_width="match_parent"
    android:layout_height="wrap_content"
    android:background="@android:color/white"
    android:orientation="vertical">

    <LinearLayout
        android:layout_width="match_parent"
        android:layout_height="wrap_content"
        android:orientation="horizontal"
        android:padding="2dp">

        <ImageView
            android:id="@+id/remoteview_notification_icon"
            android:layout_width="50dp"
            android:layout_height="50dp"
            android:layout_marginRight="2dp"
            android:layout_weight="0"
            android:scaleType="centerCrop"/>

        <LinearLayout
            android:layout_width="0dp"
            android:layout_height="wrap_content"
            android:layout_weight="1"
            android:orientation="vertical">

            <TextView
                android:id="@+id/remoteview_notification_headline"
                android:layout_width="match_parent"
                android:layout_height="wrap_content"
                android:ellipsize="end"
                android:singleLine="true"
                android:textSize="12sp"/>

            <TextView
                android:id="@+id/remoteview_notification_short_message"
                android:layout_width="match_parent"
                android:layout_height="wrap_content"
                android:ellipsize="end"
                android:paddingBottom="2dp"
                android:singleLine="true"
                android:textSize="14sp"
                android:textStyle="bold"/>

        </LinearLayout>
    </LinearLayout>

</LinearLayout>
MainActivity:
import com.bumptech.glide.Glide;
import com.bumptech.glide.request.target.NotificationTarget;
import android.app.Activity;
import android.app.Notification;
import android.app.NotificationManager;
import android.content.Context;
import android.os.Bundle;
import android.support.v4.app.NotificationCompat;
import android.widget.RemoteViews;

public class MainActivity extends Activity {
    Context context;
    private final int NOTIFICATION_ID=1;
    private NotificationTarget notificationTarget;
    public static String[] eatFoodyImages = {
            "http://i.imgur.com/rFLNqWI.jpg",
            "http://i.imgur.com/C9pBVt7.jpg",
            "http://i.imgur.com/rT5vXE1.jpg",
            "http://i.imgur.com/aIy5R2k.jpg",
            "http://i.imgur.com/MoJs9pT.jpg",
            "http://i.imgur.com/S963yEM.jpg",
            "http://i.imgur.com/rLR2cyc.jpg",
            "http://i.imgur.com/SEPdUIx.jpg",
            "http://i.imgur.com/aC9OjaM.jpg",
            "http://i.imgur.com/76Jfv9b.jpg",
            "http://i.imgur.com/fUX7EIB.jpg",
            "http://i.imgur.com/syELajx.jpg",
            "http://i.imgur.com/COzBnru.jpg",
            "http://i.imgur.com/Z3QjilA.jpg",
    };
    @Override
    protected void onCreate(Bundle savedInstanceState) {
        super.onCreate(savedInstanceState);
        setContentView(R.layout.activity_main);
        context=this;
        final RemoteViews rv = new RemoteViews(context.getPackageName(), R.layout.activity_main);

        rv.setImageViewResource(R.id.remoteview_notification_icon, R.drawable.ic_launcher);

        rv.setTextViewText(R.id.remoteview_notification_headline, "Headline");
        rv.setTextViewText(R.id.remoteview_notification_short_message, "Short Message");

        // build notification
        NotificationCompat.Builder mBuilder =
            new NotificationCompat.Builder(context)
                .setSmallIcon(R.drawable.ic_launcher)
                .setContentTitle("Content Title")
                .setContentText("Content Text")
                .setContent(rv)
                .setPriority( NotificationCompat.PRIORITY_MIN);

        final Notification notification = mBuilder.build();

        // set big content view for newer androids
        if (android.os.Build.VERSION.SDK_INT >= 16) {
            notification.bigContentView = rv;
        }

        NotificationManager mNotificationManager = (NotificationManager) context.getSystemService(Context.NOTIFICATION_SERVICE);
        mNotificationManager.notify(NOTIFICATION_ID, notification);

        notificationTarget = new NotificationTarget(
                context,
                rv,
                R.id.remoteview_notification_icon,
                notification,
                NOTIFICATION_ID);

        Glide
        .with( context.getApplicationContext() ) // safer!
        .load( eatFoodyImages[3] )
        .asBitmap()
        .into( notificationTarget );
    }
}
步骤:
- 代码中我们首先定义一个RemoteViews 加载和设置值,
- 接着我们自定义了一个notification并将rv作为content传入,
- 接这new NotificationTarget ()将rv,notificaiton传入,
- 最后将配置好的notificationTarget 传入Glide.into()即可
App Widgets
如果你的程序中有widgets并且有图片来自网络,使用AppWidgetTarget将是非常方便的,下面看一个实例;
import com.bumptech.glide.Glide;
import com.bumptech.glide.request.target.AppWidgetTarget;
import android.appwidget.AppWidgetManager;
import android.appwidget.AppWidgetProvider;
import android.content.ComponentName;
import android.content.Context;
import android.widget.RemoteViews;

public class FSAppWidgetProvider extends AppWidgetProvider {

    private AppWidgetTarget appWidgetTarget;

    @Override
    public void onUpdate(Context context, AppWidgetManager appWidgetManager,
                         int[] appWidgetIds) {

        RemoteViews rv = new RemoteViews(context.getPackageName(), R.layout.activity_main);

        appWidgetTarget = new AppWidgetTarget( context, rv,R.id.remoteview_notification_icon, appWidgetIds );

        Glide
                .with( context.getApplicationContext() ) // safer!
                .load( MainActivity.eatFoodyImages[3] )
                .asBitmap()
                .into( appWidgetTarget );

        pushWidgetUpdate(context, rv);
    }

    public static void pushWidgetUpdate(Context context, RemoteViews rv) {
        ComponentName myWidget = new ComponentName(context, FSAppWidgetProvider.class);
        AppWidgetManager manager = AppWidgetManager.getInstance(context);
        manager.updateAppWidget(myWidget, rv);
    }
}
重要行是声明appWidgetTarget对象和Glide的构建。好消息是AppWidgetTarget你不需要进一步覆盖onResourceReady方法。Glide自动为你做好了。非常好!
十二、Glide — Exceptions: Debugging and Error Handling
Local Debugging
Glide的GeneralRequest类提供了一个方法来设置log级别。不幸的是,你不能容易的使用。然而,有一个非常简单的方法得到Glide的debug log。你所要做的就是通过使用命令行 adb shell 来激活它。打开终端,使用以下命令:
adb shell setprop log.tag.GenericRequest DEBUG 最后一个字段DEBUG是log等级,有如下几种:
- VERBOSE
- DEBUG
- INFO
- WARN
ERROR
例如你有一个图片不存在的错误,它会这样输出:
io.futurestud.tutorials.glide D/GenericRequest: load failed
io.futurestud.tutorials.glide D/GenericRequest: java.io.IOException: Request failed 404: Not Found
...
你已经猜到了,上述只能有错误在才能调试测试app,所以下面我们将讲解回调
General Exception Logging
Glide不提供直接访问GenericRequest类设置log记录,但是你可以捕获异常,以防出现错误的请求。例如,如果一个图像不可用,Glide(默默地)会抛出一个异常并会将drawable显示在你指定的. error()中。如果你明确想知道异常信息,你可以创建一个监听器并将其传递给.listener()方法:
为了防止被回收,我们必须将它定义在域字段
private RequestListener<String, GlideDrawable> requestListener = new RequestListener<String, GlideDrawable>() {
    @Override
    public boolean onException(Exception e, String model, Target<GlideDrawable> target, boolean isFirstResource) {
        // todo log exception

        // important to return false so the error placeholder can be placed
        return false;
    }

    @Override
    public boolean onResourceReady(GlideDrawable resource, String model, Target<GlideDrawable> target, boolean isFromMemoryCache, boolean isFirstResource) {
        return false;
    }
};
在onException方法()您可以捕获问题,决定你需要做什么,例如需要进行log记录。如果Glide处理结果,如显示一个错误占位符,你应该在onException方法返回false:
Glide
    .with( context )
    .load(UsageExampleListViewAdapter.eatFoodyImages[0])
    .listener( requestListener )
    .error( R.drawable.cupcake )
    .into( imageViewPlaceholder );
如果你返回false在onException()方法,. error()不需要进行log记录的工作,只会将你设置的drawable显示出来
十三.Glide — Custom Transformations
在前面的十二个博客,您已经了解了所需的所有基础利用Glide的标准功能。从这篇文章开始,我们将深入研究了一些高级的主题。本篇文章,我们将仔细看看Transformations。
Transformations
Transformations可以作为图像处理之前的图像被显示出来。例如,如果您的应用程序需要显示一个图像灰度,但只有获得原始fully-colored版本,您可以使用一个Transformations操作的位图使之从彩色版本变成惨淡的灰色。我们不能理解错了,Transformations并不局限于颜色。你可以改变任何一个图像的大小,颜色,像素,和更多!Glide已经附带两个Transformations,在之前图像调整时候有:fitCenter and centerCrop
Implementing Your Own Transformation
为了应用自己的自定义Transformation,您需要创建一个新类,它实现了Transformation interface。您需要实现的方法很复杂,你得有相当的洞察力,Glide的内部结构使它做得很好。如果你只是想改变常规的位图图像(没有gif /视频!),我们建议使用抽象BitmapTransformation类。它简化了实现不少,应该覆盖95%的用例。 所以,让我们看一个示例BitmapTransformation实现。
public class BlurTransformation extends BitmapTransformation {

    public BlurTransformation(Context context) {
        super( context );
    }

    @Override
    protected Bitmap transform(BitmapPool pool, Bitmap toTransform, int outWidth, int outHeight) {
        return null; // todo
    }

    @Override
    public String getId() {
        return null; // todo
    }
}
模糊图像渲染脚本:
public class BlurTransformation extends BitmapTransformation {

    private RenderScript rs;

    public BlurTransformation(Context context) {
        super( context );

        rs = RenderScript.create( context );
    }

    @Override
    protected Bitmap transform(BitmapPool pool, Bitmap toTransform, int outWidth, int outHeight) {
        Bitmap blurredBitmap = toTransform.copy( Bitmap.Config.ARGB_8888, true );

        // Allocate memory for Renderscript to work with
        Allocation input = Allocation.createFromBitmap(
            rs,
            blurredBitmap,
            Allocation.MipmapControl.MIPMAP_FULL,
            Allocation.USAGE_SHARED
        );
        Allocation output = Allocation.createTyped(rs, input.getType());

        // Load up an instance of the specific script that we want to use.
        ScriptIntrinsicBlur script = ScriptIntrinsicBlur.create(rs, Element.U8_4(rs));
        script.setInput(input);

        // Set the blur radius
        script.setRadius(10);

        // Start the ScriptIntrinisicBlur
        script.forEach(output);

        // Copy the output to the blurred bitmap
        output.copyTo(blurredBitmap);

        toTransform.recycle();

        return blurredBitmap;
    }

    @Override
    public String getId() {
        return "blur";
    }
}
如果你困惑的代码块transform(),请等待我模糊脚本渲染文章。getId()方法描述了一个独特的标识符对于这个特定的转换。Glide使用缓存系统的关键部分。确保你让它独一无二的以避免意想不到的问题。 在下一节中,我们将学习如何应用我们刚刚创建的转换。
Apply a Single Transformation
Glide有两种应用方式转换。
- 第一是你的类的一个实例作为参数传递给.transform()。可以是任何的Transformation,无论它是一个图像或Gif。
- 另一个选择是使用.bitmapTransform(),它只接受转换为位图。
因为我们实现上面是专为位图,我们可以使用:
Glide
    .with( context )
    .load( eatFoodyImages[0] )
    .transform( new BlurTransformation( context ) )
    //.bitmapTransform( new BlurTransformation( context ) ) // this would work too!
    .into( imageView1 );
这足以加载我们从网络获取的模糊算法图片
Apply Multiple Transformations
通常,Glide的连贯接口允许链接方法。然而Transformations的连贯并非如此。确保你只调用.transform()或.bitmapTransform()一次,或之前的配置将被覆盖!然而,你仍然可以申请多个转换通过多个对象作为参数转变成.transform()(或.bitmapTransform()):
Glide
    .with( context )
    .load( eatFoodyImages[1] )
    .transform( new GreyscaleTransformation( context ), new BlurTransformation( context ) )
    .into( imageView2 );
在这个代码片段中,我们应用一个灰度图像,然后模糊。
Glide执行自动转换。太棒了!
提示:当您使用转换,您不能使用.centerCrop()或.fitCenter()
Collection of Glide Transformations
如果你已经有一个想法什么样的Transformations可以使用在你的应用程序,看第二个库:glide-transformations。
它提供了一个各种滑动转换的整和,可能它已经存在你想的转换。 这个library附带两个不同的版本。扩展的版本包括更多的转换,如GPU。他们需要额外的依赖,所以设置为两个版本有点不同。你应该通过转换列表和决定使用哪个版本
Setup for Glide Transformations
配置是很容易的!对于基本的版本你可以添加另一个你当前的build.gradle行:
dependencies {
    compile 'jp.wasabeef:glide-transformations:2.0.0'
}
如果你想使用GPU的转换
repositories {
    jcenter()
    mavenCentral()
}

dependencies {
    compile 'jp.wasabeef:glide-transformations:2.0.0'
    compile 'jp.co.cyberagent.android.gpuimage:gpuimage-library:1.3.0'
}
Usage of Glide Transformations
在你同步Android studio与构建build.gradle文件,您可以使用转换集合。使用模式是一样的与你自定义转换一样。
假设我们想模糊集合的模糊图像变换:
Glide
    .with( context )
    .load( eatFoodyImages[2] )
    .bitmapTransform( new jp.wasabeef.glide.transformations.BlurTransformation( context, 25 ) )
    .into( imageView3 );
你也可以应用转换列表就像上面我们已经看到.bitmapTransform()方法接受两个,单个转换或者转换列表!
十四、Glide — Custom Animations with animate()
上篇博客,我们看了之前转换图像显示。本篇博客我们继续与动画图像的显示的操作。
Animation Basics
从图像到图像的平滑过渡它是非常重要的。用户在欣赏app的时候没有很大的改变,这就是Glide动画,Glide附带了一个标准的动画在软化UI的变化。在我们的第4篇中有提到.crossFade()
Glide提供两个选项设置动画。两个版本都是.animate()方法,只是传入不同的参数。
- 我们忽略了第三个动画:animate(Animation animation).
Animation from Resources
Glide
    .with( context )
    .load( eatFoodyImages[0] )
    .animate( android.R.anim.slide_in_left ) // or R.anim.zoom_in
    .into( imageView1 );
返回代码:第一个操作是通过一个Android资源id指向一个动画资源。一个简单的例子是Android系统提供的:android.R.anim.slide_in_left。其背后的代码仅仅是一个XML描述动画:
<?xml version="1.0" encoding="utf-8"?>
<set xmlns:android="http://schemas.android.com/apk/res/android">
    <translate android:fromXDelta="-50%p" android:toXDelta="0"
            android:duration="@android:integer/config_mediumAnimTime"/>
    <alpha android:fromAlpha="0.0" android:toAlpha="1.0"
            android:duration="@android:integer/config_mediumAnimTime" />
</set>
当然,您可以创建您自己的XML动画。例如,一个从小到大动画,开始图片小,然后扩大到全尺寸:
<?xml version="1.0" encoding="utf-8"?>
<set xmlns:android="http://schemas.android.com/apk/res/android"
     android:fillAfter="true">

    <scale
        android:duration="@android:integer/config_longAnimTime"
        android:fromXScale="0.1"
        android:fromYScale="0.1"
        android:pivotX="50%"
        android:pivotY="50%"
        android:toXScale="1"
        android:toYScale="1"/>

</set>
动画在网络请求加载时就已经准备好了
Animation via Custom Class
通过实现ViewPropertyAnimation.Animator接口
接口是简单的事情,你只需要实现void animate(View view)方法。这个View对象是整个target View。如果它是一个自定义View,您可以找到你的view的子元素,并做必要的动画。
让我们看一个简单的例子。假设你想通过编程实现一个fading(衰弱)的动画,你需要创建动画对象:
ViewPropertyAnimation.Animator animationObject = new ViewPropertyAnimation.Animator() {
    @Override
    public void animate(View view) {
        // if it's a custom view class, cast it here
        // then find subviews and do the animations
        // here, we just use the entire view for the fade animation
        view.setAlpha( 0f );

        ObjectAnimator fadeAnim = ObjectAnimator.ofFloat( view, "alpha", 0f, 1f );
        fadeAnim.setDuration( 2500 );
        fadeAnim.start();
    }
};
接下来在Glide中设置请求
Glide
    .with( context )
    .load( eatFoodyImages[1] )
    .animate( animationObject )
    .into( imageView2 );
当然,在你的动画对象的animate(View view)的方法,你可以做任何你想做的视图。用你的动画展现创意。
十五、Glide — Integrating Networking Stacks
一个重要的模块是从网络通过HTTP/HTTPS协议下载图片显示。已经有不少开发人员对于网络提供了框架。每个框架都有自己的优点和缺点。最后,框架的归结为项目和开发人员的个人品味。
从理论上讲,Glide可以处理任何实现,满足基本的网络功能。将网络用在Glide并非完全无缝的。它需要一个接口Glide’s ModelLoader。
为了使你的开发更容易,Glide提供了实现两个网络库:OkHttp和 Volley。
OkHttp 2
让我们假设你想要集成OkHttp 2作为Glide的网络框架。集成可以通过声明一个GlideModule手动完成。如果你想避免手工实现,只需要打开您的构建。gradle并添加以下两行你的依赖关系:
dependencies {
    // your other dependencies
    // ...

    // Glide
    compile 'com.github.bumptech.glide:glide:3.7.0'

    // Glide's OkHttp2 Integration
    compile 'com.github.bumptech.glide:okhttp-integration:1.4.0@aar'
    compile 'com.squareup.okhttp:okhttp:2.7.5'
}
Gradle将自动合并必要的GlideModule 到你的AndroidManifest。清单文件中Glide会认出它的存在和使用OkHttp所有网络连接。
Volley
如果使用Volley,你必须改变build.gradle:
dependencies {
    // your other dependencies
    // ...

    // Glide
    compile 'com.github.bumptech.glide:glide:3.7.0'

    // Glide's Volley Integration
    compile 'com.github.bumptech.glide:volley-integration:1.4.0@aar'
    compile 'com.mcxiaoke.volley:library:1.0.8'
}
Volley集成库添加到您的项目。集成库添加GlideModule到你的 AndroidManifest。Glide会自动识别它并使用Volley作为网络框架。不需要进一步配置!
警告:如果你声明两个库在你的build.gradle,都将得到增加。因为Glide不负载在任何特定的顺序,你将会出现一个不稳定的情况,因为Glide不清楚使用哪个网络框架了。确保你只添加一个集成库。
OkHttp 3
如果使用OkHttp3,你必须改变build.gradle:
dependencies {
    // your other dependencies
    // ...

    // Glide
    compile 'com.github.bumptech.glide:glide:3.7.0'

    // Glide's OkHttp3 Integration
    compile 'com.github.bumptech.glide:okhttp3-integration:1.4.0@aar'
    compile 'com.squareup.okhttp3:okhttp:3.2.0'
}
Other Networking Libraries
如果你想使用其他的网络框架,那么你是倒霉的,因为Glide不会自动配置除了Volly,OKHttp2&OkHttp3,然而你还是去GitHub上参考实现这Volly还有OkHttp2&OkHtp3
十六、Glide — How to Rotate Images
一段时间前,我们有一个问题关于如何用Glide旋转图像,因为Picasso提供 out-of-the-box的函数。不幸的是,Glide并没有提供一个方法调用,但在这篇文章我们将向您展示如何让它几乎一样容易。
How to Rotate Images with Glide
实际上 android.graphics.Matrix类提供了我们需要的(以及更多)。旋转图像的代码片段非常简单:
Bitmap toTransform = ... // your bitmap source

Matrix matrix = new Matrix();
matrix.postRotate(rotateRotationAngle);

Bitmap.createBitmap(toTransform, 0, 0, toTransform.getWidth(), toTransform.getHeight(), matrix, true);
为了使它更有用,特别是在使用Glide的情况下,我们将包装这个BitmapTransformation:
public class RotateTransformation extends BitmapTransformation {

    private float rotateRotationAngle = 0f;

    public RotateTransformation(Context context, float rotateRotationAngle) {
        super( context );

        this.rotateRotationAngle = rotateRotationAngle;
    }

    @Override
    protected Bitmap transform(BitmapPool pool, Bitmap toTransform, int outWidth, int outHeight) {
        Matrix matrix = new Matrix();

        matrix.postRotate(rotateRotationAngle);

        return Bitmap.createBitmap(toTransform, 0, 0, toTransform.getWidth(), toTransform.getHeight(), matrix, true);
    }

    @Override
    public String getId() {
        return "rotate" + rotateRotationAngle;
    }
}
如果你不确定发生了什么在这个类中,去看我的第13篇,这将给你所有你需要知道的。 最后,让我们看看我们新的转换的几个例子:
private void loadImageOriginal() {
    Glide
        .with( context )
        .load( eatFoodyImages[0] )
        .into( imageView1 );
}

private void loadImageRotated() {
    Glide
        .with( context )
        .load( eatFoodyImages[0] )
        .transform( new RotateTransformation( context, 90f ))
        .into( imageView3 );
}
效果图:
当然,你可以改变第二个参数,表示图像要旋转多少度的,任何你所需要的。
读者可以自行研究下
资料:https://futurestud.io/tutorials/glide-customize-glide-with-modules
Glide结语:提升自己的同时希望能帮到大家,谢谢!
1.2 Picasso
一、Picasso — Getting Started & Simple Loading
注:因为Picasso和Glide基本类似,所以写Picasso不会细讲
Gradle:
compile 'com.squareup.picasso:picasso:2.5.2'First Peek: Loading Image from a URL
ImageView targetImageView = (ImageView) findViewById(R.id.imageView);
String internetUrl = "http://i.imgur.com/DvpvklR.png";

Picasso
    .with(context)
    .load(internetUrl)
    .into(targetImageView);
- with(Context context) -Context是许多Android API需要调用的,Picasso在这里也是一样的。
- load(String imageUrl) -这里你可以指定加载的图片是哪个,大多数它是一个String类型的url去加载网络图片
- into(ImageView targetImageView) -这是是你图片显示的目标ImageView
就是这样!如果图像URL存在和你ImageView可见的话,你在几秒钟会看到图像。如果图像不存在,Picasso将返回错误回调,我们以后再看。通过例子你可能相信Picasso对你是有用的,但这只是冰山一角。
二、Picasso — Advanced Loading
Loading from Resources
nt resourceId = R.mipmap.ic_launcher;

Picasso
    .with(context)
    .load(resourceId)
    .into(imageViewResource);
Loading from File
File file = new File(Environment.getExternalStoragePublicDirectory(Environment.DIRECTORY_PICTURES), "Running.jpg");

Picasso
    .with(context)
    .load(file)
    .into(imageViewFile);
Loading from Uri
Uri uri = resourceIdToUri(context, R.mipmap.future_studio_launcher);

Picasso
    .with(context)
    .load(uri)
    .into(imageViewUri);
这个帮助函数是简单的将资源文件转换成Uri
public static final String ANDROID_RESOURCE = "android.resource://";
public static final String FOREWARD_SLASH = "/";

private static Uri resourceIdToUri(Context context, int resourceId) {
    return Uri.parse(ANDROID_RESOURCE + context.getPackageName() + FOREWARD_SLASH + resourceId);
}
三、Picasso — Adapter Use (ListView, GridView, …)
主界面代码:
package com.example.jhl.picassodemo;

import android.support.v7.app.AppCompatActivity;
import android.os.Bundle;
import android.widget.ListView;

public class MainActivity extends AppCompatActivity {

    public static String[] eatFoodyImages = {
            "http://i.imgur.com/rFLNqWI.jpg",
            "http://i.imgur.com/C9pBVt7.jpg",
            "http://i.imgur.com/rT5vXE1.jpg",
            "http://i.imgur.com/aIy5R2k.jpg",
            "http://i.imgur.com/MoJs9pT.jpg",
            "http://i.imgur.com/S963yEM.jpg",
            "http://i.imgur.com/rLR2cyc.jpg",
            "http://i.imgur.com/SEPdUIx.jpg",
            "http://i.imgur.com/aC9OjaM.jpg",
            "http://i.imgur.com/76Jfv9b.jpg",
            "http://i.imgur.com/fUX7EIB.jpg",
            "http://i.imgur.com/syELajx.jpg",
            "http://i.imgur.com/COzBnru.jpg",
            "http://i.imgur.com/Z3QjilA.jpg",
    };

    ListView lv_image;
    @Override
    protected void onCreate(Bundle savedInstanceState) {
        super.onCreate(savedInstanceState);
        setContentView(R.layout.activity_main);
        lv_image= (ListView) findViewById(R.id.lv_image);
        lv_image.setAdapter(new ImageListAdapter(MainActivity.this, eatFoodyImages));
    }
}
主布局:
<?xml version="1.0" encoding="utf-8"?>
<RelativeLayout
    xmlns:android="http://schemas.android.com/apk/res/android"
    xmlns:tools="http://schemas.android.com/tools"
    android:layout_width="match_parent"
    android:layout_height="match_parent"
    android:paddingBottom="@dimen/activity_vertical_margin"
    android:paddingLeft="@dimen/activity_horizontal_margin"
    android:paddingRight="@dimen/activity_horizontal_margin"
    android:paddingTop="@dimen/activity_vertical_margin"
    tools:context="com.example.jhl.picassodemo.MainActivity">

    <ListView
        android:layout_width="wrap_content"
        android:layout_height="wrap_content"
        android:id="@+id/lv_image"/>
</RelativeLayout>
适配器:
package com.example.jhl.picassodemo;

import android.content.Context;
import android.view.LayoutInflater;
import android.view.View;
import android.view.ViewGroup;
import android.widget.ArrayAdapter;
import android.widget.ImageView;

import com.squareup.picasso.Picasso;

/**
 * Created by wt on 2016/12/28.
 */
public class ImageListAdapter extends ArrayAdapter {
    private Context context;
    private LayoutInflater inflater;

    private String[] imageUrls;

    public ImageListAdapter(Context context, String[] imageUrls) {
        super(context, R.layout.listview_item_image, imageUrls);

        this.context = context;
        this.imageUrls = imageUrls;

        inflater = LayoutInflater.from(context);
    }

    @Override
    public View getView(int position, View convertView, ViewGroup parent) {
        if (null == convertView) {
            convertView = inflater.inflate(R.layout.listview_item_image, parent, false);
        }

        Picasso
                .with(context)
                .load(imageUrls[position])
                .fit() // will explain later
                .into((ImageView) convertView);

        return convertView;
    }
}
item布局:
<?xml version="1.0" encoding="utf-8"?>
<ImageView xmlns:android="http://schemas.android.com/apk/res/android"
           android:layout_width="match_parent"
           android:layout_height="200dp"/>
我们将每个图片额高度限制为200dp,宽度设置为和设备一样,可能不是很漂亮,但这只是作为我们的一小练习。
效果图:

作为andorid程序员你应该知道ListView在快速和平滑的时候会不断创建layout,Picasso好处之一就是自动帮我们取消请求,清除ImageView,和加载适当的图片在ImageView
注:适配器中有一个操作是帮助我们优化适配器的fit()和tags();
A Strength of Picasso: Caching
上下滚动很多时,你会发现图像显示比以前快得多。你可以认为这些图片来自缓存和不从网络加载了。Picasso的缓存实现全面的和让我们加载图片变得更简单。实现缓存的大小取决于设备的磁盘大小。
当加载一张图片时,Picasso使用三个资源:内存,磁盘,和网络(顺序从最快到最慢),这里我们不需要做任何事情,因为Picasso将所有的复杂事情隐藏了,和智能的帮我们创建一个缓存大小。关于更多缓存我们将在以后章节细谈。
GridView
<?xml version="1.0" encoding="utf-8"?>
<GridView
    android:id="@+id/usage_example_gridview"
    xmlns:android="http://schemas.android.com/apk/res/android"
    android:layout_width="match_parent"
    android:layout_height="wrap_content"
    android:numColumns="2"/>
关于GridView我们仍然可以使用和ListView相同的适配器,只需要将主界面更改成如上所示
效果图:

以上的ListVIew和GridView中我们只是简单的去加载一张图片,实际开发中肯定不只单独一个ImageView,我们只需要更改适配器中的getView()方法,Picasso的用法还是一样的。
四、Picasso — How to Deal with Null/Empty Values (in ListViews)
首先,开发者遇到
IllegalArgumentException: Path must not be empty其次,开发者要确保app是否是使用不完整的图片集合在ListView中
我们将接着使用第三节中的ListView中的代码:
public class SimpleImageListAdapter extends ArrayAdapter {
    private Context context;
    private LayoutInflater inflater;

    private String[] imageUrls;

    public SimpleImageListAdapter(Context context, String[] imageUrls) {
        super(context, R.layout.listview_item_image, imageUrls);

        this.context = context;
        this.imageUrls = imageUrls;

        inflater = LayoutInflater.from(context);
    }

    @Override
    public View getView(int position, View convertView, ViewGroup parent) {
        // changed, see next code blog
    }
}
现在我们看到getView()方法,首先,你可以捕获图片URL是否为空和是一个空的字符串,幸运的是,android提供了方法帮助我们判断TextUtils.isEmpty();
如果图片URL是空,你想做什么呢?你可能想丢弃这个空ImageView,或者显示一个占位符和Glide一样。
Option 1: Leave ImageView Empty
如果你想要丢弃这个空的ImagView,你需要取消Picasso请求 使用cancelRequest();它确保在特定的图片中请求不能被打开。当用户在一个ListView上滑动非常迅速的时候,ImageView被系统不断使用,这可能发生。这样就避免了一个错误的图片在ListView显示。
然后你可以重置ImageView,你不需要Picasso清空这个ImageView。你可以调用imageView.setImageDrawable(null);然而你得确保你的UI看起来不能怪怪的,因为ImageView可能占满整个UI。
Option 2: Display Placeholder
另一种方式是使用一个占位符代替这个空的ImageView。具体使用哪个操作适合我们取决你的意见和实际情况。
如果你决定使用占位符,你可以使用常规的
.load().info(imageView)去加载一个占位符。
如果你使用Picasso做这个操作,你不需要调用cancelReuqest(),因为Picasso不会自动请求一个图片在这个ImageView上。
Example for the getView() Method
@Override
public View getView(int position, View convertView, ViewGroup parent) {
    if (null == convertView) {
        convertView = inflater.inflate(R.layout.listview_item_image, parent, false);
    }

    ImageView imageView = (ImageView) convertView;

    if (TextUtils.isEmpty(imageUrls[position])) {
        // option 1: cancel Picasso request and clear ImageView
        Picasso
                .with(context)
                .cancelRequest(imageView);

        imageView.setImageDrawable(null);

        // option 2: load placeholder with Picasso
        /*
        Picasso
                .with(context)
                .load(R.drawable.floorplan)
                .into(imageView);
        */
    }
    else {
        Picasso
                .with(context)
                .load(imageUrls[position])
                .fit() // will explain later
                 .into(imageView);
    }

    return convertView;
}
我们改变getView()方法,捕获当图片额URL是空的情况,目前,我们使用的是第一中方式去操作我们的空的图片。
五、Picasso — Placeholders, Errors and Fading
Placeholder: .placeholder()
我们可能甚至不需要解释或讨论:空imageview在任何界面不好看。如果您使用的是Picasso,你最有可能是加载图像通过一个网络连接。根据用户的环境中,这可能要花费大量的时间。一个应用程序的预期行为是显示一个占位符,直到图像加载和处理。
Picasso为我们提供了方便的接口去显示一个占位符
.placeHolder()
和传入一个drawable资源和Picasso将一个显示这个占位符知道你实际要加载的图片显示。
Picasso
    .with(context)
    .load(UsageExampleListViewAdapter.eatFoodyImages[0])
    .placeholder(R.mipmap.ic_launcher) // can also be a drawable
    .into(imageViewPlaceholder);
显而易见,你不能使用一个网络图片去作为占位符,因为加载需要时间,所以我们必须使用一个app中的drawablw资源,因为它是可获得的,然而,对于load()中额参数,它可以是任意一个值,这就可能导致我们的图片不能被加载(没有网络或者服务器停止等),在下面我们将讨论关乎error占位符。
Error Placeholder: .error()
显示一个错误的占位符和我们上一个篇基本相似,只是这里使用的是error():
Picasso
    .with(context)
    .load("http://futurestud.io/non_existing_image.png")
    .placeholder(R.mipmap.ic_launcher) // can also be a drawable
    .error(R.mipmap.future_studio_launcher) // will be displayed if the image cannot be loaded
    .into(imageViewError);
当我们从网站加载的图片不能被加载的时候,R.mipmap.future_studio_launcher将作为ImageView的显示,error的参数和之前的一样只能是已经存在的资源。(R.drawable.)。
Use of noFade()
无论你显示还是不显示占位符在图片加载之前,Picasso自动会使用fades将图片柔和的显示在ImageView中,但是如果你希望立即显示图片没有fades效果,你可以调用.noFade()在你的Picasso对象中:
Picasso
    .with(context)
    .load(UsageExampleListViewAdapter.eatFoodyImages[0])
    .placeholder(R.mipmap.ic_launcher) // can also be a drawable
    .error(R.mipmap.future_studio_launcher) // will be displayed if the image cannot be loaded
    .noFade()
    .into(imageViewFade);
Use of noPlaceholder()
让我们假设有这么一种情况:你想加载一张图片在一个ImageView,一段时间后,你又想加载一个不同的图片在这个相同的ImageView中。在之前的Picasso配置上,我们在创建一个Picasso,因为我们之前的Picasso可能设置了.placeHolder(),所以当我们加载第二张图片的时候它会先显示一张占位图在ImageView然后再去显示我们的第二张图片,但是这样的UI效果可能是丑陋的或者不是我们想要的,这时候我们就可以在第二个Picasso中使用
.nPlaceHolder()这将会在第二张图片显示之前一直显示第一张图片,这样的结果可能能给用户更舒适的体验。
// load an image into the imageview
Picasso
    .with(context)
    .load(UsageExampleListViewAdapter.eatFoodyImages[0])
    .placeholder(R.mipmap.ic_launcher) // can also be a drawable
    .into(imageViewNoPlaceholder, new Callback() {
        @Override
        public void onSuccess() {
            // once the image is loaded, load the next image
            Picasso
                .with(context)
               .load(UsageExampleListViewAdapter.eatFoodyImages[1])
               .noPlaceholder() // but don't clear the imageview or set a placeholder; just leave the previous image in until the new one is ready
               .into(imageViewNoPlaceholder);
        }

        @Override
        public void onError() {

        }
    });
通过此段代码我们在加载完第一个图片之后去加载第二张图片并不会去显示占位符。
如果你对.into(imageView, callback)困惑的话,不要担心,我将会在以后讲解。
六、Picasso — Image Resizing, Scaling and fit()
通常我们的服务器或者API需要我们提供一个准确的图片尺寸,以至提高我们的带宽,节省内存,提高图片的质量等。
Picasso提供了
resize(horizontalSize,verticalSize)去改变图片显示适当的大小,这将在图片显示在ImageView之前调用。
Picasso
    .with(context)
    .load(UsageExampleListViewAdapter.eatFoodyImages[0])
    .resize(600, 200) // resizes the image to these dimensions (in pixel). does not respect aspect ratio
    .into(imageViewResize);
Use of scaleDown()
当我们使用 resize()操作将提高图片的质量,因为一张小图片大大提高了图片的质量,但是却浪费了电脑的时间,我们可以调用onlyScaleDown();仅仅当resize()的图片大小小于我们的原始图片的时候应用。
Picasso
    .with(context)
    .load(UsageExampleListViewAdapter.eatFoodyImages[0])
    .resize(6000, 2000)
    .onlyScaleDown() // the image will only be resized if it's bigger than 6000x2000 pixels.
    .into(imageViewResizeScaleDown);
大多数操作中,resize图片实际上会扭曲图片显示比率,以至于图片很丑,如果你想预防这种事情发生,Picasso提供了两个选择调用centerCrop()或者centerInside()
CenterCrop
CenterCrop()是一中裁剪技术它将填充整个ImageView和裁剪这特定的区域,ImageView将会被填充完成,但是图片可能显示不完全。
Picasso
    .with(context)
    .load(UsageExampleListViewAdapter.eatFoodyImages[0])
    .resize(600, 200) // resizes the image to these dimensions (in pixel)
    .centerCrop()
    .into(imageViewResizeCenterCrop);
CenterInside
CenterInside()表示图片显示在ImageView的内部,也就是图片的大小小于或者等于ImageView的大小,这个时候图片将会使显示完整,但是可能不会填充整个ImageView。
Picasso
    .with(context)
    .load(UsageExampleListViewAdapter.eatFoodyImages[0])
    .resize(600, 200)
    .centerInside()
    .into(imageViewResizeCenterInside);
Last, but not least: Picasso’s fit()
Picasso
    .with(context)
    .load(UsageExampleListViewAdapter.eatFoodyImages[0])
    .fit()
    // call .centerInside() or .centerCrop() to avoid a stretched image
    .into(imageViewFit);
fit()是测量标准的图片尺寸和内部使用resize()减少图片尺寸大小在ImageView,这里有两件事关于fit(),首先,fit()能够延迟加载图片,因为Picasso需要等到图片能够被测量,第二,使用fit()仅仅当ImageView作为一个目标显示。
它的有点是加载更低的分辨率进内存而不影响图片质量,较低的分辨率意味着更少的数据保存在缓存中。这可以显著降低图像的影响应用程序的内存占用。总之,如果你喜欢较低的内存的影响在一个更快的加载时间,fit()是一个很好的方式。
七、Picasso — Ordering Requests by Image Priority
Priority: High, Medium, Low
你可能不会考虑一个特定的场景,但是如果你需要优先考虑图像加载,可以使用priority()。这将需要三个常数之一HIGH, MEDIUM, or LOW。默认情况下,所有请求优先级中。分配不同的优先级将影响Picasso的加载方式。
Example: XML Layout
<ScrollView xmlns:android="http://schemas.android.com/apk/res/android"
        android:layout_width="match_parent"
        android:layout_height="wrap_content">

    <LinearLayout
        android:layout_width="match_parent"
        android:layout_height="wrap_content"
        android:orientation="vertical">

        <ImageView
            android:id="@+id/activity_request_priority_hero"
            android:layout_width="match_parent"
            android:layout_height="200dp"
            android:layout_margin="5dp"/>

        <TextView
            android:id="@+id/textView"
            android:layout_width="wrap_content"
            android:layout_height="wrap_content"
            android:layout_margin="5dp"
            android:text="Sweets"
            android:textAppearance="?android:attr/textAppearanceLarge"/>

        <TextView
            android:id="@+id/textView2"
            android:layout_width="wrap_content"
            android:layout_height="wrap_content"
            android:layout_margin="5dp"
            android:text="Lorem Ipsum is simply dummy text"/>

        <LinearLayout
            android:layout_width="match_parent"
            android:layout_height="100dp"
            android:layout_gravity="center_horizontal"
            android:orientation="horizontal">

            <ImageView
                android:id="@+id/activity_request_priority_low_left"
                android:layout_width="0dp"
                android:layout_height="match_parent"
                android:layout_weight="1"/>

            <ImageView
                android:id="@+id/activity_request_priority_low_right"
                android:layout_width="0dp"
                android:layout_height="match_parent"
                android:layout_weight="1"/>
        </LinearLayout>

    </LinearLayout>
</ScrollView>
这个XML文件并不重要,重要的是理解它的转换,效果图:
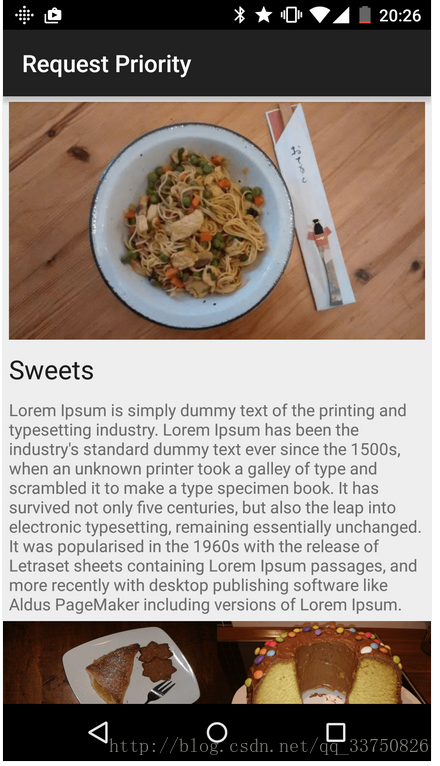
Example: Activity Code
在我们的activity中,我们西药加载图片到三个ImageView,你现在应该知道正确的使用Picasso请求,这里图片是高的优先级:
Picasso
    .with(context)
    .load(UsageExampleListViewAdapter.eatFoodyImages[0])
    .fit()
    .priority(Picasso.Priority.HIGH)
    .into(imageViewHero);
下面的两张图片是低的优先级:
Picasso
    .with(context)
    .load(UsageExampleListViewAdapter.eatFoodyImages[1])
    .fit()
    .priority(Picasso.Priority.LOW)
    .into(imageViewLowPrioLeft);

Picasso
    .with(context)
    .load(UsageExampleListViewAdapter.eatFoodyImages[2])
    .fit()
    .priority(Picasso.Priority.LOW)
    .into(imageViewLowPrioRight);
重要的是理解,这个排序使得picasso请求没有很大的意义,确保你的Picasso Priorities不是影响Picasso请求排序。
八、Picasso — Request Management by Grouping of Images via Tag()
Idea of Picasso’s tag()
在过去的博客文章中,您已经了解了如何优化特定的图像。这可能是不够的,如果你需要取消、暂停或恢复多个图像在同一时间。如果你的View改变迅速,它将有利取消所有的图片请求之前,划过的屏幕和启动图片在新的View。Picasso覆盖方法tag().
tag(Object object)可以携带任何的java对象作为参数。因此,您可以基于任何逻辑构建图像组。你有以下选项与图像组:
pause requests with pauseTag()
resume requests with resumeTag()
cancel requests with cancelTag().
基本上,当你需要暂停或取消一个或多个图片的加载,应用一个tag,然后调用相应的方法。这听起来可能有点抽象,让我们看一个例子。
Example #1: pauseTag() and resumeTag()
picasso tag的使用标准的例子是一个ListView。让我们猜想一个收件箱视图显示发送者发送的消息。发送者通过一张个人照片代替他们。

现在,让我们考虑以下场景:用户正在寻找一个旧消息并向下滚动快速的动作。ListView迅速回收和重用item。如果正确实现适配器,它会是一个平滑的体验。然而,Picasso会开始请求每一行,然后又马上取消,因为用户滚动列表时,那么快。
它将是更有效的暂停图片加载直到这个不再fling状态,用户感觉不到任何的差异,但是你app大大减少了请求的数量
实现也是很容易的,首先增加一个tags在你的Picasso请求。
Picasso
    .with(context)
    .load(UsageExampleListViewAdapter.eatFoodyImages[0])
    .tag("Profile ListView") // can be any Java object
    .into(imageViewWithTag);

Second, implement a `AbsListView.OnScrollListener` and override `onScrollStateChanged()`:

@Override
  public void onScrollStateChanged(AbsListView view, int scrollState) {
    final Picasso picasso = Picasso.with(context);

    if (scrollState == SCROLL_STATE_IDLE || scrollState == SCROLL_STATE_TOUCH_SCROLL) {
          picasso.resumeTag(context);
    } else {
          picasso.pauseTag(context);
    }
  }
最后,设置ListView的监听事件:
ListView listView = ... // e.g. findById()
listView.setOnScrollListener(onScrollListener);
当ListView的滑动状态改变成fling时,它暂停所有的请求,当这滑动状态返回idle和常规的滑动时,它将继续请求。
Example #2: cancelTag()
上一个ListView没有使用cacelTag()方法,让我们看一个不同的例子。你实现一个购物车,你显示所有选中的商品图片,当用户点击”Buy”的按钮,你显示一个ProgressDialog请求服务器并检验交易是否有效,当用户点击”Buy”:的按钮,之前购物车中的Item清单应该部分隐藏,因为通过继续加载item图片时去加重这设备的网络请求,电池和内存。
我们可以优化这种行为通过调用.cancelTag()之后显示ProgressDialog将被显示出来
public void buyButtonClick(View v) {
    // display ProgressDialog
    // ...

    // stop image requests
    Picasso
        .with(context)
        .cancelTag("ShoppingCart");

    // make 'buy'-request to server
    // ...
}
Summary and A Warning
这两个例子只是冰山一角的你能做的tag要求。根据您的用例中,您可能想使用一个不同的对象作为标记。这篇博客使用字符串,但是您可以使用任何东西。有些人可能会想要使用Context(或Activity,Fragment)对象作为tag。虽然这是可能的,通过多种方法是智慧的,记住以下官方javadoc的警告:
Picasso will keep a reference to the tag for as long as this tag is paused and/or has active requests. Look out for potential leaks.
换句话说,如果用户离开了一个你暂停Picasso的加载图片Activity,,垃圾收集器可能无法销毁Activity对象。这是一个标准的例子内存泄漏。
九、Picasso — Callbacks, RemoteViews and Notifications
Callbacks and Targets
在我们进入回调之前,它可能是值得指出各种方法来加载一个图像。Picasso一般提供了同步和异步加载。
Difference between fetch(), get() and Target
.fetch()将在一个后台线程异步加载图片,但是在ImageView既不会显示,也不返回Bitmap。这个方法只保存图像到磁盘和内存缓存。如果你需要想减少图片加载时间,它可以用来填补在后台缓存的图片。
. get()同步加载图像和返回一个Bitmap对象。确保你不是从UI线程调用. get()。将冻结UI !
除了使用.into()擦偶作,还有另一个方法callbacks。在Picasso的语言命名Targets。
Use Target as Callback Mechanism
到目前为止,我们一直使用一个ImageView作为.into参数()。这不是.into()完整的功能。还可以使用Target接口的一个实现。
Picasso将加载图片和之前一样,但是替代显示ImageView的是它返回的是一个Bitmap(或者一个错误)对于Target回调
首先看下我们之前一个例子:
Picasso
    .with(context)
    .load(UsageExampleListViewAdapter.eatFoodyImages[0])
    .into(target);
实现一个Traget:
private Target target = new Target() {
    @Override
    public void onBitmapLoaded(Bitmap bitmap, Picasso.LoadedFrom from) {
        // loading of the bitmap was a success
        // TODO do some action with the bitmap
    }

    @Override
    public void onBitmapFailed(Drawable errorDrawable) {
        // loading of the bitmap failed
        // TODO do some action/warning/error message
    }

    @Override
    public void onPrepareLoad(Drawable placeHolderDrawable) {

    }
};
如果成功,这个回调将接收一个bitmap对象和一个Picasso.LoadedFrom对象。之后将指定如果你的图片来自缓存或者网络。在这一点上,你可以对bitmap做任何你需要做的事情。
总之,当你需要原始位图使用要么. get()或实现Target来接收图像。
重要的是:总是将实现Target声明成一个字段域,不能匿名,否则垃圾回收机制将销毁你的target对象使你永远得不到Biamap。
Load Images to Custom Notifications with RemoteViews
一个新特性是加载图像到RemoteViews。RemoteViews用于Widgets和 custom notification layouts.
让我们来看一个例子为一个自定义通知和RemoteViews。如果你感兴趣的自定义通知布局,你可能知道如何构建通知。
// create RemoteViews
final RemoteViews remoteViews = new RemoteViews(getPackageName(), R.layout.remoteview_notification);

remoteViews.setImageViewResource(R.id.remoteview_notification_icon, R.mipmap.future_studio_launcher);

remoteViews.setTextViewText(R.id.remoteview_notification_headline, "Headline");
remoteViews.setTextViewText(R.id.remoteview_notification_short_message, "Short Message");

remoteViews.setTextColor(R.id.remoteview_notification_headline, getResources().getColor(android.R.color.black));
remoteViews.setTextColor(R.id.remoteview_notification_short_message, getResources().getColor(android.R.color.black));

// build notification
NotificationCompat.Builder mBuilder = new NotificationCompat.Builder(UsageExampleTargetsAndRemoteViews.this)
    .setSmallIcon(R.mipmap.future_studio_launcher)
    .setContentTitle("Content Title")
    .setContentText("Content Text")
    .setContent(remoteViews)
    .setPriority(NotificationCompat.PRIORITY_MIN);

final Notification notification = mBuilder.build();

// set big content view for newer androids
if (android.os.Build.VERSION.SDK_INT >= 16) {
    notification.bigContentView = remoteViews;
}
这一切都是用自定义布局创建一个通知。我们不会进入细节,因为它不是本教程的一部分。有趣的是下一步:加载图片到ImageView。
Picasso调用非常简单。类似于imageview,我们使用.into()方法函数写好RemoteViews。然而,不同的参数:
.into(android.widget.RemoteViews remoteViews, int viewId, int notificationId, android.app.Notification notification)Picasso
.with(UsageExampleTargetsAndRemoteViews.this)
.load(UsageExampleListViewAdapter.eatFoodyImages[0])
.into(remoteViews, R.id.remoteview_notification_icon, NOTIFICATION_ID, notification);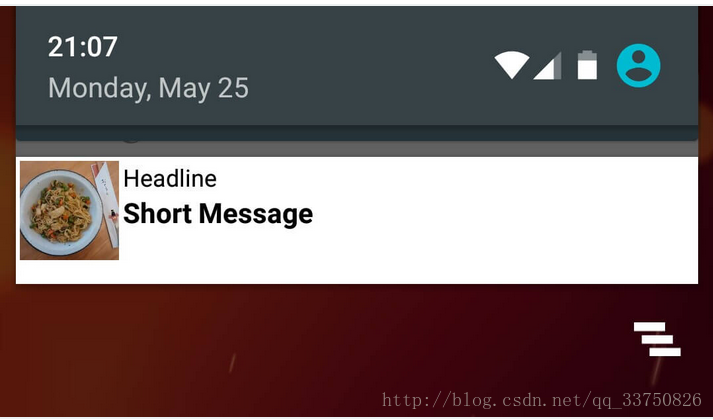
如果你对加载图片到Widgets感兴趣,你还可以参考另外一个.into():
into(android.widget.RemoteViews remoteViews, int viewId, int[] appWidgetIds)十、Picasso — Image Rotation and Transformation
Image Rotation
Picasso支持simple和complx的rotation
Simple Rotation
简单的旋转调用是这样的:rotate(float degrees)。这个简单的旋转图像通过角度的作为参数传递。角度值> 0 < 360度才是有意义(0到360的图像依然完好无损)。让我们看一个代码示例:
Picasso
    .with(context)
    .load(UsageExampleListViewAdapter.eatFoodyImages[0])
    .rotate(90f)
    .into(imageViewSimpleRotate);
Complex Rotation
默认的,旋转中心是屏幕的左上交,坐标原点(0,0),但是有时候大概我们需要改变旋转中心,你可以使用rotate(float degrees, float pivotX, float pivotY).:
Picasso
    .with(context)
    .load(R.drawable.floorplan)
    .rotate(45f, 200f, 100f)
    .into(imageViewComplexRotate);
Transformation
旋转只是一小部分的图片处理操作,Picasso有足够的方法允许们去操作图片,你可以实现一个Transformation和实现它主要的方法transform(android.graphice.Bitmap source).这个方法携带一个bitmap和返回转换后的图片
在实现你的Transformation之前你可以简单的设置transform(Transfromation transfromation)在你的Picasso项目中,这将导致图像转换才会显示出来。
Example #1: Blurring an Image
public class BlurTransformation implements Transformation {

    RenderScript rs;

    public BlurTransformation(Context context) {
        super();
        rs = RenderScript.create(context);
    }

    @Override
    public Bitmap transform(Bitmap bitmap) {
        // Create another bitmap that will hold the results of the filter.
        Bitmap blurredBitmap = bitmap.copy(Bitmap.Config.ARGB_8888, true);

        // Allocate memory for Renderscript to work with
        Allocation input = Allocation.createFromBitmap(rs, blurredBitmap, Allocation.MipmapControl.MIPMAP_FULL, Allocation.USAGE_SHARED);
        Allocation output = Allocation.createTyped(rs, input.getType());

        // Load up an instance of the specific script that we want to use.
        ScriptIntrinsicBlur script = ScriptIntrinsicBlur.create(rs, Element.U8_4(rs));
        script.setInput(input);

        // Set the blur radius
        script.setRadius(10);

        // Start the ScriptIntrinisicBlur
        script.forEach(output);

        // Copy the output to the blurred bitmap
        output.copyTo(blurredBitmap);

        bitmap.recycle();

        return blurredBitmap;
    }

    @Override
    public String key() {
        return "blur";
    }
}
再一次,将转换添加到Picasso请求超级简单:
Picasso
    .with(context)
    .load(UsageExampleListViewAdapter.eatFoodyImages[0])
    .transform(new BlurTransformation(context))
    .into(imageViewTransformationBlur);
这将模糊图像之前,它会显示在目标图像
Example #2: Blurring and Gray-Scaling an Image
Picasso也允许转换的参数是一个列表:Transformations: transform(List
public class GrayscaleTransformation implements Transformation {

    private final Picasso picasso;

    public GrayscaleTransformation(Picasso picasso) {
        this.picasso = picasso;
    }

    @Override
    public Bitmap transform(Bitmap source) {
        Bitmap result = createBitmap(source.getWidth(), source.getHeight(), source.getConfig());
        Bitmap noise;
        try {
            noise = picasso.load(R.drawable.noise).get();
        } catch (IOException e) {
            throw new RuntimeException("Failed to apply transformation! Missing resource.");
        }

        BitmapShader shader = new BitmapShader(noise, REPEAT, REPEAT);

        ColorMatrix colorMatrix = new ColorMatrix();
        colorMatrix.setSaturation(0);
        ColorMatrixColorFilter filter = new ColorMatrixColorFilter(colorMatrix);

        Paint paint = new Paint(ANTI_ALIAS_FLAG);
        paint.setColorFilter(filter);

        Canvas canvas = new Canvas(result);
        canvas.drawBitmap(source, 0, 0, paint);

        paint.setColorFilter(null);
        paint.setShader(shader);
        paint.setXfermode(new PorterDuffXfermode(PorterDuff.Mode.MULTIPLY));

        canvas.drawRect(0, 0, canvas.getWidth(), canvas.getHeight(), paint);

        source.recycle();
        noise.recycle();

        return result;
    }

    @Override
    public String key() {
        return "grayscaleTransformation()";
    }
}
Picasso请求添加不止一个转换是可能通过构建一个List,并将它作为一个参数传递:
List<Transformation> transformations = new ArrayList<>();

transformations.add(new GrayscaleTransformation(Picasso.with(context)));
transformations.add(new BlurTransformation(context));

Picasso
    .with(context)
    .load(UsageExampleListViewAdapter.eatFoodyImages[0])
    .transform(transformations)
    .into(imageViewTransformationsMultiple);
应该给你足够的转换工具来改变图像根据您的需要。这是你应该知道实现一个自定义的转换的两个事实:
就返回原来的,不需要转换
在创建一个新的bitmap时,调用.recycle()在旧的bmiap。
十一、Picasso — Influencing Image Caching
Standard Behavior
默认的Picasso 有以下设置
LRU 15%可用的应用程序的内存缓存内存
2%的磁盘高速缓存存储空间50 mb,但不少于5 mb。(注:这只是上可用的API 14 +或如果您正在使用一个独立的库,它提供了一个磁盘缓存在所有API级别,像OkHttp)
三为磁盘和网络下载线程访问。
缓存的大小可以改变,但超出了这篇文章的范围。回到图像缓存的主题:Picasso总是试图先从内存缓存加载图像。如果图像最近没有请求,因此不在内存缓存的图片,Picasso接下来会检查磁盘高速缓存。如果没有可用的磁盘上,Picsso只有将网络请求开始。
此外,所有请求的图片存储在缓存(直到他们被删除以释放空间)。总之,Picsso将检查内存- >网络- >磁盘。
如果你想要或需要Picsso表现不同,您可以自定义的内存和网络政策。让我们看看MemoryPolicy。
Memory Policy
Picasso首先尝试从内存获取所请求的图像。如果你想Picsso跳过这一步,你可以调用
memoryPolicy(memoryPolicy policy,memoryPolicy…additional)在你的Picasso创建请求的时候。MemoryPolicy是一个简单的枚举两个值:NO_CACHE NO_STORE。
例如:一个Picasso请求图片不来自内存,使用NO_CACHE:
Picasso
    .with(context)
    .load(UsageExampleListViewAdapter.eatFoodyImages[1])
    .memoryPolicy(MemoryPolicy.NO_CACHE)
    .into(imageViewFromDisk);
如果你想知道NO_STORE枚举可以用于:如果你请求的图片你知道你会需要它只有一个单一的时间,调用.memoryPolicy(MemoryPolicy.NO_STORE)。因此,Picasso不会把这张图片在内存缓存中(因此没有反冲另一个重要的缓存图像)。 当然,您可以组合这些选项在一个中调用:
Picasso
    .with(context)
    .load(UsageExampleListViewAdapter.eatFoodyImages[1])
    .memoryPolicy(MemoryPolicy.NO_CACHE, MemoryPolicy.NO_STORE)
    .into(imageViewFromDisk);
当心,调用.memoryPolicy(MemoryPolicy.NO_CACHE)不会阻止Picasso从磁盘高速缓存图片!为了跳过两个缓存,你需要看看NetworkPolicy。
Network Policy
MemoryPolicy调节内存缓存的方式与NetworkPolicy调节磁盘缓存是相同的方式。枚举甚至命名相同的方式!
如果你想跳过磁盘缓存,调用
.networkPolicy(NetworkPolicy policy, NetworkPolicy... additional)和NetworkPolicy.NO_CACHE作为参数。
Picasso
    .with(context)
    .load(UsageExampleListViewAdapter.eatFoodyImages[2])
    .networkPolicy(NetworkPolicy.NO_CACHE)
    .into(imageViewFromNetwork);
当然,还可以联合之前的操作配置:
Picasso
    .with(context)
    .load(UsageExampleListViewAdapter.eatFoodyImages[2])
    .memoryPolicy(MemoryPolicy.NO_CACHE, MemoryPolicy.NO_STORE)
    .networkPolicy(NetworkPolicy.NO_CACHE)
    .into(imageViewFromNetwork);
最后,还有第三个整洁NetworkPolicy选项:OFFLINE。如果你通过这个参数,Picasso将试图为加载图片从一个缓存,而不是做一个网络请求,即使网络连接可用图像并没有在缓存中找到。
十二、Picasso — Cache Indicators, Logging & Stats
Cache Indicators
作为一名开发人员,重要的是能够分析一个图像从何而来。最简单的方法就是激活Cache Indicators。简单地调用.setIndicatorsEnabled(true);一旦你Picasso实例:
Picasso
    .with(context)
    .setIndicatorsEnabled(true);
所有图像后请求将在左上角有一个小的指标:
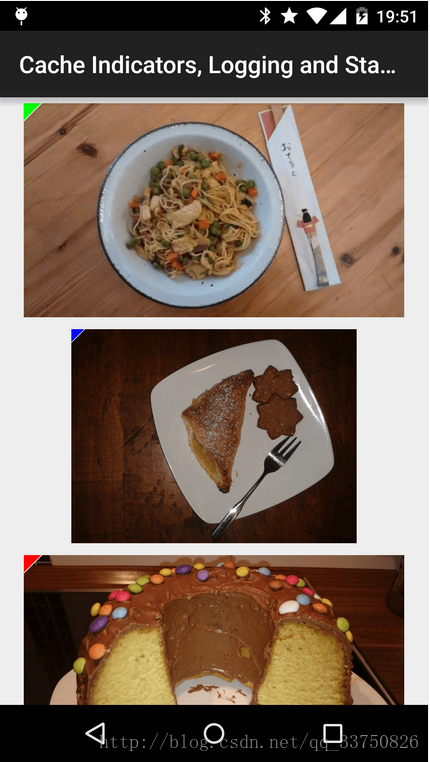
颜色代表一个来源:
- 绿色(内存、最佳性能)
- 蓝色(磁盘、良好的性能)
- 红色(网络、表现最差)。
Logging
颜色指示器往往已经解决缓慢加载图片的问题,因为它应该帮助你检测一个缓存的问题。然而,如果情况还没有清理,考虑激活日志通过调用.setLoggingEnabled(trie)在Picasso实例(这个选项是默认设置为false)。
Picasso
    .with(context)
    .setLoggingEnabled(true);
这将返回所有的Picasso请求的log打印在这个Android LogCat上面(直到你调用.setLoggingEnabled(false))。一旦图像请求启动,看Android logcat请求的详细信息。Picasso将打印所有相关数据。
例如:Picasso 从网路加载图片:
Picasso
    .with(context)
    .load(UsageExampleListViewAdapter.eatFoodyImages[2])
    .memoryPolicy(MemoryPolicy.NO_CACHE)
    .networkPolicy(NetworkPolicy.NO_CACHE)
    .into(imageViewFromNetwork);
在Android logcat打印类似的数据:
D/Picasso﹕ Main        created      [R0] Request{http://i.imgur.com/rT5vXE1.jpg}
D/Picasso﹕ Dispatcher  enqueued     [R0]+21ms
D/Picasso﹕ Hunter      executing    [R0]+26ms
D/Picasso﹕ Hunter      decoded      [R0]+575ms
D/Picasso﹕ Dispatcher  batched      [R0]+576ms for completion
D/Picasso﹕ Main        completed    [R0]+807ms from NETWORK
D/Picasso﹕ Dispatcher  delivered    [R0]+809ms
StatsSnapshot
最后,但并非最不重要的,你可以选择看大图片。而不是分析单请求,你可以通过查看StatsSnapshot积累和平均结果。
为了访问数据,只需调用:
StatsSnapshot picassoStats = Picasso.with(context).getSnapshot(); 返回的对象可以是分析在调试器中,或者在Android logcat打印
Log.d("Picasso Stats", picassoStats.toString()); Log:
D/Picasso Stats﹕ StatsSnapshot{
maxSize=28760941,
size=26567204,
cacheHits=30,
cacheMisses=58,
downloadCount=0,
totalDownloadSize=0,
averageDownloadSize=0,
totalOriginalBitmapSize=118399432,
totalTransformedBitmapSize=96928004,
averageOriginalBitmapSize=2466654,
averageTransformedBitmapSize=2019333,
originalBitmapCount=48,
transformedBitmapCount=41,
timeStamp=1432576918067}
十三、Picasso — Customizing Picasso with Picasso.Builder
Picasso.Builder for Custom Picasso
Picasso有直接的方式修改Picasso实例:Picasso.Builder类。我们将使用Picasso.Builder创建自己的自定义Picasso实例。我们的新Picasso实例可以有几个替代组件。我们看看可能的替代组件之前,让我们看看如何创建自定义Picasso实例。
Using Custom Picasso Instance Locally
我们跳进定制Picasso实例之前,让我们简要地反思我们如何得到我们的标准Picasso实例:
Picasso picasso = Picasso.with(Context); Picasso.with( Context)总是返回标准Picasso 实例。在情况下,您需要一个自定义的实例,一个选择是简单地创建一个Picasso .Builder对象,让你调整,最后建立一个Picasso 实例。
// create Picasso.Builder object
Picasso.Builder picassoBuilder = new Picasso.Builder(context);

// todo make your adjustments here (will do in a minute)

// Picasso.Builder creates the Picasso object to do the actual requests
Picasso picasso = picassoBuilder.build();
新创建的Picasso对象具有相同的功能作为我们的标准Picasso。
// instead of Picasso.with(Context context) you directly use this new custom Picasso object
picasso
    .load(UsageExampleListViewAdapter.eatFoodyImages[0])
    .into(imageView1);
如果你需要一个特殊的Picasso行为对你所有的请求,你可以选择在应用中定制毕加索实例。
Using Custom Picasso Instance Globally
创建和修改Picasso实例的方式保持不变:
// create Picasso.Builder object
Picasso.Builder picassoBuilder = new Picasso.Builder(context);

// Picasso.Builder creates the Picasso object to do the actual requests
Picasso picasso = picassoBuilder.build();
让这Picasso实例在所有的activity一个,调用Picasso.setSingletonInstance(picasso);。重要的是,你只能在做任何Picasso请求之前这样做!理想情况下,您应该把这个定义在应用程序开始。
// set the global instance to use this Picasso object
// all following Picasso (with Picasso.with(Context context) requests will use this Picasso object
// you can only use the setSingletonInstance() method once!
try {
    Picasso.setSingletonInstance(picasso);
} catch (IllegalStateException ignored) {
    // Picasso instance was already set
    // cannot set it after Picasso.with(Context) was already in use
}
一旦你实现在应用程序开始,所有未来的Picasso。与Picasso(Context context)调用将返回您的自定义实例:
// you can continue to use Picasso.with(Context context), but it'll return your custom instance
Picasso
    .with(context)
    .load(UsageExampleListViewAdapter.eatFoodyImages[1])
    .into(imageView2);
如果你觉得在你的app中这个决定是理想的,为了帮助你的决定,我们将向你展示一个可能定制Picasso行为:一个网络组件所取代。
Influencing Picasso’s Behavior: Replacing the Downloader
Picasso将默认使用可用的最佳可用缓存&网络组件。如果你想确保Picasso是使用特定的。使用Picasso.Builder和调用.downloader(Downloader downloader)。下载接口的一个实现是Square的HTTP客护端OkHttp。
// create Picasso.Builder object
Picasso.Builder picassoBuilder = new Picasso.Builder(context);

// let's change the standard behavior before we create the Picasso instance
// for example, let's switch out the standard downloader for the OkHttpClient
picassoBuilder.downloader(new OkHttpDownloader(new OkHttpClient()));

// Picasso.Builder creates the Picasso object to do the actual requests
Picasso picasso = picassoBuilder.build();

picasso
   .load(UsageExampleListViewAdapter.eatFoodyImages[2])
   .into(imageView3);
这没有任何实际效果,因为Picasso会选择OkHttp(如果可用)。一个实际的例子将真实世界的场景如下:从您自己的服务器应用程序下载图像。服务器使用HTTPS,但也有一个自签名证书。标准OkHttp实现会拒绝这连接由于SSL认证问题,之后不下载图片并因此你ImageView将保持空的。 与一个OkHttp实现你可以解决这个问题(见UnsafeOkHttpClient),而忽略了HTTPS的问题。通过设置这个HTTP客户端作为Picasso下载,你可以显示图像,这是托管在一个自签名HTTPS环境。
picassoBuilder.downloader(
    new OkHttpDownloader(
        UnsafeOkHttpClient.getUnsafeOkHttpClient()
    )
);
必须警告:确保你知道你在使用一个网络组件做什么,它忽略了所有安全检查!
Further Customizations
Picasso.Builder类提供了更多的定制除了下载器(也作为磁盘缓存)。在我们看来这两个最有趣的部分是:
Memory
Cache:如果你不同意的标准设置(15%可用的应用程序内存),您可以实现您自己的Picasso.Builder缓存解决方案和应用它。Request Handlers:如果你定制Uri上的图像格式,请求处理程序给你一个强大的工具。本系列的下一个也是最后一个内容的博客将请求处理程序。
十四、Picasso — Custom Request Handlers
Custom Request Handlers via Picasso.Builder
再一次,我们将不进入细节如何设置您的自定义Picasso实例,所以我们希望你理解下面的代码片段:
// create Picasso.Builder object
Picasso.Builder picassoBuilder = new Picasso.Builder(context);

// add our custom eat foody request handler (see below for full class)
picassoBuilder.addRequestHandler(new EatFoodyRequestHandler());

// Picasso.Builder creates the Picasso object to do the actual requests
Picasso picasso = picassoBuilder.build();
唯一的新部分是这行,我们设置EatFoody请求处理程序作为本教程的例子,这是很简单的:
picassoBuilder.addRequestHandler(new EatFoodyRequestHandler()); 现在我们知道Picasso实例的请求处理程序,并将每个未来的请求传递给它。我们所有的准备工作已经完成,所以让我们更详细地看RequestHandler类。
RequestHandler Implementation
请求处理程序接口有两个方法:
- boolean canHandleRequest(Request data)
Result load(Request request, int networkPolicy).
第一个方法会让Picasso知道这个请求处理程序可以处理当前请求。如果可以,请求将被传递到load()方法。
整个实现的请求处理程序可能看起来像这样:
public class EatFoodyRequestHandler extends RequestHandler {
    private static final String EAT_FOODY_RECIPE_SCHEME = "eatfoody";

    @Override
    public boolean canHandleRequest(Request data) {
        return EAT_FOODY_RECIPE_SCHEME.equals(data.uri.getScheme());
    }

    @Override
    public Result load(Request request, int networkPolicy) throws IOException {
       // do whatever is necessary here to load the image
       // important: you can only return a Result object
       // the constructor takes either a Bitmap or InputStream object, nothing else!

       // get the key for the requested image
       // if the schema is "eatfoody://cupcake", it'd return "cupcake"
       String imageKey = request.uri.getHost();

       Bitmap bitmap;
       if (imageKey.contentEquals("cupcake")) {
           bitmap = BitmapFactory.decodeResource(getResources(), R.drawable.cupcake);
       }
       else if (imageKey.contentEquals("full_cake")) {
           bitmap = BitmapFactory.decodeResource(getResources(), R.drawable.full_cake);
       }
       else {
           // fallback image
           bitmap = BitmapFactory.decodeResource(getResources(), R.mipmap.ic_launcher);
       }

       // return the result with the bitmap and the source info
       return new Result(bitmap, Picasso.LoadedFrom.DISK);
    }
}
在这个canHandleRequest方法eat foody的实现检查传入的请求的Uri模式“eatfoody”(e.g. eatfoody://cupcake)。如果请求没有eat foody模式,毕加索会检查其他请求处理程序,最后,如果没有一个能够处理请求,恢复到标准的下载。
如果请求实际上有eatfoody模式,load()方法实现我们的类被调用和负责返回一个结果对象(理想情况下包含一个Bitmap)。我们的实现可以做一个网络请求或加载图片从手机的磁盘。为了保持简单,我们检查我们的Uri路径的两个最喜欢的食谱和从我们的程序加载显示图像资源。如果不匹配,我们返回eat foody 的图标。
最后,我们要创建一个结果对象返回我们的bitmap。它包含bitmap本身和指向资源。在我们的例子中,我们从磁盘载入图像。
Example Requests
足够的干燥的理论,让我们来看一些例子。正如预期的那样,如果你通过常规的http uri搭配Picasso,它不会使用我们eat foody的请求处理程序(因为http eatfoody不匹配)。毕加索将加载图像正常。
// example #1: regular HTTP Uri schema, which will not use our custom request handler
picasso
    .load(UsageExampleListViewAdapter.eatFoodyImages[0])
    .into(imageView1);
不过,您可以使用相同的Picasso实例通过eatfoody uri。Picasso将检测我们的请求处理程序是适合这个任务,让我们从磁盘加载适当的图像:
// example #2 & #3: custom eatfoody Uri schema, which will trigger our custom request handler
picasso
    .load("eatfoody://cupcake")
    .into(imageView2);

picasso
    .load("eatfoody://full_cake")
    .into(imageView3);
十五、Picasso Transformation Library
如果你已经有一个想法什么样的转换可以使用在你的应用程序,看以下库:picasso-transformations。它提供了一个收集各种Picasso的转换。以检查是否你的想法可能已经实现了。
这个library附带两个不同的版本。扩展的版本包括更多的转换,计算设备的GPU。他们需要额外的依赖,所以设置为两个版本有点不同。你应该通过转换和决定你需要哪个版本的列表。
Setup for Picasso Transformations
build.gradle:
dependencies {
    compile 'jp.wasabeef:picasso-transformations:2.1.0'
}
如果你想使用GPU的转换:
repositories {
    jcenter()
    mavenCentral()
}

dependencies {
    compile 'jp.wasabeef:picasso-transformations:2.1.0'
    compile 'jp.co.cyberagent.android.gpuimage:gpuimage-library:1.4.1'
}
Usage of Picasso Transformations
在你同步AndroidStudio与build.gradle文件,您可以使用转换集合。使用模式是一样的与你自己的一样,自定义转换。让我们假设我们想裁剪一张图像用这个集合的转换:
Picasso
    .with(context)
    .load(UsageExampleListViewAdapter.eatFoodyImages[0])
    .transform(new CropCircleTransformation())
    .into(imageViewTransformationBlur);
你也可以应用转换列表,通过transform()的调用:
int color = Color.parseColor("#339b59b6");

Picasso
        .with(context)
        .load(UsageExampleListView.eatFoodyImages[0])
        .transform(new ColorFilterTransformation(color))
        .transform(new CropCircleTransformation())
        .into(imageViewTransformationLibrary);
十六、Picasso 2.5 — Integrate OkHttp3 as Network Stack
Jake Wharton’s OkHttp 3 Downloader
Jake Wharton已经发布了一个专门为Picasso OkHttp 3 Downloader。它环绕着OkHttpOkHttp 33的新架构,使其兼容Picass02的网络实现需求。 幸运的是,它是作为Gradle依赖。因此,你只需要编辑您的build.gradle和同步您的项目:
compile 'com.jakewharton.picasso:picasso2-okhttp3-downloader:1.0.2' Setup OkHttp 3 as Picasso’s Downloader
接下来,您需要设置Picasso这样使用OkHttp 3下载器。第一步是创建一个实例OkHttp和OkHttp 3下载器:
okhttp3.OkHttpClient okHttp3Client = new okhttp3.OkHttpClient();
OkHttp3Downloader okHttp3Downloader = new OkHttp3Downloader(okHttp3Client);
第二步是通过Picasso 的downloader。我们使用Picassor.Builder定制毕加索的行为。如果你需要捕获Picasso.Builders是怎样工作的。请去看第十三章节。
Picasso picasso = new Picasso.Builder(context)
        .downloader(new CustomOkHttp3Downloader(client))
        .build();
第三和最后一步是使用我们的新创建的Picasso实例请求一个图像:
String internetUrl = "http://i.imgur.com/DvpvklR.png";
picasso
        .with(context)
        .load(internetUrl)
        .into(imageView1);
我们实现我们的目标和图像将通过OkHttp加载3 \ o /
General Setup of Picasso’s Downloader
现在你问,每次我想请求一个图像我要创建一个自定义Picasso实例?不,你不能这样!!就像我们展示了Picasso.Builder博客,您可以设置一个Picasso实例作为整个应用使用:
// set the global instance to use this Picasso object
// all following Picasso (with Picasso.with(Context context) requests will use this Picasso object
// you can only use the setSingletonInstance() method once!
try {
    Picasso.setSingletonInstance(picasso);
} catch (IllegalStateException ignored) {
    // Picasso instance was already set
    // cannot set it after Picasso.with(Context) was already in use
}
所有请求后将重用自定义Picasso实例。因此,您的整个应用程序将使用OkHttp 3 !
Customize OkHttp3Downloader
显示集成库的核心是OkHttp3Downloader单个类。它实现了包装OkHttp 3。如果你不想添加另一个gradle依赖,就像我们上面已经向你们展示,或者需要定制OkHttp 3包装,复制这些类从 Jake’s repository.
假设您已经实现了自定义CustomOkHttp3Downloader类,它遵循最初的设计并实现了Downloader接口。您可以使用同样的方法来利用它作为你的网络堆栈:
okhttp3.OkHttpClient client = new okhttp3.OkHttpClient();
Picasso picasso = new Picasso.Builder(context)
        .downloader(new CustomOkHttp3Downloader(client))
        .build();

String internetUrl = "http://i.imgur.com/DvpvklR.png";
picasso
        .with(context)
        .load(internetUrl)
.into(imageView2);参考:https://futurestud.io/tutorials/picasso-series-round-up
Picasso有的没有都说了一大堆,希望能帮到大家和自己,加油。好累!
2.1 xUtil3
前言:基本大家都知道xUtil3主要分成4个模块,下面一一讲解使用方式
一、注解模块
初始化
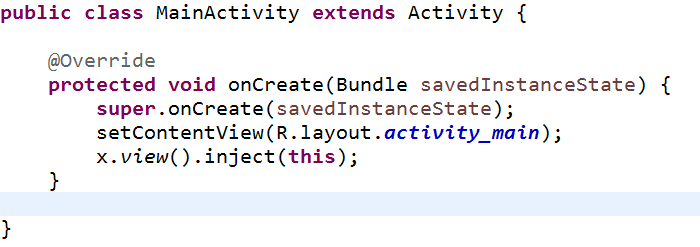
在Application的onCreate()方法中加入下面代码: x.Ext.init(this);
如果当前类是Activity,在Activity的onCreate()方法中加入下面代码: x.view().inject(this);
如果当前类是Fragment,在Fragment的onCreateView中return如下代码return
x.view().inject(this, inflater, container)


加载布局
在activity类上添加@ContentView(布局)
给View初始化ID
使用@InjectView(id)
监听事件
使用@Envent (value={点击的id1,点击的id2}, type=View.OnClickListener.class)
默认type=View.OnClickListener.class
import org.xutils.x;
import org.xutils.view.annotation.ContentView;
import org.xutils.view.annotation.Event;
import org.xutils.view.annotation.ViewInject;
import android.app.Activity;
import android.os.Bundle;
import android.view.View;
import android.widget.Button;
import android.widget.ImageView;
import android.widget.Toast;

@ContentView(R.layout.activity_main)
public class MainActivity extends Activity {


    @ViewInject(R.id.button)
    Button button;

    @ViewInject(R.id.imageView)
    ImageView imageView;

    @Override
    protected void onCreate(Bundle savedInstanceState) {
        super.onCreate(savedInstanceState);
        x.view().inject(this);
        button.setText("xutil注解");
    }

    @Event(value={R.id.button}, type=View.OnClickListener.class)
    private void onClick(View view){
        switch (view.getId()) {
        case R.id.button:
            Toast.makeText(this, "点击了我", Toast.LENGTH_SHORT).show();
            break;

        default:
            break;
        }
    }

}
提示:监听时间的方法必须是private修饰
Adapter中的注解
import org.xutils.x;
import org.xutils.view.annotation.ContentView;
import org.xutils.view.annotation.ViewInject;
import android.app.Activity;
import android.content.Context;
import android.os.Bundle;
import android.view.View;
import android.view.ViewGroup;
import android.widget.BaseAdapter;
import android.widget.ImageView;
import android.widget.ListView;

@ContentView(R.layout.activity_main)
public class MainActivity extends Activity {


    int[] images={R.drawable.insert_card_004,R.drawable.insert_card_005,R.drawable.insert_card_006,R.drawable.insert_card_007};

    @ViewInject(R.id.listView)
    ListView listView;

    @Override
    protected void onCreate(Bundle savedInstanceState) {
        super.onCreate(savedInstanceState);
        x.view().inject(this);
        MyAdapter adapter=new MyAdapter(this);
        listView.setAdapter(adapter);
    }

    class MyAdapter extends BaseAdapter{

        Context context;
        public MyAdapter(Context context) {
            this.context=context;
        }
        @Override
        public int getCount() {
            return images.length;
        }

        @Override
        public Object getItem(int position) {
            return images[position];
        }

        @Override
        public long getItemId(int position) {
            return position;
        }

        @SuppressWarnings({ "static-access", "null" })
        @Override
        public View getView(int position, View convertView, ViewGroup parent) {
            ViewHolder viewHolder;
            if (convertView==null) {
                convertView=getLayoutInflater().inflate(R.layout.listview_item_image, null);
                viewHolder=new ViewHolder();
                x.view().inject(viewHolder,convertView);
                convertView.setTag(viewHolder);
            } else{
                viewHolder=(ViewHolder) convertView.getTag();
            }
            viewHolder.imageView.setImageResource(images[position]);
            return convertView;
        }

        class ViewHolder{
            @ViewInject(R.id.imageView)
            ImageView imageView;
        }

    }

}
当item中的控件比较多的时候在getView()中会省去大量代码
二、网络模块

从图中我们可以看到对于xUtil的网络模块,主要提供了三种方式实现
然后三个方法基本都有一个参数:RequestParams ,
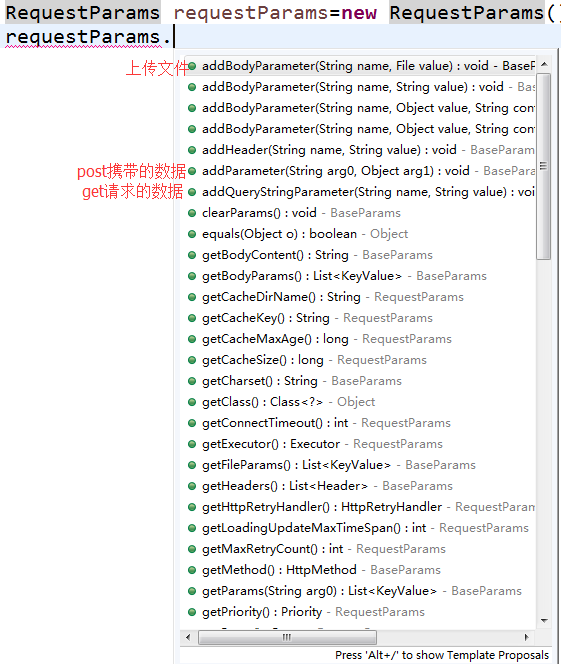
发送get请求
       //请求的url
        String url="";
        //请求参数对象
        RequestParams params=new RequestParams(url);
        //如果请求需要携带参数使用map集合装载
        Map<String, String> map=null;
        if(null!=map){
            for(Map.Entry<String, String> entry : map.entrySet()){
                //将需要携带的参数放入请求参数对象中
                params.addQueryStringParameter(entry.getKey(), entry.getValue());
            }
        }
        x.http().get(params, new CommonCallback<String>() {

            @Override
            public void onCancelled(CancelledException arg0) {
            }

            @Override
            public void onError(Throwable arg0, boolean arg1) {
            }

            @Override
            public void onFinished() {
            }

            @Override
            public void onSuccess(String arg0) {

            }
        });
上面的代码我们可以看出首先我们new RequestParams(url)并将url传入,然后判断是否会携带参数,是的话使用addQueryStringParameter(key,value)增加,最后使用 x.http().get()发送请求,其中一个参宿是requestParams对象,另一个是回调函数CommonCallback(),T是一个泛型,表示返回的结果类型,根据需求去定义
第二种GET请求方式:
        //请求的url
        String url="";
        //请求参数对象
        RequestParams params=new RequestParams(url);
        //如果请求需要携带参数使用map集合装载
        Map<String, String> map=null;
        if(null!=map){
            for(Map.Entry<String, String> entry : map.entrySet()){
                //将需要携带的参数放入请求参数对象中
                params.addQueryStringParameter(entry.getKey(), entry.getValue());
            }
        }
        //第一个参数即为请求方式
        x.http().request(HttpMethod.GET, params, new CommonCallback<String>() {
            @Override
            public void onSuccess(String result) {
            }

            @Override
            public void onError(Throwable ex, boolean isOnCallback) {
            }

            @Override
            public void onCancelled(CancelledException cex) {
            }

            @Override
            public void onFinished() {
            }
        });
以上代码其实和第一种get请求方式是大同小异,只是在最后请求的使用x.http().request(),并且使用HttpMethod来声明get还是post
发送Post请求
//请求的url
        String url="";
        //请求参数对象
        RequestParams params=new RequestParams(url);
        //如果请求需要携带参数使用map集合装载
        Map<String, String> map=null;
        if(null!=map){
            for(Map.Entry<String, String> entry : map.entrySet()){
                //将需要携带的参数放入请求参数对象中
                params.addParameter(entry.getKey(), entry.getValue());
            }
        }
        x.http().post(params, new CommonCallback<String>() {

            @Override
            public void onCancelled(CancelledException arg0) {
            }

            @Override
            public void onError(Throwable arg0, boolean arg1) {
            }

            @Override
            public void onFinished() {
            }

            @Override
            public void onSuccess(String arg0) {

            }
        });
从以上代码可以看出,post请求和get请求的第一种方式基本一样,post参数的方法使用的是
params.addParameter(entry.getKey(), entry.getValue());
最后调用x.http().post()
最后post第二种方式和get的第二种方式也是大同小异的,这里就不介绍了。
上传文件
       //上传文件的路径
        String path = Environment.getExternalStorageDirectory() + "/1.docx";
        //上传到至服务器的地址
        String url = "http://www.omghz.cn/FirstService/FileReceive";
        RequestParams params = new RequestParams(url);
        //使用Multipart表单上传
        //params.setMultipart(true);
        params.addHeader("FileName", "1.docx");
        File file = new File(path);
        params.addBodyParameter("File", file);
        x.http().post(params, new Callback.CommonCallback<String>() {
            @Override
            public void onSuccess(String result) {
            }

            @Override
            public void onError(Throwable ex, boolean isOnCallback) {
            }

            @Override
            public void onCancelled(CancelledException cex) {
            }

            @Override
            public void onFinished() {
            }
        });
经过以上三篇博客,我们基本可以确定xUtil网络请求的步骤
- new RequestParams(url);
- 如果在网路请求时需要携带数据的,params.addBodyParameter(key, value);
- x.http().后面接你需要的方法
下载文件
        //文件下载地址
        String url="";
        //文件保存在本地的路径
        String filepath="";
        RequestParams params=new RequestParams(url);
        //设置断点续传
        params.setAutoResume(true);
        params.setSaveFilePath(filepath);
        x.http().get(params, new Callback.CommonCallback<String>() {
            @Override
            public void onSuccess(String result) {
            }

            @Override
            public void onError(Throwable ex, boolean isOnCallback) {
            }

            @Override
            public void onCancelled(CancelledException cex) {
            }

            @Override
            public void onFinished() {
            }
        });
第二种带进度条下载文件:
        String url = " ";
        RequestParams params = new RequestParams(url);
        //设置文件保存路径
        params.setSaveFilePath(Environment.getExternalStorageDirectory());
      //设置断点续传
        params.setAutoRename(true);
        x.http().get(params, new Callback.ProgressCallback<File>() {
            @Override
            public void onSuccess(File result) {
            }

            @Override
            public void onLoading(long total, long current, boolean isDownloading) {
                //这里可以获取到下载文件的大小,当前下载进度
                seekBar.setMax((int) total);
                seekBar.setProgress((int) current);
            }

            @Override
            public void onError(Throwable ex, boolean isOnCallback) {
            }

            @Override
            public void onCancelled(CancelledException cex) {
            }

            @Override
            public void onFinished() {
            }

            @Override
            public void onWaiting() {
                //网络请求之前被调用,最先被调用
            }

            @Override
            public void onStarted() {
                //网络请求开始的时候回调
            }

        });
两种下载文件的方式大同小异,第二种携带了下载进度,使用的ProgressCallback()回调
三、图片加载模块
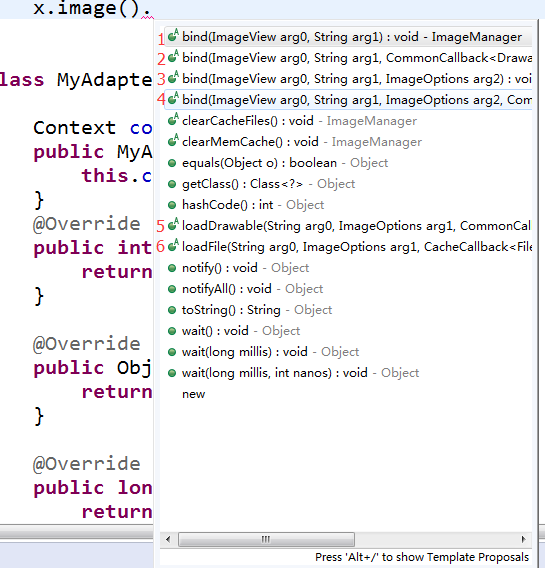
xUtil基本就提供了6中去加载图片,其中参数对于回调函数前面都是已经提到了,这里就不啰嗦了,
这里重点说一下ImageOptions参数
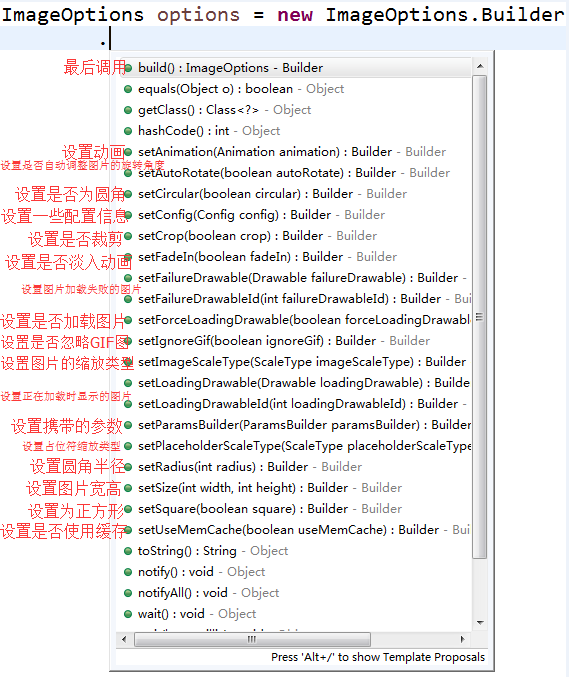
从上面可以看出它是一个图片操作类,下面我们看下代码
ImageOptions options = new ImageOptions.Builder()
                .setConfig(Bitmap.Config.RGB_565)//设置图片质量,这个是默认的
                .setFadeIn(true)//淡入效果
                //需成对使用
                .setCrop(true)//设置图片大小
                .setSize(500, 500)//设置图片大小

                .setAnimation()//设置动画
                .setAutoRotate()//自动获取图片信息将照片旋转至正确角度
                .setCircular(true)//展示为圆形
                .setFailureDrawable()//当图片下载失败时。设置展示的图片
                .setFailureDrawableId()//当图片下载失败时。设置展示的图片

                .setForceLoadingDrawable(true)//设置为true时会显示正在加载的图片,否则不显示
                .setLoadingDrawable()//图片正在加载时显示的默认图片
                .setLoadingDrawableId()//图片正在加载时显示的默认图片

                .setIgnoreGif()//是否忽略Gif图片
                .setParamsBuilder(new ImageOptions.ParamsBuilder() {//添加请求参数
                    @Override
                    public RequestParams buildParams(RequestParams params, ImageOptions options) {
                        params.addBodyParameter("key", "value");
                        return params;
                    }
                })
                .setPlaceholderScaleType()//设置加载失败或是加载中图片的缩放
                .setRadius()//设置拐角的弧度
                .setSquare(true)//设置为正方形
                .setUseMemCache()//设置缓存,默认为true
                .build();
        String url="";
        x.image().bind(imageView, url);
        //不同之前网络模块里讲解的是这里回调函数默认接收Drawable类型参数
        x.image().bind(imageView, url,new CommonCallback<Drawable>() {
            @Override
            public void onCancelled(CancelledException arg0) {}
            @Override
            public void onError(Throwable arg0, boolean arg1) {}
            @Override
            public void onFinished() {}
            @Override
            public void onSuccess(Drawable arg0) {}
        });
        x.image().bind(imageView, url, options);
        x.image().bind(imageView, url, options,new CommonCallback<Drawable>() {
            @Override
            public void onCancelled(CancelledException arg0) {}
            @Override
            public void onError(Throwable arg0, boolean arg1) {}
            @Override
            public void onFinished() {}
            @Override
            public void onSuccess(Drawable arg0) {}
        });
        x.image().loadDrawable(url, options, new CommonCallback<Drawable>() {
            @Override
            public void onCancelled(CancelledException arg0) {}
            @Override
            public void onError(Throwable arg0, boolean arg1) {}
            @Override
            public void onFinished() {}
            @Override
            public void onSuccess(Drawable arg0) {}
        });
        x.image().loadFile(url, options, new Callback.CacheCallback<File>() {
            @Override
            public boolean onCache(File result) {
                //true相信本地缓存,第二次加载图片将不会请求网络同时onSuccess返回为空
                return true;
            }
            @Override
            public void onCancelled(CancelledException arg0) {}
            @Override
            public void onError(Throwable arg0, boolean arg1) {}
            @Override
            public void onFinished() {}
            @Override
            public void onSuccess(File arg0) {}
        });
以上加载图片代码由浅到深,第一个参数基本就是ImageView控件,第二个图片地址,最后一般都是对图片的进行的一些操作,回调之类的。
四、数据库模块
如何创建数据库:
首先我们先来了解一下以下每次都会用到得类DbManager :在xUtil中它是一个管理者身份,所有的数据库的操作都是通过它进行的,接下来看代码:
private DbManager creatDB() {
        DbManager.DaoConfig config = new DbManager.DaoConfig();
        config
        .setDbName("studentInfo.db")
        .setDbVersion(1)
        .setAllowTransaction(true)
        .setDbUpgradeListener(new DbUpgradeListener() {
            @Override
            public void onUpgrade(DbManager db, int oldVersion, int newVersion) {

            }
        })
        .setTableCreateListener(new TableCreateListener() {
            @Override
            public void onTableCreated(DbManager arg0, TableEntity<?> arg1) {
            }
        })
        .setDbOpenListener(new DbManager.DbOpenListener() {//设置数据库打开的监听
            @Override
            public void onDbOpened(DbManager db) {
                db.getDatabase().enableWriteAheadLogging();//开启多线程操作
            }
        });
        DbManager manager = x.getDb(config);
        Log.i("createDB", "数据库创建");
        return manager;

    }
从代码中我们首先可以看到,我们用到了一个DbManager的内部类DaoConfig ,顾名思义DaoConfig 用于数据库的配置
对于基本的数据库的配置用到以上代码的方法就已经足够了,下面解释写每个方法的含义:
- setDbName:设置数据库的名字
- setDbVersion:设置数据库
- setAllowTransaction(true):允许数据库事物
- setDbUpgradeListener(DbUpgradeListener dbUpgradeListener):数据库升级监听
- setTableCreateListener(TableCreateListener tableCreateListener) :表格创建监听
- .setDbOpenListener(DbManager.DbOpenListener dbOpenListener):数据库打开监听
接下来使用xUtil中的getDb()方法将config传进去得到管理者DbManager,这样数据库就创建成功了
如何创建表
首先在xUtil中表中的数据是用bean对象装载的,表中的每一列对应bean对象中有添加声明的每一个属性,所以我们首先看看具体怎么创建表对象
import org.xutils.db.annotation.Column;
import org.xutils.db.annotation.Table;

@Table(name="student")    //表明
public class Student {

    //指明字段,主键,是否自增长,约束(不能为空)
    @Column(name = "id", isId = true, autoGen = true, property = "NOT NULL")
    private int id;

    @Column(name="name")
    private String name;

    @Column(name="age")
    private int age;

    @Column(name="sax")
    private String sax;

    public Student() {
        super();
    }
    public Student(String name, int age, String sax) {
        super();
        this.name = name;
        this.age = age;
        this.sax = sax;
    }

    public String getName() {
        return name;
    }

    public void setName(String name) {
        this.name = name;
    }

    public int getAge() {
        return age;
    }

    public void setAge(int age) {
        this.age = age;
    }

    public String getSax() {
        return sax;
    }

    public void setSax(String sax) {
        this.sax = sax;
    }

}
从代码中我们可以看到这里的对象和我们java、Android中是一样的,只不过这里需要注意几点:
- 以 @Table(name=”student”) 的形式将表名声明在类上方
- 在需要的列名所对应的属性上方以 @Column(name=”age”) 的形式声明表示该属性表示一个age列名,未声明表示该属性不是表中的列
- int id是该对象中必定要有的属性,并且添加声明@Column(name = “id”, isId = true, autoGen = true, property = “NOT NULL”),表示id是主键,自增,不为空,没有该属性以及声明表格会创建失败,log会输出异常
4.此对象必须有一个空的构造函数
以上我们就表的载体写好了,下面看看怎么添加到指定数据库
            DbManager manager = creatDB();
            Student student = new Student();
            try {
                manager.save(student);
//              manager.saveBindingId(student);
//              manager.saveOrUpdate(student);
                Log.i("createDB", "表创建");
            } catch (DbException e) {
                e.printStackTrace();
            }
在这篇博客刚开始我们就提到了以下的操作都会使用大DbManager这个对象,所以这里我们首先获得了manager对象,然后调用sava方法将表添加到数据库
下面我们开始往表中添加数据
增
            DbManager manager = creatDB();
            Student student = new Student("wt",19,"男");
            Log.i("createDB", "添加一行数据");
            try {
                manager.save(student);
                Log.i("createDB", "表创建");
            } catch (DbException e) {
                e.printStackTrace();
            }
从代码中我们可以看到只是在创建表格的基础上增加了构造函数的参数,当然你也可以添加多条数据,因为创建表的三个方法接收的是一个Object对象,例如:
DbManager manager = creatDB();
            List<Student> list=new ArrayList<Student>();
            Student student = new Student("wt",19,"男");
            Student student1 = new Student("wt1",191,"男");
            Student student2= new Student("wt2",192,"男");
            Student student3 = new Student("wt3",193,"男");
            list.add(student);list.add(student1);list.add(student2);list.add(student3);
            Log.i("createDB", "添加多条数据");
            try {
                manager.save(list);
                Log.i("createDB", "表创建");
            } catch (DbException e) {
                e.printStackTrace();
            }
查:
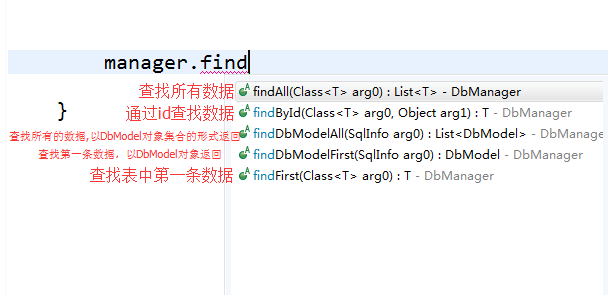
从图中可以得知可以得知关于find开头的就有5中方式:
               //查找所有
                list=manager.findAll(Student.class);
                Iterator<Student> iterator=list.iterator();
                while(iterator.hasNext()){
                    Student stu=iterator.next();
                    Log.i("findAll", stu.toString());
                }
                //通过ID查找第二条
                Student stud=manager.findById(Student.class, "2");
                Log.i("findById", stud.toString());

                List<DbModel> models=manager.findDbModelAll(new SqlInfo("select * from student where age>190"));
                Iterator<DbModel> iter=models.iterator();
                while(iter.hasNext()){
                    DbModel model=iter.next();
                    Log.i("findDbModelAll",model.getString("name")+"");
                }

                DbModel model=manager.findDbModelFirst(new SqlInfo("select * from student"));
                Log.i("findDbModelFirst",model.getString("sex")+"");

                Student s=manager.findFirst(Student.class);
                Log.i("findFirst", s.toString());

                Student student4=manager.selector(Student.class).where("age",">",19).findFirst();
                Log.i("selector",student4.toString());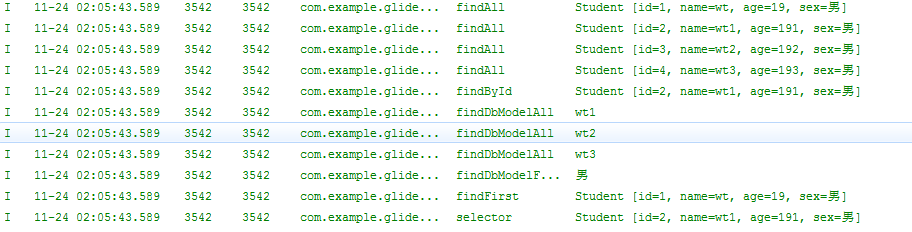
从上面可以看出findAll,findById,findFirst是比较简单的,selector返回的是一个Selector,一般后面可以.where/and等条件字段,最后配合其他查询方法使用,
最后看到findDbModelAll和findDbModelFirst,这两个方法都有一个DbModel 对象,一个SqlInfo对象,其中SqlInfo是一个关于sql语法的对象,一般在构造函数中携带String类型的sql语句,然后传入查询方法中即可,DbModel 是xUtil中装载数据对象Student的另一版,内部使用map集合将表的列名和值存起来,我们查询的时候得到DbModel对象以后,可以直接使用map集合根据key我们这里 key就是列名而找出对应的value列名所对应的值
DbModel源码:
public final class DbModel {

    /**
     * key: columnName
     * value: valueStr
     */
    private HashMap<String, String> dataMap = new HashMap<String, String>();

    public String getString(String columnName) {
        return dataMap.get(columnName);
    }

    public int getInt(String columnName) {
        return Integer.valueOf(dataMap.get(columnName));
    }

    public boolean getBoolean(String columnName) {
        String value = dataMap.get(columnName);
        if (value != null) {
            return value.length() == 1 ? "1".equals(value) : Boolean.valueOf(value);
        }
        return false;
    }

    public double getDouble(String columnName) {
        return Double.valueOf(dataMap.get(columnName));
    }

    public float getFloat(String columnName) {
        return Float.valueOf(dataMap.get(columnName));
    }

    public long getLong(String columnName) {
        return Long.valueOf(dataMap.get(columnName));
    }

    public Date getDate(String columnName) {
        long date = Long.valueOf(dataMap.get(columnName));
        return new Date(date);
    }

    public java.sql.Date getSqlDate(String columnName) {
        long date = Long.valueOf(dataMap.get(columnName));
        return new java.sql.Date(date);
    }

    public void add(String columnName, String valueStr) {
        dataMap.put(columnName, valueStr);
    }

    /**
     * @return key: columnName
     */
    public HashMap<String, String> getDataMap() {
        return dataMap;
    }

    /**
     * @param columnName
     * @return
     */
    public boolean isEmpty(String columnName) {
        return TextUtils.isEmpty(dataMap.get(columnName));
    }
} 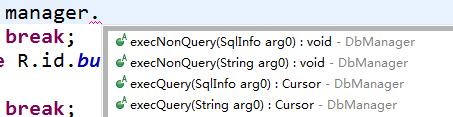
当然xUtil还提供了四种查询方式,由于这四种使用方式和Android里面大同小异,这里就不介绍了,还不懂数据库的可以去我的主页看看关于数据库的文章
改:

从图中可以看出xUtil主要提供了两个方法来更改数据:
try {
                Student s1=manager.findFirst(Student.class);
                Log.i("第一种update之前age",s1.getAge()+"");
                s1.setAge(190);
                manager.update(s1, "age");
                Log.i("第一种update之后age", s1.getAge()+"");

                list=manager.findAll(Student.class);
                Iterator<Student> iterator=list.iterator();
                while(iterator.hasNext()){
                    Student stu=iterator.next();
                    Log.i("第二种update之前age", stu.getAge()+"");
                    stu.setAge(200);
                    manager.update(stu, null, "age");
                }
                list=manager.findAll(Student.class);
                Iterator<Student> iterator1=list.iterator();
                while(iterator1.hasNext()){
                    Student stu=iterator1.next();
                    Log.i("第二种update之后age", stu.getAge()+"");
                }
            } catch (DbException e) {
                e.printStackTrace();
            }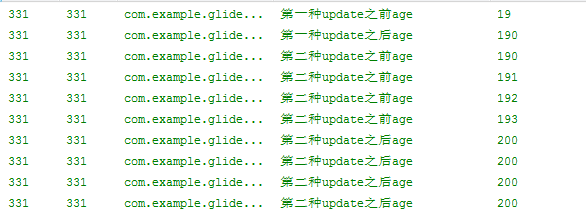
通过log我们可以很清晰的看到数据的改变
其中第一个更改方式update(Object obj ,String… arg1):
- 第一个参数是我们的装载对象,
- 第二是一个String…表示后面可以接多个String类型的值,值填写更改的列名
第二个方法update(Class<?> obj,WhereBuilder builder,KeyValue.. keyValue):
第一个参数是装载类对象
第二WhereBuilder 表示更改条件构造者,
使用方式如:WhereBuilder builder=WhereBuilder.b(“age”,”=”,”200”)第三个参数keyValue…,顾名思义是用来存放键值对的,…和之前方法一样表示可以填写多个keyValue的值
使用方式如:KeyValue age = new KeyValue(“age”, “100”);
KeyValue name = new KeyValue(“name”, “tw”)
最后:
update(Student.class,builder,age,name):
删:
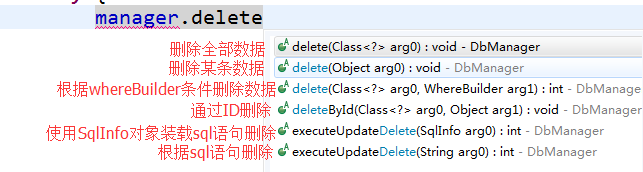
Student s1=manager.findFirst(Student.class);
                manager.delete(s1);
                Log.i("delete", "删除第一条数据");

                manager.delete(Student.class, WhereBuilder.b("name","=","wt2"));
                Log.i("delete", "删除name=wt2的数据");

                manager.deleteById(Student.class, "2");
                Log.i("delete", "删除id=2的数据");

                manager.delete(Student.class);
                Log.i("delete", "删除表中的数据");

                manager.dropTable(Student.class);
                Log.i("delete", "删除表");

                manager.dropDb();
                Log.i("delete", "删除数据库");
其中纠正一个错误delete(Object arg0)支持删除多条数据,可以将一个传进去,
最后两个删除用到是sql语句挺简单的,和android、java里一样,不懂的可以去我的主页有相关博客。
xUtil结语:自己回顾的同时希望能帮到大家
2.2 OkHttp3
前言:
android提供了两种Http通信类,HttpURLConnection和HttpClient
尽管google在部分安卓系统中推荐使用HttpURLConnection,但是相比HttpClien,它功能还是相对较少,需要手动封装
而OkHttp是一个相对成熟的解决方案,Android4.4中源码中可以看到已经将OkHttp代替HttpURLConnection
OkHttp主要功能如下:
- 一般的get请求
- 一般的post请求
- 基于Http的文件上传
- 文件下载
- 加载图片
- 支持请求回调,直接返回对象、对象集合
- 支持session的保持
功能讲解:
1、一般的get请求,下载图片
import java.io.IOException;
import android.app.Activity;
import android.graphics.Bitmap;
import android.graphics.BitmapFactory;
import android.os.Bundle;
import android.os.Handler;
import android.os.Message;
import android.util.Log;
import android.view.View;
import android.widget.ImageView;
import okhttp3.OkHttpClient;
import okhttp3.Request;
import okhttp3.Response;

public class MainActivity extends Activity {

    private static final int BITMAP=0;
    String url="https://ss0.bdstatic.com/5aV1bjqh_Q23odCf/static/superman/img/logo/bd_logo1_31bdc765.png";

    ImageView iv_baidu;
    @Override
    protected void onCreate(Bundle savedInstanceState) {
        super.onCreate(savedInstanceState);
        setContentView(R.layout.activity_main);
        iv_baidu=(ImageView) findViewById(R.id.iv_baidu);
    }

    Handler handler=new Handler(){
        public void handleMessage(android.os.Message msg) {
            switch (msg.what) {
            case BITMAP:
                byte[] buf=(byte[]) msg.obj;
                BitmapFactory.Options options=new BitmapFactory.Options();
                options.inSampleSize=2;
                Bitmap bitmap=BitmapFactory.decodeByteArray(buf, 0, buf.length,options);
                iv_baidu.setImageBitmap(bitmap);
                break;

            default:
                break;
            }
        };
    };

    public void btn_get(View view){
        new Thread(){
            @Override
            public void run() {
                OkHttpClient client=new OkHttpClient();
                Request request=new Request.Builder().url(url).build();
                try {
                    Response response=client.newCall(request).execute();
                    if (response.isSuccessful()) {
                        Log.i("MainActivitu", "success");
                        byte[] buf=response.body().bytes();
                        Message message=new Message();
                        message.what=BITMAP;
                        message.obj=buf;
                        handler.sendMessage(message);
                    }
                } catch (IOException e) {
                    e.printStackTrace();
                }
            }
        }.start();
    }

}
以上就是一个使用OkHttp3发送get请求的一个简单的小例子,布局就是使用一个按钮点击发送get请求去得到一个网络图片现在在ImageView中
首先我们需要注意的是android有关的网络操作都要在子线程,不能出现在main线程,因为我这里使用的OkHttp3中同步请求,所以必须自己手动去开启一个线程
其次看下get的大致步骤:
1.首先创建OkHttpClient 对象,用于执行请求
2.构建Request对象,从这个对象名也可以知道它是一个创建一些请求的对象,然后调用我们需要传入的Url方法,默认是使用get请求,所以可以省略
requestBuilder.method("GET",null);3.最后使用OkHttpClient对象.newCall得到一个Call对象,使用call中的方法去执行Request对象中创建的请求,返回一个Response 对象,故名思意是我们请求的响应结果对象
下面我们来看看官网对Call的概述:
call是一个接口,它将执行一个请求execute()/enqueue(),能取消请求cancel(),可以代表一个请求对象request()或者响应对象execute(),它不能执行两次
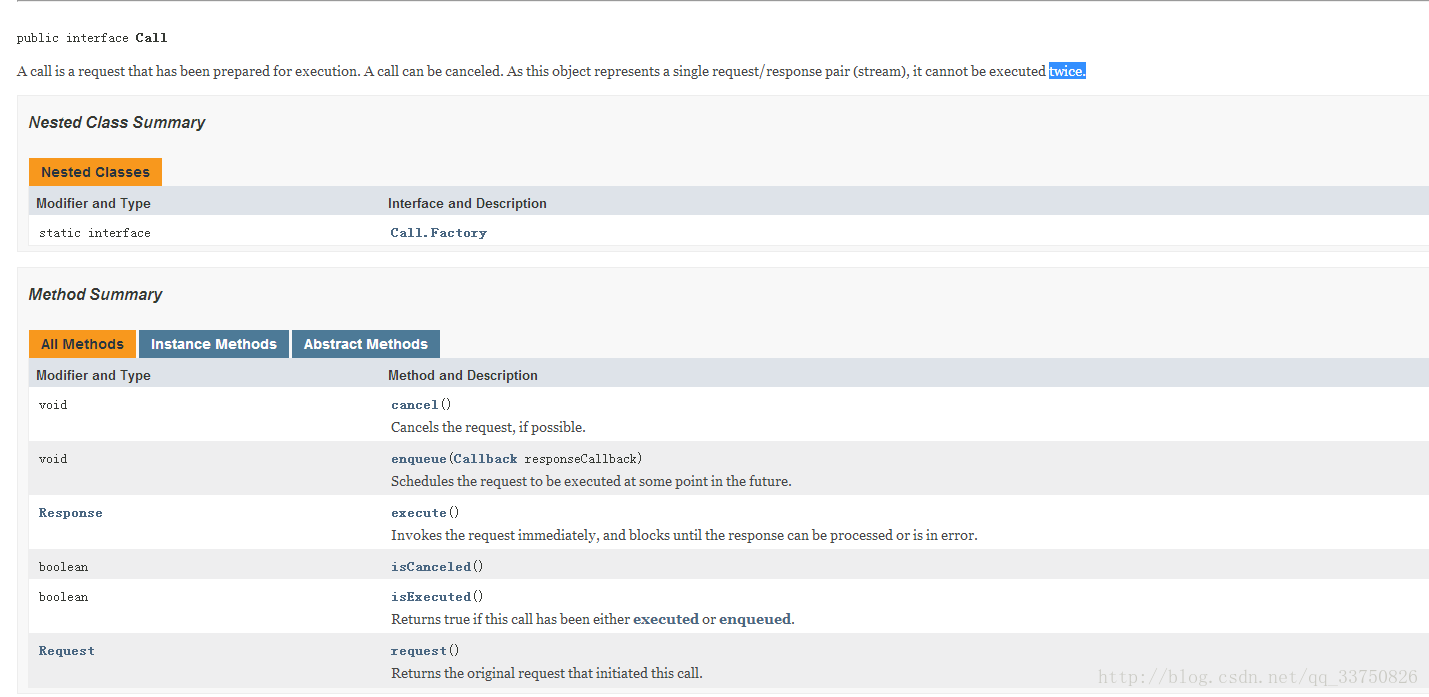
4.拿到Response首先我们必须先去判断是否响应成功然后再去得到请求体ResponseBody得到相关的数据
response.isSuccessful();5.如果响应是成功的话,我们使用Response.body().(类型数据),代码中我们得到的是一个byte类型的数组
下面是关于Response响应数据的类型
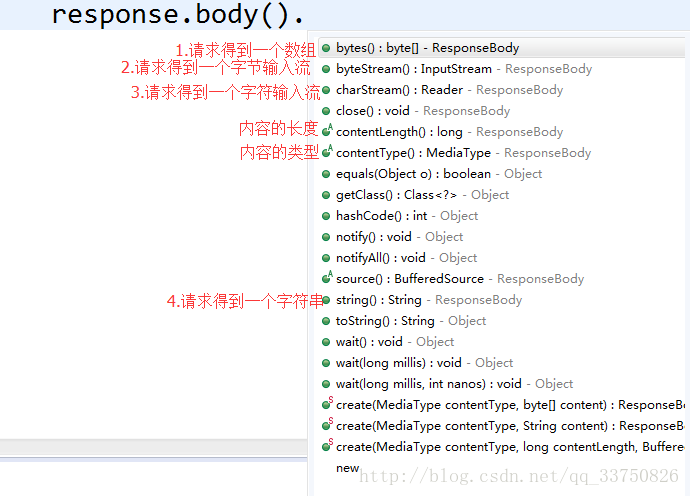
当然我们在实际开发中大多数get返回的一般的都是Json数据,而且我们可能会有大量的网络请求,所以代码就会重复,我们这里一般需要进一步的封装一下
import java.io.IOException;
import org.json.JSONException;
import org.json.JSONObject;
import okhttp3.Call;
import okhttp3.Callback;
import okhttp3.OkHttpClient;
import okhttp3.Request;
import okhttp3.Response;

public class OkHttpUtil {
    OkHttpClient client;
    static OkHttpUtil okHttpUtil;

    private OkHttpUtil() {
        client = new OkHttpClient();
    }

    public static OkHttpUtil getInstance() {
        if (okHttpUtil == null) {
            synchronized (OkHttpClient.class) {
                if (okHttpUtil == null) {
                    okHttpUtil = new OkHttpUtil();
                }
            }
        }
        return okHttpUtil;
    }

    //返回JSON字符串
    public void ansyJsonStringGet(String url, final JsonStringCallBack callBack) {
        Request request = new Request.Builder().url(url).build();
        client.newCall(request).enqueue(new Callback() {

            @Override
            public void onResponse(Call arg0, Response response) throws IOException {
                if (callBack != null) {
                    if (response.isSuccessful()) {
                        callBack.onResponse(response.body().string());
                    }
                }
            }

            @Override
            public void onFailure(Call call, IOException e) {
                callBack.onFailure(call, e);
            }
        });
    }

    //返回JSON字符串
    public void ansyJsonObjectGet(String url, final JsonObjectCallBack callBack) {
        Request request = new Request.Builder().url(url).build();
        client.newCall(request).enqueue(new Callback() {

            @Override
            public void onResponse(Call arg0, Response response) throws IOException {
                if (callBack != null) {
                    if (response.isSuccessful()) {
                        String data = response.body().string();
                        try {
                            callBack.onResponse(new JSONObject(data));
                        } catch (JSONException e) {
                            e.printStackTrace();
                        }
                    }
                }
            }

            @Override
            public void onFailure(Call call, IOException e) {
                callBack.onFailure(call, e);
            }
        });
    }

    interface JsonStringCallBack {
        void onResponse(String jsonString);

        void onFailure(Call call, IOException e);
    }

    interface JsonObjectCallBack {
        void onResponse(JSONObject jsonObject);

        void onFailure(Call call, IOException e);
    }

}
调用:
private String json_path = "http://api2.hichao.com/stars?category=%E5%85%A8%E9%83%A8&pin=&ga=%2Fstars&flag=&gv=63&access_token=&gi=862949022047018&gos=5.2.3&p=2013022&gc=xiaomi&gn=mxyc_adr&gs=720x1280&gf=android&page=2";

public void btn_json(View view) {
        OkHttpUtil okHttpUtil=OkHttpUtil.getInstance();
        okHttpUtil.ansyJsonStringGet(json_path, new JsonStringCallBack() {

            @Override
            public void onResponse(String jsonString) {
                Log.i("MainActivity String", jsonString);
            }

            @Override
            public void onFailure(Call call, IOException e) {

            }
        });
    }

    public void btn_jsonObject(View view) {
        OkHttpUtil okHttpUtil=OkHttpUtil.getInstance();
        okHttpUtil.ansyJsonObjectGet(json_path, new JsonObjectCallBack() {

            @Override
            public void onResponse(JSONObject jsonObject) {
                Log.i("MainActivity JSONObject:", jsonObject.toString());
            }

            @Override
            public void onFailure(Call call, IOException e) {

            }
        });
    }
Log:
上面代码我只是简单的将请求的返回类型为JsonObject和String封装,大家当然也可以对其他的返回类型进行封装。
其中我们使用的enqueue()为我们提供了异步请求,之前的exeute()是同步的:
                       client.newCall(request).enqueue(new Callback() {

                        @Override
                        public void onResponse(Call arg0, Response response) throws IOException {

                        }

                        @Override
                        public void onFailure(Call arg0, IOException arg1) {

                        }
                    });
其中的onResponse则是我们的响应回调,response参数和我们同步请求得到的response是一样的,onFailure则是我们失败回调,运行效果也是一样的。
2.下载文件
private String loaddown="http://ddd1.pc6.com/soft/explorer.exe";

public void btn_loaddown(View view) {
        OkHttpClient client = new OkHttpClient();
        Request request = new Request.Builder().url(loaddown).method("GET", null).build();
        client.newCall(request).enqueue(new Callback() {
            @Override
            public void onResponse(Call arg0, Response response) throws IOException {
                if (response.isSuccessful()) {
                    OutputStream fos=new FileOutputStream("sdcard/explorer.exe");
                    InputStream is = response.body().byteStream();
                    int len=0;
                    byte[] buffer = new byte[1024];
                    while ((len=is.read(buffer))!=-1) {
                        fos.write(buffer,0,len);
                    }
                    Log.i("MainActivity", "文件下载成功");
                    fos.close();
                }
            }

            @Override
            public void onFailure(Call arg0, IOException arg1) {

            }
        });
    }
代码中可以看到,下载文件就是我们将我们responseBody中得到的东西转换成输入流,然后进行读出写入以完成下载的动作。
GET请求总结:
根据第一小节和本节,因此可以总结get请求只要能知道我们get的内容是什么,然后随之调用responseBody相应的内容的方法,就基本可以掌握OkHttp中的get请求。所以我们将不再讲解get请求
3、一般的post请求,上传表单数据
private String loginUrl = "http://192.168.2.160:8080/Login/LoginServlet";

public void btn_post(View view){
        new Thread(){
            @Override
            public void run() {
                FormBody.Builder formBody=new FormBody.Builder();
                formBody.add("username", "wt");
                formBody.add("password", "12345");
                RequestBody requestBody=formBody.build();

                OkHttpClient client=new OkHttpClient();
                Request request=new Request.Builder().url(loginUrl).post(requestBody).build();
                client.newCall(request).enqueue(new Callback() {

                    @Override
                    public void onResponse(Call arg0, Response response) throws IOException {
                        if (response.isSuccessful()) {
                            String data=response.body().string();
                            Log.i("MainActivitu", data);
                        }
                    }

                    @Override
                    public void onFailure(Call arg0, IOException arg1) {

                    }
                });
            }
        }.start();
    }
其中我的URL是自己用MyEclipse写的一个简单的登录的Servlet:点击下载
首先我们也来分析一下Post请求的步骤:
1..首先创建OkHttpClient 对象,用于执行请求
2.构建Request对象,然后调用我们需要传入的Url方法,因为get是默认的,post我们就得得调用
3.使用OkHttpClient 的newCall执行Request请求,得到Call对象
4.使用Call.enqueue()异步请求
综合post和get两个步骤可以看到基本步骤都是一样的,所以下面我们将不再讲解
再次看到代码,我们这里有FormBody表单对象,用于增加键值对的表单数据,也就是我们需要发给服务器的数据,
代码中我们可以看到post请求接收的是一个RequestBody 对象,顾名思义就是请求体,将我们需要给服务器的数据放在它里面
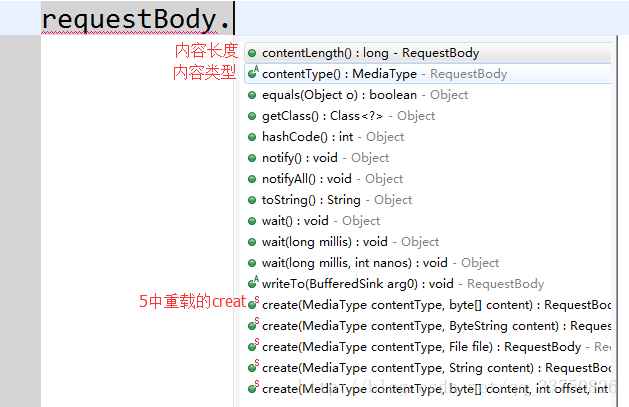
其中我们post请求主要用到的就是这5个重载的create();每个create用于post不同的数据类型,如果你比较细心你就会发现这里的RquestBody这5个Create方法第二个参数和我们第一小节中的ResponseBody中得到的数剧类型是一一对应的,所谓我们可以从得到什么数据就可以上传什么数据。
1.create(MediaType contentType,byte[] content):post一个byte数组
2.create(MediaType contentType,ByteString content):post的ByteString 它是为ok-io.jar包的,在OkHttp官网也可以下载
3.create(MediaType contentType,File file):也就是我们下面需要说的上传的文件
4.create(MediaType contentType,String content):post一个字符串
5.create(MediaType contentType,byte[] content,int offset,int byteCount):指定从offset-byteCount的post一个byte数组
然后每个create第一个参数都是MediaType 对象,关于MediaType 使用静态方法parse(String string)获取,官网说的是这代表一个HTTP请求体或者响应体的类型
关于MediaType 的定义:
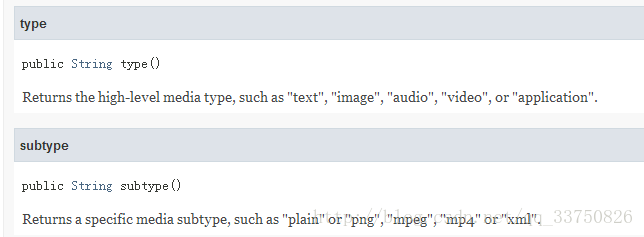
前面代表父类类型后面子类类型,例如:”text/x-markdown;charset=utf-8”
4、基于Http的文件上传
    //提交字符串
    private static final MediaType MEDIA_TYPE_MARKDOWN = MediaType.parse("text/x-markdown;charset=utf-8");

public void btn_upload(View view) {
        OkHttpClient client = new OkHttpClient();
        File file=new File("/sdcard/explore.exe");
        Request request = new Request.Builder()
                .url(upload_path)
                .post(RequestBody.create(MEDIA_TYPE_MARKDOWN, file))
                .build();
        client.newCall(request).enqueue(new Callback() {

            @Override
            public void onResponse(Call arg0, Response response) throws IOException {
                if (response.isSuccessful()) {
                    String data = response.body().string();
                    Log.i("MainActivity upload", data);
                }
            }

            @Override
            public void onFailure(Call arg0, IOException arg1) {

            }
        });
    }
抱歉的是我这里是没有服务器,所以就不能清晰的给大家看到上传的效果图,不过根据第一节中内容和本节代码我们也可以对post做一个基本的总结:post的三四节代码中无非就是Post里面的数据不一样,只要我们知道自己要post设么数据,然后在post()方法中传入响应的数据就Ok了
post和get讲解完了下面我们将来看看OkHttp3中一些其他的方法
5.本地缓存和控制缓存
public void btn_cache(View view){
        OkHttpClient client = new OkHttpClient.Builder().cache
                (new Cache(getCacheDir().getAbsoluteFile(), 1024*1024*10)).build();
        Request request = new Request.Builder().url(url).method("GET", null).build();;

        client.newCall(request).enqueue(new Callback() {
            @Override
            public void onResponse(Call arg0, Response response) throws IOException {
                if (response.isSuccessful()) {
                    byte[] buf = response.body().bytes();
                    Message message = new Message();
                    message.what = BITMAP;
                    message.obj = buf;
                    handler.sendMessage(message);
                    Log.i("MainActivity", "response :"+response);
                    Log.i("MainActivity", "cacheResponse :"+response.cacheResponse());
                    Log.i("MainActivity", "networkResponse :"+response.networkResponse());
                }
            }

            @Override
            public void onFailure(Call arg0, IOException arg1) {

            }
        });
    }
我们这里还是去请求我们的百度图片,但是不同的是这里加入一个本地缓存
OkHttpClient client = new OkHttpClient.Builder().cache
                (new Cache(getCacheDir().getAbsoluteFile(), 1024*1024*10)).build();
Cache(File cacheFile,int cacheSize)第一个参数是本地缓存路径,第二是缓存大小
然后我们去执行一次:

第一次执行我们可以看到这里本地缓存是null,网络响应有数据,
然后我们再次执行:

可以看到它这里网络响应为NULL,而本地缓存有数据,说明我们是从本地加载的图片
但有时候即使在有缓存的情况下我们依然需要去后台请求最新的资源(比如资源更新了)这个时候可以使用强制走网络来要求必须请求网络数据,OkHttp也提供了响应的方法去控制缓存,所以我们再次修改代码
public void btn_cache(View view){
        OkHttpClient client = new OkHttpClient.Builder().cache
                (new Cache(getCacheDir().getAbsoluteFile(), 1024*1024*10)).build();
        Request request = new Request.Builder()
                .url(url)
                .cacheControl(CacheControl.FORCE_CACHE)
                .build();

        Request request2 = new Request.Builder()
                .url(url)
                .cacheControl(CacheControl.FORCE_NETWORK)
                .build();

        client.newCall(request).enqueue(new Callback() {
            @Override
            public void onResponse(Call arg0, Response response) throws IOException {
                if (response.isSuccessful()) {
                    byte[] buf = response.body().bytes();
                    Message message = new Message();
                    message.what = BITMAP;
                    message.obj = buf;
                    handler.sendMessage(message);
                    Log.i("MainActivity", "response :"+response);
                    Log.i("MainActivity", "cacheResponse :"+response.cacheResponse());
                    Log.i("MainActivity", "networkResponse :"+response.networkResponse());
                }
            }

            @Override
            public void onFailure(Call arg0, IOException arg1) {

            }
        });

        client.newCall(request2).enqueue(new Callback() {
            @Override
            public void onResponse(Call arg0, Response response) throws IOException {
                if (response.isSuccessful()) {
                    byte[] buf = response.body().bytes();
                    Message message = new Message();
                    message.what = BITMAP;
                    message.obj = buf;
                    handler.sendMessage(message);
                    Log.i("MainActivity", "response2 :"+response);
                    Log.i("MainActivity", "cacheResponse2 :"+response.cacheResponse());
                    Log.i("MainActivity", "networkResponse2 :"+response.networkResponse());
                }
            }

            @Override
            public void onFailure(Call arg0, IOException arg1) {

            }
        });
    }
首先看下Log:
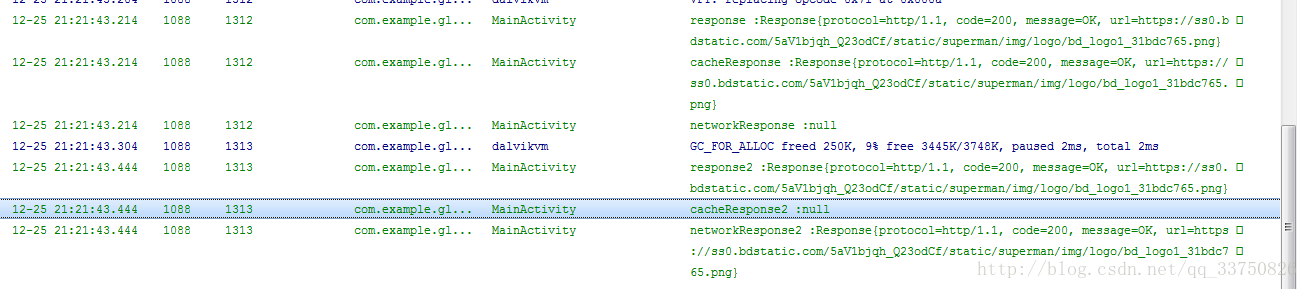
然后看到代码
cacheControl是用于控制缓存的,看方法名也知道了,传入的是一个CacheControl对象,使用静态的
FORCE_CACHE和FORCE_NETWORK表示强制从本地缓存加载和网络加载,所以可以看到我们的Log中即使我们是使用了缓存,但请求中我们又强制使用了网络加载所以最后数据还是不一样。
注意:如果缓存中还没有数据但是你去强制使用缓存加载这时候加载会失败
6.设置超时:
OkHttpClient client = new OkHttpClient.Builder().cache
                (new Cache(getCacheDir().getAbsoluteFile(), 1024*1024*10))
                .connectTimeout(1000, TimeUnit.SECONDS)
                .readTimeout(1000, TimeUnit.SECONDS).
                writeTimeout(1000, TimeUnit.SECONDS)
                .build();
第一个参数是时间大小,第二是类型和HTTP中的方法类似
7.重置OkHttpClient的配置
从第5、6节我们可以知道有关的配置都在OkHttpClient中设置,如果我们想要重用OkHttpClient,但是配置不一样我们使用如下代码:
client = new OkHttpClient().newBuilder().cache
                (new Cache(getCacheDir().getAbsoluteFile(), 1024*1024*10))
                .connectTimeout(1000, TimeUnit.SECONDS)
                .readTimeout(1000, TimeUnit.SECONDS).
                writeTimeout(1000, TimeUnit.SECONDS)
                .build();
使用newBuilder重新构造一个OkHttpClient.Builder()对象
结语:
讲到这里OkHttp3中常用的功能基本就完了,希望能帮到大家,更多方法可以去gitHub去看文档使用
2.3 Retrofit
一、Retrofit — Getting Started and Creating an Android Client
1.1 What is Retrofit
官方描述Retrofit是
A type-safe REST client for Android and Java.
您将使用注释来描述HTTP请求,URL参数替换和查询参数默认支持集成。此外,它提供了自定义功能头,多部分请求体,文件的上传和下载,模拟响应等等。在以后的教程,我们将更详细地查看所有这些细节。
1.2 Prepare Your Android Project
让我们把我们的手回到键盘。如果你已经创建了你的Android项目,继续前进,从下一节开始。否则,创建一个新项目在你最喜爱的IDE。我们喜欢Android Studio以它为构建系统,但你当然可以使用你选择的IDE或Maven。
1.3 Define Dependencies: Gradle or Maven
首先,建立Retrofit作为一个依赖为你的项目。选择你使用的构建系统和定义Retrofit的依赖在你的build.gradle 或者 pom.xml 。当运行这个命令去构建你的代码,构建系统将下载和提供相关的库为你的项目。
build.gradle
dependencies {
    // Retrofit & OkHttp
    compile 'com.squareup.retrofit2:retrofit:2.3.0'
    compile 'com.squareup.retrofit2:converter-gson:2.3.0'
}
pom.xml
<dependency>
    <groupId>com.squareup.retrofit2</groupId>
    <artifactId>retrofit</artifactId>
    <version>2.3.0</version>
</dependency>
<dependency>
    <groupId>com.squareup.retrofit2</groupId>
    <artifactId>converter-gson</artifactId>
    <version>2.3.0</version>
</dependency>
Retrofit 1.9
如果你仍然依赖 Retrofit 1.9,您需要声明OkHttp,因为它功能作为网络层为Retrofit。
build.gradle
dependencies {
    // Retrofit & OkHttp
    compile 'com.squareup.retrofit:retrofit:1.9.0'
    compile 'com.squareup.okhttp:okhttp:2.7.2'
}
pom.xml
<dependency>
    <groupId>com.squareup.retrofit</groupId>
    <artifactId>retrofit</artifactId>
    <version>1.9.0</version>
</dependency>
<dependency>
    <groupId>com.squareup.okhttp</groupId>
    <artifactId>okhttp</artifactId>
    <version>2.7.2</version>
</dependency>
1.4 Android’s Network Permission
Retrofit 执行HTTP请求对一个API运行在互联网上服务器。执行那些请求来自一个Android应用程序请求网络权限打开网络套接字。你需要定义这个权限在AndroidManifest.xml文件。如果你还没有设置这个网络权限,请增加下面这行在你的AndroidManifest.xml文件。
<uses-permission android:name="android.permission.INTERNET" /> 现在你的项目已经准备好继承Retrofit,让我们创建一个Android API/HTTP 客户端。
1.5 How to Describe API Endpoints
之前,你可以开始你的第一个请求,您需要描述你想交互的API端点。在本教程中,我们会描述一个简单的GitHub端点。我们将详细介绍API端点描述在后面的教程。
首先,你必须创建一个接口,定义所需的方法。
GitHub Client
下面的代码定义了GitHubClient和一个方法reposForUser请求列表仓库为一个给定的用户。@GET注释声明这个请求使用HTTPGET方法。代码片段也演示了Retrofit的path 参数替换功能的使用。在定义的方法{user}path将替换给定的变量值当调用reposForUser方法
Retrofit 2
public interface GitHubClient {
    @GET("/users/{user}/repos")
    Call<List<GitHubRepo>> reposForUser(
        @Path("user") String user
    );
}
Retrofit 1.9
public interface GitHubClient {
    @GET("/users/{user}/repos")
    void reposForUser(
        @Path("user") String user,
        Callback<List<GitHubRepo>> callback
    );
}
有定义个类GitHubRepo。这个类包含请求的类属性映射这个响应数据。
public class GitHubRepo {
    private int id;
    private String name;

    public GitHubRepo() {
    }

    public int getId() {
        return id;
    }

    public String getName() {
        return name;
    }
}
关于前面提到的JSON映射:GitHubClient接口定义了一个方法叫reposForUser和返回类型List< GitHubRepo >。Retrofit 确保服务器响应得到正确的映射(以防响应匹配给定的类)
1.6 Retrofit REST Client
描述了API接口和对象模型之后,下面准备一个实际的请求。Retrofit 的所有请求是基于 RestAdapter (v1.9)或者Retrofit (v2.0)类。两个版本中你创建和配置他们流利的API。为此,您可以使用builder为所有请求设置一些选项,例如base URL或converter。我们会详细的讲解所有可用选项在后面的教程。
一旦你创建一个adapter,你可以创建一个client。您将使用client来执行实际的请求。
Retrofit 2
String API_BASE_URL = "https://api.github.com/";

OkHttpClient.Builder httpClient = new OkHttpClient.Builder();

Retrofit.Builder builder =
    new Retrofit.Builder()
            .baseUrl(API_BASE_URL)
            .addConverterFactory(
                GsonConverterFactory.create()
            );

Retrofit retrofit =
    builder
        .client(
            httpClient.build()
        )
        .build();

GitHubClient client =  retrofit.create(GitHubClient.class);
Retrofit 1.9
String API_BASE_URL = "http://your.api-base.url";

RestAdapter.Builder builder =
    new RestAdapter.Builder()
        .setEndpoint(API_BASE_URL)
        .setClient(
            new OkClient(new OkHttpClient())
        );

RestAdapter adapter = builder.build();

GitHubClient client = adapter.create(GitHubClient.class);
在我们的例子,GitHub的API base URL是https://api.github.com/。在上面的代码片段中,我们仅仅与最低的选择。有很多选项可用于精确控制你的请求。但它足以使我们的第一个请求的目的!
1.7 JSON Mapping
在大多数情况请求一个服务器,和来自服务器的响应不是一个java对象。它们是映射到一些语言中立格式像JSON。由于GitHub的API使用JSON,我们需要准备Retrofit 为它。
Retrofit 1.9 默认附带了Google的Gson(将JSNO解析成一个java对象)。你需要做的是定义个响应对象类和响应将自动映射。
当使用Retrofit 2 ,你需要增加一个转换明确到 Retrofit对象,以上,我们添加下面这行在我们的build.gradle文件导入Gson转换在Retrofit 2。
compile 'com.squareup.retrofit2:converter-gson:2.3.0' 如果在我们下面的章节开始,你已经完成这个。
1.8 Retrofit in Use
做大量的准备工作后,现在是时候来获得收益,最后让你的请求。好消息是:它只会是几行!
Retrofit 1.9
对于Retrofit 1.9,你传入一个callback最为最后的参数,一旦Retrofit已经完成请求,这个callback得到执行。也有一个简单的方法通过使用同步请求,但这些并不可用在大多数Android的用例。
// Create a very simple REST adapter which points the GitHub API endpoint.
GitHubClient client = adapter.create(GitHubClient.class);

// Fetch a list of the Github repositories.
client.reposForUser("fs-opensource", new Callback<List<GitHubRepo>>() {
    @Override
    public void success(List<GitHubRepo> repos, Response response) {
        // The network call was a success and we got a response
        // TODO: use the repository list and display it
    }

    @Override
    public void failure(RetrofitError error) {
        // the network call was a failure or the server send an error
        // TODO: handle error
    }
});
Retrofit 2.0
在Retrofit 2,你也使用你的client对象。然而,这里你不需要传入一个callback作为最后一个参数。你使用client得到一个call对象,一旦你通过Retrofit调用.enququecall 对象将被创建。也有一个选项做一个同步的请求,但是在后面查看。
// Create a very simple REST adapter which points the GitHub API endpoint.
GitHubClient client =  retrofit.create(GitHubClient.class);

// Fetch a list of the Github repositories.
Call<List<GitHubRepo>> call =
    client.reposForUser("fs-opensource");

// Execute the call asynchronously. Get a positive or negative callback.
call.enqueue(new Callback<List<GitHubRepo>>() {
    @Override
    public void onResponse(Call<List<GitHubRepo>> call, Response<List<GitHubRepo>> response) {
        // The network call was a success and we got a response
        // TODO: use the repository list and display it
    }

    @Override
    public void onFailure(Call<List<GitHubRepo>> call, Throwable t) {
        // the network call was a failure
        // TODO: handle error
    }
});
在这两种情况下,您应该能够使你的第一个请求与Retrofit。如果一切顺利,Retrofit会返回你一个方便的List< GitHubRepo >,您可以进一步在应用程序中使用来显示数据。
最初,Retrofit看起来很复杂。我们承诺,它很干净,有回报,如果你工作在一个更大的项目。如果你花更多的时间阅读更多的教程,你也很快就会爱Retrofit。
Additional Resources
二、Retrofit 2 — Basics of API Description
2.1 How to Describe API Endpoints
在我们学习了第一章节后,我们描述所有的Retrofit请求在一个类接口。我们的第一个例子,演示了一些功能,这是一个:
public interface GitHubClient {
    @GET("/users/{user}/repos")
    Call<List<GitHubRepo>> reposForUser(
        @Path("user") String user
    );
}
是时候看看所有的选项的细节
2.2 HTTP Method
你已经知道我们使用注释在Java接口的方法来描述单个API端点和最终,处理请求。第一件事情是定义HTTP请求方法像:GET,POST,PUT,DELETE,等等。Retrofit 提供了注释为每一个主要的标准请求方法。你只要使用适当的Retrofit注释为每个HTTP方法:@GET,@POST,@PUT,@DELETE@PATCH,@HEAD。
你总是需要指定什么样的请求方法端点期望从你的应用程序。如果你从未听说过HTTP请求方法,了解它在维基百科上的HTTP页面。你应该能够pull预期的HTTP请求方法从API文档。
一些简单的例子:@GET,@PUT,@DELETE
public interface FutureStudioClient {
    @GET("/user/info")
    Call<UserInfo> getUserInfo();

    @PUT("/user/info")
    Call<UserInfo> updateUserInfo(
        @Body UserInfo userInfo
    );

    @DELETE("/user")
    Call<Void> deleteUser();
}
2.3 HTTP Resource Location
额外的,你需要增加相关的端点URL作为一个String参数在注释。例如:@GET("/user/info")。在大多数情况,你仅传入一个相关的URL,和不是一个完整的URL(像http://futurestud.io/api/user/info)。这个的优点,Retrofit只有要求base URL(http://futurestud.io)。如果你改变API base URL,你仅仅必须改变一个地方。此外,它使一些更高级的东西,像动态base URL,容易得多。不过,您可以指定一个完整的URL。
一个简单的例子:
public interface FutureStudioClient {
    @GET("/user/info")
    Call<UserInfo> getUserInfo();

    @PUT("/user/info")
    Call<UserInfo> updateUserInfo(
        @Body UserInfo userInfo
    );

    @DELETE("/user")
    Call<Void> deleteUser();

    // example for passing a full URL
    @GET("https://futurestud.io/tutorials/rss/")
    Call<FutureStudioRssFeed> getRssFeed();
}
2.4 Function Name & Return Type
你现在有一个HTTP请求方法注释是被谁使用的想法。然而,我们没有讨论实际的java方法声明:Call<UserInfo> getUserInfo();。它包含三个部分:
- 方法名称
- 方法返回类型
方法参数
让我们从容易的开始:方法名字。你可以自由的定义这个方法名字。Retrofit不关心和它不会对功能有任何影响。但是,你应该选择一个名字,帮助你和其他开发者理解这个API请求。
另一方面,方法的返回类型是至关重要的。你必须定义一种你期望从服务器的数据。例如:当你请求一些用户信息,你大概指定它作为 Call<UserInfo>返回值。UserInfo类包含用户数据属性。Retrofit将自动映射,你不需要做任何手动解析。如果你想要原始响应,你可以使用ResponseBody 替代指定的类像 UserInfo。如果你不关心所有的服务器响应,你可以使用Void。在所有这些情况下,你不得不把它变成一个类型Retrofit Call<>类。
最后,这种高度取决于API端点,您可以将参数传递给方法。有多种可能的选项,所以我们就联系你一些选项:
@Body:发送一个java对象作为请求体
@Url:使用动态的URL
@Field:发送数据作为 form-urlencoded
再次,演示了一些用例:
public interface FutureStudioClient {
    @GET("/user/info")
    Call<UserInfo> getUserInfo();

    @PUT("/user/info")
    Call<Void> updateUserInfo(
        @Body UserInfo userInfo
    );

    @GET
    Call<ResponseBody> getUserProfilePhoto(
        @Url String profilePhotoUrl
    );
}
由于path 和query 参数非常普遍,我们将更详细地讨论他们在接下来的两个部分。
2.5 Path Parameters
REST APIs 是构建在动态的URLs。你访问资源通过替换URL的部分,例如得到我们第三个章节在我们的页面大概是http://futurestud.io/api/tutorials/3。3在最后指定你想访问哪个章节。Retrofit提供了一种简单的方式取代这些所谓的path参数。您已经看到入门教程的一个例子:
public interface GitHubClient {
    @GET("/users/{user}/repos")
    Call<List<GitHubRepo>> reposForUser(
        @Path("user") String user
    );
}
这里,{user}表明Retrofit这个值是动态的和将在准备请求的时候设置。如果你包括一个path参数在URL,你需要增加一个@path()方法参数。@path()值匹配占位符在URL(在这个情况他必须是@path("user"))。你可以是哟过多个占位符,如果需要。只要确保你总是匹配参数的确切数额。
2.6 Query Parameters
另一个很大程度的动态url查询参数。如果你已经使用我们的过滤器,你看到他们在我们的网站:https://futurestud.io/tutorials?filter=video。?filter=video是查询参数,进一步描述了请求的资源。与路径参数不同,你不需要将它们添加到注释URL。您可以简单地添加一个方法参数@Query()和查询参数名称,和你很好去描述的类型。Retrofit会自动将它附加到请求。如果你通过一个null值作为查询参数,Retrofit会忽略它。你也可以添加多个查询参数在以后章节讲解。
public interface FutureStudioClient {
    @GET("/tutorials")
    Call<List<Tutorial>> getTutorials(
        @Query("page") Integer page
    );

    @GET("/tutorials")
    Call<List<Tutorial>> getTutorials(
            @Query("page") Integer page,
            @Query("order") String order,
            @Query("author") String author,
            @Query("published_at") Date date
    );
}
在上面这个例子,您也可以删除第一个getTutorials()方法,使用第二个通过null值作为最后的三个参数的值。
三、Retrofit 2 — Creating a Sustainable Android Client
3.1 The ServiceGenerator
在我们的第一章节你已经知道,Retrofit对象和它的builder是所有请求的核心。这里你配置和准备请求,响应,认证,日志和错误处理。不幸的是,我们看到太多的开发人员只是复制粘贴这些部分而不是分离到一个干净的类。ServiceGenerator将给你我们的解决方案。
让我们开始简单的代码。在它当前的状态,它仅仅定义一个方法去创建一个基本的REST 客户端为一个给定的类或者接口,返回一个服务器类来自这个接口。
public class ServiceGenerator {

    private static final String BASE_URL = "https://api.github.com/";

    private static Retrofit.Builder builder =
            new Retrofit.Builder()
                    .baseUrl(BASE_URL)
                    .addConverterFactory(GsonConverterFactory.create());

    private static Retrofit retrofit = builder.build();

    private static OkHttpClient.Builder httpClient =
            new OkHttpClient.Builder();

    public static <S> S createService(
        Class<S> serviceClass) {
        return retrofit.create(serviceClass);
    }
}
ServiceGenerator类使用Retrofit的 Retrofit builder去创建一个新的REST客户端和给定API base url(BASE_URL)。例如,位于GitHub的API基础url https://api.github.com/ ,您必须更新示例url提供了自己的GitHub的url调用你的API。
createService 方法携带一个serviceClass,是API请求注释接口,作为一个参数和创建一个可使用的客户端为它。在得到的结果的客户端你将能够执行你的网络请求。
3.2 Why Is Everything Declared Static Within the ServiceGenerator?
你大概想知道为什么我们使用静态的字段和方法在ServiceGenerator类。实际上,它有一个简单的原因:我们想要使用相似的对象(OkHttpClient,Retrofit,…)在app只打开一个socket连接处理所有的请求和响应包括缓存等等。它的常见的练习是只打开一个OkHttpClient实例去重复打开socket连接。这意味着,我们要么需要注入OkHttpClient这类通过依赖注入或使用一个静态字段。正如您可以看到的,我们选择使用静态字段。因为我们使用OkHttpClient在这个类,我们需要让所有字段和方法静态。
另外加快工作效率,我们可以节省一点宝贵的内存在移动设备上,当我们不用一遍又一遍地重建相同的对象。
3.3 Using the ServiceGenerator
还记得我们第一个章节的代码吗?
String API_BASE_URL = "https://api.github.com/";

OkHttpClient.Builder httpClient = new OkHttpClient.Builder();

Retrofit.Builder builder =
    new Retrofit.Builder()
            .baseUrl(API_BASE_URL)
            .addConverterFactory(
                GsonConverterFactory.create()
            );

Retrofit retrofit =
    builder
        .client(
            httpClient.build()
        )
        .build();

GitHubClient client = retrofit.create(GitHubClient.class); 对于一个请求,这个开起来很好。但是如果你有几十个网络请求在你的app。它将是一个噩梦。在我们的ServiceGenerator,你仅仅需要单一的一行:
GitHubClient client = ServiceGenerator.createService(GitHubClient.class); 所有的准备我们将移动到ServiceGenerator
不幸的是,在大多数情况ServiceGenerator不能保留这么简单。因此,上面的代码仅仅是给你一个起点。你需要适应它你的需要就像我们会做在其他教程。然而,在接下来的两个部分,我们将探讨一些可能的变化。
3.4 Preparing Logging
常见的一种希望,开发人员是知道什么样的数据实际上是发送和接收通过Retrofit。之后有一个完整的教程在Retrofit与Logging 。
Logging与Retrofit 2是通过一个名为HttpLoggingInterceptor的拦截器。你需要添加OkHttpClient这个拦截器的实例。例如,您可以解决它通过以下方式:
public class ServiceGenerator {

    private static final String BASE_URL = "https://api.github.com/";

    private static Retrofit.Builder builder =
            new Retrofit.Builder()
                    .baseUrl(BASE_URL)
                    .addConverterFactory(GsonConverterFactory.create());

    private static Retrofit retrofit = builder.build();

    private static HttpLoggingInterceptor logging =
            new HttpLoggingInterceptor()
                    .setLevel(HttpLoggingInterceptor.Level.BODY);

    private static OkHttpClient.Builder httpClient =
            new OkHttpClient.Builder();

    public static <S> S createService(
        Class<S> serviceClass) {
        if (!httpClient.interceptors().contains(logging)) {
            httpClient.addInterceptor(logging);
            builder.client(httpClient.build());
            retrofit = builder.build();
        }

        return retrofit.create(serviceClass);
    }
}
有几件事你需要注意的。首先,确保你没有偶多次添加拦截!我们检查httpClient.interceptors().contains(logging)如果日志记录拦截器已经存在。其次,确保不会构建Retrofit对象在每个createService调用。否则整个ServiceGenerator的目的是打败了。
Prepare Authentication
请求认证有一点点不同。你可以学习更多在之后的章节。虽然每个验证实现的细节有些不同,你可能要改变ServiceGenerator。变化之一是,您需要额外的参数传递给createService创建一个客户端。
让我们来看一个例子 Hawk认证:
public class ServiceGenerator {

    private static final String BASE_URL = "https://api.github.com/";

    private static Retrofit.Builder builder =
            new Retrofit.Builder()
                    .baseUrl(BASE_URL)
                    .addConverterFactory(GsonConverterFactory.create());

    private static Retrofit retrofit = builder.build();

    private static HttpLoggingInterceptor logging =
            new HttpLoggingInterceptor()
                    .setLevel(HttpLoggingInterceptor.Level.BODY);

    private static OkHttpClient.Builder httpClient =
            new OkHttpClient.Builder();

    public static <S> S createService(
            Class<S> serviceClass, final HawkCredentials credentials) {
        if (credentials != null) {
            HawkAuthenticationInterceptor interceptor =
                    new HawkAuthenticationInterceptor(credentials);

            if (!httpClient.interceptors().contains(interceptor)) {
                httpClient.addInterceptor(interceptor);

                builder.client(httpClient.build());
                retrofit = builder.build();
            }
        }

        return retrofit.create(serviceClass);
    }
}
我们的createService 现在已经有第二个参数HawkCredentials。如果你传入一个不是null值。它将创建必要的Hawk认证拦截器和增加它到Retrofit客户端。我们也需要重新构建Retrofit去应用我们的改变在下一个请求。
一个警告,你可能会看到不同版本的ServiceGenerator其他章节。不要混淆!我们也建议您保持ServiceGenerator微小的和详细的为用于用例!
四、Retrofit 2 — URL Handling, Resolution and Parsing
4.1 Url Handling Introduction
在Retrofit 2,你所有的url解决使用HttpUrl类的由OkHttp 3。这是一个棒极了的类,它工作得很好。尽管如此,它介绍方式的变化需要处理所有你的urls在你的app:基于和端点url以及任何动态url定义为一个特定的请求。
记住:你的urls在Retrofit 2是处理像链接在一个web 页面:….
4.2 baseUrl Resolution
使用Retrofit,你是请求一个指定的API总是有一个相同的基本地址。这个基本地址分享相同的协议和主机和你可以定义它在一个单一的地方(使用Retrofit.Builder())和改变它,如果必要的话不触碰你的app的任何端点。
Retrofit.Builder builder = new Retrofit.Builder()
            .baseUrl("https://your.base.url/api/");
这个base url被任何请求和任何端点值使用,像@GET等等,得到对地址的解决。你应该在base url的末尾添加一根斜杠:/。当然我们告诉你为什么:每个端点定义与一个相对路径地址正确解决,因为它将自己添加到base url已经定义或包括路径参数。
让我们看一个例子:
# Good Practice
base url: https://futurestud.io/api/
endpoint: my/endpoint
Result:   https://futurestud.io/api/my/endpoint

# Bad Practice
base url: https://futurestud.io/api
endpoint: /my/endpoint
Result:   https://futurestud.io/my/endpoint

# Bad Practice
base url: https://futurestud.io/api
endpoint: my/endpoint
Result:   https://futurestud.io/my/endpoint
上面的例子演示如果你没有在base url的末尾添加一个根斜杠。api路径参数将被忽略和移除从请求的url。
实际上,Retrofit 可以帮助你,如果你传入一个base url 而没有一根斜杠,它将抛出一个异常告诉你的base url需要在末尾添加一根斜杠。
4.3 Absolute Urls
从上面你已经看到了bad practice,你可以传入绝对urls到端点urls。然而,这种技术可能是必要的在app调用适当的端点。随着时间的推移,你的后端将发布一个新的API版本。依赖在版本的类型,让我们假设你的后端开发人员选择url中的API版本。你需要将你的b as eurl 从v2到v3。在这一点上,你必须照顾所有的突发变化引入的API v3。依赖于选定的v2端点,您可以直接使用一个绝对url来指定一个API版本。
# Example 1
base url: https://futurestud.io/api/v3/
endpoint: my/endpoint
Result:   https://futurestud.io/api/v3/my/endpoint

# Example 2
base url: https://futurestud.io/api/v3/
endpoint: /api/v2/another/endpoint
Result:   https://futurestud.io/api/v2/another/endpoint
当你改变你的base url的情况下,你自动升级所有端点使用新的url和请求。正如你所看到的,Example 1像预期的那样工作,只是在base url附加的端点url对v3的API调用。如果你不希望打破改变v3端点,这是最方便的升级方式。
Example 2演示的情况,你升级你的base url v3和仍在使用的API v2选择端点。这可能导致在你的客户端巨大的升级,你还想从中能够带来其他好处为其他端点的API v3。
4.4 Dynamic Urls or Passing a Full Url
Retrofit 2,你能够通过一个给定的url端点然后用于请求。如果你想阅读更多关于动态url在Retrofit2中,看后面章节)
当使用一个动态url,Retrofit是非常灵活的,可以保持你的base url协议。这意味着,如果你定义你的base url是https,你想确保所有其他请求在你的应用程序也使用https,你可以只在开始你的请求urls使用两根斜杠://。这是常见的做法在web浏览器警告以避免使用安全和不安全的资源在同一页。
# Example 3 — completely different url
base url: http://futurestud.io/api/
endpoint: https://api.futurestud.io/
Result:   https://api.futurestud.io/

# Example 4 — Keep the base url’s scheme
base url: https://futurestud.io/api/
endpoint: //api.futurestud.io/
Result:   https://api.futurestud.io/

# Example 5 — Keep the base url’s scheme
base url: http://futurestud.io/api/
endpoint: //api.github.com
Result:   http://api.github.com
Example 3展示你使用一个完整的url替换base url。这个例子是有利的当请求一个文件或者图片在不同的位置,像一些文件是在你自己的服务器和其他在其他的服务器。你仅仅接收本地的作为url,你能够通过传入一个完成的url为你的请求端点。
更早的提到,你可以保持base url的协议。在Example 4,我们不使用路径段API,而是一个域。我们仍然想保持前面定义的协议,因此只传入在完成的url上添加//。
Example 5使用相同的协议作为定义的base url,但是取代了主机和路径段与给定端点url。
五、Retrofit 2 — How to Change API Base Url at Runtime
5.1 The Core: ServiceGenerator
长时间的读者会知道我们大部分的Retrofit教程利用ServiceGenerator类从创建一个可持续的安卓客户端教程。因为我们将主要从事ServiceGenerator代码,确保你熟悉这门课。
在当前版本ServiceGenerator使用多个静态字段和一个字符串常量API_BASE_URL,拥有API base url:
public class ServiceGenerator {
    public static final String API_BASE_URL = "http://futurestud.io/api";
    private static Retrofit retrofit;

    private static Retrofit.Builder builder =
            new Retrofit.Builder()
                    .addConverterFactory(GsonConverterFactory.create())
                    .baseUrl(API_BASE_URL);

    private static OkHttpClient.Builder httpClient =
            new OkHttpClient.Builder();

    // No need to instantiate this class.
    private ServiceGenerator() {

    }

    public static <S> S createService(Class<S> serviceClass, AccessToken token) {
        String authToken = token.getTokenType().concat(token.getAccessToken());
        return createService(serviceClass, authToken);
    }

    // more methods
    // ...
}
5.2 Adjusting the ServiceGenerator
这个设置你没有机会在运行时改变API_BASE_URL常数。你改变它的源代码,编译一个新的.apk和测试一遍。因为这是很不方便,如果你使用多个API部署,我们将作细微改动ServiceGenerator类:
public class ServiceGenerator {
    public static String apiBaseUrl = "http://futurestud.io/api";
    private static Retrofit retrofit;

    private static Retrofit.Builder builder =
            new Retrofit.Builder()
                    .addConverterFactory(GsonConverterFactory.create())
                    .baseUrl(apiBaseUrl);

    private static OkHttpClient.Builder httpClient =
            new OkHttpClient.Builder();

    // No need to instantiate this class.
    private ServiceGenerator() {
    }

    public static void changeApiBaseUrl(String newApiBaseUrl) {
        apiBaseUrl = newApiBaseUrl;

        builder = new Retrofit.Builder()
                        .addConverterFactory(GsonConverterFactory.create())
                        .baseUrl(apiBaseUrl);
    }

    public static <S> S createService(Class<S> serviceClass, AccessToken token) {
        String authToken = token.getTokenType().concat(token.getAccessToken());
        return createService(serviceClass, authToken);
    }

    // more methods
    // ...
}
让我们检查我们额改变,我们重命名常量API_BASE_URL为没有final字段的apiBaseUrl。我们也增加一个新的static方法changeApiBaseUrl(String newApiBaseUrl),这个方法将改变apiBaseUrl变量。它也创建一个Retrofit.Builder新的版本实例builder。这是重要的,应为我们使用builder请求。如果我们不创建一个新的实例,所有的请求仍使用原始的apiBaseUrl值。
5.3 Example Usage
我们已经得到了必要的改变在ServiceGenerator,让我们使用新的功能:
public class DynamicBaseUrlActivity extends AppCompatActivity {

    public static final String TAG = "CallInstances";
    private Callback<ResponseBody> downloadCallback;

    @Override
    protected void onCreate(Bundle savedInstanceState) {
        super.onCreate(savedInstanceState);
        setContentView(R.layout.activity_file_upload);

        downloadCallback = new Callback<ResponseBody>() {
            @Override
            public void onResponse(Call<ResponseBody> call, Response<ResponseBody> response) {
                Log.d(TAG, "server contacted at: " + call.request().url());
            }

            @Override
            public void onFailure(Call<ResponseBody> call, Throwable t) {
                Log.d(TAG, "call failed against the url: " + call.request().url());
            }
        };

        // first request
        FileDownloadService downloadService = ServiceGenerator.create(FileDownloadService.class);
        Call<ResponseBody> originalCall = downloadService.downloadFileWithFixedUrl();
        originalCall.enqueue(downloadCallback);

        // change base url
        ServiceGenerator.changeApiBaseUrl("http://development.futurestud.io/api");

        // new request against new base url
        FileDownloadService newDownloadService = ServiceGenerator.create(FileDownloadService.class);
        Call<ResponseBody> newCall = newDownloadService.downloadFileWithFixedUrl();
        newCall.enqueue(downloadCallback);
    }
}
在这个activity我们演示了连个请求下载一个文件从服务器。第一个请求执行之后,我们改变base url在我们的开发环境和新的ServiceGenerator.changeApiBaseUrl()方法。
最后,我们使用了相同的下载请求,当我们开启app,我们得到了以下log:
D/CallInstances: server contacted at: http://futurestud.io/resource/example.zip
D/CallInstances: server contacted at: http://development.futurestud.io/resource/example.zip
5.4 When To Change the Base Url at Runtime
上面演示代码简化了事情。我们通常在调试版本应用中实现一个按钮的,测试人员可以选择希望的服务器环境。因此,根据您的情况,您可能需要编写更多的代码来决定何时改变base url。
同时,我们只推荐这样做用于调试目的。我们不认为这是一个好方法让你的应用程序使用不同的服务器在同一时间。如果您的应用程序需要处理多个API,寻找一个不同的版本。动态url教程可能是一个好的开始。
最后,请测试如果你可以简单的选择你的app环境。例如,如果你在服务器端存储用户和认证信息,转换环境可能导致问题。生产数据库最有可能不包含相同的用户作为开发数据库,对吗?在我们的app中,我们删除所有相关的用户数据,并迫使一个新的,刷新登录后测试人员通过新base url改变了环境。
5.5 Summary
在这个章节,你学了怎么改变API base url在运行时。这可以非常有用,如果你处理多个API部署。我们已经向你们展示必要的增强ServiceGenerator类以及如何进行必要的请求。你也必须意识到可能的后果切换时API在运行时部署。不过,如果你花了一个小时为你实现这个应用程序,你可以节省的编译时间!
六、 Retrofit 2 — Upgrade Guide from 1.9
6.1 Introduction
Retrofit 终于第二个主要发布2016年3月。Retrofit 2有各种根本性的变化,而且还包括打破更改内部API。需要你更新你的代码当使用Retrofit 2。
6.2 Maven & Gradle Dependencies
Retrofit 可获得的作为Maven和Gradle的依赖。在Retrofit 1,需要导入底层的HTTP客户端。默认情况下,Retrofit 2利用OkHttp工作已经定义一个依赖作为Retrofit 2本身。
Gradle: Retrofit & OkHttp
compile 'com.squareup.retrofit2:retrofit:2.2.0' 如果你不想依赖OkHttp 节点依赖片段在Retrofit 2中,您可以导入所需的版本OkHttp本身。为了避免混乱和双重导入OkHttp,告诉gradle明确排除Retrofit 的依赖。
compile ('com.squareup.retrofit2:retrofit:2.2.0') {
  // exclude Retrofit’s OkHttp peer-dependency module and define your own module import
  exclude module: 'okhttp'
}
compile 'com.squareup.okhttp3:okhttp:3.6.0'
Maven: Retrofit & OkHttp
<dependency>
  <groupId>com.squareup.retrofit2</groupId>
  <artifactId>retrofit</artifactId>
  <version>2.2.0</version>
</dependency>
<dependency>
  <groupId>com.squareup.okhttp</groupId>
  <artifactId>okhttp</artifactId>
  <version>3.6.0</version>
</dependency>
retrofit 2不附带Gson默认情况下。之前,你不需要担心任何集成转换器,您可以使用Gson开箱即用的。这个库变化影响你的应用,你需要导入一个转换器作为兄弟姐妹包。之后我们会接触到转换器在这篇文章向您展示如何配置Gson或其他任何响应转换为您的应用程序。
Converters
compile 'com.squareup.retrofit2:converter-gson:2.2.0' RxJava也不是默认集成了。你需要这些额外的导入添加到您的app的依赖关系得到reactive功能在你的应用程序。
RxJava
compile 'com.squareup.retrofit2:adapter-rxjava:2.2.0'
compile 'io.reactivex:rxandroid:1.0.1'
6.3 RestAdapter —> Retrofit
以前叫RestAdapter的类是重命名为 Retrofit。建造者模式仍然可用,您可以很容易地链接方法可用来定制默认的行为。
Retrofit 1.9
RestAdapter.Builder builder = new RestAdapter.Builder(); Retrofit 2.x
Retrofit.Builder builder = new Retrofit.Builder(); 6.4 setEndpoint —> baseUrl
你已经阅读了关于重新命名从RestAdapter到Retrofit。有一个其他的改变在Retrofit类影响这个base url(之前的名字是endpoint url)。在Retrofit 1,setEndpoint(String url)方法。
Retrofit 1.9
RestAdapter adapter = new RestAdapter.Builder()
    .setEndpoint(API_BASE_URL);
    .build();

YourService service = adapter.create(YourService.class);
在Retrofit 2,这个方法是命名为baseUrl(String url)
Note:你可以在调用Retrofit.Builder之前调用build(),你需要在之前定义base url。
Retrofit 2.x
Retrofit retrofit = new Retrofit.Builder()
    .baseUrl(API_BASE_URL);
    .build();

YourService service = retrofit.create(YourService.class);
有其他的主要的改变在API url处理,下个小节解释改变的更多细节。
6.5 Base Url Handling
有一个完整的新的Url处理在Retrofit 2。这是非常重要的理解当从1.x更新至2.x!
之前,定义endpoint总是被使用为默认的url请求,在你的接口定义代表调用API endpoints,你定义你的部分路线包括query 或者paht 参数,请求体或者多个请求multiparts。
API endpoint url和部分url 连接成最终的url当请求时发送。演示这个所有的理论,让我们看一个例子:
Retrofit 1.x
public interface UserService {
    @POST("me")
    User me();
}

RestAdapter adapter = RestAdapter.Builder()
    .setEndpoint("https://your.api.url/v2/");
    .build();

UserService service = adapter.create(UserService.class);

// the request url for service.me() is:
// https://your.api.url/v2/me
在Retrofit 2.x,你需要调整你的思想在API base url。Retrofit 1只连接定义的字符串值作为最终的请求url。这种行为变化在Retrofit 2因为现在创建请求url使用HttpUrl.resolve()方法。这将创建链接类似于众所周知的< a href >。
先把事说清楚,看下面的代码片段说明了新方法解决url。
public interface UserService {
    @POST("/me")
    Call<User> me();
}

Retrofit retrofit = new Retrofit.Builder()
    .baseUrl("https://your.api.url/v2");
    .build();

UserService service = retrofit.create(UserService.class);

// the request url for service.me() is:
// https://your.api.url/me
你看,在部分Url开头的//v2 API endpoint 定义。在部分Url移除开头的/增加到base url 将带来一个期望的结果。
public interface UserService {
    @POST("me")
    Call<User>me();
}

Retrofit retrofit = new Retrofit.Builder()
    .baseUrl("https://your.api.url/v2/");
    .build();

UserService service = retrofit.create(UserService.class);

// the request url for service.me() is:
// https://your.api.url/v2/me
Pro Tip: use relative urls for your partial endpoint urls and end your base url with the trailing slash
/.
6.6 Dynamic Urls
我们想下载一个.zip文件从互联网和文件会有不同的url。文件存储在Amazon的S3或者别的地方。我们的问题是,我们需要创建一个RestAdapter与每个base url 每次我们想加载一个文件。这使你头痛,因为你需要实例化多个HTTP客户端,这是绝对不好的练习。
最后,痛苦的时候会发现在Retrofit 2结束,我们可以使用动态url为每一个endpoint。你可以把HTTP动词注释空和使用 @Url作为方法参数注释。Retrofit将映射提供的url字符串和为你做这项工作。
public interface UserService {
    @GET
    public Call<File> getZipFile(@Url String url);
}
6.7 OkHttp Integrated
你看过这篇文章的开头,你不一定需要导入OkHttp除了Retrofit 本身。Retrofit 2依赖OkHttp 作为HTTP客户端和有自己的依赖库。
在Retrofit 1中,您可以手动设置OkHttp作为选择的HTTP客户端。现在,OkHttp需要使用Call类响应得到封装。
如果您想要导入一个特定版本的OkHttp和不使用Retrofi附带的,使用特定的gradle导入排除Retrofit 的OkHttp内置的依赖:
compile ('com.squareup.retrofit2:retrofit:2.2.0') {
  // exclude Retrofit’s OkHttp peer-dependency module and define your own module import
  exclude module: 'okhttp'
}
compile 'com.squareup.okhttp3:okhttp:3.6.0'
Maven将自动移除节点依赖如果你指定OkHttp作为依赖模式在你的项目。
<dependency>
  <groupId>com.squareup.okhttp</groupId>
  <artifactId>okhttp</artifactId>
  <version>3.6.0</version>
</dependency>
6.8 Interceptors Powered by OkHttp
拦截器是一种强大的方法来定制Retorift 请求。这个特性在Retorfit 1中是有益的,所以会在版本2。一个常见的用例,你想拦截实际的请求是添加单个请求头。根据API实现,你就会想通过传入身份验证令牌值为Authorization 头。
由于Refrofit 严重依赖于OkHttp,你需要定制OkHttpClient和添加一个拦截器。下面的代码片段说明了如何添加一个新的拦截器的使用增加了原始请求的Authorization 和Accept标头和收益与实际执行。
OkHttpClient.Builder httpClient = new OkHttpClient.Builder();
httpClient.addInterceptor(new Interceptor() {
    @Override
    public Response intercept(Chain chain) throws IOException {
        Request original = chain.request();

        // Customize the request
        Request request = original.newBuilder()
                .header("Accept", "application/json")
                .header("Authorization", "auth-token")
                .method(original.method(), original.body())
                .build();

        Response response = chain.proceed(request);

        // Customize or return the response
        return response;
    }
});

OkHttpClient client = httpClient.build();
Retrofit retrofit = new Retrofit.Builder()
    .baseUrl("https://your.api.url/v2/");
    .client(client)
.build();如果你使用自定义OkHttpClient,你需要设置客户端在Retrofit.Builder通过使用.client方法。这个将更新默认的客户端与增强自定的版本。
你可以应用拦截器为几个案例像认证,日志,请求和响应操作等等。
6.9 Synchronous & Asynchronous Requests
如果你想使用Retrofit 1,你熟悉的不同服务接口中的方法声明。同步方法需要返回类型的。相比之下,异步方法需要一个通用的Callback作为最后一个方法参数。
在Retrofit 2,没有区别同步和异步请求。请求现在包裹成一个通用的Call类使用所需的响应类型。下面的段落将给你Retrofit 1与Retrofit 2的差异服务声明和请求执行。
Retrofit 1.9
public interface UserService {
    // Synchronous Request
    @POST("/login")
    User login();

    // Asynchronous Request
    @POST("/login")
    void getUser(@Query String id, Callback<User> cb);
}
在Retrofit 2,没有更多不同的声明。实际的执行类型是定义通过被使用最终Call对象方法
Retrofit 2.x
public interface UserService {
    @POST("/login")
    Call<User> login();
}
6.10 Request Execution
Retorfit 1处理该请求执行通过使用一个返回类型为同步或Callback为异步回调。如果你使用过Retrofit,你熟悉下面的代码块。
Retrofit 1.9
// synchronous
User user = userService.login();

// asynchronous
userService.login(new Callback<User>() {
@Override
    public void success(User user, Response response) {
        // handle response
    }

    @Override
    public void failure(RetrofitError error) {
        // handle error
    }
});
有一个完整的不同的请求执行处理在Retrofit 2。由于每个请求是包装成一个Call 对象,你现在执行请求使用call.execute()为同步和call.enqueue(new Callback<>() {})为异步。下面的例子演示了你怎样执行每一个请求类型
Retrofit 2.x
// synchronous
Call<User> call = userService.login();
User user = call.execute().body();

// asynchronous
Call<User> call = userService.login();
call.enqueue(new Callback<User>() {
    @Override
    public void onResponse(Call<User> call, Response<User> response) {
        // response.isSuccessful() is true if the response code is 2xx
        if (response.isSuccessful()) {
            User user = response.body();
        } else {
            int statusCode = response.code();

            // handle request errors yourself
            ResponseBody errorBody = response.errorBody();
        }
    }

    @Override
    public void onFailure(Call<User> call, Throwable t) {
        // handle execution failures like no internet connectivity
    }
}
在Retrofit 2,即使请求没有成功 onResponse()方法也会执行。Response 类有一个方便的方法 isSuccessful()检测你自己请求处理是否成功(返回状态码2xx)和你可以使用响应对象为进一步处理。如果这状态码是2xx,你需要处理错误。如果你期望响应体是失败的情况(像一个错误信息)。你可以解析这个对象通过使用ResponseBody类的 errorBody()方法。
同步请求在Android大概会导致app崩溃在Android 4.0+。使用异步请求来避免阻塞主UI线程会导致应用程序的失败。
6.11 Cancel Requests
在Retrofit 1,没有办法取消请求,即使他们还没有执行。这变化在Retrofit 2和你最后能够取消任何请求如果HTTP协议已经没有执行它了。
Call<User> call = userService.login();
User user = call.execute().body();
// changed your mind, cancel the request
call.cancel(); 没关系如果你执行一个同步或异步请求,OkHttp不会发送请求,如果你改变你的思维不够快。
6.12 No Default Converter
以前Retorift的版本1附带Gson集成作为默认JSON转换器。即将发布的没有任何默认的集成器。您需要定义你喜欢的转换器作为一个依赖在你的项目。如果你想使用Gson,您可以使用以下gradle导入定义兄弟模块:
compile 'com.squareup.retrofit2:converter-gson:2.2.0' 有多个转换器可以获得,下面的列表展示需要导入到得到更新转换器为Retrofit 2
Available Converters
- Gson: com.squareup.retrofit2:converter-gson:2.2.0
- Moshi: com.squareup.retrofit2:converter-moshi:2.2.0
- Jackson: com.squareup.retrofit2:converter-jackson:2.2.0
- SimpleXML:com.squareup.retrofit2:converter-simplexml:2.2.0
- ProtoBuf:com.squareup.retrofit2:converter-protobuf:2.2.0
- Wire: com.squareup.retrofit2:converter-wire:2.2.0
如果上面的列表没有你需要的,你可以创建你自己的通过实现抽象类Converter.Factory。在后面我们也会讲解。
6.13 Add Converter to Retrofit
我们需要手动添加所需的转换器到Retrofit。上面的部分描述了如何导入一个给定的转换器模块,另外,你需要插入一个或者多个ConverterFactory到Retrofit对象。
Retrofit retrofit = new Retrofit.Builder()
.baseUrl("https://your.api.url/v2/");
.addConverterFactory(ProtoConverterFactory.create())
.addConverterFactory(GsonConverterFactory.create())
.build();上面的例子插入两个转换器到Retrofit。您指定的顺序转换器很重要!假设下面的场景,澄清转换器秩序的重要性。由于协议缓冲区可能用JSON编码,Retrofit使用Gson试图解析数据如果它被定义为第一个转换器。但是我们想要的是原型转换器试图解析数据,如果不能处理它,把它传给下一个转换器(如果有另一个可用)。
6.14 RxJava Integration
Retrofit 1已经集成了3个请求执行机制:同步和异步和RxJava。在Retrofit 2,仅仅同步和异步还是可获得的。因此,Retrofit开发团队创建了一个方法插入额外的执行机制到Retrofit。你可以添加多个应用程序像RxJava或Futures的机制。
得到Rxjava功能支持Retrifit,需要导入以下两个依赖项。第一个依赖是RxJava CallAdapter,让Retrofit可以知道有一种新的方式来处理请求。准确地说,这意味着你可以通过替换Call< T >通过Customized < T >。在RxJava的情况,我们将改变调用Call< T >与Observable >。
第二个依赖是需要AndroidSchedulers类需要订阅代码在Android的主线程。
Gradle Dependencies
compile 'com.squareup.retrofit2:adapter-rxjava:2.2.0'
compile 'io.reactivex:rxandroid:1.0.1' 下面的事需要增加新的CallAdapter 到Retrofit 对象创建服务实例之前。
Retrofit retrofit = new Retrofit.Builder()
.baseUrl(baseUrl);
.addCallAdapterFactory(RxJavaCallAdapterFactory.create())
.addConverterFactory(GsonConverterFactory.create())
.build();代码比所有的理论更好。这就是为什么我们演示下一个代码示例来说明使用RxJava时的变化。首先,我们声明一个服务接口。之后,我们假设有一个userService实例创建并可以直接利用被观察者到观察者在Android的主线程。我们还通过一个被订阅者和订阅者最终将提供成功响应或者错误。
public interface UserService {
@POST("/me")
Observable<User> me();
}
// this code is part of your activity/fragment
Observable<User> observable = userService.me();
observable
.observeOn(AndroidSchedulers.mainThread())
.subscribeOn(Schedulers.io())
.subscribe(new Subscriber<User>() {
@Override
public void onCompleted() {
// handle completed
}
@Override
public void onError(Throwable e) {
// handle error
}
@Override
public void onNext(User user) {
// handle response
}
});
6.15 No Logging by Default (But We’ve Got You Covered!)
我们写了一篇博客文章 on how to get back logging into Retrofit 2 展示过程集成OkHttp日志拦截器。
实际上,也有不幸的消息:没有日志在Retrofit 2了。开发团队删除日志功能。说实话,日志功能不可靠。Jake Wharton显式地声明,日志信息或对象是假定的值和他们无法验证是真实的。实际的请求到达服务器可能改变请求主体或者其他东西。
即使没有集成日志在默认情况下,您可以利用任何Java日志并使用它在一个定制的OkHttp拦截器。
七、Retrofit — How to use OkHttp 3 with Retrofit 1
7.1 Dependencies
首先您需要添加OkHttp 3到您的项目。
此外,您需要的包装类来自Jake Wharton的retrofit1-okhttp3-client的 GitHub库。Jake 已经发布的客户端代码,你可以直接使用这个小助手通过导入Gradle或Maven库。下面的代码片段显示你所需导入的Retrofit工作的OkHttp 3.
Gradle
compile 'com.squareup.retrofit:retrofit:1.9.0'
compile 'com.squareup.okhttp3:okhttp:3.0.0'
compile 'com.jakewharton.retrofit:retrofit1-okhttp3-client:1.0.2'Maven
<dependency>
<groupId>com.squareup.retrofit</groupId>
<artifactId>retrofit</artifactId>
<version>1.9.0</version>
</dependency>
<dependency>
<groupId>com.squareup.okhttp3</groupId>
<artifactId>okhttp</artifactId>
<version>3.0.0</version>
</dependency>
<dependency>
<groupId>com.jakewharton.retrofit</groupId>
<artifactId>retrofit1-okhttp3-client</artifactId>
<version>1.0.2</version>
</dependency> 7.2 Use OkHttp 3 Client in RestAdapter
将依赖增加到你的bulde.gradle文件之后并完成同步,你准备插入OkHttp 3客户端。
在
RestAdapter.Builder builder = new RestAdapter.Builder()
.setClient(new Ok3Client(new OkHttpClient()))
.setEndpoint(API_BASE_URL);留意OkHttpClient和确保你使用OkHttp 3版本。因为OkHttp介绍了名为com.squareup.okhttp3的新组id,你能够有OkHttp 2和3在您的项目。Ok3Client实现所需的Client接口,这意味着没有什么要做,享受OkHttp 3的新特性和改进。
7.3 OkHttp 3 Advantages and Features
更新OkHttp 3,你可以挑选和使用功能强大的拦截器。你需要做的是用你的OkHttpClient请求和响应拦截而不是替代Retrofit的拦截器。
下面的代码块概述了如何使用一个OkHttp 3客户端添加了拦截器和一个身份。优势在Retrofit方面的拦截器是,您可以添加多个,而不仅仅是一个。
OkHttpClient.Builder httpBuilder = new OkHttpClient.Builder();
// add interceptors
httpBuilder.addInterceptor(/** Your Interceptor **/)
httpBuilder.addNetworkInterceptor(/** Your Network Interceptor **/)
httpBuilder.authenticator(/** Your Authenticator **/)
// create the OkHttpClient instance from httpBuilder
OkHttpClient client = httpBuilder.build();
RestAdapter.Builder builder = new RestAdapter.Builder()
.setClient(new Ok3Client(client))
.setEndpoint(API_BASE_URL);我们希望有助于你理解添加OkHttp 3 到你的Retorfit 1项目可以提高项目的质量和开启新的强大的可能性(OkHttp 3拦截器很强大!)与OkHttp 3的优势。
八、Requests Retrofit — Synchronous and Asynchronous Requests
8.1 Synchronous Requests
同步请求在Retrofit 1.9声明是通过定义个返回类型。下面的例子期望一个响应的任务列表,当执行getTasks方法。
Retrofit 2
public interface TaskService {
@GET("/tasks")
Call<List<Task>> getTasks();
}
Retrofit 1.9
public interface TaskService {
@GET("/tasks")
List<Task> getTasks();
}
在Retrofit 2,每个请求是包装成一个Call对象。实际的同步或异步请求是执行不同的在创建Call对象之后使用所需的方法。然而,同步和异步请求的接口定义在Retrofit 2是相同的。
同步方法是执行在主线程,这意味着UI是阻塞的在请求执行期间和在这个时期没有交互是可能的
Warning:同步请求会导致app崩溃在Android 4.0或者更新的版本,你将看到
NetworkOnMainThreadExceptionerror.
同步方法提供直接使用返回值的能力,因为在你的网络请求的一切操作是阻塞的。
对于非阻塞UI,您必须处理请求在自己独立的线程中执行。这意味着,你仍然可以与app交互而本身在等待响应。
8.2 Get Results from Synchronous Requests
让我们来到执行实际的请求。这个行为改变从Retrofit v1到v2。下面的代码片段演示了同步请求执行在Retrofit和假设我们使用熟悉的ServiceGenerator 类
Retrofit 2
TaskService taskService = ServiceGenerator.createService(TaskService.class);
Call<List<Task>> call = taskService.getTasks();
List<Task>> tasks = call.execute().body(); Retrofit 1.9
TaskService taskService = ServiceGenerator.createService(TaskService.class);
List<Task> tasks = taskService.getTasks(); 使用.execute()方法在call 对象中将执行同步请求在Retrofit 2。反序列化响应体是获得的通过在响应对象的.body()方法
8.3 Asynchronous Requests
除了同步回调,Retrofit支持异步请求开箱。异步请求在Retrofit 1.9没有一个返回类型,相反,定义的方法需要一个callback类型作为最后一个参数。
Retrofit 2
public interface TaskService {
@GET("/tasks")
Call<List<Task>> getTasks();
}
Retrofit 1.9
public interface TaskService {
@GET("/tasks")
void getTasks(Callback<List<Task>> cb);
}
Retrofit执行和处理这个方法在一个分开的线程。CallBack类是通用的和映射你定义的返回类型。我们的例子返回一个任何列表和Callback做映射交互
正如上面已经提到的:同步和异步请求在Retrofit 2中的接口定义是相同的。期望的返回类型封装成Call对象和实际的请求执行定义它的类型(同步/异步)。
8.4 Get Results from Asynchronous Requests
使用异步请求迫使你实现Callback 的两个回调方法:success and code>failure。当从一个服务类调用异步的getTasks()方法,你必须实现一个新的Callback 和定义一旦请求完成应该做些什么。下面的代码片段演示了一个模范实现。
Retrofit 2
TaskService taskService = ServiceGenerator.createService(TaskService.class);
Call<List<Task>> call = taskService.getTasks();
call.enqueue(new Callback<List<Task>>() {
@Override
public void onResponse(Call<List<Task>> call, Response<List<Task>> response) {
if (response.isSuccessful()) {
// tasks available
} else {
// error response, no access to resource?
}
}
@Override
public void onFailure(Call<List<Task>> call, Throwable t) {
// something went completely south (like no internet connection)
Log.d("Error", t.getMessage());
}
}Retrofit 1.9
askService taskService = ServiceGenerator.createService(TaskService.class);
taskService.getTasks(new Callback<List<Task>>() {
@Override
public void success(List<Task> tasks, Response response) {
// here you do stuff with returned tasks
}
@Override
public void failure(RetrofitError error) {
// you should handle errors, too
}
});8.5 Get Raw(原生) HTTP Response
如果你需要原始的HTTP响应对象,定义它最为方法的返回类型。Response 类适用于这两种方法都像其他类。
Retrofit 2
call.enqueue(new Callback<List<Task>>() {
@Override
public void onResponse(Call<List<Task>> call, Response<List<Task>> response) {
// get raw response
Response raw = response.raw();
}
@Override
public void onFailure(Call<List<Task>> call, Throwable t) {}
}Retrofit 1.9
// synchronous
@GET("/tasks")
Response getTasks();
// asynchronous
@GET("/tasks")
void getTasks(Callback<Response> cb); 九、Retrofit — Send Objects in Request Body
9.1 Send Objects as Request Body
Retrofit提供了请求体中传递对象的能力。对象可以用作指定HTTP请求体通过@Body注释。Retrofit 2@Body的功能没有改变。
Retrofit 2
public interface TaskService {
@POST("/tasks")
Call<Task> createTask(@Body Task task);
}
Retrofit 1.9
public interface TaskService {
@POST("/tasks")
void createTask(@Body Task task, Callback<Task> cb);
}
定义的Retrofit 转换器(像Gson)将映射定义的对像到JSON和它将最终发送最为请求到你定义的服务器。
9.2 Example
让我们看一个特殊的例子
public class Task {
private long id;
private String text;
public Task(long id, String text) {
this.id = id;
this.text = text;
}
}
实例化一个新的Task对象填充它的属性值id和text。进一步,当传入的这个对象到service类,这对象的字段和值将被转换为JSON。
Retrofit 2
Task task = new Task(1, "my task title");
Call<Task> call = taskService.createTask(task);
call.enqueue(new Callback<Task>() {}); Retrofit 1.9
Task task = new Task(1, "my task title");
taskService.createTask(task, new Callback<Task>)() {}); 调用service的createTask方法将转换task的属性为JSON的格式。task的JSON格式像这样:
{
"id": 1,
"text": "my task title"
}
十、Retrofit — Add Custom Request Header
10.1 Define Custom Request Headers
Retrofit提供了两个选项定义HTTP请求头字段:static和dynamic。Static头不能为不同的请求改变。头的键和值是固定的和初始化应用程序启动。
相比之下,dynamic头必须设置为每个请求。
10.2 Static Request Header
第一个选项添加一个静态头是定义头和各自的价值为您的API方法作为注释。头被Retrofit自动添加为每个请求使用此方法。注释可以是键值对作为一个字符串或字符串的列表。让我们面对两个具体的例子说明定义选项:
Retrofit 2
public interface UserService {
@Headers("Cache-Control: max-age=640000")
@GET("/tasks")
Call<List<Task>> getTasks();
}
Retrofit 1.9
public interface UserService {
@Headers("Cache-Control: max-age=640000")
@GET("/tasks")
List<Task> getTasks();
}
上面的例子演示了键-值-定义为static头。进一步,你可以传入多个键-值字符串作为一个列表封装在花括号{ } @Headers注释。
Retrofit 2
public interface UserService {
@Headers({
"Accept: application/vnd.yourapi.v1.full+json",
"User-Agent: Your-App-Name"
})
@GET("/tasks/{task_id}")
Call<Task> getTask(@Path("task_id") long taskId);
}
Retrofit 1.9
public interface UserService {
@Headers({
"Accept: application/vnd.yourapi.v1.full+json",
"User-Agent: Your-App-Name"
})
@GET("/tasks/{task_id}")
Task getTask(@Path("task_id") long taskId);
}
额外的,你可以定义static头通过Retrofits RequestInterceptor(在Retrofit 2的Interceptor接口自定义实现)的intercept方法。我们已经使用过RequestInterceptor在之前的文章和当然你可以加强t啊通过设置头字段。
Retrofit 2
在Retrofit 2,你需要拦截请求在网络层通过OkHttp
OkHttpClient.Builder httpClient = new OkHttpClient.Builder();
httpClient.addInterceptor(new Interceptor() {
@Override
public Response intercept(Interceptor.Chain chain) throws IOException {
Request original = chain.request();
Request request = original.newBuilder()
.header("User-Agent", "Your-App-Name")
.header("Accept", "application/vnd.yourapi.v1.full+json")
.method(original.method(), original.body())
.build();
return chain.proceed(request);
}
}
OkHttpClient client = httpClient.build();
Retrofit retrofit = new Retrofit.Builder()
.baseUrl(API_BASE_URL)
.addConverterFactory(GsonConverterFactory.create())
.client(client)
.build();Retrofit 1.9
RequestInterceptor requestInterceptor = new RequestInterceptor() {
@Override
public void intercept(RequestFacade request) {
request.addHeader("User-Agent", "Your-App-Name");
request.addHeader("Accept", "application/vnd.yourapi.v1.full+json");
}
};
RestAdapter restAdapter = new RestAdapter.Builder()
.setEndpoint("https://api.github.com")
.setRequestInterceptor(requestInterceptor)
.build();正如您可以看到的,上面的示例设置各自的User-Agent和Accept头字段值。这些值传递与每个请求执行使用RestAdapter和集成RequestInterceptor。
10.3 Dynamic Header
更多可定制的方法是动态头。一个动态头就像一个参数传递给方法。提供的参数值得到映射在Retrofit执行请求之前。让我们来看看代码示例:
Retrofit 2
public interface UserService {
@GET("/tasks")
Call<List<Task>> getTasks(@Header("Content-Range") String contentRange);
}
Retrofit 1.9
public interface UserService {
@GET("/tasks")
List<Task> getTasks(@Header("Content-Range") String contentRange);
}
定义动态的头你大概传入不同d额值为每个请求。这个例子演示了动态的头与Content-Range定义
10.4 No Header Override in Retrofit 1
记住:Retrofit不覆盖名称相同的头定义。每次定义的头是会添加到这个请求。
就是这样。Retrofit 简化头操作,并允许简单地改变它们为各自的请求在必要时。
10.5 Override Existing Headers in Retrofit 2
对比Retrofit v1,您可以重写现有的头字段的值。您可以重写这个值在Interceptor 实现传递到OkHttp客户端。Request.Builder 提供了两个方法来添加头文件:
- .header(key, value): 覆盖相应的头的键和值,如果已经有一个现有的头key。
- .addHeader(key, value): 增加各自的头的键和值,即使有一个现有的头字段相同的key
十一、Retrofit 2 — Manage Request Headers in OkHttp Interceptor
11.1 Add Request Headers
增加HTTP请求头是一个好的练习为API 请求增加信息。一个普通的例子是认证使用Authorization 头字段。如果你需要头字段包括它的值在几乎每个请求,你可以使用一个拦截器去增加这条信息。这种方式,你不需要增加@Header注释到每个端点声明。
okHttp拦截器提供2个方法增加头字段和值。你可以用相同的key覆盖现有的头或只是将它们添加没有检查如果有另一个头键值对已经存在的。我们将带您通过他们在接下来的段落。
11.2 How to Override Headers
拦截HTTP请求在OkHttp拦截器的帮助下允许你实际操作请求和应用于你的定制。请求构建器有一个.header(key, val)方法将定义头添加到请求。如果已经有一个现有的头用相同的key标识符,这种方法将会覆盖前面定义的值。
OkHttpClient.Builder httpClient = new OkHttpClient.Builder();
httpClient.addInterceptor(new Interceptor() {
@Override
public Response intercept(Interceptor.Chain chain) throws IOException {
Request original = chain.request();
// Request customization: add request headers
Request.Builder requestBuilder = original.newBuilder()
.header("Authorization", "auth-value"); // <-- this is the important line
Request request = requestBuilder.build();
return chain.proceed(request);
}
});
OkHttpClient client = httpClient.build(); Retrofit,尤其是OkHttp,允许您添加多个头使用相同的key。.header方法将取代所有现有的定义键标识符头。在上面的代码片段中,每个Authorizationr头(如果多个已经定义)将被更新和他们之前的值将被替换为auth-value。
11.3 How to Not Override Headers
在有些情况下,使用多个具有相同名称的头。实际上,我们只知道一个具体的例子从练习:Cache - Control头。HTTP RFC2616指定多个具有相同名称头的值是允许的如果他们可以表示为一个以逗号分隔的列表。
意味着:
Cache-Control: no-cache
Cache-Control: no-store 相同的:
Cache-Control: no-cache, no-store 使用Retrofit 2和一个OkHtp拦截器,你可以增加多个相同key的请求头,这个方法你需要使用的是.addHeader.
下面的例子将增加Cache-Control头从上面额例子。
OkHttpClient.Builder httpClient = new OkHttpClient.Builder();
httpClient.addInterceptor(new Interceptor() {
@Override
public Response intercept(Interceptor.Chain chain) throws IOException {
Request original = chain.request();
// Request customization: add request headers
Request.Builder requestBuilder = original.newBuilder()
.addHeader("Cache-Control", "no-cache")
.addHeader("Cache-Control", "no-store");
Request request = requestBuilder.build();
return chain.proceed(request);
}
});
OkHttpClient client = httpClient.build(); 11.4 Take Away
注意到小而有力的区别:
- .header(key, val): 将覆盖现有的key身份头
- .addHeader(key, val):将添加标题,不要覆盖先前存在的
确保你使用适当的方法来实现你想要请求的结果。
十二、Retrofit 2 — Dynamic Request Headers with @HeaderMap
12.1 Dynamic Request Headers
不幸的是,我们向你展示的方法在前面的博文都是静态的。虽然您可以改变头的值,实际上你不能动态选择头发送。如果你在运行时需要决定哪些头文件添加到您的请求,@HeaderMap是一个可能的解决方案。
类似于@Header注释,您需要声明@HeaderMap作为接口的一个参数。参数的类型需要Java Map接口的实现:
public interface TaskService {
@GET("/tasks")
Call<List<Task>> getTasks(
@HeaderMap Map<String, String> headers
);
}
使用上面我们声明的接口非常简单。你可以创建一个Map实例和填充值取决于您的需要。Retrofit将添加的每个@HeaderMap非空元素作为请求头。
TaskService taskService = ServiceGenerator.createService(TaskService.class);
Map<String, String> map = new HashMap<>();
map.put("Page", String.valueOf(page));
if (BuildConfig.DEBUG) {
map.put("Accept", "application/vnd.yourapi.v1.full+json");
map.put("User-Agent", "Future Studio Debug");
}
else {
map.put("Accept", "application/json");
map.put("Accept-Charset", "utf-8");
map.put("User-Agent", "Future Studio Release");
}
Call<List<Task>> call = taskService.getTasks(map);
// Use it like any other Retrofit call十三、Retrofit — Multiple Query Parameters of Same Name
13.1 Query Parameters
查询参数是一个普通的方法传入数据从客户端到服务器。我们都知道他们的请求。让我们面对以下示例请求一个特定的任务id = 123从我们的示例API。
https://api.example.com/tasks?id=123这个响应从例子API是仅仅一个单一的id=123任务
Retrofit方法定义为查询请求是开门见山的。
Retrofit 2
public interface TaskService {
@GET("/tasks")
Call<Task> getTask(@Query("id") long taskId);
}
Retrofit 1.9
public interface TaskService {
@GET("/tasks")
Task getTask(@Query("id") long taskId);
}
getTask(...)需要参数taskId.这个参数将映射到通过Retrofit给定@Query参数值。在这个情况这个参数名称是id,将决定最终请求url的部分
像
/tasks?id=<taskId>13.2 Multiple Query Parameters
一些用例需要传入多个相同名称的查询参数。关于前面的例子从一个API请求的任务,我们可以扩展查询参数接受一个与多个任务id列表。
我们想要创建的请求url应该像这样:
https://api.example.com/tasks?id=123&id=124&id=125 期待的服务器响应应该是一个从url查询参数给定的ids=[123, 124, 125]任务列表。
Retrofit方法执行多个相同名称查询参数的请求是完成通过提供一个ids作为参数。Retrofit给定列表连接到多个名称相同的查询参数。
Retrofit 2
public interface TaskService {
@GET("/tasks")
Call<List<Task>> getTask(@Query("id") List<Long> taskIds);
}
Retrofit 1.9
public interface TaskService {
@GET("/tasks")
List<Task> getTask(@Query("id") List<Long> taskIds);
}
由此产生的请求url看起来就像上面的例子在这一部分的开始(多个查询参数)。
十四、Retrofit — Optional Query Parameters
14.1 Query Parameters with Retrofit
Retrofit使用注释定义查询参数为每个请求。这个注释是定义在方法参数和指定的请求参数名称之前。这个参数所需的值为在方法调用传递。让我们面对一个具体的例子。下面的代码演示了一个请求方法有/tasks作为API端点url和提供选项来传递一个sort参数为所需的排序
Retrofit 2
public interface TaskService {
@GET("/tasks")
Call<List<Task>> getTasks(@Query("sort") String order);
}
Retrofit 1.9
public interface TaskService {
@GET("/tasks")
List<Task> getTasks(@Query("sort") String order);
}
假设你的base url是https://your.api.com,请求使用上面的TaskService 调用getTasks 方法,最终请求的urls是: https://your.api.com/tasks?sort=value-of-order-parameter
14.2 Optional Query Parameters
根据API设计,sort参数大概是可选的。在这种情况你不想要传入它作为请求,当方法调用的时候只需要传入null作为order的值
service.getTasks(null); 改造跳过空参数,忽略了他们的组合请求。记住,你不能传入null为原始数据类型,如int,float,long,等。相反,使用Integer、Float、Long等,编译器不会警告。
即将到来的例子描述了前面提到的服务定义数据类型。
Retrofit 2.0
public interface TaskService {
@GET("/tasks")
Call<List<Task>> getTasks(
@Query("sort") String order,
@Query("page") Integer page);
}
Retrofit 1.9
public interface TaskService {
@GET("/tasks")
List<Task> getTasks(
@Query("sort") String order,
@Query("page") Integer page);
}
现在你可以传入null为定义的每个查询参数order 和page 当调用getTasks方法。
service.getTasks(null, null); 十五、Retrofit — Send Data Form-Urlencoded
15.1 Form Encoded Requests
执行form-urlencoded使用Retrofit 的直接请求。这只是另一个Retrofit注释,将自动调整您的请求的合适的mime类型application/x-www-form-urlencoded。下面的接口定义为Retrofit 1和2将向您展示如何注释服务接口form-encoded的请求。)
Retrofit 2.0
public interface TaskService {
@FormUrlEncoded
@POST("tasks")
Call<Task> createTask(@Field("title") String title);
}
Retrofit 1.9
public interface TaskService {
@FormUrlEncoded
@POST("/tasks")
void createTask(@Field("title") String title, Callback<Task> cb);
}
我们使用TaskInterface演示代码。重要的步骤是@FormUrlEncoded 注释。请注意一个事实,你不能使用该注释为GET请求。表单编码的请求是为了发送数据到服务器!
此外,您需要使用@Field注释为你要发送你的请求的参数。在@Field("key")中的key定义参数名称。此外,添加你的值的类型作为方法参数。如果你不使用String,Retrofit将创建一个字符串值使用Java的String.valueOf(yourObject)方法。
让我们看看一个例子来说明所有的理论!使用以下服务调用
service.createTask("Research Retrofit form encoded requests"); 结果在下面额表单编码结果体:
title=Research+Retrofit+form+encoded+requests 当然。,你可以有多个参数为你的请求,只需要增加多个@Field注释与想要的类型。
15.2 Form Encoded Requests Using an Array of Values
上面的例子描述在一个单一的值使用@Field注释。如果你不使用string作为这个对象l类型,Retrofit将做这个工作从这个给定的对象解析成一个字符串值。
然后,你可以传入一个数组使用相同的key为你表单编码请求。
Retrofit 2
public interface TaskService {
@FormUrlEncoded
@POST("tasks")
Call<List<Task>> createTasks(@Field("title") List<String> titles);
}
Retrofit 1.9
public interface TaskService {
@FormUrlEncoded
@POST("/tasks")
void createTasks(@Field("title") List<String> titles, Callback<List<Task>> cb);
}
你已经看到,唯一的区别就是这里使用列表标题作为参数。Retrofit将映射给定的列表标题作为titlekey
好了,下个时间去触摸另一个例子:
List<String> titles = new ArrayList<>();
titles.add("Research Retrofit");
titles.add("Retrofit Form Encoded")
service.createTasks(titles); 下面的结果是表单编码请求体
title=Research+Retrofit&title=Retrofit+Form+Encoded 每一个item在任务列表将映射成一个键值对通过Retrofit。每对的titlekey将是相同的。每对键值对通过&符号链接和通过=号将titlekey与其值连接。
15.3 Field Options
@Field注释有一个选项字段为编码:
encoded:可以是true或者false,默认是false.
encoded:选项定义是否你提供的键值对已经url编码。指定编码选项值,你需要传入它在@Field 注释。下面额例子演示了和设置编码选项值为true
@Field(value = "title", encoded = true) String title15.4 Form-Urlencoded vs. Query Parameter
当设置表单请求结果的的时候,你大概询问你自己:表单编码和查询参数的不同是什么?从本质上讲:请求类型。
- form-urlencoded: POST
- query parameter: GET
使用form-urlencoded请求发送数据到服务器或者API。数据是发送在请求体和不是作为一个url参数。
Query parameters 当从一个服务器或者API使用特殊的字段或者过滤器的请求数据的时候使用。
十六、Retrofit — Send Data Form-Urlencoded Using FieldMap
16.1 What Is @Fieldmap in Retrofit?
你已经熟悉Retrofit的注释映射参数值转换成适当的格式。有多个注释对于不同的情况,比如添加查询或路径参数,请求负载使用给定的对象或从form-urlencoded创建请求字段体。
让我们重点转移到一个例子使事情更加平易近人。假设你可以选择更新用户数据在你的Android应用程序,你想调用一个API端点,需要一个对象的键值对。
我们希望使用一个form-urlencoded请求,因为API接受一个JSON对象代表应该更新的字段。你想在客户端使用以下定义API端点接口定义。
public interface UserService {
@FormUrlEncoded
@PUT("user")
Call<User> update(
@Field("username") String username,
@Field("name") String name,
@Field("email") String email,
@Field("homepage") String homepage,
@Field("location") String location
);
}
PUT 请求需要多个参数值像username ,email,homepage等等。
缺点:每次我们想发送一个更新的新用户数据,我们必须为每个参数提供一个值,即使他们并没有改变。它炸毁你的代码和想象的参数数量翻了一倍甚至两倍的进化!这么长的方法调用文本会爆炸Android工作室的画布。
实际上,在Retrofit已经有一个更好的集成:@FieldMap
16.2 Form Encoded Requests Using FieldMap
在这种情况你只需要发送选择的字段应该被更新为给定的用户,使用Retrofit的@FieldMap。你可以增加想要的键值对到一个标准的java Map实现。
public interface UserService {
@FormUrlEncoded
@PUT("user")
Call<User> update(@FieldMap Map<String, String> fields);
}
特殊的,如果你想要更新username,不需要增加任何username的其他字段,你的请求仅仅考虑单一的字段。
你会发现各种应用程序在app @FieldMap。当然,有一个阴暗面附加到此方法:你不直观地知道哪些字段是允许的,他们的名字是什么。需要一些额外的文档在你的代码,如果这是唯一需要注意的,就去做吧!
16.3 FieldMap Options
@FieldMap注释有一个选项字段为编码:
encoded:可以是true或者false,默认是false。
下面的例子演示:
@FieldMap(encoded = true) Map<String, String> fieldsencoded选项定义是否每个体动键值对是已经url编码。指定编码选项值,你需要传入它在@FieldMap 注释。
让我们查看一个例子,我们想要更新username字段到新的值marcus-poehls.默认的行为(encoded=false),键值对结果是username=marcus-poehls。编码开启结果是code>username=marcus%2poehls
十七、Retrofit 2 — How to Add Query Parameters to Every Request
17.1 Add Query Parameters
如果你使用过Retrofit,你知道@Query注释添加查询参数用于单一请求。有一种情况你想要z鞥家相同的查询参数每个请求。就像增加一个Authorization 头到每个请求的身份验证令牌。如果你要求一个API接受apikey作为请求参数,它是有价值的使用拦截器而不是查询参数添加到每个请求的方法。
你可以通过添加一个新的OkHttpClient请求拦截器。拦截实际请求并得到HttpUrl。添加所需的http url到查询参数,因为它将改变以前生成的请求url的通过附加查询参数名称和它的值。
下面的代码演示了拦截器和我们将解释下面的代码细节.
OkHttpClient.Builder httpClient =
new OkHttpClient.Builder();
httpClient.addInterceptor(new Interceptor() {
@Override
public Response intercept(Chain chain) throws IOException {
Request original = chain.request();
HttpUrl originalHttpUrl = original.url();
HttpUrl url = originalHttpUrl.newBuilder()
.addQueryParameter("apikey", "your-actual-api-key")
.build();
// Request customization: add request headers
Request.Builder requestBuilder = original.newBuilder()
.url(url);
Request request = requestBuilder.build();
return chain.proceed(request);
}
});一旦你有HttpUrl对象,您可以创建一个新的构建器基于最初的http url对象。建造者会让你增加进一步查询参数使用.addQueryParameter(k,ey,val)方法。一旦你添加查询参数,使用.build()方法来创建新的HttpUrl对象添加到请求使用Request.Builder。上面的代码构建的新请求额外的参数基于最初的请求。
十八、Retrofit 2 — Add Multiple Query Parameter With QueryMap
18.1 What is @QueryMap in Retrofit?
Retrofit使用注释转换定义的key和value成适当的格式。使用@Query("key") String value注释将z增加一个查询参数到请求url(当然你可以使用其他类型)
实际上,端点APIs有允许你传入多个查询参数。你想要避免像下面这样的一个服务方法声明为请求参数与“无穷无尽”选项:
public interface NewsService() {
@GET("/news")
Call<List<News>> getNews(
@Query("page") int page,
@Query("order") String order,
@Query("author") String author,
@Query("published_at") Date date,
…
);
}
可以调用.getNews服务方法使用null值为每个参数使其可选的。Retrofit将忽略null值,和不映射它们作为查询参数。然而,有一个更好的解决方案来处理复杂的API端点查询参数的各种选项。
18.2 How to Use QueryMap
@QueryMap注释期望一个String类型的键值对Map.每个key有一个非控制将被映射和你可以动态增加你想要的查询参数。
public interface NewsService() {
@GET("/news")
Call<List<News>> getNews(
@QueryMap Map<String, String> options
);
}
如果你想要请求新闻从作者Marcus的页面2,你仅仅需要增加map实体为page和author。不需要担心关于其他可获得的选项。
下面的片段演示怎么执行一个具体的请求获取新闻:
private void fetchNews() {
Map<String, String> data = new HashMap<>();
data.put("author", "Marcus");
data.put("page", String.valueOf(2));
// simplified call to request the news with already initialized service
Call<List<News>> call = newsService.getNews(data);
call.enqueue(…);
}结果url:
http://your.api.url/news?page=2&author=Marcus 18.3 QueryMap Options
@QueryMap 注释有一个选项字段为编码:
encoded:可以是true或者false,默认是false。你可以设置
encoded的值,像这样:
Call<List<News>> getNews((@QueryMap(encoded=true) Map<String, String> options);开启encoded前将编码单个字符添加到请求url。使用keyauthor与值marcus-poehls将导致以下编码url:author=marcus%2Dpoehls
设置encoded为false(默认情况下),上面的示例将作者的url = marcus-poehls。
十九、Retrofit 2 — How to Use Dynamic Urls for Requests
19.1 Use-Case Scenarios
可能没有直接用例来表达你的意思,需要动态端点url的定义。我们可以给你两个例子来说明真实世界的场景。
Profile Pictures::如果您的应用程序允许用户上传他们的个人档案照片,你可能会存储在不同的位置像自己的服务器,Amazon S3或者你也允许连接的功能。
File Downloads:文件可以存储在各类的位置和你想要/需要灵活下载任何资源路径。
19.2 How to Use Dynamic Urls
实际上,它仅仅需要你增加一个单一的String参数注释@Url在你的端点定义
public interface UserService {
@GET
public Call<ResponseBody> profilePicture(@Url String url);
}
你已经看到,端点url你将使用@get注释和添加@Url到方法本身。
19.3 How Urls Resolve Against Your Base Url
这是另一个有钱的步骤和需要注意:如何解决动态url对定义的base url ?Retrofit 2使用OkHttp 的HttpUrl和解决每个端点url像在任何网站上的链接(…).
让我们触碰一些场景和首先查看一个url指向一个profile picture储在Amazon S3上。我们将有一个base url 定义和具体的调用profilePicture 方法使用一个完整的不同的。
Retrofit retrofit = Retrofit.Builder()
.baseUrl("https://your.api.url/");
.build();
UserService service = retrofit.create(UserService.class);
service.profilePicture("https://s3.amazon.com/profile-picture/path");
// request url results in:
// https://s3.amazon.com/profile-picture/path因为你设置一个完整的不同的主机包括一个协议(https://s3.amazon.com vs https://your.api.url),OkHttp的HttpUrl 将解决它。
另一个例子,这个时间我们指定动态的Url为我们的profile picture到相同的服务器作为我们已经定义的base url。
Retrofit retrofit = Retrofit.Builder()
.baseUrl("https://your.api.url/");
.build();
UserService service = retrofit.create(UserService.class);
service.profilePicture("profile-picture/path");
// request url results in:
// https://your.api.url/profile-picture/path这一次,最后的请求url得到解决的base url连接和动态定义端点url。HttpUrl将认识到,我们没有指定一个协议和主机,和因此附加端点url到base url。
第三个例子:假设后端开发人员推动更新产生API的base url到版本2的碰撞。
Retrofit retrofit = Retrofit.Builder()
.baseUrl("https://your.api.url/v2/");
.build();
UserService service = retrofit.create(UserService.class);
service.profilePicture("/profile-picture/path");
// request url results in:
// https://your.api.url/profile-picture/path第二个和第三个例子的区别是:我们添加v2 /到base url并在端点url开头增加。实际上,这将导致相同的最后一个请求url,因为端点url开头的 /将附加到base url的主机url。后面一切主机url将被省略当端点url使用斜杠。你可以解决你的问题通过移除开头的 /
二十、Retrofit 2 — Constant, Default and Logic Values for POST and PUT Requests
20.1 Adding a Request for a Feedback Function
让我们假设你的老板要你的Android app实现反馈功能。反馈功能应该允许用户给一些文本输入以及一些通用设备数据自动收集。你的后端开发人员已经做过的工作和描述端点。端点预计如下:
URL: /feedback
Method: POST
Request Body Params (Required):
- osName=[String]
- osVersion=[Integer]
- device=[String]
- message=[String]
- userIsATalker=[boolean]
Response: 204 (Empty Response Body) 前三个值都是关于设备用户发送的数据反馈。第四个是他的实际消息。最后一个是一个标志,如果消息信号特别长。
20.2 Simple Approach
第一次尝试可能将REST API文档交给我们的Retrofit服务声明:
@FormUrlEncoded
@POST("/feedback")
Call<ResponseBody> sendFeedbackSimple(
@Field("osName") String osName,
@Field("osVersion") int osVersion,
@Field("device") String device,
@Field("message") String message,
@Field("userIsATalker") Boolean userIsATalker);
接下来,你连接到提交按钮的onclick方法的反馈形式。你收集数据,计算逻辑值和调用服务方法与所有数据的值:
private void sendFeedbackFormSimple(@NonNull String message) {
// create the service to make the call, see first Retrofit blog post
FeedbackService taskService = ServiceGenerator.create(FeedbackService.class);
// create flag if message is especially long
boolean userIsATalker = (message.length() > 200);
Call<ResponseBody> call = taskService.sendFeedbackSimple(
"Android",
android.os.Build.VERSION.SDK_INT,
Build.MODEL,
message,
userIsATalker
);
call.enqueue(new Callback<ResponseBody>() {
...
});
}
可以看到上面的方法声明sendFeedbackFormSimple(),唯一真正的变量是用户的消息。osName变量不会改变,实际上是一个常数(Android应用程序总有Android作为操作系统)。接下来,osVersion和device是默认字符串根据设备模型。userIsATalker是一个逻辑值,计算每次都以同样的方式。
在本例中,它不是一个大问题,因为你在你的应用程序只有一个反馈形式。但是,如果这将是一个端点你从你的app多个地方调用(例如更新用户配置文件)?然后你会有很多重复的代码。当然,你可以构造一些常量和一个辅助方法,使逻辑在一个地方,但有一个更清洁的方法。在下一节中,我们将向您展示如何创建一个POST或PUT请求只有一个真正的参数,而其余会自动设定。
20.3 Advanced Approach With Passing the Only True Variable
首先,我们将改变服务声明。这个请求现在是一个Java对象(Retrofit将自动序列化它)
@POST("/feedback")
Call<ResponseBody> sendFeedbackConstant(@Body UserFeedback feedbackObject); 这个参数是一个UserFeedback 类实例,我们还没有展示它的优点在哪里:
public class UserFeedback {
private String osName = "Android";
private int osVersion = android.os.Build.VERSION.SDK_INT;
private String device = Build.MODEL;
private String message;
private boolean userIsATalker;
public UserFeedback(String message) {
this.message = message;
this.userIsATalker = (message.length() > 200);
}
// getters & setters
// ...
}
这个类的构造函数只包含真正的变量message,一切就会自动设置或计算!因为我们将传入整个对象,所有的值将被发送。
这使得请求调用回我们的UI代码精简:
private void sendFeedbackFormAdvanced(@NonNull String message) {
FeedbackService taskService = ServiceGenerator.create(FeedbackService.class);
Call<ResponseBody> call = taskService.sendFeedbackConstant(new UserFeedback(message));
call.enqueue(new Callback<ResponseBody>() {
...
});
}
即使app有多个本地请求,所有的常量,默认和逻辑值是计算在一个单独的地方。请求调用仅仅传入单一的变量。使得你的代码更简洁对进一步的改变(和容易阅读)
二十一、Retrofit 2 — Cancel Requests
21.1 Cancel Requests
让我们使用 how to download files with Retrofit的示例代码。但确切的请求并不重要,因为这是适用于任何Retrofit的要求。我们添加了一个新的activity,创建一个新的请求并执行它,就像我们通常做的事:
public class CallExampleActivity extends AppCompatActivity {
public static final String TAG = "CallInstances";
private Callback<ResponseBody> downloadCallback;
@Override
protected void onCreate(Bundle savedInstanceState) {
super.onCreate(savedInstanceState);
setContentView(R.layout.activity_file_download);
FileDownloadService downloadService =
ServiceGenerator.create(FileDownloadService.class);
String fileUrl = "http://futurestud.io/test.mp4";
Call<ResponseBody> call =
downloadService.downloadFileWithDynamicUrlSync(fileUrl);
call.enqueue(new Callback<ResponseBody>() {
@Override
public void onResponse(Call<ResponseBody> call, Response<ResponseBody> response) {
Log.d(TAG, "request success");
}
@Override
public void onFailure(Call<ResponseBody> call, Throwable t) {
Log.e(TAG, "request failed");
}
};);
}
// other methods
// ...
}
现在让我们假设用户点击“Abort”按钮或者app移动到一个请求不是必要的状态:我们需要取消这个请求。在Retrofit 2,这是容易完成的通过使用call.cancel。这将取消每个网络请求,如果它已经不在运行或者不在请求状态。就是这样!如果我们展开相关的请求代码通过一个简单的取消行动,它看起来就像这样:
String fileUrl = "http://futurestud.io/test.mp4";
Call<ResponseBody> call =
downloadService.downloadFileWithDynamicUrlSync(fileUrl);
call.enqueue(new Callback<ResponseBody>() {
@Override
public void onResponse(Call<ResponseBody> call, Response<ResponseBody> response) {
Log.d(TAG, "request success");
}
@Override
public void onFailure(Call<ResponseBody> call, Throwable t) {
Log.e(TAG, "request failed");
}
});
}
// something happened, for example: user clicked cancel button
call.cancel();
}21.2 Check If Request Was Cancelled
如果你取消了这个请求,Retrofit将这个作为一个失败的请求和因此调用onFailure()回调在你的请求声明。这个回调当没有网络连接或者一些错误发生在网络离开的时候也使用。从app的角度来看,这些错误是相当不同的。因此,它很有帮助知道如果请求被取消或者设备没有互联网连接。
幸运的是,Call类提供了一个isCanceled()方法来检查是否请求被取消了。这个小检查你在回调可以区分不同的错误:
new Callback<ResponseBody>() {
@Override
public void onResponse(Call<ResponseBody> call, Response<ResponseBody> response) {
Log.d(TAG, "request success");
}
@Override
public void onFailure(Call<ResponseBody> call, Throwable t) {
if (call.isCanceled()) {
Log.e(TAG, "request was cancelled");
}
else {
Log.e(TAG, "other larger issue, i.e. no network connection?");
}
}
};
二十二、Retrofit 2 — Reuse and Analyze Requests
22.1 Reuse of Call Objects
在这篇文章中,我们将使用 how to download files的代码。如果你感兴趣的细节,给它一个快速阅读。否则,继续。什么样的请求,其实并不重要。我们将向你展示的所有特性应用所有的Retrofit请求。
22.2 One Request for Each Call Object
第一件事你知道Call类及其实例:每个实例是特别为一个且只有一个请求。你不能简单地使用相同的对象,并调用execute()或enqueue()
FileDownloadService downloadService = ServiceGenerator.create(FileDownloadService.class);
Call<ResponseBody> originalCall = downloadService.downloadFileWithDynamicUrlSync(fileUrl);
Callback<ResponseBody> downloadCallback = new Callback<ResponseBody>() {...};
// correct usage:
originalCall.enqueue(downloadCallback);
// some other actions in between
// ...
// incorrect reuse:
// if you need to make the same request again, don't use the same originalCall again!
// it'll crash the app with a java.lang.IllegalStateException: Already executed.
originalCall.enqueue(downloadCallback); // <-- would crash the app 22.3 Duplicated Call Objects
相反,如果你想要相同的请求,你可以使用Call类的clone方法去创建它的复制体。它将包含相同的设置和配置。你可以使用新的复制体制作一个新的请求到服务器。
FileDownloadService downloadService =
ServiceGenerator.create(FileDownloadService.class);
Call<ResponseBody> originalCall =
downloadService.downloadFileWithDynamicUrlSync(fileUrl);
Callback<ResponseBody> downloadCallback = new Callback<ResponseBody>() {...};
// correct reuse:
Call<ResponseBody> newCall = originalCall.clone();
newCall.enqueue(downloadCallback); 这是非常有利的如果你需要在多个时间发送相同的请求。
22.4 Analyzing Requests With the Call Object
你已经看到,Retrofit 2在每个回调方法都包含Call实例。因此,如果请求是成功的或者即使是失败,你仍可以获得原始的Call对象。但是并不能导致你可以重用call(提示:用clone()),你可以分析请求,使用call.request()。这将返回完整的请求数据。让我们来看一个例子:
FileDownloadService downloadService =
ServiceGenerator.create(FileDownloadService.class);
Call<ResponseBody> originalCall =
downloadService.downloadFileWithDynamicUrlSync(fileUrl);
originalCall.enqueue(new Callback<ResponseBody>() {
@Override
public void onResponse(Call<ResponseBody> call, Response<ResponseBody> response) {
checkRequestContent(call.request());
}
@Override
public void onFailure(Call<ResponseBody> call, Throwable t) {
checkRequestContent(call.request());
}
});两个回调方法是传入请求到一个新的帮助方法checkRequestContent(),访问请求头,请求体和url。
private void checkRequestContent(Request request) {
Headers requestHeaders = request.headers();
RequestBody requestBody = request.body();
HttpUrl requestUrl = request.url();
// todo make decision depending on request content
}
这大概是有利的如果你想要检阅这个请求发送到服务器。
22.5 Preview Requests
也很高兴知道你可以利用call.request()在任何时候,即使请求不是预定或还没成功!它将会生成请求就像它将为常规网络调用。
重要:call.request()方法做一些重要的计算,如果请求还没有执行。这不是推荐的预览数据通过.request()()在Android上的UI /主线程!
二十三、Retrofit — Optional Path Parameters
23.1 API Description
让我们假设我们想要请求一个任务列表从一个API。这个任务端点是/tasks和API实现允许你过滤请求到一个单独任务通过一个的个人任务id, /tasks/。你将接收相同的响应格式:一个任务列表。如果你指定任务id,你将接收一个任务列表与单一的item。
23.2 Optional Path Parameter
有关上述假想的API,我们可以使用下面的接口请求任务的列表并过滤到一个任务项。
public interface TaskService {
@GET("tasks/{taskId}")
Call<List<Task>> getTasks(@Path("taskId") String taskId);
}
你已经看到上面的TaskService ,我们定义一个路径参数taskId 将适当的映射它的值。
诀窍是:您需要使用一个空字符串参数。Retrofit 将适当映射空字符串的值作为它的值,但结果是一个没有路径参数的url。
看,以下url相同的处理在服务器端允许我们重用不同请求的端点:
# will be handled the same
https://your.api.url/tasks
https://your.api.url/tasks/
下面的代码片段演示你怎么请求通用的任务列表和怎样过滤到一个单一的任务item。
// request the list of tasks
TaskService service =
ServiceGenerator.createService(TaskService.class);
Call<List<Task>> voidCall = service.getTasks("");
List<Task> tasks = voidCall.execute().body(); 传入一个空字符串到getTasks方法,Retrofit将移除路径参数和只使用url作为请求
下面的代码演示请求过滤一个单一的任务使用相同的端点。因为我们现在传入一个实际的值为路径参数,这个请求url包含参数值。
// request a single task item
TaskService service =
ServiceGenerator.createService(TaskService.class);
Call<List<Task>> voidCall = service.getTasks("task-id-1234");
// list of tasks with just one item
List<Task> task = voidCall.execute().body(); 诀窍是重用一个端点如果API返回数据在一个一致的模式。
23.3 Attention
实际上,技巧会导致问题。如果你的url的路径参数是正确的在url中间,传递一个空字符串会导致错误的请求url。假设有一个第二端点响应给定任务的子任务列表
public interface TaskService {
@GET("tasks/{taskId}/subtasks")
Call<List<Task>> getSubTasks(@Path("taskId") String taskId);
}
传入一个空值为taskId 将是下面额结果:
https://your.api.url/tasks//subtasks 你看到,API不能获得子任务,因为实际的任务id是错误的。
23.4 Don’t Pass Null as Parameter Value
Retrofit不允许你传入null作为路径参数的值,和如果你这样做,它抛出一个IllegalArgumentException。意味着,你的app将崩溃在运行时。意识到这种行为涉及一个路径参数的请求。确保稳定通过验证路径参数值总是not null。
二十四、Retrofit 2 — How to Send Plain Text Request Body
24.1 Overview
有个问题你只需要发送plain text作为请求。实际上,有多个解决达到期望的结果我们将演示其中两个。这个描述解决适用于任何java原语,不仅仅是字符串。
相关的实际问题如何发送纯文本在请求体中,我们将等待一个纯文本的反应。Retrofit及其它的转换器在这两种情况下都得到了你的返回。
24.2 Solution 1: Scalars Converter
有多个存在的Retrofit converters为各种数据格式。你可以序列化和反序列化java对象到JSON或者XML或者任何其他的数据格式。在可获得的转换器,你将发现一个Retrofit Scalars Converter
,解析任何Java原语的工作将在请求体中。转换适用于两个方向:请求和响应。calars converter可用于序列化你的text/plain请求值。
24.3 Add Scalars Converter to Your Project
scalars converter默认没有集成,你需要在你的build.gradle增加依赖文件。同步你的项目之后增加新的converter-scalars依赖。
compile 'com.squareup.retrofit2:converter-scalars:2.1.0' 只导入新的依赖是不够的对于解析适当的java原语。第二步是需要:增加scalars converter 到你的Retrofit实例。请注意为了你增加响应converters 很重要。作为一个经验法则,最后添加Gson作为最后的converter 到你的Retrofit实例。
Retrofit retrofit = new Retrofit.Builder()
.addConverterFactory(ScalarsConverterFactory.create())
.addConverterFactory(GsonConverterFactory.create())
.baseUrl("https://your.base.url/")
.build();现在您已经集成了各自的scalars 转换器,下面我们看一个实际的请求。
24.4 Use Primitives and Boxed Types for Requests & Response
下面的代码片段所示的服务接口只是一个说明来发送和接收文本值。只是用Gson为定义的字符串不会映射数据正确和一个错误发生在运行
public interface ScalarService {
@POST("path")
Call<String> getStringScalar(@Body String body);
}
使用scalars converter将相应地定义的字符串值添加到你的请求体。Retrofit迭代通过响应转换器的列表并选择第一个适用:scalars converter.
String body = "plain text request body";
Call<String> call = service.getStringScalar(body);
Response<String> response = call.execute();
String value = response.body(); 请求原语与更复杂的对象完全一样。使用call对象作为你任何其他Java对象。
如果你不想集成另一个转换器处理Java原语,Retrofit(尤其是OkHttp)让你覆盖,并允许您利用RequestBody类。我们将向您展示如何应用该类在以下部分。
24.5 Solution 2: Use RequestBody Class
什么原因阻碍你添加 scalars converter,你不取依赖它添加纯文本作为请求负载。您还可以使用OkHttp 的RequestBody类和创造自己的请求体通过定义内容类型。
下面的服务接口说明了RequestBody类负载的使用,我们会利用另一个OkHttp类RequestBody去获得原始值的返回。
public interface ScalarService {
@POST("path")
Call<ResponseBody> getStringRequestBody(@Body RequestBody body);
}
RequestBody类允许我们接收任何响应数据。下面的代码片段演示了详细使用:
String text = "plain text request body";
RequestBody body =
RequestBody.create(MediaType.parse("text/plain"), text);
Call<ResponseBody> call = service.getStringRequestBody(body);
Response<ResponseBody> response = call.execute();
String value = response.body().string(); 如前所述,您需要创建你自己的请求负载通过定义内容类型为给定的数据。使用静态RequestBody.create()来创建负载。最后,response 实例包含从服务器接收到的数据。你可以访问响应体作为你想要的任何其他响应类型。使用.string()方法允许我们接收从响应体格式化的字符串数据。
使用RequestBody和ResponseBody类是一个更复杂的站在你这一边,因为你需要处理你自己创造的请求体。描述 scalars converter 隐藏这种复杂性和你可以继续定义任何Java原始类型的请求体和响应体。
二十五、Responses Retrofit 2 — Ignore Response Payload with Call
25.1 Call vs. Call vs. Call
大多数端点将声明一个特定的返回类型,像Call.根据这个情况Retrofit将总是携带响应体和尝试转换它为java对象。当然,这需要时间,内存和处理能力。
如果你没有可以映射的Java对象,你应该选择Call< ResponseBody >。这使得你获得原始响应负载,但跳过映射到Java对象。使用这个选项,您仍然有机会分析负载(如。JSON)。
最有效的方法是Call ,因为它不仅跳过转换为Java对象,它也忽略了响应体负载。当响应体非常大(如。大型JSON或图像),你可以节省一点额外的时间和电池消耗通过使用Call。当然,这导致响应体对象的body()方法返回null。
二十六、Converters Retrofit 2 — Introduction to (Multiple) Converters
26.1 Integrating Standard Converters
为了使Android客户端和服务端之间通信,他们需要同意在一个共同的数据代表格式。所有格式的共同点是,您需要将Java对象映射到标准的格式。在Retrofit 2中,这个ava对象和标准格式之间的映射的任务是通过转换器。转换器可以支持两个方向:从Java对象到标准格式(请求),反之亦然:标准格式到Java对象(响应)。
因为有很多格式和库来支持他们,Retrofit创作者提供一个转换器的列表。我们不能通过每一个,所以我们只给你一个概述。retrofit-converters目录列出了所有官方响应转换器的实现:
Gson
Gson是为JSNO映射和能增加下面的依赖:
compile 'com.squareup.retrofit2:converter-gson:2.3.0' SimpleXML
SimpleXML是为XML映射,你将需要一下这行在你的build.gradle:
compile 'com.squareup.retrofit2:converter-simplexml:2.3.0' Jackson
Jackson是一个替代Gson和自称是更快的JSON数据的映射。设置为您提供更多的定制和可能值得一看。你可以把它添加:
compile 'com.squareup.retrofit2:converter-jackson:2.3.0' Moshi
Moshi是另一个替代Gson,它的创建通过Retrofit的开发者。Moshi是基于Gson,但是不同的是它本身更加简化。如果你想要试试,添加它:
compile 'com.squareup.retrofit2:converter-moshi:2.3.0' Protobuf
Protobuf是为格式化Protocol Buffers构建,这是一个新的序列化结构化数据的机制。Protocol Buffers是新一代,有很多好处。如果你的API已经利用它,你可以快速添加在应用方面的支持:
compile 'com.squareup.retrofit2:converter-protobuf:2.3.0' Wire
Wire 也为Protocol Buffers格式化,它的开发者通过Retrofit创建者和带来他们的代码的想象到转换器。如果你有兴趣,看看通过添加依赖关系:
compile 'com.squareup.retrofit2:converter-wire:2.3.0' Scalars
最后,如果你不想映射这些复杂的数据结构,只是想映射基本Java原语,可以使用Scalars:
compile 'com.squareup.retrofit2:converter-scalars:2.3.0' Retrofit是开放的和允许其他的转换器。例如:我们会开发我们自己的自定义转换器在以后的博文。当然,你可以提供你的转换器到开发人员社区和扩大可用转换器的列表。一个优秀的第三方库是这个转换器,增加了对洛根广场JSON序列化的支持库。而改造使其很容易支持多种数据格式,有几件事你需要记住为了保持工作的一切。
26.2 Dealing with Multiple Converters
Retrofit接受各种结构化数据格式痛殴的外包给独立的转换器。这些转换器通常只有一个特定的目的。例如,Gson处理JSON格式,SimpleXML转换XML数据。Retorift使它方便,允许开发人员调用addConverterFactory在多次Retrofit builder。只要转换器是自由的冲突,例如Gson和SimpleXML,不会有任何问题。但如果你添加两个转换器,这或多或少相同的工作,例如SimpelXML vs Gson,不会有任何问题。但如果你添加两个转换器,这或多或少做相同的工作,例如Moshi vs Gson吗?
改造有一个简单的方式处理这个问题。首先,它会检查每一次转换器如果能够解决这个特定的数据类型。如果传入的转换器无法理解一些数据,它不会考虑请求(但又将被询问在接下来的请求)。检查的顺序是由谁先添加谁先检查。这意味着你第一个转换器传入Retrofit与addConverterFactory()首先会检查。如果第一个转换器接受挑战,列表的其余部分将不会问。
实际上,这意味着,你需要非常小心当添加转换器!确保你* *指定专用转换器首先拥有有限的能力和最后的通用转换器(如Gson)。
二十七、Retrofit 2 — Adding & Customizing the Gson Converter
27.1 Integrate a JSON Converter
常见的表示数据从服务器接收到的JavaScript对象表示法:JSON。HTTP响应体包含任何信息和Retrofit解析数据并将它映射到Java类定义。这个过程可能有点棘手,特别是在处理自定义格式化日期,嵌套对象包装在列表,等等…
正如我们所提到的在我们的 Upgrade Guid,Retrofit不附带一个集成的JSON转换器了。我们需要手动包括转换器。如果你已经使用过Retrofit 2,你可能已经编辑你的build.gradle。如果你还没有这样做,这是现在的时间:
dependencies {
// Retrofit & OkHttp
compile 'com.squareup.retrofit2:retrofit:2.3.0'
// JSON Converter
compile 'com.squareup.retrofit2:converter-gson:2.3.0'
}Google’s Gson是非常受欢迎的JSON转换器。几乎每个真正额场景使用Gson能帮助你完成JSON映射。一旦你增加Gradle依赖到你的项目你可以激活它在你的Retrofit实例。只有这样Retrofit将考虑使用该转换器。
Retrofit retrofit = new Retrofit.Builder()
.baseUrl("https://api.github.com")
.addConverterFactory(GsonConverterFactory.create())
.build();
GitHubService service = retrofit.create(GitHubService.class); 这个转换器提供了一个GsonConverterFactory 类。调用类创建实例(通过create())传入到Retrofit实例的 addConverterFactory()方法,你增加转换器到Retrofit之后,它将自动映射JSON数据到你的java对象,在之前 的博客你已经看到。当然,这适用于两个方向:发送和接收数据。
Gson的优点是,它通常不需要设置在您的Java类。然而,有符号边界情况。如果你的app需要Gson做一些特别的事情,去 Gson project查找细节。
27.2 Customize Your Gson Configuration
我们想要你知道Gson有大量的配置选项。请看到官方的User Guide,如果你想要得到一个所有选项的概述。
好的消息是Retrofit使自定义Gson非常容易。你甚至不需要实现你自己自定义的转换器,我们将在另一篇博客文章的后面看。在之前的小节,我们解释了你可以增加Gson 转换器像这样:
Retrofit retrofit = new Retrofit.Builder()
.baseUrl("https://api.github.com")
.addConverterFactory(GsonConverterFactory.create())
.build();我们没有告诉你,你可以将Gson实例传递给GsonConverterFactory.create()方法。这里有一个例子与各种Gson配置:
Gson gson = new GsonBuilder()
.registerTypeAdapter(Id.class, new IdTypeAdapter())
.enableComplexMapKeySerialization()
.serializeNulls()
.setDateFormat(DateFormat.LONG)
.setFieldNamingPolicy(FieldNamingPolicy.UPPER_CAMEL_CASE)
.setPrettyPrinting()
.setVersion(1.0)
.create();
Retrofit retrofit = new Retrofit.Builder()
.baseUrl("https://api.github.com")
.addConverterFactory(GsonConverterFactory.create(gson))
.build();如果你在转换工厂传入一个Gson实例,Retrofit将会尊重你所有的配置。这使得它很容易做你的Gson的JSON映射微调与,同时保持实际的代码变更降到最低。
二十八、Retrofit 2 — Implementing Custom Converters
二十九、Retrofit — How to Integrate XML Converter
29.1 Define Gradle Dependencyr
第一步是在 build.gradle文件。Retrofit项目已经有一个XML转换器可获得你需要增加到你项目作为节点依赖。如果你想知道更多关于存在的转换器在Retorfit,请查看我们之后的文章how to create or define your custom response converter
现在,定义依赖在你的 build.gradle。
Retrofit 1.9
dependencies {
// Retrofit XML converter (Simple)
compile 'com.squareup.retrofit:converter-simplexml:1.9.0'
}Retrofit 2.0
dependencies {
// Retrofit XML converter (Simple)
compile 'com.squareup.retrofit2:converter-simplexml:2.3.0'
}一旦你从SimpleXML转换器增加依赖到你的build.gradle文件。同步项目和等待Android Studio完成这个过程。
29.2 XMLConverter feat. RestAdapter/Retrofit
现在我们必须定义SimpleXMLConverter 作为RestAdapter 转换器(Retrofit 在Retrofit 2)
Retrofit 1.9
RestAdapter adapter = new RestAdapter.Builder()
.setClient(new OkClient(new OkHttpClient())
.setEndpoint(yourBaseUrl)
.setConverter(new SimpleXMLConverter())
.build();只传入new SimpleXMLConverter()构造到.setConverter()方法覆盖默认的转换器(GSON).
Retrofit 2
Retrofit retrofit = new Retrofit.Builder()
.baseUrl(API_BASE_URL)
.client(new OkHttpClient())
.addConverterFactory(SimpleXmlConverterFactory.create())
.build();在Retrofit 2处理响应转换器改变。你不覆盖现有的转换器。结果的可能性为Retrofit实例定义多个转换器。在内部,Retrofit将试图解析响应第一个添加转换器。如果失败,它将继续下一个,等等…
29.3 Objects Love Annotations
Retrofit将映射你的XML文件响应java对象,不关心XML转换器的使用。因此,我们需要注释的Java对象正确标签属性映射。
我们将使用下面的Task 类,添加注解映射相应的tasks.xml文件。
tasks.xml
这个XML文件似乎没有任何与之关联的样式信息。文档树如下所示。
<rss xmlns:atom="http://www.w3.org/2005/Atom" version="2.0">
<task>
<id link="http://url-to-link.com/task-id">1</id>
<title>Retrofit XML Converter Blog Post</title>
<description>Write blog post: XML Converter with Retrofit</description>
<language>de-de</language>
</task>
</rss> Task
@Root(name = "task")
public class Task {
@Element(name = "id")
private long id;
@Element(name = "title")
private String title;
@Element(name = "description")
private String description;
@Attribute(required = false)
private String link;
public Task() {}
}
注释定义的element 名称映射到类属性。在这个例子中,所有element 具有相同的名称在XML文件和Java类。当然,你可以使用不同的命名和仅在@Element注释的元素名称使用xml文件名称。
三十、Retrofit 2 — Access Mapped Objects and Raw Response Payload
三十一、Retrofit 2 — Supporting JSON and XML Responses Concurrently
三十二、Retrofit 2 — Handling of Empty Server Responses with Custom Converter
三十三、Retrofit — Define a Custom Response Converter
33.1 Basics
Retrofit附带Google的JSON默认。每个JSON映射是在GSON的帮助下完成的。一些时候,你的框架或态度需要改变集成JSON转换器。一个众所周知的转换器是 Jackson.。我们将使用 Jackson.的代码示例。
33.2 Existing Retrofit Converters
除了GSON,Retrofit可以配置各种内容格式。retrofit-converters 现有目录列表响应转换器:
- JSON (using Jackson)
- XML (using Simple)
- Protocol Buffers (using protobuf or Wire)
在gradle集成可以使用这些命令完成:
compile 'com.squareup.retrofit:converter-<converter-name>:1.9.0'
# e.g. Jackson
compile 'com.squareup.retrofit:converter-jackson:1.9.0'
# e.g. XML
compile 'com.squareup.retrofit:converter-simplexml:1.9.0' 33.3 Create Your Own Converter
这种情况你需要创建你自己的Retrofit响应转换器,你可以跟随下面的步骤,我们将使用Jackson 库演示具体的定义和处理。
**Remember:**Retrofit 转换器有现有的,您可以直接使用它们通过整合各自的gradle依赖。上面列表中描述了现有的转换器,将作为一个单独的gradle依赖和在Retrofit可以很容易集成。
33.4 Jackson Gradle Dependency
首先,定义Jackson 依赖。这个例子使用Jackson 2.x附带的组合和工件id与之前的Jackson 1.x不同。添加所需的Maven存储库和编译依赖。
repositories {
maven { url "http://repository.codehaus.org/org/codehaus" }
}
dependencies {
compile 'com.fasterxml.jackson.core:jackson-databind:2.4.3'
}33.5 Implement Your Custom JSON Converter
重要步骤是替换Retrofit的JSON转换器实现Converter 接口和覆盖它的两个方法fromBody 和toBody。两个方法处理转换和JSON。
public class JacksonConverter implements Converter {
private ObjectMapper mapper = new ObjectMapper();
@Override
public Object fromBody(TypedInput body, Type type) throws ConversionException {
JavaType javaType = mapper.getTypeFactory().constructType(type);
try {
return mapper.readValue(body.in(), javaType);
} catch (IOException e) {
throw new ConversionException(e);
}
}
@Override
public TypedOutput toBody(Object object) {
try {
String charset = "UTF-8";
String json = mapper.writeValueAsString(object);
return new JsonTypedOutput(json.getBytes(charset));
} catch (IOException e) {
throw new AssertionError(e);
}
}
private static class JsonTypedOutput implements TypedOutput {
private final byte[] jsonBytes;
JsonTypedOutput(byte[] jsonBytes) { this.jsonBytes = jsonBytes; }
@Override public String fileName() { return null; }
@Override public String mimeType() { return "application/json; charset=UTF-8"; }
@Override public long length() { return jsonBytes.length; }
@Override public void writeTo(OutputStream out) throws IOException { out.write(jsonBytes); }
}
JsonTypedOutput类是用于设置正确的mimeType。由于输出类型是JSON,mime类型应该也是application / JSON。
// Create our Converter
JacksonConverter jacksonConverter = new JacksonConverter();
// Build the Retrofit REST adaptor pointing to the URL specified, with the Converter.
// Note: The Converter must be set before the .build() command
RestAdapter restAdapter = new RestAdapter.Builder()
.setConverter(jacksonConverter)
.setEndpoint("https://api.example.com/")
.build();
好极了,现在你创建Rest apapters将使用JacksonConverter 处理JSON。
三十四、Error Handling Retrofit 2 — Simple Error Handling
34.1 Error Handling Preparations
即使你想让你的应用程序总是工作如预期和执行请求时不应该有任何问题。但是,你不是在服务器将失败的s时候控制或用户将输入错误数据导致从请求API返回的错误。在这些情况下,你想为用户提供尽可能多的反馈需要设置他/她进入正确的上下文,以便他/她明白问题是什么。
在深入实际的请求导致一个错误,我们要准备类解析响应体包含更多的信息。
34.2 Error Object
首先,我们创建错误对象代表你将从你的请求API接收的响应。让我们假设你的API发送一个JSON错误体像这样:
{
statusCode: 409,
message: "Email address already registered"
}
如果我们想要只演示用户常见的错误信息像here went something wrong,他/她将立即生气这愚蠢的程序无法显示出了什么问题。
为了避免这些糟糕的用户体验,我们映射响应体到一个Java对象,由下面的类。
public class APIError {
private int statusCode;
private String message;
public APIError() {
}
public int status() {
return statusCode;
}
public String message() {
return message;
}
}
我们实际上并不需要响应体内部的状态代码,只是出于演示目的,这样你不需要额外获取响应。
34.3 Simple Error Handler
我们将使用下面的类只有一个static 方法返回一个APIError对象。parseError方法期望响应作为参数。进一步,你需要让你的Retrofit实例可以对收到的JSON错误响应转换为适当的响应。
public class ErrorUtils {
public static APIError parseError(Response<?> response) {
Converter<ResponseBody, APIError> converter =
ServiceGenerator.retrofit()
.responseBodyConverter(APIError.class, new Annotation[0]);
APIError error;
try {
error = converter.convert(response.errorBody());
} catch (IOException e) {
return new APIError();
}
return error;
}
}
我们暴露Retrofit实例从ServiceGenerator通过静态方法(如果你不熟悉ServiceGenerator,请阅读本系列的入门文章)。需要响应转换器解析JSON错误。和响应转换器是可获得的通过我们的Retrofit对象。
首先,我们得到的错误转换器ServiceGenerator.retrofit()实例,另外我们的APIError类作为参数传递给responseBodyConverter方法。responseConverter方法将返回适当的转换器来解析响应体类型。在我们的例子中,我们期待一个JSON转换器,因为我们收到的JSON数据。
此外,我们调用converter.convert解析接收到的响应体数据转换成一个APIError对象。之后,我们将返回创建的对象。
34.4 Error Handler in Action
Retrofit 2比Retrofit 1处理“成功”的请求有不同的概念。在Retrofit 2中,所有的请求都可以执行(发送到API)和你收到的响应被视为“成功”。这意味着,对于这些请求onResponse触发回调,你实际需要手动检查请求是否成功(状态,200 - 299年)或错误的(400 - 599)状态。
如果请求成功完成,我们可以使用响应对象,做任何我们想做的事情。以防错误实际上失败(记住,状态,400 - 599),我们想要显示用户适当的信息的问题。
Call<User> call = service.me();
call.enqueue(new Callback<User>() {
@Override
public void onResponse(Call<User> call, Response<User> response) {
if (response.isSuccessful()) {
// use response data and do some fancy stuff :)
} else {
// parse the response body …
APIError error = ErrorUtils.parseError(response);
// … and use it to show error information
// … or just log the issue like we’re doing :)
Log.d("error message", error.message());
}
}
@Override
public void onFailure(Call<User> call, Throwable t) {
// there is more than just a failing request (like: no internet connection)
}
});你已经看到,我们使用ErrorUtils 类解析错误体和得到APIError 对象。使用这个对象和所包含的信息来显示一个有意义的信息,而不是一个通用的错误消息。
三十五、Retrofit 2 — Catch Server Errors Globally with Response Interceptor
35.1 Distinguish Server Error Responses
在接下来的几分钟,我们假定您的服务器是符合HTTP标准和发送适当的状态码,如404对资源没有找到。Retrofit 的onResponse()回调你访问响应状态代码通过response.code()方法。
一个简单的解决方案将会检查该代码错误场景并采取相应行动:
call.enqueue(new Callback<List<GitHubRepo>>() {
@Override
public void onResponse(Call<List<GitHubRepo>> call, Response<List<GitHubRepo>> response) {
if (response.isSuccessful()) {
Toast.makeText(ErrorHandlingActivity.this, "server returned so many repositories: " + response.body().size(), Toast.LENGTH_SHORT).show();
// todo display the data instead of just a toast
}
else {
// error case
switch (response.code()) {
case 404:
Toast.makeText(ErrorHandlingActivity.this, "not found", Toast.LENGTH_SHORT).show();
break;
case 500:
Toast.makeText(ErrorHandlingActivity.this, "server broken", Toast.LENGTH_SHORT).show();
break;
default:
Toast.makeText(ErrorHandlingActivity.this, "unknown error", Toast.LENGTH_SHORT).show();
break;
}
}
}
@Override
public void onFailure(Call<List<GitHubRepo>> call, Throwable t) {
Toast.makeText(ErrorHandlingActivity.this, "network failure :( inform the user and possibly retry", Toast.LENGTH_SHORT).show();
}
});虽然这工作,很低效。你需要这段代码复制并粘贴到每一个响应回调。特别是当你想要改变的行为很快变成了一场噩梦。即使你移动逻辑到中心的方法,你必须记得要调用这个方法在每一个响应回调。
应对全局错误场景的最好方法是在一个中央位置处理所有请求:一个OkHttp拦截器。
35.2 Global Error Handler: OkHttp Interceptor
我们使用OkHttp拦截行动全局的在app在以前的教程,例如查询参数添加到每一个要求。不同的是,这一次我们拦截请求在它的方法返回。而不是修改请求,我们拦截服务器响应!具体来说,我们看一下状态代码,如果它是一个500状态代码,我们打开一个单独的活动来通知用户,服务器目前不可用。用户将无法进一步与应用程序交互,遇到更多的未定义的行为。
我们添加一个响应拦截的方式几乎与之前的添加请求拦截器是一样我们使用:
OkHttpClient okHttpClient = new OkHttpClient.Builder()
.addInterceptor(new Interceptor() {
@Override
public okhttp3.Response intercept(Chain chain) throws IOException {
Request request = chain.request();
okhttp3.Response response = chain.proceed(request);
// todo deal with the issues the way you need to
if (response.code() == 500) {
startActivity(
new Intent(
ErrorHandlingActivity.this,
ServerIsBrokenActivity.class
)
);
return response;
}
return response;
}
})
.build();
Retrofit.Builder builder = new Retrofit.Builder()
.baseUrl("http://10.0.2.2:3000/")
.client(okHttpClient)
.addConverterFactory(GsonConverterFactory.create());
Retrofit retrofit = builder.build(); 正如你所看到的在上面的代码片段中,okhttp3。okhttp3.Response response = chain.proceed(request);一行访问服务器响应。因此,我们可以用如果检查状态代码if (response.code() == 500),然后打开ServerIsBrokenActivity。
根据你的用例和需求你将需要调整这种行为和可能的状态代码到你的场景。就像一个提醒,响应仍将到达回调的!确保你不是配置冲突的app行为。
这种方法的优点是:每个请求与Retrofit对象将以同样的方式处理错误。你只有一个地方为所有主要的错误处理。我们建议移到ServiceGenerator。太棒了!
三十六、Logging Retrofit 2 — Log Requests and Responses
我们发布了一篇博客在 how to debug requests using Retrofit 1. 如果你使用第一个Retrofit主要的版本,请链接下面相关的博客
36.1 Logging In Retrofit 2
Retrofit 2的所有网络操作依赖于OkHttp.OkHttp的开发者已经发布了一个单独的日志记录拦截器项目,为OkHttp实现日志。你可以添加它到你的项目快速编辑你的build.gradle:
compile 'com.squareup.okhttp3:logging-interceptor:3.8.0' 在开发你的app和调试目的它的好处是有一个日志特点集成请求和响应信息。由于日志在Retrofit 2 默认没有集成,我们需要增加一个日志集成为OkHttp.幸运的是OkHttp已经附带了这个集成和你仅需要激活它为OkHttpClient.
HttpLoggingInterceptor logging = new HttpLoggingInterceptor();
// set your desired log level
logging.setLevel(Level.BODY);
OkHttpClient.Builder httpClient = new OkHttpClient.Builder();
// add your other interceptors …
// add logging as last interceptor
httpClient.addInterceptor(logging); // <-- this is the important line!
Retrofit retrofit = new Retrofit.Builder()
.baseUrl(API_BASE_URL)
.addConverterFactory(GsonConverterFactory.create())
.client(httpClient.build())
.build();我们建议添加日志作为最后的拦截器,因为这也将日志信息与先前的拦截器添加您的请求。
36.2 Log Levels
日志记录太多的信息会炸毁你的Android监视器,这就是为什么OkHttp记录拦截器有四个日志级别:NONE, BASIC, HEADERS, BODY.。我们将带你通过每一个日志级别和描述他们的输出。
None
No logging.
对生产环境中使用这个日志级别通过跳过任何日志记录操作提高应用程序性能。
Basic
Log request type, url, size of request body, response status and size of response body.
D/HttpLoggingInterceptor$Logger: --> POST /upload HTTP/1.1 (277-byte body)
D/HttpLoggingInterceptor$Logger: <-- HTTP/1.1 200 OK (543ms, -1-byte body) 使用日志等级BASIC 仅日志最小的信息关于请求。如果你只对请求体大小,响应体大小和响应状态感兴趣,这个log等级是正确的选择。
Headers
Log request and response headers, request type, url, response status.
使用HEADERS log等级将仅log请求头和响应头。Retrofit或者OkHttp默认将增加适当的请求头,但他们不会出现在你的请求,因为它们被添加在请求链中。如果你不拦截实际的请求在Android,没有什么看的。如果你添加自己的请求头,确保日志拦截器是最后一个拦截器添加到OkHttp客户端。如果你先添加这个拦截器,请求还没有任何头数据集的。
我们使用两个头字段Accept 和 Content-Type演示输出,如果你定义你自己的值。
D/HttpLoggingInterceptor$Logger: --> POST /upload HTTP/1.1
D/HttpLoggingInterceptor$Logger: Accept: application/json
D/HttpLoggingInterceptor$Logger: Content-Type: application/json
D/HttpLoggingInterceptor$Logger: --> END POST
D/HttpLoggingInterceptor$Logger: <-- HTTP/1.1 200 OK (1039ms)
D/HttpLoggingInterceptor$Logger: content-type: text/html; charset=utf-8
D/HttpLoggingInterceptor$Logger: cache-control: no-cache
D/HttpLoggingInterceptor$Logger: vary: accept-encoding
D/HttpLoggingInterceptor$Logger: Date: Wed, 28 Oct 2015 08:24:20 GMT
D/HttpLoggingInterceptor$Logger: Connection: keep-alive
D/HttpLoggingInterceptor$Logger: Transfer-Encoding: chunked
D/HttpLoggingInterceptor$Logger: OkHttp-Selected-Protocol: http/1.1
D/HttpLoggingInterceptor$Logger: OkHttp-Sent-Millis: 1446020610352
D/HttpLoggingInterceptor$Logger: OkHttp-Received-Millis: 1446020610369
D/HttpLoggingInterceptor$Logger: <-- END HTTP 服务器的头除外,你会得到信息,协议选择和各自的毫秒当你的请求被发送和响应被接收。
Body
Log request and response headers and body.
这是一个完整的日志等级和将打印输出每个相关的信息为你的请求和响应。
D/HttpLoggingInterceptor$Logger: --> POST /upload HTTP/1.1
D/HttpLoggingInterceptor$Logger: --9df820bb-bc7e-4a93-bb67-5f28f4140795
D/HttpLoggingInterceptor$Logger: Content-Disposition: form-data; name="description"
D/HttpLoggingInterceptor$Logger: Content-Transfer-Encoding: binary
D/HttpLoggingInterceptor$Logger: Content-Type: application/json; charset=UTF-8
D/HttpLoggingInterceptor$Logger: Content-Length: 37
D/HttpLoggingInterceptor$Logger:
D/HttpLoggingInterceptor$Logger: "hello, this is description speaking"
D/HttpLoggingInterceptor$Logger: --9df820bb-bc7e-4a93-bb67-5f28f4140795--
D/HttpLoggingInterceptor$Logger: --> END POST (277-byte body)
D/HttpLoggingInterceptor$Logger: <-- HTTP/1.1 200 OK (1099ms)
D/HttpLoggingInterceptor$Logger: content-type: text/html; charset=utf-8
D/HttpLoggingInterceptor$Logger: cache-control: no-cache
D/HttpLoggingInterceptor$Logger: vary: accept-encoding
D/HttpLoggingInterceptor$Logger: Date: Wed, 28 Oct 2015 08:33:40 GMT
D/HttpLoggingInterceptor$Logger: Connection: keep-alive
D/HttpLoggingInterceptor$Logger: Transfer-Encoding: chunked
D/HttpLoggingInterceptor$Logger: OkHttp-Selected-Protocol: http/1.1
D/HttpLoggingInterceptor$Logger: OkHttp-Sent-Millis: 1446021170095
D/HttpLoggingInterceptor$Logger: OkHttp-Received-Millis: 1446021170107
D/HttpLoggingInterceptor$Logger: Perfect!
D/HttpLoggingInterceptor$Logger: <-- END HTTP (8-byte body) 这是唯一的日志级别,你会得到响应体数据。如果你和你的后端开发人员在一个论点,使用这个日志级别显示接收到的响应数据。然而,BODY 的日志级别将混乱你的Android监控如果你收到大型数据集。只在必要时使用这个等级。
三十七、Retrofit 2 — Enable Logging for Development Builds Only
37.1 Differentiate Development/Production Builds
自动化是一个最好的工具来提高开发人员的注意力和较高的生产率。Retrofit的启用和禁用日志记录是乏味的,重复的任务,分散你的注意力。此外,它增加了日志为生产build 开启的机会。让我们自动化这个过程:日志将为调试 builds启用在您的开发过程中;和日志将为你的app所有的生产版本禁止!
解决方案很简单:我们利用Android框架提供的BuildConfig.DEBUG布尔变量。它将为开发build返回true,为生产版本返回false
在前面的博文,我们向您展示了这个代码片段:
HttpLoggingInterceptor logging = new HttpLoggingInterceptor();
logging.setLevel(Level.BODY);
OkHttpClient.Builder httpClient = new OkHttpClient.Builder();
httpClient.addInterceptor(logging);
Retrofit retrofit = new Retrofit.Builder()
.baseUrl(API_BASE_URL)
.addConverterFactory(GsonConverterFactory.create())
.client(httpClient.build())
.build();是时候稍微改变代码只为调试build启用日志:
OkHttpClient.Builder httpClient = new OkHttpClient.Builder();
if (BuildConfig.DEBUG) {
HttpLoggingInterceptor logging = new HttpLoggingInterceptor();
logging.setLevel(Level.BODY);
httpClient.addInterceptor(logging);
}
Retrofit retrofit = new Retrofit.Builder()
.baseUrl(API_BASE_URL)
.addConverterFactory(GsonConverterFactory.create())
.client(httpClient.build())
.build();仅增加日志拦截器如果它是一个开发build。我们强烈推荐这种或类似的方法应用到你的应用程序。这不会是几个小时,但它会每天为你节省一点时间。你的时间很重要!
37.2 Use Different Logging Levels
如果你看到日志的值为生产应用程序,但想使用一个不同的日志级别,您可以使用我们刚刚展示的方法。
让我们一次修改的代码片段:
OkHttpClient.Builder httpClient = new OkHttpClient.Builder();
HttpLoggingInterceptor logging = new HttpLoggingInterceptor();
if (BuildConfig.DEBUG) {
// development build
logging.setLevel(Level.BODY);
} else {
// production build
logging.setLevel(Level.BASIC);
}
httpClient.addInterceptor(logging);
Retrofit retrofit = new Retrofit.Builder()
.baseUrl(API_BASE_URL)
.addConverterFactory(GsonConverterFactory.create())
.client(httpClient.build())
.build();三十八、Retrofit 2 — Log Network Traffic with Stetho and Chrome Developer Tools
38.1 Prerequisites
在开启之前,你需要利用一些Stetho工具,你将需要安装:
- Chrome Browser 包装的开发工具来显示网络活动。
- Android ADB 已经安装,如果你使用了Android Studio。因此,增加它到你的机器。
38.2 Stetho Dependencies
接下来,你需要增加两个Gradle依赖到你的项目:
// stetho
compile 'com.facebook.stetho:stetho:1.4.2'
// for OkHttp3, if you're using an older version,
// check the stetho website
compile 'com.facebook.stetho:stetho-okhttp3:1.4.2' 同步你的项目和你可以移动到下个步骤。
38.3 Adding Stetho Logging
一旦你打开你的Android项目,你将需要修改你的app的application类,如果你还没有一个application类,你可以增加一个:
public class MyApplication extends Application {
public void onCreate() {
super.onCreate();
Stetho.initializeWithDefaults(this);
}
}
确保在 super.onCreate();方法之后调用Stetho.initializeWithDefaults(this);。如果你只是第一时间增加application类,你将也需要修改你的 AndroidManifest.xml和设置MyApplication 类作为你的application:
<manifest package="io.futurestud.stetho"
xmlns:android="http://schemas.android.com/apk/res/android">
...
<application
android:icon="@mipmap/ic_launcher"
android:label="@string/app_name"
android:name="io.futurestud.stetho.MyApplication"
...
</application>
...
</manifest> 就像OkHttp日志拦截器,你需要增加一个拦截器到Retrofit的OkHttp客户端。因此,下一步将增加一个network interceptor到你的OkHttp client.
OkHttpClient okHttpClient = new OkHttpClient.Builder()
.addNetworkInterceptor(new StethoInterceptor())
.build();
Retrofit.Builder builder = new Retrofit.Builder()
.baseUrl("http://futurestud.io/api")
.client(okHttpClient)
.addConverterFactory(GsonConverterFactory.create());
Retrofit retrofit = builder.build(); 下面每个调用Retrofit实例将Log所有Stetho的请求。
重要的是要注意,这只包括网络请求。从OkHttp缓存服务的请求不会出现!如果你想分析缓存行为,您需要回到OkHttp日志拦截器。
38.4 Access Network Logging in Chrome
接下来你构建你的app,Stetho将准备好了。为了查看请求,你打开Chrome浏览器,输入chrome://inspect。你会看到一个列表的设备和应用程序启用了Stetho的列表。在我们的例子中,
三十九、Retrofit — Using the Log Level to Debug Requests
我们发布了一篇博客 how to debug requests using Retrofit 2。如果你已经使用Retrofit第二个主要的版本,请链接到相关的博客。
39.1 Activating Retrofit Logging
我们可以查看请求和响应可以是一个很好的助手。然而,它的默认禁用。幸运的是,启用日志功能是快速和容易:
RestAdapter.Builder builder = new RestAdapter.Builder()
.setEndpoint(API_LOCATION)
.setLogLevel(RestAdapter.LogLevel.FULL) // this is the important line
.setClient(new OkClient(new OkHttpClient()));这是你所要做的。现在启动应用程序或测试,并强制执行的请求。
39.2 Using the Logs
请求执行之后,查看你的测试设备的Android Logcat。Retrofit post很多有趣的事情:
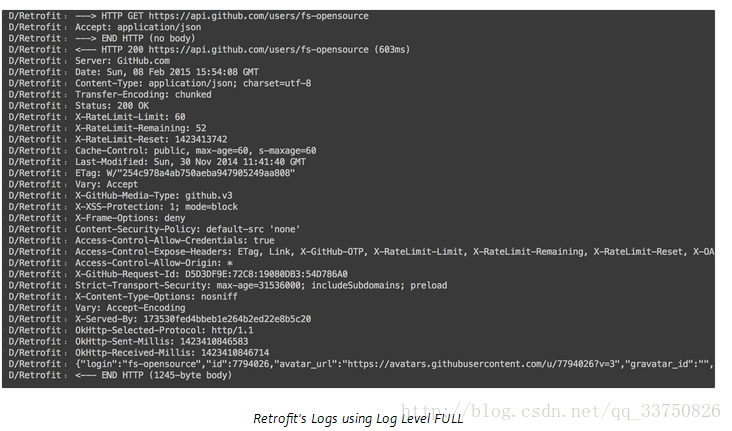
你已经看到,包含整个请求体和响应体。虽然这可能是有用的和必要的,信息太多,堆满你的日志。
39.3 Knowing the Levels
不要担心,Retrofit有不同的日志级别匹配所需的信息没有炸毁你的日志太多。让我们来看看各个等级:
- NONE
描述:没有日志
- BASIC
描述:只Log请求方法和URL和响应状态码和执行时间
例如:

- HEADERS
描述:log基本的请求头和响应头信息
例如:
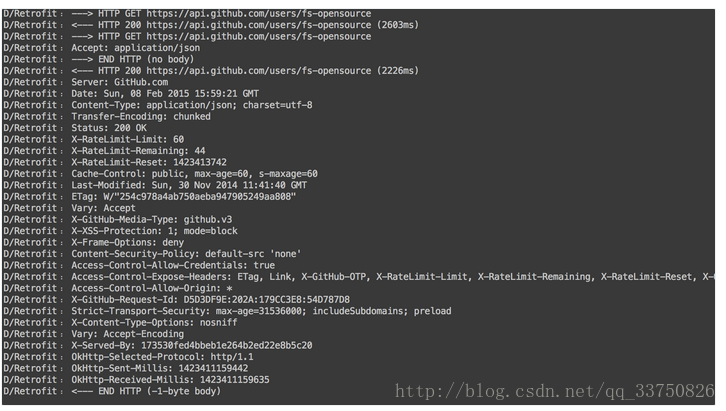
- HEADERS_AND_ARGS
描述:log基本的请求和响应对象信息通过toString().
例如:
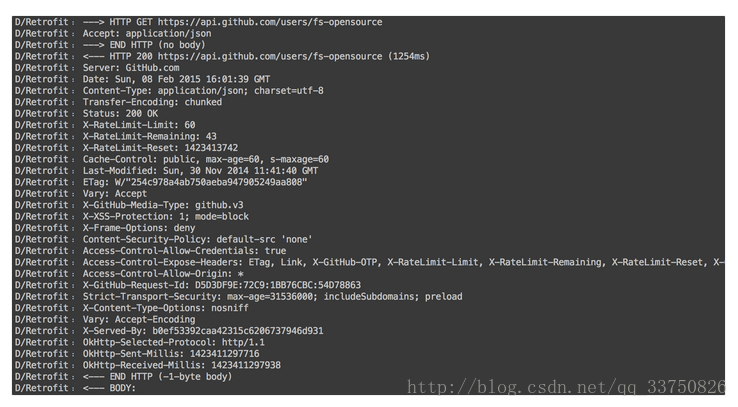
- FULL
描述:log头和体,和metadata从请求和响应
例如:
看上面的Using the Logs
四十、Retrofit 2 — Analyze Network Traffic with Android Studio Profiler
40.1 Prerequisites & Setup
不像OkHttp拦截器和Stetho您不需要对代码进行任何更改。这个解决方案在Android Studio 3.0开箱即用的工作。
然而,目前你还需要启用advanced profiling在你的运行/调试配置。当您运行这个更新的应用程序配置,您将能够使用Android分析器来分析应用程序的网络流量。
40.2 Analyze Network Traffic with Android Profiler
一旦你的app运行在一个设备或者模拟器,你可以使用Android Profiler查看分析界面,CPU,内存和网络细节。
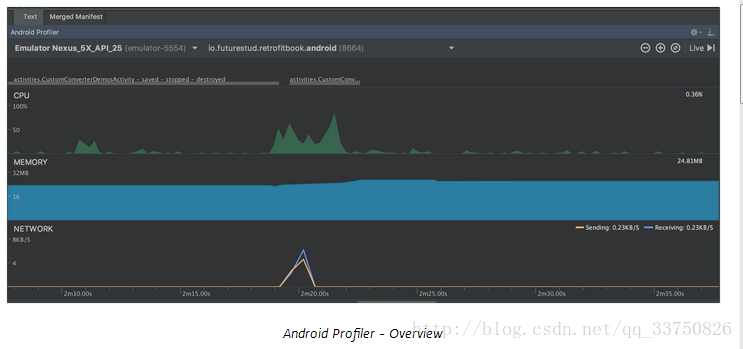
概述不断提出了更新时间表,已经给你有价值的信息怎样的UI事件,CPU和内存使用情况和网络流量相关。
因为本教程是专注于网络的一部分,你可以点击进入网络部分开放一个详细的网络视图。
40.3 Network View
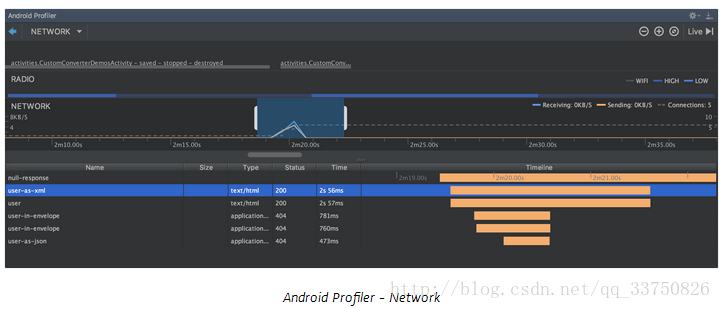
在这个网络工作视图你将看到所有的请求,当他们完成时和用了多长时间来完成它们。这是在一个方便的时间轴,和额外的在一个列表。、
当你点击一个特定的请求,你可以进一步的进入这个请求
40.4 Request Details
这个细节视图提供你准确的信息关于请求的负载,头和meta data。此外,您还可以看到调用堆栈的网络活动和理解你的代码开始网络请求。
四十一、Pagination Retrofit 2 — Pagination Using Query Parameter
四十二、Retrofit 2 — Pagination Using Link Header and Dynamic Urls (Like GitHub)
四十三、Retrofit 2 — Pagination Using Range Header Fields (Like Heroku)
四十四、File Upload & Download Retrofit 2 — How to Upload Files to Server
44.1 File Upload with Retrofit 1.x
我们已经发布了一个章节在how to upload files using Retrofit1.x。如果你使用Retrofit 1,请链接它。如果使用Retrofit 2请阅读这个章节。
44.2 Upload Files With Retrofit 2
本教程是故意分开教程 how to upload files with Retrofit v1, ,因为Retrofit 1到Retrofit 2中的内部变化是深远的,你需要了解的方式改造2处理文件上传。
Retrofit 1 使用一个叫做TypedFile类为文件上载到服务器。这个类已被Retrofit 2删除。进一步,现在Retrofit 2利用OkHttp库为任何网络操作,因此,OkHttp的类为用例,像文件上传。
使用Retrofit 2,您需要使用OkHttp 的RequestBody或MultipartBody.Part类和封装您的文件到一个请求体。让我们看一看接口定义为文件上传。
public interface FileUploadService {
@Multipart
@POST("upload")
Call<ResponseBody> upload(
@Part("description") RequestBody description,
@Part MultipartBody.Part file
);
}
让我们解释上面定义的每个步骤。首先,你需要声明整个调用作为@Multipart 请求。让我们继续description注释。description仅仅是一个字符串值包装在RequestBody 实例。其次,还有一个@Part在这个要求:实际的file。我们使用MultipartBody.Part类,允许我们发送实际的文件名除了二进制文件数据的请求。您将看到如何创建一个file对象正确在以下部分。
44.3 Android Client Code
在这点上,你要定义必要的服务接口为Retrofit。现在你可以移动和触碰实际的文件上传。我们将使用通用的服务客户端ServiceGenerator 。
下面的代码片段演示uploadFile(Uri fileUri)方法携带文件的uri作为参数。如果你开启一个意图选择一个文件,你将在Android的生命周期方法onActivityResult()方法返回。在这个方法,你可以得到文件的url和是正确的你将使用它上传文件在uploadFile 方法
private void uploadFile(Uri fileUri) {
// create upload service client
FileUploadService service =
ServiceGenerator.createService(FileUploadService.class);
// https://github.com/iPaulPro/aFileChooser/blob/master/aFileChooser/src/com/ipaulpro/afilechooser/utils/FileUtils.java
// use the FileUtils to get the actual file by uri
File file = FileUtils.getFile(this, fileUri);
// create RequestBody instance from file
RequestBody requestFile =
RequestBody.create(
MediaType.parse(getContentResolver().getType(fileUri)),
file
);
// MultipartBody.Part is used to send also the actual file name
MultipartBody.Part body =
MultipartBody.Part.createFormData("picture", file.getName(), requestFile);
// add another part within the multipart request
String descriptionString = "hello, this is description speaking";
RequestBody description =
RequestBody.create(
okhttp3.MultipartBody.FORM, descriptionString);
// finally, execute the request
Call<ResponseBody> call = service.upload(description, body);
call.enqueue(new Callback<ResponseBody>() {
@Override
public void onResponse(Call<ResponseBody> call,
Response<ResponseBody> response) {
Log.v("Upload", "success");
}
@Override
public void onFailure(Call<ResponseBody> call, Throwable t) {
Log.e("Upload error:", t.getMessage());
}
});
}
上面的这个片段演示初始化负载(body 和description)和怎样使用这个文件上传服务器。正如已经提到的,从OkHttp的 类,用于描述。它的.create()方法需要两个参数:第一,媒体类型,其次,实际的数据。媒体类型的描述可以是OkHttp常量为多部分请求:
okhttp3.MultipartBody.FORM。媒体类型的文件应该是实际的 content-type。例如,一个PNG图像应该是image/png。上面的代码片段中找出getContentResolver().getType(fileUri)的content type调用然后解析结果到MediaType.parse ()的OkHttp的媒体类型。
除了描述,您将添加文件包装成MultipartBody.Part实例。这就是您需要使用适当的从客户端上传文件。此外,您可以在createFormData()中添加的原始文件名称方法和重用你的后端。
44.4 Remember the Content-Type
请留意留意Retrofit的content type。如果你拦截底层OkHttp客户端和更改content type为application / json,你的服务器可能在反序列化过程有问题。确保你没有定义头指示你发送JSON数据,但multipart/form-data。
44.5 Exemplary Hapi Server for File Uploads
如果你已经有后端项目,你可以依靠下面的示例代码。我们使用一个简单的Hapi服务器与在/upload 的POST。此外,我们告诉hapi 不解析传入的请求,因为我们使用一个Node.js库叫做multiparty
为负载的解析。
在multiparty的解析的回调函数,我们记录每个字段来显示其输出。
method: 'POST',
path: '/upload',
config: {
payload: {
maxBytes: 209715200,
output: 'stream',
parse: false
},
handler: function(request, reply) {
var multiparty = require('multiparty');
var form = new multiparty.Form();
form.parse(request.payload, function(err, fields, files) {
console.log(err);
console.log(fields);
console.log(files);
return reply(util.inspect({fields: fields, files: files}));
});
}
}Android客户端期待一个String返回类型,我们发送接收信息作为响应。当然,你的响应将应该看起来不同。
下面你可以看到成功请求的输出和负载解析在服务端。首先null是err对象。
后来,你可以看到fields 仅作为请求步骤的描述。最后但并非最不重要,文件是可获得的在picture 字段。这里你看到我们在客户端之前定义的名字。20160312 _095248.jpg传递作为原始名称和实际的字段名的是picture 。为进一步处理,访问路径上传图像的位置。
Server Log for Parsed Payload
null
{ description: [ 'hello, this is description speaking' ] }
{ picture:
[ { fieldName: 'picture',
originalFilename: '20160312_095248.jpg',
path: '/var/folders/rq/q_m4_21j3lqf1lw48fqttx_80000gn/T/X_sxX6LDUMBcuUcUGDMBKc2T.jpg',
headers: [Object],
size: 39369 } ] }四十五、Retrofit 2 — How to Upload Multiple Files to Server
45.1 Upload Multiple Files With Retrofit 2
进入上传多个文件的细节之前,请确保您了解uploading files with Retrofit 2.的原则。多个文件的方法是非常相似的。
首先,我们需要集成我们的
public interface FileUploadService {
// previous code for single file uploads
@Multipart
@POST("upload")
Call<ResponseBody> uploadFile(
@Part("description") RequestBody description,
@Part MultipartBody.Part file);
// new code for multiple files
@Multipart
@POST("upload")
Call<ResponseBody> uploadMultipleFiles(
@Part("description") RequestBody description,
@Part MultipartBody.Part file1,
@Part MultipartBody.Part file2);
}
如果你比较这两个接口方法uploadFile()()和uploadMultipleFiles(),您可以发现很容易区别。Retrofit 2使它简单的添加新文件部分。在接口声明,我们只是需要添加另一行@Part MultipartBody.Part file。uploadMultipleFiles()方法目前只支持两个文件。你需要调整MultipartBody.Part的数量。在后面的教程中,我们将看一个方法添加一个动态数量的文件到你的请求。
声明接口仅是一部分工作。其他的部分是在activity或者fragment中实现。因为我们现在处理多个文件,我们已经实现了两个助手方法使事情更健壮的:
@NonNull
private RequestBody createPartFromString(String descriptionString) {
return RequestBody.create(
okhttp3.MultipartBody.FORM, descriptionString);
}
@NonNull
private MultipartBody.Part prepareFilePart(String partName, Uri fileUri) {
// https://github.com/iPaulPro/aFileChooser/blob/master/aFileChooser/src/com/ipaulpro/afilechooser/utils/FileUtils.java
// use the FileUtils to get the actual file by uri
File file = FileUtils.getFile(this, fileUri);
// create RequestBody instance from file
RequestBody requestFile =
RequestBody.create(
MediaType.parse(getContentResolver().getType(fileUri)),
file
);
// MultipartBody.Part is used to send also the actual file name
return MultipartBody.Part.createFormData(partName, file.getName(), requestFile);
} createPartFromString()方法可以用于发送描述多部分上传。prepareFilePart()方法builds一个MultipartBody.Part对象,包含一个文件(像一张照片或者视频)。包装在MultipartBody.PartRetrofit上传文件是必要的
因此让我们使用我们助手方法发送两个文件:
Uri file1Uri = ... // get it from a file chooser or a camera intent
Uri file2Uri = ... // get it from a file chooser or a camera intent
// create upload service client
FileUploadService service =
ServiceGenerator.createService(FileUploadService.class);
// create part for file (photo, video, ...)
MultipartBody.Part body1 = prepareFilePart("video", file1Uri);
MultipartBody.Part body2 = prepareFilePart("thumbnail", file2Uri);
// add another part within the multipart request
RequestBody description = createPartFromString("hello, this is description speaking");
// finally, execute the request
Call<ResponseBody> call = service.uploadMultipleFiles(description, body1, body2);
call.enqueue(new Callback<ResponseBody>() {
@Override
public void onResponse(Call<ResponseBody> call,
Response<ResponseBody> response) {
Log.v("Upload", "success");
}
@Override
public void onFailure(Call<ResponseBody> call, Throwable t) {
Log.e("Upload error:", t.getMessage());
}
});这是所有您需要做的在一个请求中发送多个文件。当然,你可以添加另一个或更多的部分接口,如果必要的。使用这种方法你可以发送尽可能多的文件。
四十六、Retrofit 2 — How to Upload a Dynamic Amount of Files to Server
46.1 Upload Files With Retrofit 2
如果这个是你的第一个Retrofit上传文件章节,你应该查看我们的 uploading files with Retrofit和uploading multiple files章节
在之前的章节,我们还用各种上传选项在FileUploadService 类。
public interface FileUploadService {
// previous code for single file uploads
@Multipart
@POST("upload")
Call<ResponseBody> uploadFile(
@Part("description") RequestBody description,
@Part MultipartBody.Part file);
// previous code for multiple files
@Multipart
@POST("upload")
Call<ResponseBody> uploadMultipleFiles(
@Part("description") RequestBody description,
@Part MultipartBody.Part file1,
@Part MultipartBody.Part file2);
}
第二个选项让你上传多个文件,但是你总是提前指定有多少。这是困难当你的应用程序没有一个固定数量的文件,它可以随用例或用户输入。
46.2 Upload a Dynamic Amount of Files
这个问题的解决情况是传入一个List 或者Array 或者MultipartBody.Part对象。Retrofit和OkHttp将构建一个适当的多部分请求的所有文件。Java数组或者集合允许您根据需要自由添加文件。
46.3 Endpoint Declaration
你知道这个理论,那么是时候来看一个例子。像往常一样,我们首先描述端点接口。当然,这取决于你的后端。确保你的API可以处理一个随机的文件!
public interface FileUploadService {
@Multipart
@POST("upload")
Call<ResponseBody> uploadMultipleFilesDynamic(
@Part("description") RequestBody description,
@Part List<MultipartBody.Part> files);
}
在前面的例子中,我们携带每个请求的描述。我们将向您展示如何将工作,当然这只是一个单一的描述为很多文件。如果你还需要发送一个动态数量的其他信息,您应该检查我们的教程@PartMap。
第二部分的实现是使用新的端点声明和传递一些文件。我们重用之前的教程的助手方法来简化创建必要的多部分:
@NonNull
private RequestBody createPartFromString(String descriptionString) {
return RequestBody.create(
okhttp3.MultipartBody.FORM, descriptionString);
}
@NonNull
private MultipartBody.Part prepareFilePart(String partName, Uri fileUri) {
// https://github.com/iPaulPro/aFileChooser/blob/master/aFileChooser/src/com/ipaulpro/afilechooser/utils/FileUtils.java
// use the FileUtils to get the actual file by uri
File file = FileUtils.getFile(this, fileUri);
// create RequestBody instance from file
RequestBody requestFile =
RequestBody.create(
MediaType.parse(getContentResolver().getType(fileUri)),
file
);
// MultipartBody.Part is used to send also the actual file name
return MultipartBody.Part.createFormData(partName, file.getName(), requestFile);
} 最后,我们将把一切放在一起构建上传请求:
Uri photoUri = ... // get it from a file chooser or a camera intent
Uri videoUri = ... // get it from a file chooser or a camera intent
// ... possibly many more file uris
// create list of file parts (photo, video, ...)
List<MultipartBody.Part> parts = new ArrayList<>();
// add dynamic amount
if (photoUri != null) {
parts.add(prepareFilePart("photo", photoUri));
}
if (videoUri != null) {
parts.add(prepareFilePart("video", videoUri));
}
// ... possibly add more parts here
// add the description part within the multipart request
RequestBody description = createPartFromString("hello, this is description speaking");
// create upload service client
FileUploadService service = ServiceGenerator.createService(FileUploadService.class);
// finally, execute the request
Call<ResponseBody> call = service.uploadMultipleFilesDynamic(description, parts);
call.enqueue(...); 上面所有的步骤应该相当熟悉。我们只是为每个文件创建一个部分描述。一切都放在一起后,我们可以创建一个新的Call对象从我们的FileUploadService像往常一样和执行请求
四十七、Retrofit 2 — Upload Files with Progress
四十八、Retrofit 2 — Passing Multiple Parts Along a File with @PartMap
48.1 Multiple Parts with @PartMap
多部分请求通常用于与一个额外的文件表单。例如,我们使用它在过去的一个反馈表单,也允许用户上传照片。
如果你只需要通过一个或两个描述文件,你可以声明它@Part作为您的服务声明:
public interface FileUploadService {
// previous code for single description
@Multipart
@POST("upload")
Call<ResponseBody> uploadFile(
@Part("description") RequestBody description,
@Part MultipartBody.Part file);
}
这是伟大的为小的用例,但是如果你需要发送多一些属性,它变得很混乱,特别是如果他们全部不是集合。
改造提供了一种简单的解决方案,使上传完全可定制:@PartMap。@PartMap是请求参数的一个额外的注释,它允许我们指定多少和哪些部分在运行时发送。这可能很有帮助如果你的表单是很长,但只有少数输入字段值是实际发送。而不是声明一个接口方法有20或更多的参数,您可以使用单个@PartMap。让我们看看这在行动!
首先,我们需要创建一个新接口方法@PartMap注释:
public interface FileUploadService {
// declare a description explicitly
// would need to declare
@Multipart
@POST("upload")
Call<ResponseBody> uploadFile(
@Part("description") RequestBody description,
@Part MultipartBody.Part file);
@Multipart
@POST("upload")
Call<ResponseBody> uploadFileWithPartMap(
@PartMap() Map<String, RequestBody> partMap,
@Part MultipartBody.Part file);
}
你是用一个Map
@NonNull
private MultipartBody.Part prepareFilePart(String partName, Uri fileUri) {
// https://github.com/iPaulPro/aFileChooser/blob/master/aFileChooser/src/com/ipaulpro/afilechooser/utils/FileUtils.java
// use the FileUtils to get the actual file by uri
File file = FileUtils.getFile(this, fileUri);
// create RequestBody instance from file
RequestBody requestFile =
RequestBody.create(
MediaType.parse(getContentResolver().getType(fileUri)),
file
);
// MultipartBody.Part is used to send also the actual file name
return MultipartBody.Part.createFormData(partName, file.getName(), requestFile);
最后,让我们使用这个方法和查看完整的代码从创建的Retrofit service,用数据填充请求和enqueuing 请求:
Uri fileUri = ... // from a file chooser or a camera intent
// create upload service client
FileUploadService service =
ServiceGenerator.createService(FileUploadService.class);
// create part for file (photo, video, ...)
MultipartBody.Part body = prepareFilePart("photo", fileUri);
// create a map of data to pass along
RequestBody description = createPartFromString("hello, this is description speaking");
RequestBody place = createPartFromString("Magdeburg");
RequestBody time = createPartFromString("2016");
HashMap<String, RequestBody> map = new HashMap<>();
map.put("description", description);
map.put("place", place);
map.put("time", time);
// finally, execute the request
Call<ResponseBody> call = service.uploadFileWithPartMap(map, body);
call.enqueue(...); 当然,根据你的用例填写你的逻辑。如果你像一个类似的场景到我们的反馈表单,你可以只通过EditText列表和添加非空的内容到你的多部分请求。
四十九、Retrofit 2 — How to Download Files from Server
49.1 How to Specify the Retrofit Request
对于Retrofit专家:请求下载文件的声明看起来几乎像任何其他请求:
// option 1: a resource relative to your base URL
@GET("/resource/example.zip")
Call<ResponseBody> downloadFileWithFixedUrl();
// option 2: using a dynamic URL
@GET
Call<ResponseBody> downloadFileWithDynamicUrlSync(@Url String fileUrl); 49.2 How to Call the Request
申明我们的请求后,我们需要实际的调用它:
FileDownloadService downloadService = ServiceGenerator.create(FileDownloadService.class);
Call<ResponseBody> call = downloadService.downloadFileWithDynamicUrlSync(fileUrl);
call.enqueue(new Callback<ResponseBody>() {
@Override
public void onResponse(Call<ResponseBody> call, Response<ResponseBody> response) {
if (response.isSuccess()) {
Log.d(TAG, "server contacted and has file");
boolean writtenToDisk = writeResponseBodyToDisk(response.body());
Log.d(TAG, "file download was a success? " + writtenToDisk);
} else {
Log.d(TAG, "server contact failed");
}
}
@Override
public void onFailure(Call<ResponseBody> call, Throwable t) {
Log.e(TAG, "error");
}
});如果你感到困惑ServiceGenerator.create(),去开始我们的第一个博客。一旦我们创建了服务,我们将请求就像任何其他Retrofit调用!
只有一件事,目前隐藏背后的功能writeResponseBodyToDisk():将文件写入磁盘!
49.3 How to Save the File
writeResponseBodyToDisk()方法携带ResponseBody 对象和读写它的的字节值到磁盘。看起来比实际上更加困难的代码是:
private boolean writeResponseBodyToDisk(ResponseBody body) {
try {
// todo change the file location/name according to your needs
File futureStudioIconFile = new File(getExternalFilesDir(null) + File.separator + "Future Studio Icon.png");
InputStream inputStream = null;
OutputStream outputStream = null;
try {
byte[] fileReader = new byte[4096];
long fileSize = body.contentLength();
long fileSizeDownloaded = 0;
inputStream = body.byteStream();
outputStream = new FileOutputStream(futureStudioIconFile);
while (true) {
int read = inputStream.read(fileReader);
if (read == -1) {
break;
}
outputStream.write(fileReader, 0, read);
fileSizeDownloaded += read;
Log.d(TAG, "file download: " + fileSizeDownloaded + " of " + fileSize);
}
outputStream.flush();
return true;
} catch (IOException e) {
return false;
} finally {
if (inputStream != null) {
inputStream.close();
}
if (outputStream != null) {
outputStream.close();
}
}
} catch (IOException e) {
return false;
}
}
大多数它只是通用的Java I / O样板。您可能需要调整第一行在哪里和什么名字你的文件被保存。当你做了,你就可以用Retrofit下载文件了!
但是我们还没有完全准备好所有文件。有一个大问题:默认情况下,Retrofit在得到结果之前放入整个服务器响应到。对于一些JSON或XML响应,这种方式工作得很好,但大文件可以很容易地导致Out-of-Memory-Errors。
如果你的应用需要下载甚至略大的文件,我们强烈推荐阅读下一节。
49.4 Beware with Large Files: Use @Streaming!
如果你想要下载一个大文件,Retrofit将试着移动完整的文件进入内存。为了避免这种情况,我们向请求添加一个特殊的注释声明:
@Streaming
@GET
Call<ResponseBody> downloadFileWithDynamicUrlAsync(@Url String fileUrl); @Streaming声明并不意味着你观看Netflix文件。这意味着,而不是将整个文件移动到内存,它将马上传递字节。但是要小心,如果你添加@Streaming声明和继续使用上面的代码中,Android将触发一个android.os.NetworkOnMainThreadException。
因此,最后的步骤哦时包装调用在一个单独的线程,例如ASyncTask:
final FileDownloadService downloadService =
ServiceGenerator.createService(FileDownloadService.class);
Call<ResponseBody> call = downloadService.downloadFileWithDynamicUrlSync(fileUrl);
call.enqueue(new Callback<ResponseBody>() {
@Override
public void onResponse(Call<ResponseBody> call, final Response<ResponseBody> response) {
if (response.isSuccessful()) {
Log.d(TAG, "server contacted and has file");
new AsyncTask<Void, Void, Void>() {
@Override
protected Void doInBackground(Void... voids) {
boolean writtenToDisk = writeResponseBodyToDisk(FileDownloadActivity.this, response.body(), null);
Log.d(TAG, "file download was a success? " + writtenToDisk);
return null;
}
}.execute();
}
else {
Log.d(TAG, "server contact failed");
}
}
@Override
public void onFailure(Call<ResponseBody> call, Throwable t) {
Log.e(TAG, "error");
}
}); 你还恶意s还用相同writeResponseBodyToDisk()方法。如果你记住@Streaming 声明h额俄格片段,你可以使用Retrofit有效的下载甚至更大的文件
49.5 Next: Download Files with Progress Updates
如果你下载文件在前台和他们不是小,您可能想要通知用户在你的行动。理想情况下,您将显示进展更新你已经下载了多少。我们另一个教程如何下载文件进度更新。
五十、Retrofit 2 — Download Files with Progress Updates
五十一、Retrofit — How to Upload Files to Server
51.1File Upload with Retrofit 2.x
我们已经发布一个章节在 how to upload files using Retrofit 2.x. .如果你使用Retrofit 1,请链接它。
51.2 Upload Files with Retrofit 1
Retrofit 提供了执行多部分请求的能力。允许上传文件到服务器的功能。@Multipart注释需要执行这些请求。下面的代码显示了方法定义上传文件到一个给定的API端点。
public interface FileUploadService {
public static final String BASE_URL = "http://your.api/endpoint/base-url";
@Multipart
@POST("/upload")
void upload(@Part("myfile") TypedFile file,
@Part("description") String description,
Callback<String> cb);
}
FileUploadService接口是客户端API声明。你要请求http://your.api/endpoint/base-url/upload链接与两个参数:一个文件myfile 和Stringdescription
执行实际的请求,你需要实例化一个RestAdapter。请看第一小节我们提交一个ServiceGenerator 类为定义接口创建一个services.
ServiceGenerator (在第一小节描述)为你的service接口创建和实例化请求HTTP客户端。在这个用例,我们通过FileUploadService 的静态方法createService 和得到一个实现执行upload的方法。
下面的代码片段演示了之前描述的方法的使用。
FileUploadService service = ServiceGenerator.createService(FileUploadService.class, FileUploadService.BASE_URL);
TypedFile typedFile = new TypedFile("multipart/form-data", new File("path/to/your/file"));
String description = "hello, this is description speaking";
service.upload(typedFile, description, new Callback<String>() {
@Override
public void success(String s, Response response) {
Log.e("Upload", "success");
}
@Override
public void failure(RetrofitError error) {
Log.e("Upload", "error");
}
});TypedFile是Retrofit中一个代表mime type文件的类。我们使用multipart/form-data作为mime type和从一个给定的路径创建一个文件。
51.3 Remember the Content-Type
Attention:留意RestAdapter的content type。如果你指定头 request.addHeader("Content-Type", "application/json");通过RequestInterceptor,这个请求将可能失败在服务端因为你发送多部分数据和不是JSON
51.4 Example hapi.js Server to Handle File Uploads、
我们从Android到hapi.js的服务器后端测试上传功能。为此,我们实现了一个基本的功能仅log在服务器端传入的数据. Multiparty是我们数据解析操作模块的首选。当然,你可以使用任何你喜欢的。
hapi.js路由配置为我们的文件上传测试。
server.route([
{
method: 'POST',
path: '/upload',
config: {
payload: {
maxBytes: 209715200,
output: 'stream',
parse: false
},
handler: function(request, reply) {
var multiparty = require('multiparty');
var form = new multiparty.Form();
form.parse(request.payload, function(err, fields, files) {
console.log(err);
console.log(fields);
console.log(files);
});
}
}
}]);我们想分离Retrofit文件上传的标题在Android和hapi.js服务器。这就是为什么我们分开上面的代码片段,没有任何额外的注释。
然而,这里的服务器日志对于一个成功的请求。
Server Log for incoming data
null
{ description: [ 'hello, this is description speaking' ] }
{ myfile:
[ { fieldName: 'myfile',
originalFilename: 'IMG-20150311-WA0000.jpg',
path: '/var/folders/rq/q_m4_21j3lqf1lw48fqttx_80000gn/T/wcvFPnGewEPCm9IHM7ynAS3I.jpg',
headers: [Object],
size: 34287 } ] }
首先null 日志是错误的对象。然后是description 字段和最后的myfile。
五十二、Authentication Retrofit — Basic Authentication on Android
52.1 Integrate Basic Authentication
让我们更新ServiceGenerator 类和创建一个增加认证请求的方法。下面的代码片段继承自上面的ServiceGenerator 类。
Retrofit 2
public class ServiceGenerator {
public static final String API_BASE_URL = "https://your.api-base.url";
private static OkHttpClient.Builder httpClient = new OkHttpClient.Builder();
private static Retrofit.Builder builder =
new Retrofit.Builder()
.baseUrl(API_BASE_URL)
.addConverterFactory(GsonConverterFactory.create());
private static Retrofit retrofit = builder.build();
public static <S> S createService(Class<S> serviceClass) {
return createService(serviceClass, null, null);
}
public static <S> S createService(
Class<S> serviceClass, String username, String password) {
if (!TextUtils.isEmpty(username)
&& !TextUtils.isEmpty(password)) {
String authToken = Credentials.basic(username, password);
return createService(serviceClass, authToken);
}
return createService(serviceClass, null, null);
}
public static <S> S createService(
Class<S> serviceClass, final String authToken) {
if (!TextUtils.isEmpty(authToken)) {
AuthenticationInterceptor interceptor =
new AuthenticationInterceptor(authToken);
if (!httpClient.interceptors().contains(interceptor)) {
httpClient.addInterceptor(interceptor);
builder.client(httpClient.build());
retrofit = builder.build();
}
}
return retrofit.create(serviceClass);
}
}
Retrofit 1.9
public class ServiceGenerator {
public static final String API_BASE_URL = "https://your.api-base.url";
private static RestAdapter.Builder builder = new RestAdapter.Builder()
.setEndpoint(API_BASE_URL)
.setClient(new OkClient(new OkHttpClient()));
public static <S> S createService(Class<S> serviceClass) {
return createService(serviceClass, null, null);
}
public static <S> S createService(Class<S> serviceClass, String username, String password) {
if (username != null && password != null) {
// concatenate username and password with colon for authentication
String credentials = username + ":" + password;
// create Base64 encodet string
final String basic =
"Basic " + Base64.encodeToString(credentials.getBytes(), Base64.NO_WRAP);
builder.setRequestInterceptor(new RequestInterceptor() {
@Override
public void intercept(RequestFacade request) {
request.addHeader("Authorization", basic);
request.addHeader("Accept", "application/json");
}
});
}
RestAdapter adapter = builder.build();
return adapter.create(serviceClass);
}
}
新的方法有两个参数:username 和password。你也可以为email使用username参数。创建客户端的基本方法和在第一个方法是一样的:使用Retrofit( RestAdapter在Retrofit 1)类创建OkHttp客户对于任何HTTP请求和响应处理。
现在不同的是:我们使用一个Interceptor( RequestInterceptor 在Retrofit 1)为OkHttp客户端执行HTTP请求设置认证头的值。但是如果提供了username和password参数这是仅完成。如果你没有传入任何username和password到这个方法,他将创建和第一个方法相同的客户端。这就是为什么我们可以简化ServiceGenerator 类的第一个方法。Retrofit 2提供了 OkHttp3的Credentials 类,这可以为我们工作。
为了认证步骤我们必调整给定的username和password的格式。基本的认证请求两个值作为一个连接字符串通过冒号隔开。额外的,新创建的(连接)是Base64编码的字符串。
几乎所有的webservice 和API评估HTTP请求Authorization 头。这就是为什么我们设置编码证书值给头字段。在这个用例webservice 你想调用这个客户端指定的另一个头字段到期望的用户的证书,调整从Authorization头字段到你的头字段。
Accept 字段是重要的如果你想要接收服务器响应再一个指定的格式。在我们的例子我们想要接收响应JSON格式,自Retrofit 1.9附带 序列化对象到他们的JSON代表的 Google’s Gson
在我们的Retrofit 2,我们引入逻辑在一个AuthenticationInterceptor 类。
public class AuthenticationInterceptor implements Interceptor {
private String authToken;
public AuthenticationInterceptor(String token) {
this.authToken = token;
}
@Override
public Response intercept(Chain chain) throws IOException {
Request original = chain.request();
Request.Builder builder = original.newBuilder()
.header("Authorization", authToken);
Request request = builder.build();
return chain.proceed(request);
}
}
52.2 Usage
只调用ServiceGenerator 类的新方法向我们之前第一个小节中的例子部分。例如,让我们假设你定义一个LoginService 像下面的代码:
Retrofit 2
public interface LoginService {
@POST("/login")
Call<User> basicLogin();
}
Retrofit 1.9
public interface LoginService {
@POST("/login")
void basicLogin(Callback<User> cb);
}
上面的接口仅有一个方法basicLogin。它有一个User 类作为响应值和不期望任何额外查询和路径参数。
现在你可以创建你的HTTP客户端通过传入你给定的证书(username, password)
Retrofit 2
LoginService loginService =
ServiceGenerator.createService(LoginService.class, "user", "secretpassword");
Call<User> call = loginService.basicLogin();
call.enqueue(new Callback<User >() {
@Override
public void onResponse(Call<User> call, Response<User> response) {
if (response.isSuccessful()) {
// user object available
} else {
// error response, no access to resource?
}
}
@Override
public void onFailure(Call<User> call, Throwable t) {
// something went completely south (like no internet connection)
Log.d("Error", t.getMessage());
}
}Retrofit 1.9
LoginService loginService =
ServiceGenerator.createService(LoginService.class, "user", "secretpassword");
loginService.basicLogin(new Callback<User>() {
@Override
public void success(User user, Response response) {
// user object available
}
@Override
public void failure(RetrofitError error) {
// handle errors, too
}
});ServiceGenerator 方法将创建HTTP客户端包括定义的认证头。一旦你调用loginService的loginService方法,提供的证书将自动传入请求API端点。
五十三、Retrofit — Token Authentication on Android
53.1 Integrate Token Authentication
如果你阅读过之前的章节关于Retrofit认证,你将猜测我们打算做:继承ServiceGenerator 类和集成一个方法处理令牌验证。让我们进入你的猜测继承ServiceGenerator 类和第二个createService 方法。
Retrofit 2
public class ServiceGenerator {
public static final String API_BASE_URL = "https://your.api-base.url";
private static OkHttpClient.Builder httpClient = new OkHttpClient.Builder();
private static Retrofit.Builder builder =
new Retrofit.Builder()
.baseUrl(API_BASE_URL)
.addConverterFactory(GsonConverterFactory.create());
public static <S> S createService(Class<S> serviceClass) {
return createService(serviceClass, null);
}
public static <S> S createService(
Class<S> serviceClass, final String authToken) {
if (!TextUtils.isEmpty(authToken)) {
AuthenticationInterceptor interceptor =
new AuthenticationInterceptor(authToken);
if (!httpClient.interceptors().contains(interceptor)) {
httpClient.addInterceptor(interceptor);
builder.client(httpClient.build());
retrofit = builder.build();
}
}
return retrofit.create(serviceClass);
}
}
Retrofit 1.9
public class ServiceGenerator {
public static final String API_BASE_URL = "https://your.api-base.url";
private static RestAdapter.Builder builder = new RestAdapter.Builder()
.setEndpoint(API_BASE_URL)
.setClient(new OkClient(new OkHttpClient()));
public static <S> S createService(Class<S> serviceClass) {
return createService(serviceClass, null);
}
public static <S> S createService(Class<S> serviceClass, final String authToken) {
if (authToken != null) {
builder.setRequestInterceptor(new RequestInterceptor() {
@Override
public void intercept(RequestFacade request) {
request.addHeader("Authorization", authToken);
}
});
}
RestAdapter adapter = builder.build();
return adapter.create(serviceClass);
}
}
你已经看到,我们传入认证令牌作为一个String变量进入这个方法,使用Interceptor(RequestInterceptor 在Retrofit 1)设置Authorization的HTTP头字段。在用例我们使用另一个认证令牌HTTP头字段,上面的代码调整或创建一个新的方法处理所需的功能。
从现在开始,每一个HTTP客户端创建该方法集成了令牌授权头字段的值,并自动传递令牌值到你的任何请求API端点。
53.2 Example Usage
让我们创建一个例子和看一些代码。下面的UserService 声明了一个方法叫做me()。这个例子方法返回一个从API响应创建的user对象。
Retrofit 2
public interface UserService {
@POST("/me")
Call<User> me();
}
Retrofit 1.9
public interface UserService {
@POST("/me")
User me();
}
这个API你想要调用等待任何端点http://your.api-base.url/me的请求和需要认证得到用户的数据在响应。现在,让我们创建一个user服务对象和做实际的请求。
Retrofit 2
UserService userService =
ServiceGenerator.create(UserService.class, "auth-token");
Call<User> call = userService.me();
User user = call.execute().body(); Retrofit 1.9
UserService userService =
ServiceGenerator.create(UserService.class, "auth-token");
User user = userService.me(); 这个代码只演示怎么使用这个提交类。当然,你必须通过你的实际认证令牌值到ServiceGenerator 方法。
五十四、Retrofit — OAuth on Android
54.1 OAuth Basics
OAuth 是一个令牌基于认证方法使用一个访问令牌为用户和API交互。OAuth需要几个步骤和请求API访问令牌。
- 注册一个你想要开发的API app。使用公共API的开发者网站你去开发。
- 客户端id和客户端密码保存在你的应用程序。
- 请求访问用户数据从您的应用程序。
- 使用授权代码获取访问令牌。
- 使用访问令牌与API进行交互。
54.2 Register Your App
实现开始之前你必须为想要开发的API/service注册你的app.一旦登录你的application完成。你将接收一个client id和client secret。两个值需要验证你的app对service/API。
54.3 Create Your Project
我们将假设你已经有一个存在的项目。如果你没有,现在去创建一个Android项目。当你完成后,移动到下个步骤。
54.4 Integrate OAuth
自从我们使用ServiceGenerator 类从我们的basic authentication with Retrofit章节,我们进一步继承它h和增加一个方法处理OAuth 访问令牌。下面的片段演示了在ServiceGenerator 类请求的方法。这不意味着你应该删除之前创建的方法为基本的验证,因为你将需要他们为OAuth 。
Retrofit 2
public class ServiceGenerator {
public static final String API_BASE_URL = "https://your.api-base.url";
private static OkHttpClient.Builder httpClient = new OkHttpClient.Builder();
private static Retrofit.Builder builder =
new Retrofit.Builder()
.baseUrl(API_BASE_URL)
.addConverterFactory(GsonConverterFactory.create());
public static <S> S createService(Class<S> serviceClass) {
return createService(serviceClass, null);
}
public static <S> S createService(
Class<S> serviceClass, String clientId, String clientSecret) {
if (!TextUtils.isEmpty(clientId)
&& !TextUtils.isEmpty(clientSecret)) {
String authToken = Credentials.basic(clientId, clientSecret);
return createService(serviceClass, authToken);
}
return createService(serviceClass, null, null);
}
public static <S> S createService(
Class<S> serviceClass, final String authToken) {
if (!TextUtils.isEmpty(authToken)) {
AuthenticationInterceptor interceptor =
new AuthenticationInterceptor(authToken);
if (!httpClient.interceptors().contains(interceptor)) {
httpClient.addInterceptor(interceptor);
builder.client(httpClient.build());
retrofit = builder.build();
}
}
return retrofit.create(serviceClass);
}
}
Retrofit 1.9
public class ServiceGenerator {
public static final String API_BASE_URL = "https://your.api-base.url";
private static RestAdapter.Builder builder = new RestAdapter.Builder()
.setEndpoint(API_BASE_URL)
.setClient(new OkClient(new OkHttpClient()));
public static <S> S createService(Class<S> serviceClass) {
return createService(serviceClass, null);
}
public static <S> S createService(Class<S> serviceClass, String username, String password) {
// we shortened this part, because it’s covered in
// the previous post on basic authentication with Retrofit
}
public static <S> S createService(Class<S> serviceClass, AccessToken token) {
if (token != null) {
builder.setRequestInterceptor(new RequestInterceptor() {
@Override
public void intercept(RequestFacade request) {
request.addHeader("Accept", "application/json")
request.addHeader("Authorization",
token.getTokenType() + " " + token.getAccessToken());
}
});
}
RestAdapter adapter = builder.build();
return adapter.create(serviceClass);
}
}
我们使用Interceptor (RequestInterceptor在Retrofit 1)在HTTP请求头设置Authorization 字段。这个字段包含两个步骤:第一令牌类型是Bearer 为OAuth请求和第二个,访问令牌。
你已经在上面的代码片段看到,方法需要一个 AccessToken作为第三个参数。这个类像这样:
public class AccessToken {
private String accessToken;
private String tokenType;
public String getAccessToken() {
return accessToken;
}
public String getTokenType() {
// OAuth requires uppercase Authorization HTTP header value for token type
if (! Character.isUpperCase(tokenType.charAt(0))) {
tokenType =
Character
.toString(tokenType.charAt(0))
.toUpperCase() + tokenType.substring(1);
}
return tokenType;
}
}
AccessToken 类包含两个字段:accessToken 和tokenType。由于OAuth API的实现需要大写令牌类型,我们首先检查样式。如果它不适合,我们更新风格。例如,API返回bearer 作为令牌类型,任何这种风格请求会导致401未经授权,403年禁止或400年糟糕的请求
当设置正确,HTTP头字段将看起来像下面的例子:
Authorization: Bearer 12345 54.5 Integrate OAuth in Your App
首先我们将创建一个新的activity叫做LoginActivity。你可以使用一个简单的view仅有一个button.这是新的activity的代码:
public class LoginActivity extends Activity {
// you should either define client id and secret as constants or in string resources
private final String clientId = "your-client-id";
private final String clientSecret = "your-client-secret";
private final String redirectUri = "your://redirecturi";
@Override
protected void onCreate(Bundle savedInstanceState) {
super.onCreate(savedInstanceState);
setContentView(R.layout.activity_login);
Button loginButton (Button) findViewById(R.id.loginbutton);
loginButton.setOnClickListener(new View.OnClickListener() {
@Override
public void onClick(View v) {
Intent intent = new Intent(
Intent.ACTION_VIEW,
Uri.parse(ServiceGenerator.API_BASE_URL + "/login" + "?client_id=" + clientId + "&redirect_uri=" + redirectUri));
startActivity(intent);
}
});
}
}
你必须调整类属性clientId, clientSecret, redirectUri.的值。另外,确保部分登录url 在/login是可访问的。如果不是,更新这部分合适的一个。此外,为定义的登录按钮设置一个onclick侦听器在onCreate方法。一旦onclick事件触发,它创建一个新的意图为定义的Uri展现一个webview。重要:你必须提供你的客户端id和客户密码在此请求,因为API需要两个参数进行进一步的操作和处理的应用程序使用。
此外,检查Uri.parse(…)的部分。你必须点Uri.parse(…)到登录(或授权)端点去显示屏幕访问权限。
activity_login.xml可以看起来像这样。
<RelativeLayout xmlns:android="http://schemas.android.com/apk/res/android"
xmlns:tools="http://schemas.android.com/tools"
android:layout_width="match_parent"
android:layout_height="match_parent"
>
<Button
android:layout_width="match_parent"
android:layout_height="wrap_content"
android:text="Login"
android:id="@+id/loginbutton"
android:gravity="center_vertical|center_horizontal"
/>
</RelativeLayout> 它只是一个单一的button view
54.6 Define Activity and Intent Filter in AndroidManifest.Xml
一个意图在Android是一个信息对象使用请求action或者信息来自其他的app或者组件。这个intent filter是捕获一个信息从一个意图,通过意图的action,category 和data鉴定。
这个intent filter需要使Android返回到你的app,所以你可以抓住更多的数据在你的意图响应。这意味着,当开始意图后单击LoginActivity内的登录按钮后,这个filter 捕获任何响应,使额外的信息获得。下面的代码显示了activity在AndroidManifest.xml定义包括为这个activity的 intent filter。
<activity
android:name="com.futurestudio.oauthexample.LoginActivity"
android:label="@string/app_name"
android:configChanges="keyboard|orientation|screenSize">
<intent-filter>
<action android:name="android.intent.action.VIEW" />
<category android:name="android.intent.category.DEFAULT" />
<category android:name="android.intent.category.BROWSABLE" />
<data
android:host="redirecturi"
android:scheme="your" />
</intent-filter>
</activity> 54.7 Catch the Authorization Code
Ok,直到这里我们有定义这个意图展示在webview这表现为deny 拒绝或**allow 允许**view。你会注意到这个view中看到它的风格。
现在我们想要得到访问令牌为进一步API交互。这个令牌是其他两个API请求。首先,我们需要解析和使用返回授权代码的一部分响应意图当webview中当按下允许按钮。下面的方法属于LoginActivity。我们分开它因为它是更容易解释的内容。
@Override
protected void onResume() {
super.onResume();
// the intent filter defined in AndroidManifest will handle the return from ACTION_VIEW intent
Uri uri = getIntent().getData();
if (uri != null && uri.toString().startsWith(redirectUri)) {
// use the parameter your API exposes for the code (mostly it's "code")
String code = uri.getQueryParameter("code");
if (code != null) {
// get access token
// we'll do that in a minute
} else if (uri.getQueryParameter("error") != null) {
// show an error message here
}
}
}
你的app返回进入Android生命周期的onResume 。这里你可以看到我们使用getIntent().getData()方法检索意图的响应。
现在,我们不想遇到任何NullPointerException和检查值。后来,我们从查询参数提取授权代码。当点击允许像想象响应url像:
your://redirecturi?code=1234 和拒绝访问像:
your://redirecturi?error=message 54.8 Get Your Access Token
你已经几乎完成,访问令牌仅请求一次。现在我们有验证代码,我们需要请求访问令牌通过client id, client secret and authorization code
在下面,我们只是扩展先前提出onResume方法做另一个API请求。但首先,我们必须扩展LoginService接口,定义一个方法请求访问令牌。我们只扩展basic authentication post的LoginService 另一个方法叫做getAccessToken
Retrofit 2
public interface LoginService {
@FormUrlEncoded
@POST("/token")
Call<AccessToken> getAccessToken(
@Field("code") String code,
@Field("grant_type") String grantType);
}
Retrofit 1.9
public interface LoginService {
@FormUrlEncoded
@POST("/token")
AccessToken getAccessToken(
@Field("code") String code,
@Field("grant_type") String grantType);
}
这个接口是通过ServiceGenerator 创建一个Retrofit HTTP客户端。getAccessToken 需要两个参数。
现在onResume得到令牌的完整代码。
下面的代码片段使
ServiceGenerator.createService(…)的3个参数使用。完整的方法代码可以发现在basic authentication with Retrofit.
Retrofit 2
@Override
protected void onResume() {
super.onResume();
// the intent filter defined in AndroidManifest will handle the return from ACTION_VIEW intent
Uri uri = getIntent().getData();
if (uri != null && uri.toString().startsWith(redirectUri)) {
// use the parameter your API exposes for the code (mostly it's "code")
String code = uri.getQueryParameter("code");
if (code != null) {
// get access token
LoginService loginService =
ServiceGenerator.createService(LoginService.class, clientId, clientSecret);
Call<AccessToken> call = loginService.getAccessToken(code, "authorization_code");
AccessToken accessToken = call.execute().body();
} else if (uri.getQueryParameter("error") != null) {
// show an error message here
}
}
}
Retrofit 1.9
@Override
protected void onResume() {
super.onResume();
// the intent filter defined in AndroidManifest will handle the return from ACTION_VIEW intent
Uri uri = getIntent().getData();
if (uri != null && uri.toString().startsWith(redirectUri)) {
// use the parameter your API exposes for the code (mostly it's "code")
String code = uri.getQueryParameter("code");
if (code != null) {
// get access token
LoginService loginService =
ServiceGenerator.createService(LoginService.class, clientId, clientSecret);
AccessToken accessToken = loginService.getAccessToken(code, "authorization_code");
} else if (uri.getQueryParameter("error") != null) {
// show an error message here
}
}
}
你已经完成。你可能必须调整grant type值为你的API请求。grant type是传入作为getAccessToken(code, grantType)方法的第二个参数
五十五、Retrofit 2 — Hawk Authentication on Android
55.1 Why Is This Post Retrofit 2 Only?
Hawk验证协议需要你生成HTTP Authorization头包括请求url。在Retrofit 1没有简单的搭建得到请求url。这个行为改变在Retrofit 2,因为HTTP层是完整的驱动通过OkHttp允许获得请求Url使用一个请求拦截器。
55.2 Hawk Authentication
Hawk是一个HTTP认证协议允许认证客户端请求部分加密请求(和响应)验证。验证包括HTTP方法,请求URI,主机和可选地请求负载。
我们不会深入研究Hawk 的细节并且假设您已经熟悉认证协议。因为你正在读这篇文章,你已经决定试一试。如果你需要关于Hawk的更多信息,请访问GitHub project repository和遵循自述文件中提供的信息。
55.3 Add Hawk Dependencies
前已经实现对Node.js, Java, Ruby, Python and F#/.Net可用。我们使用Java implementation from wealdtech处理hawk凭证和头生成在客户端(Android)。添加以下行到你的build.gradle和同步项目
compile 'com.wealdtech.hawk:hawk-core:1.2.0' 一旦同步完成,移动到下个段落和集成Hawk到你的项目
55.4 Integrate Hawk Authentication
通常,Hawk认证的实现在Android是相似的和其它类型的认证(像basic,token,or OAuth).根据你的API实现,你将需要发送一个适当的只为HTTP Authorization 头字段。
如果你阅读了之前的文章在Retrofit系列,你已经熟悉我们ServiceGenerator的概念。我们使用这个类来生成service客户端从你的接口定义使用Retrofit注释。下面的代码描述了createService()方法在授权头方面。
public class ServiceGenerator {
public static final String API_BASE_URL = "https://your.api-base.url";
private static OkHttpClient.Builder httpClient = new OkHttpClient.Builder();
private static Retrofit.Builder builder =
new Retrofit.Builder()
.baseUrl(API_BASE_URL)
.addConverterFactory(GsonConverterFactory.create());
public static <S> S createService(
Class<S> serviceClass, final HawkCredentials credentials) {
if (credentials != null) {
HawkAuthenticationInterceptor interceptor =
new HawkAuthenticationInterceptor(credentials);
if (!httpClient.interceptors().contains(interceptor)) {
httpClient.addInterceptor(interceptor);
builder.client(httpClient.build());
retrofit = builder.build();
}
}
return retrofit.create(serviceClass);
}
}
我们来回顾一下代码,这是怎么回事。createService()方法参数是您想要的类生成(实际上是接口)和第二个Hawk 凭证。清除已经定义的请求拦截器后,我们正在创造一个新的和拦截请求添加所需的头字段。
对于Authorization 头,我们至少需要请求URI和请求的方法。使用Java库将自动添加所需的主机信息在生成头时。
创建所需的授权头之后,我们以原始请求为基础参考来创建一个新的。我们设置适当的头字段和请求链使用我们新创建的请求。
55.4 Usage
重要的是要理解,你需要请求你的Hawk 凭证之前,首先你可以使用身份验证。请求你的凭证,象其他任何使用通过用户名和密码登录的验证类型。API应该返回Hawk 凭证作为响应,您将使用对API端点进一步的请求。
让我们看看以下接口定义只是描述了/me端点需要身份验证返回User对象之前。
public interface UserService {
@POST("me")
Call<User> me();
}
本文将指导您完成安装和使用Hawk认证协议 使用Android作为客户端。我们假定您已经请求你的Hawk 凭证。如果你需要这些证书第一,你可能受益于我们的 basic authentication on Android 教程。
出于演示目的,我们使用测试凭证从Hawk的GitHub仓库。在服务器端,我们使用一个Node.js服务器需要Hawk认证为/me端点。
HawkCredentials hawkCredentials =
new HawkCredentials.Builder()
.keyId("dh37fgj492je")
.key("werxhqb98rpaxn39848xrunpaw3489ruxnpa98w4rxn")
.algorithm(HawkCredentials.Algorithm.SHA256)
.build();
UserService userService = ServiceGenerator.create(UserService.class, hawkCredentials);
Call<User> call = userService.me();
User user = call.execute().body(); 使用Java库创建一个HawkCredentials 对象。通过这个对象使用ServiceGenerator的createService方法生成service客户端。得到Call 对象为你的请求和执行它(异步或者同步)接收响应对象。定义OkHttp拦截器将增加认证令牌执行请求之前。
你现在能够验证你的请求使用Hawk协议。
五十六、Retrofit — How to Refresh an Access Token
五十七、Caching Retrofit 2 — Activate Response Caching (Etag, Last-Modified)
57.1 Server-Side Information for Caching
我们不会进入缓存的详细信息在互联网上与大多数服务器和浏览器如何实现它,因为它会炸毁本教程。我们将给一个概述。随时阅读教程的最后细节。
简而言之,服务器可以发送附加信息作为资源响应头。基于这些头客户端有时可以跳过加载一遍又一遍相同的资源。这将节省用户的带宽,并使得应用程序更快。双赢!
主要有两种方式怎样可以跳过加载相似的资源
第一,缓存的版本是宣称有效直到在未来某个时间。这是完成通过Expires 和Cache-Control: max-age头。后者是更优先的头。当客户端访问的资源,还没有达到Expires 日期或超过max-age,它可以完全跳过任何网络请求和重用缓存的版本。一个适当设置使用期限为缓存资源是至关重要的。
第二个可选因此叫做条件请求。这里第一个选项不需要重新验证资源是不可能的,即:资源超过maximum age。客户端将发送服务器请求与先前访问资源日期(if - modified - since)和/或一个散列的内容(Etag)。如果资源并没有改变自客户端的上个访问,服务器可以应对304 - Not Modified。只响应状态代码和头信息,不包含响应负载的实际资源。因此来自服务器的响应将远小于一个新的请求没有任何缓存头。如果当前服务器版本更新,现在不同的缓存版本(基于散列或修改日期),服务器响应常规的200和响应负载的资源。
基于上面的解释很短,你应该得到一个感觉如何优化你的应用程序的网络行为。理想情况下,应该使用缓存资源的两种方式,减少响应服务器需要发送的数量。
57.2 Integrate Response Caching in Retrofit
让我们看看实际操作。你怎么能在Retrofit中实现所有这一切?好吧,首先你通常会需要服务器支持。如果您的服务器或API不支持任何缓存头,优化网络缓存将更加困难。在以后的教程中,我们将看看如何强制缓存支持,但这将超出了这个入门教程的范围。
无论如果你想强制它,或者如果你的API提供了它在默认情况下,确保你只缓存对时间不敏感的东西!缓存的环境是非常重要的。如果应用程序展示了股票市场,您可能不希望缓存API结果两周。
让我们假设你的API开发人员帮你设置max-age和Etags设置。好消息是:Retrofit的OkHttp网络层,支持所有缓存头默认情况下。你唯一需要做的是提供一个缓存(一个地方来存储响应)。
int cacheSize = 10 * 1024 * 1024; // 10 MB
Cache cache = new Cache(getCacheDir(), cacheSize);
OkHttpClient okHttpClient = new OkHttpClient.Builder()
.cache(cache)
.build();
Retrofit.Builder builder = new Retrofit.Builder()
.baseUrl("http://10.0.2.2:3000/")
.client(okHttpClient)
.addConverterFactory(GsonConverterFactory.create());
Retrofit retrofit = builder.build(); 上面的Retrofit将缓存所有的响应直到它达到了10MB的最大值,他执行缓存磁盘限制皇后,它将清除之前的进入。OkHttp将自动应用Etag,Cache-Control等逻辑对每个请求为你。如果资源保持不变,不会再被加载了。难以置信!
你所要做的支持响应Retrofit缓存。当然,我们会更深入的细节在以后的教程,如。如何分析缓存文件。请继续关注!
五十八、Retrofit 2 — Check Response Origin (Network, Cache, or Both)
58.1 Check Response Origin
它是非常有趣的知道是否一个响应来自服务或者来自缓存。不仅当构建的app离线时,所有的响应是从缓存加载而不是网络,而且经常使用的节省带宽和时间。在这两种情况下,Retrofit 不给你一个直接的答案。你理解起源结合一些线索。
58.2 Indirect Check with Raw Response
通常,你的异步Retrofit调用将像这样:
Call<ResponseBody> call = //...
call.enqueue(new Callback<ResponseBody>() {
@Override
public void onResponse(Call<ResponseBody> call, Response<ResponseBody> response) {
// success, server (or cache) responded
}
@Override
public void onFailure(Call<ResponseBody> call, Throwable t) {
// failure, no network connection or conversion threw error
}
});当网络请求已经成功,你像获得response 对象。这是Retrofit的Response 类,泄露任何信息相关的缓存。然而,你可以沿着一个等级通过调用response.raw(),它给你的网络层OkHttp的响应对象。
OkHttp的响应对象给你两个助手方法分析缓存请求的情况:cacheResponse()和networkResponse()。
if (response.raw().cacheResponse() != null) {
// true: response was served from cache
}
if (response.raw().networkResponse() != null) {
// true: response was served from network/server
}
这个功能应该是显而易见的,如果cacheResponse()不是null,来自缓存的响应。如果networkResponse()不是null,来自服务器的响应。
你可能会问,我不能这样做在一个if - else ?不,因为这两种方法可以返回true。当Retrofit和OkHttp有一个条件请求发生。这意味着缓存的版本不保证有效了,但服务器回应304 - Not Modified头,这表明缓存的版本仍然有效。因此,来自缓存的资源内容,但头来自服务器。
您可以使用这个信息是否资源来自缓存进一步提高你的应用程序的用户体验。
五十九、Retrofit 2 — Force Server Cache Support with Response Interceptor
六十、Retrofit 2 — Support App Offline Mode by Accessing Response Caches
六十一、Retrofit 2 — Analyze Cache Files
61.1 Access Cache Files
分析缓存文件之前你需要发现他们。Retrofit或更具体地说OkHttp,存储缓存文件取决于配置。我们推荐使用Android的getCacheDir()方法来设置应用程序的私有缓存目录:
Cache cache = new Cache(getCacheDir(), cacheSize);
OkHttpClient okHttpClient = new OkHttpClient.Builder()
.addNetworkInterceptor(new StethoInterceptor())
.cache(cache)
.build();如果你也使用这个目录,你可以访问缓存文件:
/data/data//cache。你可能访问这个目录通过Android模拟器,你可以在Android Studio上的Tools > Android > Android Device Monitor找到
你可以将这个文件pull出来为了进一步分析。当然,任何其他文件浏览也会工作。在下一步中,我们仔细看看这些文件。
61.2 Analyze Cache Files
上图中你看到五个文件。其中一个是一个journal文件,顾名思义,保持所有缓存写入和读取的记录。让我们打开文件。
Journal File
一个短小样本journal文件可能有一下内容:
libcore.io.DiskLruCache
1
201105
2
DIRTY b28f3c89d9bd032214753775f500a9fc
CLEAN b28f3c89d9bd032214753775f500a9fc 4055 10279
DIRTY 9b6ee83a44cd510ae380a839a143c702
CLEAN 9b6ee83a44cd510ae380a839a143c702 5310 4841
READ 9b6ee83a44cd510ae380a839a143c702 前四行仅仅是OkHttp的信息。最后五行是相关的。DIRTY 表示开始写入响应到缓存的过程。创建完成后,我们会看到一个第二行CLEAN 使用相同的密钥。
说到密钥,b28f3c89d9bd032214753775f500a9fc前两行,这是一个散列的请求URL。因此,每个请求的URL将在缓存中只有一次,这是很有意义的。最后两个数字(4055和10279)是文件大小的元数据和负载的实际响应。在下一节中我们将研究这些文件。
你可以猜,READ 表明当缓存对象被访问的时候通过Retrofit。当然,对于真实的应用程序这个列表可以很长。
Meta Data File .0
如果你看第二个缓存文件目录,你会发现每个请求URL散列有两个文件,一个结束.0和.1。第一个,在结束.0,存储元数据的请求。这包括所有的响应头和更多:
https://gist.githubusercontent.com/planetoftheweb/98f35786733c8cccf81e/raw/f3dad774ed1fe20b36011b1261bb392ee759b867/data.json
GET
1
Accept-Encoding: gzip
HTTP/1.1 200 OK
26
Content-Security-Policy: default-src 'none'; style-src 'unsafe-inline'
Strict-Transport-Security: max-age=31536000
X-Content-Type-Options: nosniff
X-Frame-Options: deny
X-XSS-Protection: 1; mode=block
Content-Type: text/plain; charset=utf-8
X-Geo-Block-List:
X-GitHub-Request-Id: 673A:61ED:26EA810:28611A2:58E3C402
Content-Length: 4841
Accept-Ranges: bytes
Connection: keep-alive
Date: Tue, 04 Apr 2017 16:11:38 GMT
Via: 1.1 varnish
Cache-Control: max-age=300
ETag: "5a481bf446bd7513cbd73953d22895365c606d56"
X-Served-By: cache-hhn1542-HHN
X-Cache: MISS
X-Cache-Hits: 0
X-Timer: S1491322298.525447,VS0,VE111
Vary: Authorization,Accept-Encoding
Access-Control-Allow-Origin: *
X-Fastly-Request-ID: 1750b5c4ea8ff0857e4ca9ae07dea98bf9f639da
Expires: Tue, 04 Apr 2017 16:16:38 GMT
Source-Age: 0
OkHttp-Sent-Millis: 1491322298244
OkHttp-Received-Millis: 1491322298382
…Response Payload File .1
实际响应负载存储在这个文件中,结合请求URL散列 .1。您可能需要更改文件结束这取决于负载。例如,一个图像可能需要加载文件结束.png打开合适的应用程序使用正确的编码。当你似乎无法找出有效编码,你可以检查元数据文件:content - type服务器希望发送你给你一个正确的声明。
六十二、Testing & Mocking Retrofit 2 — Basics of Mocking Server Responses
六十三、Retrofit 2 — Customizing Network Behavior of Mocked Server Responses
3.1 ormlite
官方学习网址:http://ormlite.com/
官方API网址:http://ormlite.com/javadoc/ormlite-android/
好的,那我也是根据官网进行介绍学习。
ormlite:对象关系映射Lite(ORM Lite)提供一些简单,轻量级功能为持久化java对象保存到数据库同时避免复杂性和更多标准ORM包的开销。
ORMLite 使用是容易的和提供以下特性:
- 搭建你的类通过简单的增加java注释
- 强大的,抽象的数据库访问类(DAO)
- 灵活的QueryBuilder 容易的构造复杂的 请求
- Supports MySQL, Postgres, Microsoft SQL Server, H2, Derby, HSQLDB, and Sqlite 和扩展额外的数据库相对容易。
- 暂时支持DB2, Oracle, ODBC, and Netezza。你的数据库类型不支持请联系作者.
- 处理“编译” SQL声明为重复的查询任务。
- 支持“不相关”类字段对象,但是一个id存储在数据库表中。
- 基本支持数据库事务。
- 自动生成SQL来创建和删除数据库表。
- 支持配置没有注释的表和字段。
- 支持本地调用安卓SQLite数据库api
一. Getting Started
1.1 Downloading ORMLite Jar
用户连接SQL数据库通过JDBC连接将需要下载ormlite-jdbc-5.0.jar 和ormlite-core-5.0.jar。对于Android应用程序,你应该下载ormlite-android-5.0.jar 和 ormlite-core-5.0.jar。
1.2 Configuring a Class
下面的例子类是配置一个可持续化到数据库使用ORMLite注释。@DatabaseTable 注释配置Account类到可持续化到数据库表名字accounts。@DatabaseField 注释映射字段在Account到数据库列名相同的名字。
这个名字字段是配置作为数据库表的主键通过使用 id =true注释。同时,请注意,需要提供一个无参数的构造函数返回的对象可以查询。更多信息:Setting Up Your Classes
@DatabaseTable(tableName = "accounts")
public class Account {
@DatabaseField(id = true)
private String name;
@DatabaseField
private String password;
public Account() {
// ORMLite needs a no-arg constructor
}
public Account(String name, String password) {
this.name = name;
this.password = password;
}
public String getName() {
return name;
}
public void setName(String name) {
this.name = name;
}
public String getPassword() {
return password;
}
public void setPassword(String password) {
this.password = password;
}
}
1.3 Configuring a DAO
一个典型的Java样本是孤立的数据库操作在数据访问对象(DAO)类。每个DAO提供创建、删除、更新等类型的功能和专业处理一个持久化类。一个简单的方法来构建一个DAO是使用DaoManager类静态方法createDao 。例如,为Account类创建一个DAO 上面定义你会做的事:
Dao<Account, String> accountDao =
DaoManager.createDao(connectionSource, Account.class);
Dao<Order, Integer> orderDao =
DaoManager.createDao(connectionSource, Order.class);
更多信息关于搭建DAOs是获得看Setting Up the DAOs.
二、Using With Android
2.1 Android Basics
由于缺乏官方支持JDBC的Android操作系统,ORMLite使得Android数据库直接调用api来访问SQLite数据库。你应该确保你有下载并依赖ormlite-core.jar 和ormlite-android.jar文件,但不是ormlite-jdbc.jar版本。
当你阅读完第一章节之后,一下介绍应该可以帮助你使用ORMLite在Android操作系统上开始工作。
1.你将需要创建你自己的数据库帮助类继承OrmLiteSqliteOpenHelper 类。当你的应用程序安装的时候这个类create和upgrades数据库和提供DAO类使用通过你其他的类。你的帮助者类必须实现onCreate(SQLiteDatabase sqliteDatabase, ConnectionSource connectionSource)和onUpgrade(SQLiteDatabase database, ConnectionSource connectionSource, int oldVersion, int newVersion)方法。onCreate 创建数据库当你的app第一次安装。onUpgrade 处理数据库表的升级当你升级你的app到一个新的版本。
2.帮助类可以在你的app相同SQLite数据库链接重用通过所有线程保持开发。如果你打开多个连接到同一个数据库,陈旧的数据和可能发生意想不到的结果。我们建议使用OpenHelperManager监控帮助类的使用——它将创建它在第一次访问,并且每次你的代码使用它,和然后他将关闭最后时间帮助类是释放。
3.一旦你已经定义你的数据库帮助类和是管理它是适当的,你将需要使用它在你的Activity 类。一个容易的方法是使用OpenHelperManager 为你每个activity类继承OrmLiteBaseActivity 类,也有OrmLiteBaseListActivity,OrmLiteBaseService,OrmLiteBaseTabActivity。这个类提供了一个受保护的helper 字段和getHelper()方法访问数据库帮助类无论如何它是需要的和将自动创建帮助类在onCreate()和释放它在 onDestroy()方法。
4.如果你不想要继承OrmLiteBaseActivity和其他的基类然后你将需要重用他们的功能。你将需要调用OpenHelperManager.getHelper(Context context, Class openHelperClass)在你的代码开始,保存帮助类和你想要尽可能多的使用它和当你完成它时,调用 OpenHelperManager.release() 。你可能想要下面的代码在你的类:
private DatabaseHelper databaseHelper = null;
@Override
protected void onDestroy() {
super.onDestroy();
if (databaseHelper != null) {
OpenHelperManager.releaseHelper();
databaseHelper = null;
}
}
private DBHelper getHelper() {
if (databaseHelper == null) {
databaseHelper =
OpenHelperManager.getHelper(this, DatabaseHelper.class);
}
return databaseHelper;
}
5.默认情况下,如果您使用的是OrmLiteBaseActivity或其他基类,OpenHelperManager将检测数据库的助手类通过反射。另一种方法在适当的数据库辅助类是设置的完整类名open_helper_classname值定义在res/values/strings.xml资源文件。您还可以使用OpenHelperManager.setOpenHelperClass设置类(类)方法在静态代码中的{ }块。
6.Android原生SQLite数据库类型是SqliteAndroidDatabaseType和是使用内部的基类。
7.警告:您必须确保任何后台线程调用OpenHelperManager.getHelper()和适当 release()方法。否则,如果他们访问数据库之前打开或关闭之后,你会得到例外。
2.2 Using Table Config File
DAO的搭建会产生大量的垃圾和需要太多时间,ORMLite使用创建配置文件的方式解决这个问题,使用一点工作(和一些说明),你可以移除所有的注释工作从你的APP,使你的DAO创建更快。ORMLite支从一个text配置文件数据配置的加载。当一个DAO是创建,这些配置将被使用,移除任何注释。
1.OrmLiteConfigUtil 实用类写入一个ormlite_config.txt配置文件在原生资源文件夹res/raw/ormlite_config.txt
public class DatabaseConfigUtil extends OrmLiteConfigUtil {
public static void main(String[] args) throws Exception {
writeConfigFile("ormlite_config.txt");
}
}
2.您将需要在本地运行该工具类在您的开发盒(不是一个Android设备),一旦你想要改变你的数据类。这意味着,现在,这必须通过手动保持配置文件与数据库类同步。运行该工具类需要使用本地Java运行时环境(JRE)。在eclipse中,编辑”Run Configuration”为工具类,选择JRE选项卡,并选择另一个JRE(1.5或1.6)。您的项目的JRE应该是未定义的,因为它是一个Android应用程序。你还需要从Classpath 选项卡删除Android引导条目。
3.默认情况下这个工具类会在当前目录,和下面的文件以.java结尾为@DatabaseTable或DatabaseField注释的存在。这些类将调查并写入数据库配置文件。你也可以处理列表的类:
public class DatabaseConfigUtil extends OrmLiteConfigUtil {
private static final Class<?>[] classes = new Class[] {
SimpleData.class,
};
public static void main(String[] args) throws Exception {
writeConfigFile("ormlite_config.txt", classes);
}
}4.当这个工具类运行的时候,应该会在远资源文件夹下创建 ormlite_config.txt配置文件。这个文件夹必须在工具类运行之前就已经存在。然后,你刷新你的项目你应该看见这个文件应用。在Eclipse console ,你应该会看到类似如下:
Writing configurations to /HelloAndroid/./res/raw/ormlite_config.txt
Wrote config for class com.example.helloandroid.SimpleData
Done.
这个配置文件生成应该看起来像这样:
#
# generated on 2011/09/15 01:42:02
#
# --table-start--
dataClass=com.example.helloandroid.SimpleData
tableName=simpledata
# --table-fields-start--
# --field-start--
fieldName=id
canBeNull=true
generatedId=true5.第一时间你创建配置文件在资源文件夹,Android构建插件应该将它添加到R.java文件内部gen文件夹。它定义了一个唯一的整数值,这样应用程序可以打开这个资源文件通过标识号码。文件应该包含类似:
public final class R {
…
public static final class raw {
public static final int ormlite_config=0x7f040000;
}
…
}
6.在R.java文件生成之后,你将需要开启文件的读取在运行时。在你的DatabaseHelper 类内部,你将需要改变构造增加整数文件id.构造将看起来像下面这样:
public DatabaseHelper(Context context) {
super(context, DATABASE_NAME, null, DATABASE_VERSION,
R.raw.ormlite_config);
}注意到R.raw.ormlite_config 条目最后将文件标识传递给超类,因此它可以阅读。你也可以传入一个文件名或Java文件,如果你想从另一个位置加载的配置文件。
7.当你build和运行你的应用程序,你将知道数据库配置文件是加载如果你看见日志条目像下面这样:
I/DaoManager( 999): Loaded configuration for class ...SimpleData
2.3 Android Logging
AndroidLog 类定义在ormlite-android.jar这是Android ORMLite日志记录的特定版本。这个类使得在Android API调用Log.d,Log.i.看Log输出,你需要通过adb查看:
adb logcat因为INFO 是默认在Android下,只输出信息如以下默认情况下:
I/TableUtils( 254): creating table 'simpledata'
I/TableUtils( 254): creating index 'simpledata_string_idx' for table
'simpledata
I/TableUtils( 254): executed create table statement changed 1 rows:
CREATE TABLE `simpledata` (`date` VARCHAR, `id` INTEGER PRIMARY
KEY AUTOINCREMENT , `even` SMALLINT )
I/TableUtils( 254): executed create table statement changed 1 rows:
CREATE INDEX `simpledata_string_idx` ON `simpledata` ( `string` )开启更多的调试信息,你会想做一些类似下面打开日志记录为一个特定的类:
adb shell setprop log.tag.StatementExecutor VERBOSE
adb shell setprop log.tag.BaseMappedStatement VERBOSE
adb shell setprop log.tag.MappedCreate VERBOSE开启的信息,例如:
D/BaseMappedStatement(465): create object using 'INSERT INTO `simpledata`
(`date` ,`string` ,`millis` ,`even` ) VALUES (?,?,?,?)' and 4 args,
changed 1 rows
D/BaseMappedStatement(465): assigned id '9' from keyholder to 'id' in
SimpleData object
开启所有的debug信息为所有ORMLite类,使用如下:
adb shell setprop log.tag.ORMLite DEBUGNOTE:注意:不幸的是,Android属性名的大小是有限的所以ORMLite记录器只需要类的名字最后23[原文如此]字符如果大于23个字符。例如,如果类是AndroidDatabaseConnection你会做的事:
adb shell setprop log.tag.droidDatabaseConnection VERBOSE如果你想追踪到数据库的操作由ORMLite使用:
adb shell setprop log.tag.droidDatabaseConnection VERBOSE
adb shell setprop log.tag.ndroidCompiledStatement VERBOSE
2.4 Runtime Versus SQL Exceptions
默认的,大多数DAO方法抛出SQLException 是默认的内部异常对大多数JDBC和其他SQL调用。但在Android-land,特别是大部分的异常扩展RuntimeException所以不得不忽略很多 try … catch是不方便。因为这个原因我们已经添加了一个RuntimeExceptionDao包装所有调用底层DAO重新抛出SQL异常作为运行时异常的。一个,你可以自己包装的:
Dao<Account, String> dao =
DaoManager.createDao(connectionSource, Account.class);
RuntimeExceptionDao<Account, String> accountDao =
new RuntimeExceptionDao<Account, String>(dao);
或者你可以调用createDao 帮助方法在RuntimeExceptionDao:
RuntimeExceptionDao<Account, String> accountDao =
RuntimeExceptionDao.createDao(connectionSource, Account.class);其他类例如TableUtils 和QueryBuilder 还抛出SQLException 但希望RuntimeExceptionDao至少帮助一点点。
2.5 Upgrading Your Schema
当你升级你的应用程序,你可能必须增加列或者使其他改变的数据保存到之前你的应用程序的版本。如果是使用DatabaseHelper继承自OrmLiteSqliteOpenHelper,应该有一个 onUpgrade()方法
abstract void onUpgrade(SQLiteDatabase database,
ConnectionSource connectionSource, int oldVersion, int newVersion)
在这个方法你可以使用DAO执行任何调整到你的协议:
Dao<Account, Integer> dao = getHelper().getAccountDao();
// change the table to add a new column named "age"
dao.executeRaw("ALTER TABLE `account` ADD COLUMN age INTEGER;");
这里有更多关于SQLite’s ALTER TABLE。在SQLite,你也可以重新命名表名和增加一个新的列。你不能移除或者重新命名一个列名或者改变约束。记住,SQLite是无类型的因此改变列的类型并不重要。
最有可能的是,你应该让你的协议变化约束的版本升级:
if (oldVersion < 2) {
// we added the age column in version 2
dao.executeRaw("ALTER TABLE `account` ADD COLUMN age INTEGER;");
}
if (oldVersion < 3) {
// we added the weight column in version 3
dao.executeRaw("ALTER TABLE `account` ADD COLUMN weight INTEGER;");
}
您还可以修改表中的数据使用类似如下:
dao.executeRaw(
"ALTER TABLE `account` ADD COLUMN hasDog BOOLEAN DEFAULT 0;");
dao.updateRaw("UPDATE `account` SET hasDog = 1 WHERE dogCount > 0;");如果您正在使用一些其他数据库不是JDBC然后上面的命令将工作,但你必须手动处理您的应用程序的版本。
三、例子介绍:
官方例子下载:http://ormlite.com/android/examples/
下面看一个简单的例子:
public class DataBaseHelper extends OrmLiteSqliteOpenHelper {
private static final String databaseName = "myDatabase.db";
private static final int databaseVersion = 1;
private static DataBaseHelper dbHelper = null;
private HashMap<String, Dao> daos = new HashMap<String, Dao>();
public static DataBaseHelper getInstance(Context c) {
if (dbHelper == null) {
synchronized (DataBaseHelper.class) {
if (dbHelper == null) {
dbHelper = new DataBaseHelper(c);
}
}
}
return dbHelper;
}
public DataBaseHelper(Context context) {
super(context, databaseName, null, databaseVersion);
}
public synchronized Dao getDao(Class c) throws SQLException {
Dao dao = null;
String className = c.getSimpleName();
if (daos.containsKey(className)) {
dao = daos.get(className);
} else {
dao = super.getDao(c);
daos.put(className, dao);
}
return dao;
}
public void close() {
super.close();
for (String key : daos.keySet()) {
Dao dao = daos.get(key);
dao = null;
}
}
@Override
public void onCreate(SQLiteDatabase sqLiteDatabase, ConnectionSource connectionSource) {
try {
TableUtils.createTable(connectionSource, User.class);
} catch (SQLException e) {
e.printStackTrace();
}
}
@Override
public void onUpgrade(SQLiteDatabase sqLiteDatabase, ConnectionSource connectionSource, int i, int i1) {
}
}
这个类比较简单,通过单例获取帮助类使其唯一,通过getDao()方法获取DAO对象。
@DatabaseTable(tableName = "user_info")
public class User {
@DatabaseField(generatedId = true)
private int id;
@DatabaseField
private String name;
@DatabaseField
private int age;
public User() {
}
public User(String name, int age) {
this.name = name;
this.age = age;
}
public int getId() {
return id;
}
public void setId(int id) {
this.id = id;
}
public String getName() {
return name;
}
public void setName(String name) {
this.name = name;
}
public int getAge() {
return age;
}
public void setAge(int age) {
this.age = age;
}
@Override
public String toString() {
return "User{" +
"id=" + id +
", name='" + name + '\'' +
", age='" + age + '\'' +
'}';
}
}
通过@DatabaseTable(tableName = “user_info”)确定表名, @DatabaseField(generatedId = true)表示时主键自动生成,每个列名和属性名相同。
public class UserDao {
private DataBaseHelper dbHelper;
private Dao userDao;
UserDao(Context context){
dbHelper=DataBaseHelper.getInstance(context);
try {
userDao=dbHelper.getDao(User.class);
} catch (SQLException e) {
e.printStackTrace();
}
}
public void close(){
dbHelper.close();
}
public int createTable(ArrayList users){
int result =0;
try {
result=userDao.create(users);
} catch (SQLException e) {
e.printStackTrace();
}
return result;
}
public int updateWithObject(User user){
int result=0;
try {
result=userDao.update(user);
} catch (SQLException e) {
e.printStackTrace();
}
return result;
}
public int updateWithId(User user,int id){
int result=0;
try {
result=userDao.updateId(user,id);
} catch (SQLException e) {
e.printStackTrace();
}
return result;
}
public int updateWithBuilder(User user){
int result=0;
try {
UpdateBuilder builder= userDao.updateBuilder();
builder.updateColumnValue("name",user.getName()).where().eq("id",1);
result=builder.update();
} catch (SQLException e) {
e.printStackTrace();
}
return result;
}
public int deleteWithObject(User user){
int result=0;
try {
result= userDao.delete(user);
} catch (SQLException e) {
e.printStackTrace();
}
return result;
}
public int deleteWithBuilder(){
int result=0;
try {
DeleteBuilder builder= userDao.deleteBuilder();
builder.where().eq("name","张三");
result=builder.delete();
} catch (Exception e) {
e.printStackTrace();
}
return result;
}
public List<User> queryWithBuilder(){
List<User> list =null;
try {
QueryBuilder builder= userDao.queryBuilder();
builder.where().eq("age",110);
list = builder.query();
// Where where=builder.where();
// list = where.or(where.and(where.eq("name", "张三"), where.eq("age", "110")),
// where.and(where.eq("name", "李四"), where.eq("age", "119"))).query();
} catch (Exception e) {
e.printStackTrace();
}
return list;
}
public List<User> queryWithAll(){
List<User> list =null;
try {
list = userDao.queryForAll();
} catch (Exception e) {
e.printStackTrace();
}
return list;
}
}
额外的对User对象封装一个UserDao操作User,这里指的注意的是提供了builder对象的SQL数据库功能,例如这里的UpdateBuilder ,DeleteBuilder ,QueryBuilder 使用起来非常方便,采取了生成器模式,每次都将自身返回,这样可以直接将一个SQL表达式拼接。
public class MainActivity extends AppCompatActivity implements View.OnClickListener{
private static final String TAG = MainActivity.class.getSimpleName();
private Button btn_create,btn_update,btn_delete,btn_query;
private UserDao userDao;
private ArrayList<User> users;
@Override
protected void onCreate(Bundle savedInstanceState) {
super.onCreate(savedInstanceState);
setContentView(R.layout.activity_main);
initView();
}
private void initView() {
userDao=new UserDao(MainActivity.this);
btn_create= (Button) findViewById(R.id.btn_create);
btn_update= (Button) findViewById(R.id.btn_update);
btn_delete= (Button) findViewById(R.id.btn_delete);
btn_query= (Button) findViewById(R.id.btn_query);
btn_create.setOnClickListener(this);
btn_update.setOnClickListener(this);
btn_delete.setOnClickListener(this);
btn_query.setOnClickListener(this);
}
@Override
public void onClick(View v) {
int result=0;
switch (v.getId()){
case R.id.btn_create:
users=new ArrayList<User>();
User user1=new User("张三",110);
User user2=new User("李四",119);
User user3=new User("王五",120);
User user4=new User("赵六",18);
User user5=new User("孙七",20);
users.add(user1);
users.add(user2);
users.add(user3);
users.add(user4);
users.add(user5);
result=userDao.createTable(users);
Log.e(TAG,"创建表:"+result);
break;
case R.id.btn_delete:
User user7=new User("孙七",20);
user7.setId(5);
userDao.deleteWithObject(user7);
Log.e(TAG,"删除:"+result);
break;
case R.id.btn_query:
List<User> users= userDao.queryWithAll();
Log.e(TAG,users.toString());
break;
case R.id.btn_update:
User user=new User();
user.setId(1);
user.setName("zsan");
result = userDao.updateWithObject(user);
Log.e(TAG,"更新:"+result);
break;
}
}
@Override
protected void onDestroy() {
super.onDestroy();
userDao.close();
}
}
在测试Activtiy只是简单的提供了4个测试按钮,
点击创建表:


点击查询:

点击更新:

点击删除:

当然这仅是一个简单的例子为了满足你更多的例子可以去下载官方代码进行扩展。