版权声明:本文为aggresss原创文章,未经博主允许不得转载。 作者:[email protected] https://blog.csdn.net/aggresss/article/details/78585703
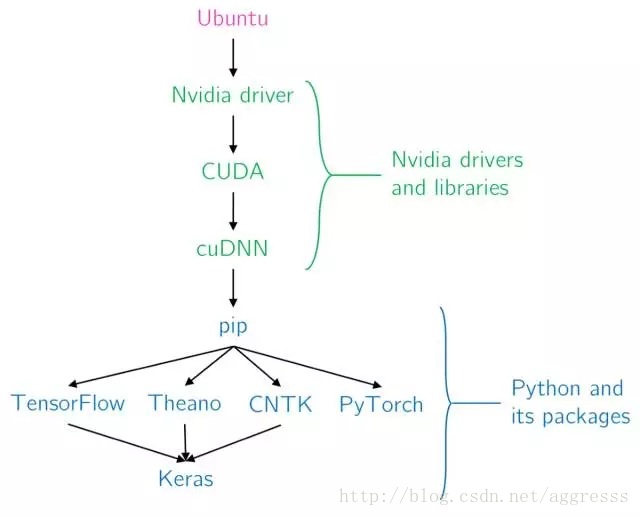
这一期我们来演示一种更加简洁的深度神经网络构建方法–Keras,下面这张图片展示了Keras在网络栈中的位置。
可见Keras是一种比较高级的API,也就是说用它来构建网络使用的代码量会更少,下面用一段代码来演示一下,我们使用通过ImageNet预先训练好的VGG16结构的网络来分类一张图片。
%matplotlib inline
from keras.applications.vgg16 import VGG16
from keras.preprocessing import image
from keras.applications.vgg16 import preprocess_input, decode_predictions
import numpy as np
import cv2
from matplotlib import pyplot as plt

model = VGG16(weights='imagenet')

img_path = 'demo.jpg'
img = image.load_img(img_path, target_size=(224, 224))
x = image.img_to_array(img)
x = np.expand_dims(x, axis=0)
x = preprocess_input(x)

features = model.predict(x)
preds = decode_predictions(features, top=1)[0][0]
print(preds)

# Label and show the image
img = cv2.imread('demo.jpg',cv2.IMREAD_COLOR)
img = cv2.cvtColor(img, cv2.COLOR_BGR2RGB)
cv2.putText(img, "Label: {}, {:.2f}%".format(preds[1], preds[2] * 100),
            (10, 30), cv2.FONT_HERSHEY_SIMPLEX, 0.75, (0,255,0), 2, cv2.LINE_AA)
plt.figure(dpi=150)
plt.imshow(img, cmap = 'gray', interpolation = 'bicubic')
plt.xticks([]), plt.yticks([])  # to hide tick values on X and Y axis
plt.show()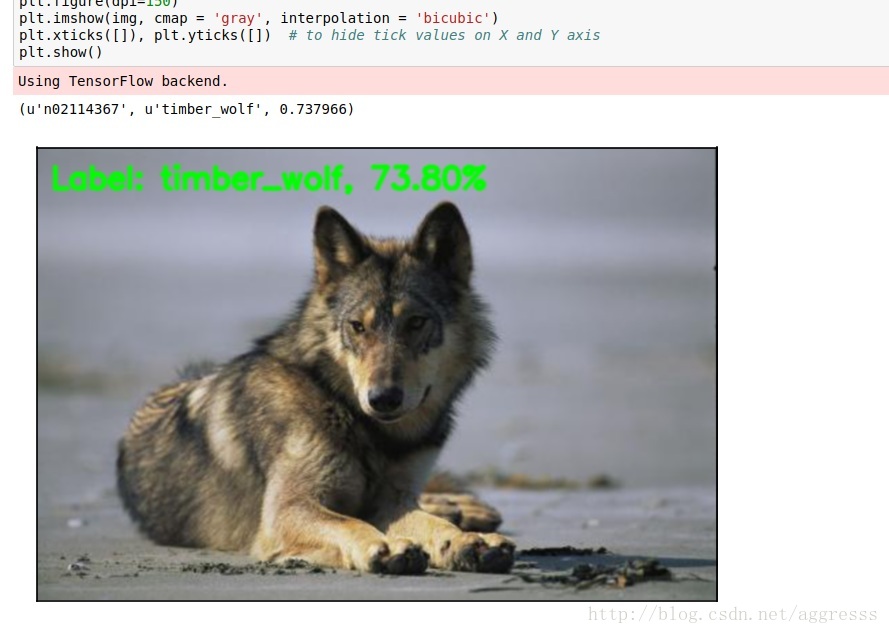
通过上面的代码就可以实现将一张图片打上ImageNet中的标签。可以看到,通过jupyter notebook 可以非常直观的展示出已训练模型的计算结果,并且可以发现,使用Keras的API相对与Tensorflow可以非常简洁的产生计算结果,所以Tensorflow的1.4版本可是引入Keras的API了,现在Tensorflow官方文档已经将自己的接口分成High-level API 和 Low-level API,以后我们演示党有福啦,几行代码就可以演示结果了。
上面的代码运行时会自动下载VGG16的weight文件,如果下载失败可以到我的网盘里下载 https://pan.baidu.com/s/1dE5PrHJ ,将 vgg16_weights_tf_dim_ordering_tf_kernels.h5 和 imagenet_class_index.json
文件保存到 ${HOME}/.keras/models/ 目录下即可。
对应源码地址: https://github.com/aggresss/GPUDemo/blob/master/keras_demo.ipynb
参考文档: https://keras.io/