MXNet是C++开发非常友好的深度学习框架!虽然比不上Python,但是相比其他深度学习框架,MXNet C++开发非常容易入手。
官网
http://mxnet.incubator.apache.org/
https://github.com/apache/incubator-mxnet
官方的windows下C++安装流程
http://mxnet.incubator.apache.org/install/build_from_source.html#build-the-c-package
具体安装流程
1,下载代码 https://github.com/apache/incubator-mxnet/releases
apache-mxnet-src-1.2.1-incubating.tar.gz 解压到某个盘文件夹下面,不要下载那个Source code (zip),缺少第三方库,也可以考虑直接git github的工程
git clone --recursive https://github.com/apache/incubator-mxnet.git
2,BLAS库:MKL或者OpenBLAS
OpenBLAS安装:
下载OpenBLAS代码并编译,参考我的上一篇OpenBLAS编译博客https://blog.csdn.net/u013701860/article/details/81542437,然后把编译好的OpenBLAS复制到D:\Program Files\OpenBLAS并设置环境变量。
Set the environment variable OpenBLAS_HOME to point to the OpenBLAS directory that contains the include/ and lib/ directories. Typically, you can find the directory in C:\Program files (x86)\OpenBLAS\.
MKL库
https://software.intel.com/en-us/articles/installing-and-building-mxnet-with-intel-mkl
如何编译MKL-DNN,参考另一篇博客:https://blog.csdn.net/u013701860/article/details/81587006
另外MKL应该可以不用标准的MKL,而是可以用MKLML(Intel MKL small libraries)这是编译MKL-DNN就用到的,参考上面的博客。但是很奇怪,MXNet的ChooseBlas.cmake以及第三方库mshadow的mshadow.cmake里面选择BLAS库的时候却是这样的语句
  if(MKL_FOUND)
    if(USE_MKLML_MKL)
      set(BLAS "open")
    else()
      set(BLAS "MKL")
    endif()
  endif()
if(MKL_FOUND)
if(USE_MKLDNN)
set(BLAS "open")
else()
set(BLAS "MKL")
endif()
endif()MKL找到的时候却设置BLAS 为OpenBLAS,这是什么鬼?是写错了还是有什么原因,目前表示非常疑惑。个人希望尽量少用三方库,最好是有编译好的DLL,因为结果给别人用的时候还需要进行额外编译,非常麻烦。
3,下载opencv库,添加环境变量
First download and install OpenCV, then set the environment variable OpenCV_DIR to point to the OpenCV build directory.
也就是为设置环境变量OpenCV_DIR 为D:\Program Files\opencv 3.4.2\build
4,下载安装CUDA,cuDNN
MXNet is compatible with both CUDA 7.5 and 8.0. It is recommended to use cuDNN 5.
5,安装CMake,编译MXNet库,创建visual studio 2015 工程,再使用Visual studio 2015编译,生成库和op.h
在mxnet目录apache-mxnet-src-1.2.1-incubating下创建build文件夹,将CMake gui两个目录分别设置为mxnet和里面的build文件夹路径。
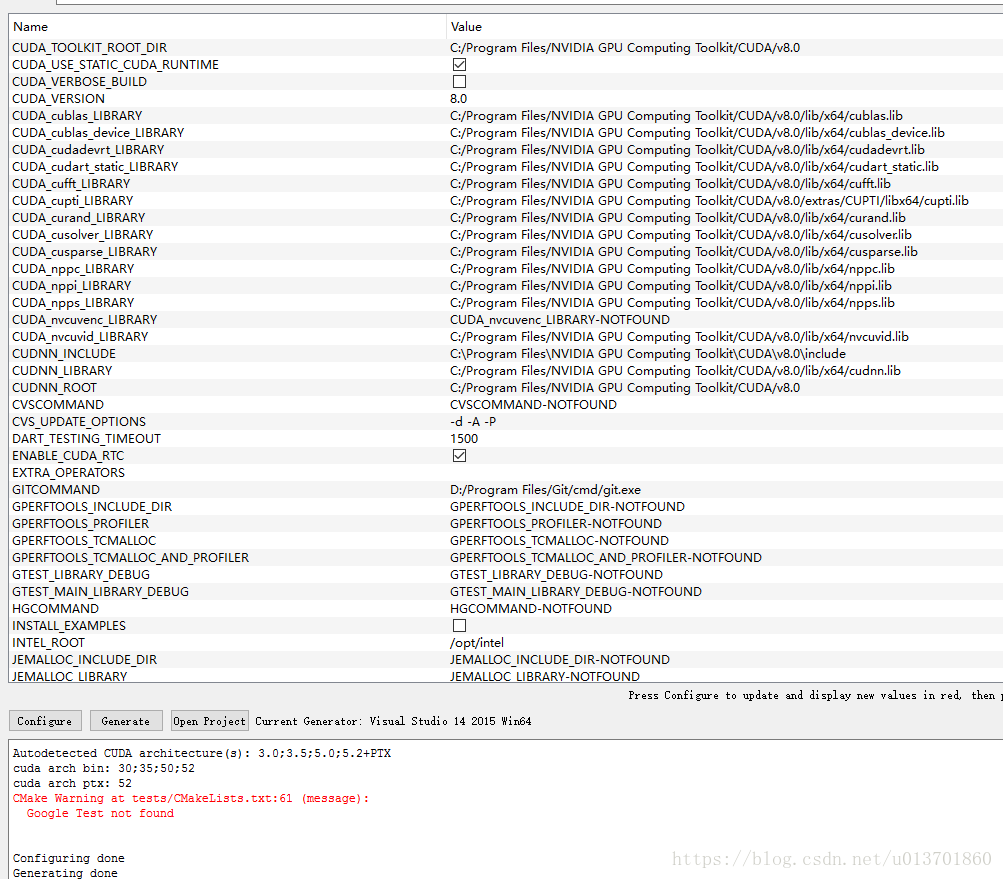
apache-mxnet-src-1.2.1-incubating目录下的CMakeLists.txt可以打开进行一些选项的ON OFF配置,默认CUDA,CUDNN已经启用,这里编译C++,需要启用USE_CPP_PACKAGE,也可以在CMake gui里面勾选
configure里面visual studio 2015 win64,然后generate,在build下面会出现VS工程,打开mxnet.sln,配置为x64 release模式,编译整个solution。
CMake里面的一些选项要注意仔细检查使能
Use CMake to create a Visual Studio solution in ./build.
Build the C++ package
The C++ package has the same prerequisites as the MXNet library, you should also have python installed. (Both python 2 and 3 are supported) To enable C++ package, just add USE_CPP_PACKAGE=1 in the build options when building the MXNet shared library.
MXNet also supports HDFS but you need to install Hadoop locally
这一步遇到过很多次错误
1,CMake编译找不到CUDA,发现很可能是安装的CUDA跟编译器版本不匹配。需要安装跟vs2015匹配的CUDA
2,apache-mxnet-src-1.2.1需要用CUDA8编译,我用了CUDA9.2编译出错失败。可以在每个工程点右键/build dependence/build customizations里面将CUDA版本选择成为CUDA8.0
3,fatal error C1083: Cannot open include file: 'mxnet-cpp/op.h': No such file or directory
中间部分工程编译后,会自动调用OpWrapperGenerator.py生成op.h,再接着编译后续的工程。但是如果前面出错了,导致Op.h没有生成,后面的编译无法进行。
另外前半部分已经成功,libmxnet.dll也已经生成,但是VS中调用OpWrapperGenerator失败。 OSError: [WinError 126] 找不到指定的模块。这是因为缺少了依赖的dll,需要把VS redistrib,cuda,cudnn,openblas,opencv,编译openblas的gcc库都拷过来,可以用dll依赖查看工具查看依赖性,把相关的都拷过来。有一部分是VS和系统的可以不管,再去手动编译。
安装python,将这些库和libmxnet.dll等拷贝到cpp-package/scripts目录,使用VS编译的也要注意Visual C++ Redistributable for Visual Studio 2015是否安装成功。
在控制台跳转到这个目录,执行,生成op.h
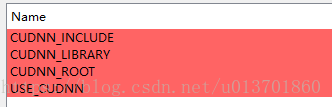
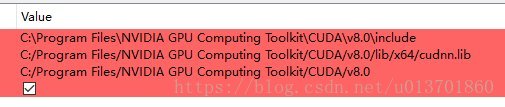
python OpWrapperGenerator.py libmxnet.dll3,我的出现第3个错误的原因是CUDNN没设置好,没有被使能,CMake没有正确找到CUDNN,相应的栏目为空,仿照其他项目把它填上,如下图。make/config.mk也有一些配置,不知道有没有用,可以尽量填上,如USE_CUDA_PATH = C:/Program Files/NVIDIA GPU Computing Toolkit/CUDA/v8.0。另外OpenBLAS库编译没有生成LAPACK也导致了失败。
4,其实只要libmxnet.dll生成,op.h产生就可以了,后面另外的几个工程遇到失败,问题是找不到mxnet_static.lib,应该是文件名的问题,应该把它替换为libmxnet.dll同期产生的libmxnet.lib就好,同时这几个工程其实是example工程,并不重要。另外里面的设置可以看看,我们自己开发的时候添加类似的include和Lib依赖。
Except linking the MXNet shared library, the C++ package itself is a header-only package, which means all you need to do is to include the header files. Among the header files, op.h is special since it is generated dynamically. The generation should be done when building the C++ package. It is important to note that you need to copy the shared library (libmxnet.so in Linux and MacOS, libmxnet.dll in Windows) from /path/to/mxnet/lib to the working directory.
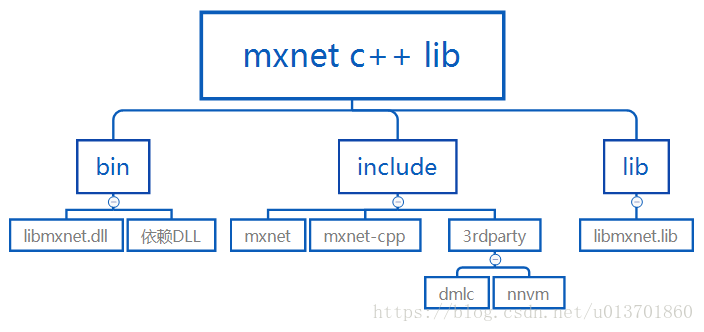
可以将开发文件整理出来,类似这样,include的部分来自于incubator-mxnet的include文件夹,开发的时候添加include路径以及libmxnet.lib,将bin内容复制到exe文件夹即可。
cpp-package/example有很多例子以供学习。