项目地址(功能已更新,如对你有帮助记得给个star哦!)
首先大家写JAVA项目多多少少都有接触过SpringMVC这个表现层框架,但是大多数人只知道怎么用这框架,却不了解这框架的原理,如果到时候工作的公司用的是公司自己的框架难道又要慢慢重学一遍吗?所以不如了解框架的原理,再学其他框架就能很快上手。
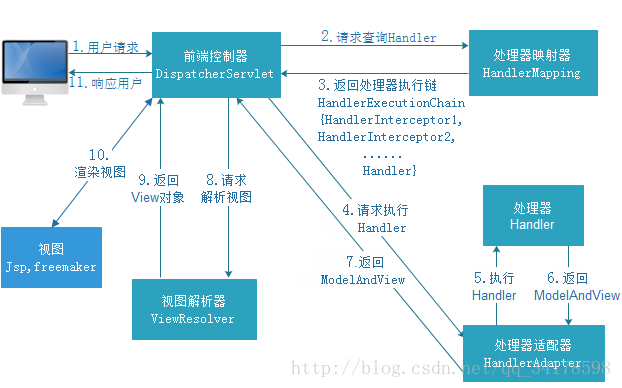
如上图所示的是SpringMVC的架构流程,下面我只简单的实现SpringMVC的请求映射方法的工作流程,请忽略其他细节。
首先建一个web项目。这是我写好的工程目录结构:

一,注解:
用过SpringMVC框架的人都知道在类上打了@Controller注解的才能被认作是一个Controller,而打了@RequestMapping才能被请求映射。
所有我们必须创建两个注解@Controller和@ReqestMapping,@Scope注解选择性创建,如果不指定Scope默认是单例的Bean
package com.ming.mvc.annotation;

import java.lang.annotation.ElementType;
import java.lang.annotation.Retention;
import java.lang.annotation.RetentionPolicy;
import java.lang.annotation.Target;

/**
 * Created by Ming on 2018/1/29.
 */
@Target(ElementType.TYPE)
@Retention(RetentionPolicy.RUNTIME)
public @interface Controller {

}
package com.ming.mvc.annotation;

import java.lang.annotation.ElementType;
import java.lang.annotation.Retention;
import java.lang.annotation.RetentionPolicy;
import java.lang.annotation.Target;

/**
 * Created by Ming on 2018/1/29.
 */
@Target({ElementType.METHOD,ElementType.TYPE})
@Retention(RetentionPolicy.RUNTIME)
public @interface RequestMapping {
    String value();
}
package com.ming.mvc.annotation;

/**
 * Created by Ming on 2018/1/29.
 */
public @interface Scope {
    String value();
}
@Target({TYPE, FIELD, METHOD, PARAMETER, CONSTRUCTOR, LOCAL_VARIABLE})
声明注解的使用范围.
TYPE: 注解可以用在类上
FIELD:注解可以用在属性上
METHOD:用在方法上
PARAMETER:用在参数声明上面
CONSTRUCTOR:用在构造方法上面
LOCAL_VARIABLE:用在本地变量上面
@Retention(RetentionPolicy.SOURCE)
声明注解的有效范围
RetentionPolicy.SOURCE: 该注解只在源码中有效!
RetentionPolicy.CLASS: 该注解在源码中,和字节码中有效!(默认)
RetentionPolicy.RUNTIME: 该注解在源码中,和字节码中有效,运行字节码的时候有效!
二,包扫描:
好了,注解写完了,但我们要让注解生效怎么办?我们用springmvc的时候都要配置包扫描,目的是为了包下的注解生效,所以我们可以建一个包扫描类ClassScanner。这个类的目的是由basePackage(如:com.ming.mvc)得到这个包下的所有.class文件的全限定名,和Class对象用一个Map容器装载。
package com.ming.mvc.utils;

import java.io.File;
import java.io.IOException;
import java.net.URL;
import java.util.*;

/**
 * Created by Ming on 2018/1/29.
 */
public class ClassScanner {


    public static Map<String, Class<?>> scannerClass(String basePackage) {
        Map<String, Class<?>> result = new HashMap<>();
        //把com.ming.mvc 换成com/ming/mvc再类加载器读取文件
        String basePath = basePackage.replaceAll("\\.", "/");
        try {
            //得到com/ming/mvc的绝对地址 /D:xxxxx/com/ming/mvc
            String rootPath = ClassScanner.class.getClassLoader().getResource(basePath).getPath();
            //只留com/ming/mvc 目的为了后续拼接成一个全限定名
            if (rootPath != null) rootPath = rootPath.substring(rootPath.indexOf(basePath));

            Enumeration<URL> enumeration = ClassScanner.class.getClassLoader().getResources(basePath);
            while (enumeration.hasMoreElements()) {
                URL url = enumeration.nextElement();
                if (url.getProtocol().equals("file")) {//如果是个文件
                    File file = new File(url.getPath().substring(1));
                    scannerFile(file, rootPath, result);
                }
            }

        } catch (IOException e) {
            e.printStackTrace();
        }
        return result;

    }

    //扫描文件
    private static void scannerFile(File folder, String rootPath, Map<String, Class<?>> classes) {
        try {
            File[] files = folder.listFiles();
            for (int i = 0; files != null && i < files.length; i++) {
                File file = files[i];
                if (file.isDirectory()) {
                    scannerFile(file, rootPath + file.getName() + "/", classes);
                } else {
                    if (file.getName().endsWith(".class")) {
                        String className = (rootPath + file.getName()).replaceAll("/", ".");
                        className = className.substring(0, className.indexOf(".class"));//去掉扩展名得到全限定名
                        //Map容器存储全限定名和Class
                        classes.put(className, Class.forName(className));
                    }
                }

            }
        } catch (Exception e) {
            e.printStackTrace();
        }
    }


    public static void main(String[] args) {

    }

}
这里这个类方法只做了一件事,就是扫描包,获取所有.class文件字节码对象,但还没有和注解关联起来。
三,DispatchServlet:
我们明白在springmvc 中 DispatchServlet这个Servlet接受用户的requestURI,最后目的就是为了执行我们打了@Controller注解的java类中的@requestMapping上的路径。
所以我们可以建立一个DispatcherServlet简单模拟这个操作。

package com.ming.mvc.servlet;

import com.ming.mvc.BaseController;
import com.ming.mvc.annotation.Controller;
import com.ming.mvc.annotation.RequestMapping;
import com.ming.mvc.annotation.Scope;
import com.ming.mvc.utils.ClassScanner;

import javax.servlet.ServletConfig;
import javax.servlet.ServletException;
import javax.servlet.annotation.WebInitParam;
import javax.servlet.annotation.WebServlet;
import javax.servlet.http.HttpServlet;
import javax.servlet.http.HttpServletRequest;
import javax.servlet.http.HttpServletResponse;
import java.io.IOException;
import java.lang.reflect.Method;
import java.util.*;

/**
 * Created by Ming on 2018/1/29.
 */
@WebServlet(urlPatterns="*.action",initParams = {@WebInitParam(name="basePackage",value = "com.ming.mvc")})
public class DispatcherServlet extends HttpServlet {
    //单例:
    //存放方法的映射地址,和方法类
    private Map<String,Method> methods = new HashMap<>();
    //存放controller实例 只打了controller注解的类才存进去
    private Map<String,Object> controllers = new HashMap<>();

    @Override
    public void init(ServletConfig config) throws ServletException {
        String basePackage = config.getInitParameter("basePackage");
        Map<String, Class<?>> classMap = ClassScanner.scannerClass(basePackage);
        Set<Map.Entry<String, Class<?>>> entries = classMap.entrySet();

        for (Map.Entry<String, Class<?>> entry : entries) {
            String className = entry.getKey();
            Class<?> clazz = entry.getValue();
            String path = "";
            try {
                //如果这个类标记了Controller注解
                if (clazz.isAnnotationPresent(Controller.class)) {
                    //如果这个类标记了RequestMapping注解
                    if (clazz.isAnnotationPresent(RequestMapping.class)) {
                        RequestMapping reqAnno = clazz.getAnnotation(RequestMapping.class);
                        path = reqAnno.value();
                    }
                    controllers.put(className, clazz.newInstance());
                    Method[] ms = clazz.getMethods();
                    for (Method method : ms) {
                        //如果这个方法标记了RequestMapping注解
                        if (method.isAnnotationPresent(RequestMapping.class)) {
                            String requestMappingPath = path + method.getAnnotation(RequestMapping.class).value();
                            methods.put(requestMappingPath,method);
                        }
                    }
                }
            } catch (Exception e) {
                e.printStackTrace();
            }
        }
    }

    @Override
    protected void service(HttpServletRequest req, HttpServletResponse resp) throws ServletException, IOException {

        try {
            String uri = req.getRequestURI();
            String contextPath = req.getContextPath();
            //   /index.action 要求拿到index
            String requestMappingPath = uri.substring(contextPath.length(),uri.indexOf(".action"));
            Method method = methods.get(requestMappingPath);
            if(method == null){
                resp.sendError(404);
                return;
            }
            BaseController controller = null;
            Class<?> requestClass = method.getDeclaringClass();
            //如果这个请求的类被标记了范围
            if(requestClass.isAnnotationPresent(Scope.class) &&
                    requestClass.getAnnotation(Scope.class).value().equals("prototype")){
                //controller 多例:
                controller = (BaseController) controllers.get(method.getDeclaringClass().getName());
            }else{//controller 单例: (默认)
                controller = (BaseController) method.getDeclaringClass().newInstance();
            }
            //传递 request 和 response
            controller.init(req,resp);
            method.invoke(controller);
        } catch (Exception e) {
            e.printStackTrace();
        }


    }
}
我们要在Controller类里用request和response,所以可以建立一个BaseController ,所有的Controller类都要继承它。
package com.ming.mvc;

import javax.servlet.http.HttpServletRequest;
import javax.servlet.http.HttpServletResponse;

/**
 * Created by Ming on 2018/1/29.
 */
public abstract class BaseController {
    protected HttpServletRequest request;
    protected HttpServletResponse response;

    public void init(HttpServletRequest request,HttpServletResponse response){
        this.request = request;
        this.response = response;
    }


    public HttpServletRequest getRequest() {
        return request;
    }

    public void setRequest(HttpServletRequest request) {
        this.request = request;
    }

    public HttpServletResponse getResponse() {
        return response;
    }

    public void setResponse(HttpServletResponse response) {
        this.response = response;
    }
}
好了完成上面的步骤我们可以写一个Controller类了:
package com.ming.mvc;

import com.ming.mvc.annotation.Controller;
import com.ming.mvc.annotation.RequestMapping;
import com.ming.mvc.annotation.Scope;

/**
 * Created by Ming on 2018/1/29.
 */
@Controller
@RequestMapping("/ming")
@Scope("prototype")
//singleton
public class IndexController extends BaseController{
    private int age = 1;

    @RequestMapping("/index")
    public void index(){
        age ++;
        System.out.println(age);
        System.out.println("index方法执行了"+"username: "+request.getParameter("username"));
    }

    @RequestMapping("/delete")
    public void delete(){
        System.out.println("delete方法执行了");
    }


    @RequestMapping("/search")
    public void search(){
        System.out.println("search方法执行了");
    }


    @RequestMapping("/update")
    public void update(){
        System.out.println("update方法");
    }

}
访问浏览器:

至此这个简易的SpringMVC框架也算成功了 └(^o^)┘