1. PureComponent
使用PureComponent来代替Component,避免React大量比较的工作,其适用于不变的组件,尤其是和数据、业务无关的纯展示组件。
2. React Native性能优化之可取消的异步操作
1) 为Promise插上可取消的翅膀
export default function makeCancelable(promise){
   let hasCanceled_ = false;
   const wrappedPromise = new Promise((resolve, reject) => {
       promise.then((val) =>
           hasCanceled_ ? reject({isCanceled: true}) : resolve(val)
       );
       promise.catch((error) =>
           hasCanceled_ ? reject({isCanceled: true}) : reject(error)
       );
   });

   return {
       promise: wrappedPromise,
       cancel() {
           hasCanceled_ = true;
       },
   };
}
这样在使用的时候只需要将makeCancelable导入到你的相应js文件中就可以了。
import makeCancelable from '../util/Cancelable'2) 可取消的网络请求Fetch
fetch是React Native开发过程中最常用的网络请求API,和Promis一样,fetch也没有提供用于取消已发出的网络请求的API。因为fetch返回的是一个Promise,所以我们可以借助上述方法,�来取消fetch所发出的网络请求。
this.cancelable = makeCancelable(fetch('url')));
        this.cancelable.promise
            .then((response)=>response.json())
            .then((responseData)=> {
                console.log(responseData);
            }).catch((error)=> {
                console.log(error);
            });
为了提高React Native应用的性能,我们需要在组件卸载的时候不仅要主动释放掉所持有的资源,也要取消所发出的一些异步请求操作。
componentWillUnmount() {
  this.cancelable.cancel();
}
3. Console.log语句
当运行一个打包好的app, Console.log语句会引起很大的瓶颈。它会包含调试库redux-logger, 所以在打包前,确保删除了Console.log语句.
4. InteractionManager 可以将一些耗时较长的工作安排到所有互动或动画完成之后再进行
//通知管理器有某个动画或者交互开始了
var handle = InteractionManager.createInteractionHandle();

//通知管理器有某个动画或者交互已经结束了
InteractionManager.clearInteractionHandle(handle);

//如果设定了一个正整数值,则会使用setTimeout来挂起所有尚未执行的任务。在eventLoopRunningTime到达设定时间后,才开始使用一个setImmediate方法来批量执行所有任务     InteractionManager.setDeadline(5000);

//安排一个函数在所有的交互和动画完成之后运行。返回一个可取消的promise
InteractionManager.runAfterInteractions(() => {
    var win_info = Dimensions.get('window');
    me.setState({
        width: win_info.width,
        height: win_info.height
    })
});
5. 善于使用shouldComponentUpdate
通过shouldComponentUpdate的返回结果我们可以去控制什么时候应该render,什么情况应该render
6. 使用Animated去处理一些简单的动画
我想应该会有很多小伙伴遇到这样的问题,切换不同的state改变某个view的height/width,是不是很多小伙伴都会用state去控制height/width。并不是说这样是完全不对,只是这样耗费性能,因为你的state的改变会触发render,而对于一个过程来说,这样的render次数是我们不愿意看到的,那该怎么解决呢?其实大家可以使用Animated去代替state,Animated封装了一系列优雅的处理函数,完全可以实现你想要的效果,使用方法官方有介绍。
7. this.refs已经过时了,可能会在未来的版本会移除, 用下边的回调函数
class CustomTextInput extends React.Component {
  constructor(props) {
    super(props);
    this.focus = this.focus.bind(this);
  }

  focus() {
    // 通过使用原生API,显式地聚焦text输入框
    this.textInput.focus();
  }

  render() {
    // 在实例中通过使用`ref`回调函数来存储text输入框的DOM元素引用(例如:this.textInput)
    return (
      <div>
        <input
          type="text"
          ref={(input) => { this.textInput = input; }} />
        <input
          type="button"
          value="Focus the text input"
          onClick={this.focus}
        />

      </div>
    );
  }
}
8. document.referrer详情
http://www.cnblogs.com/rubylouvre/p/3541411.html
9. 浏览器兼容问题
http://www.frontopen.com/2552.html、https://blog.suzper.com/2017/04/17/IE8%E4%B8%8B%E4%BD%BF%E7%94%A8react%E6%80%BB%E7%BB%93/
Bable使用: http://www.ruanyifeng.com/blog/2016/01/babel.html
10.webpack.config.js 报错"Invalid Host header"
disableHostCheck: true
11. RN image标签 读取 Native 提供的图片磁盘地址
首先加上读写磁盘权限和访问相册权限
<Image style={{ width: '100%', height: '100%' }}
source={{ uri: 'file:///storage/emulated/0/Download/crop_20a7dc7fbd29d679b456fa0f77bd9525d.jpg'}}
/>
同样如果将一个视频资源的磁盘地址赋值给image标签, image显示的是视频第一帧:
<Image style={{ width: '100%', height: '100%' }}
source={{uri: 'file:///storage/emulated/0/tencent/MicroMsg/WeiXin/1534588747082.mp4'}}
/>
12. TouchableHighlight 快速点击报错
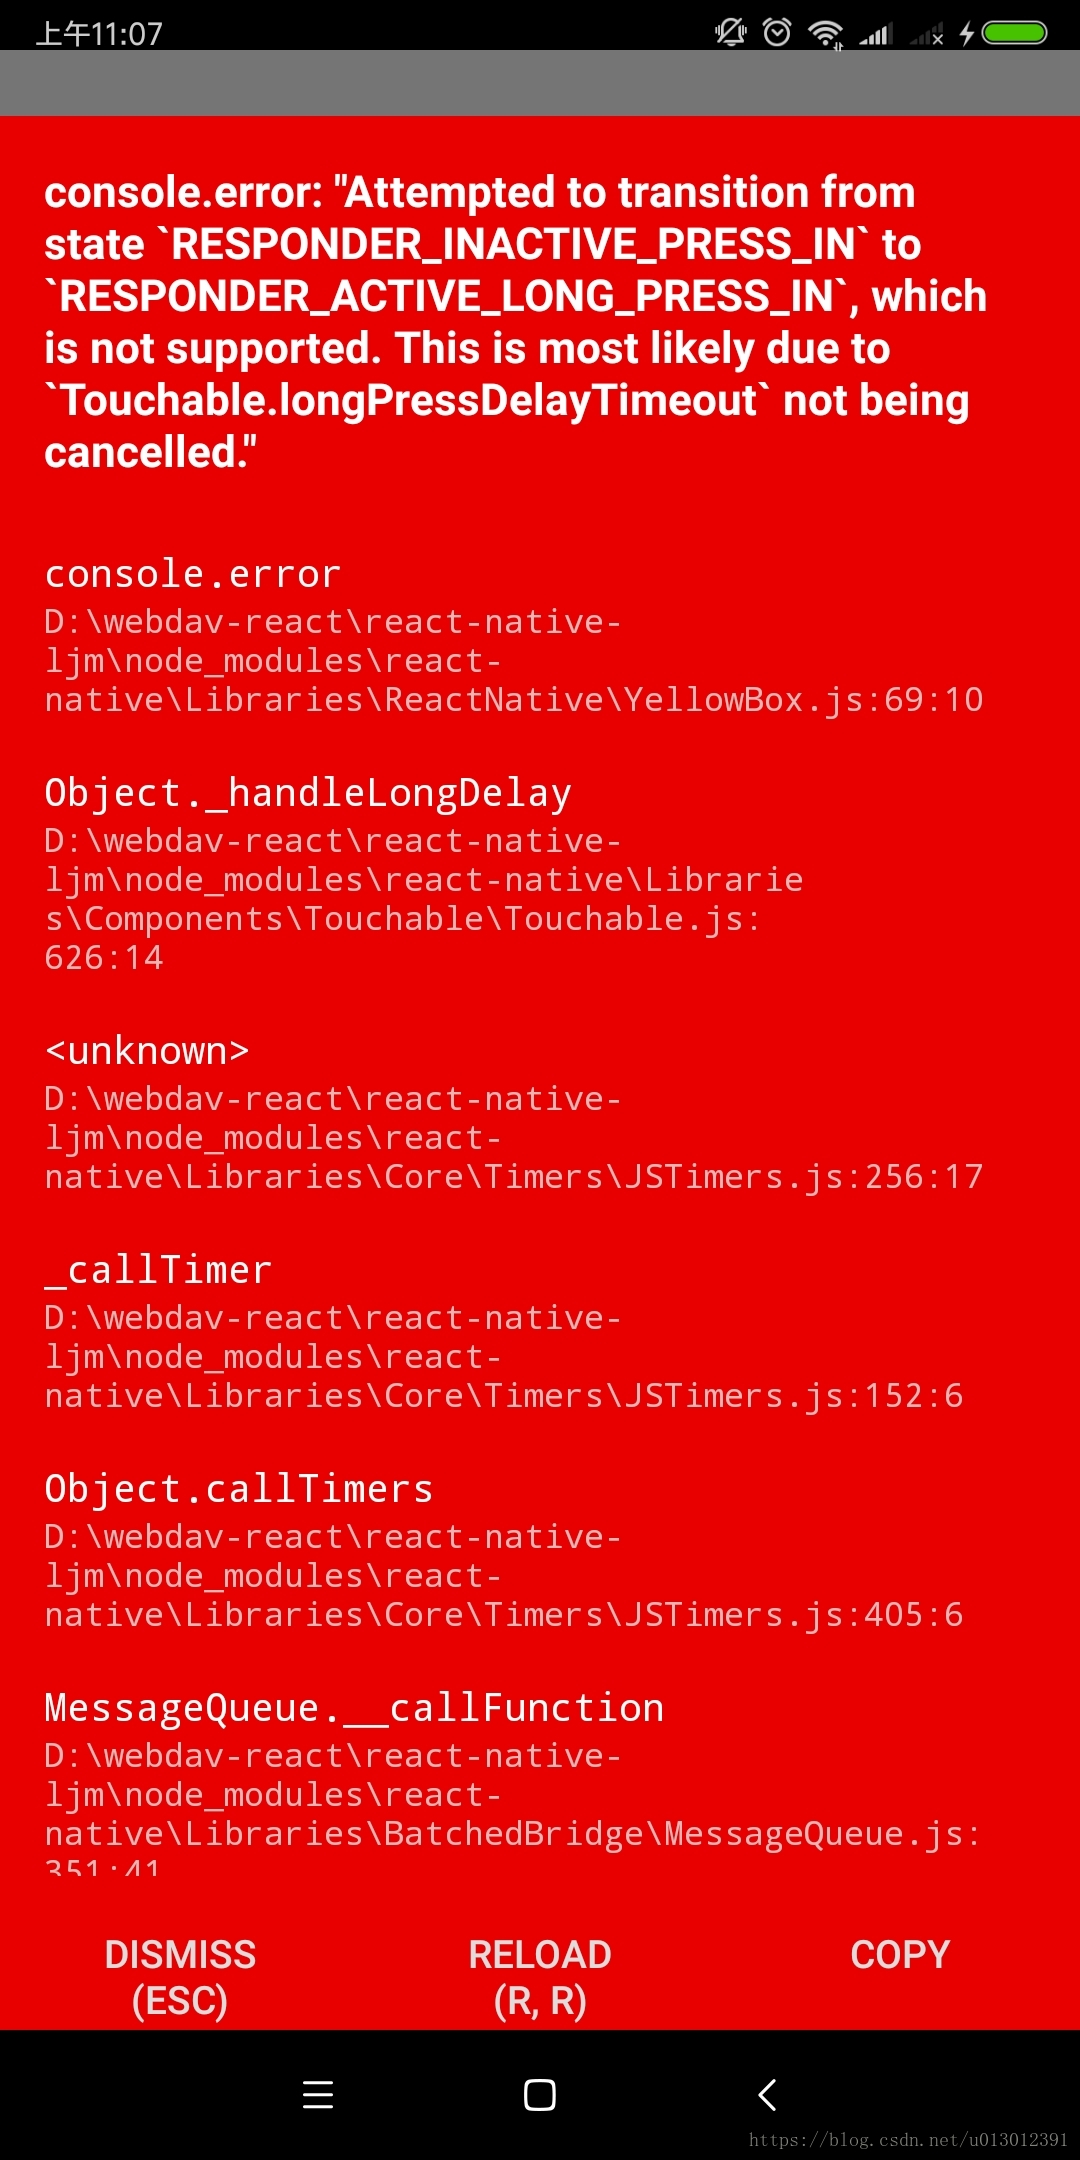
解决方案: 关闭Debug JS Remotely模式
注意事项: .
1) 在TouchableHighlight组件里只支持一个子节点,如果你希望包含多个子组件,用一个View来包装它们
2)
错误用法:
<TouchableHighlight underlayColor='#fff'>
  <View>...</View>
</TouchableHighlight>
正确用法:
<TouchableHighlight underlayColor='#fff' onPress={()=>{}}>
  <View>...</View>
</TouchableHighlight>
大家应该发现了第二段代码多了 onPress={()=>{}}
这个是个大坑本以为组件提供的属性 触发事件应该是分装在内部的, 然而我们想多了得自己手动加个事件才能使得那些属性有效.