《Android源码设计模式解析与实战》第5章第6章读书笔记
文章目录:
工厂方法模式介绍
工厂方法模式uml类图
工厂方法模式在android中的应用
抽象工厂模式介绍
抽象工厂模式uml类图
抽象工厂模式在android中的应用
抽象工厂模式的优缺点
参考
工厂方法模式介绍
工厂方法模式(Factory Pattern)创建型设计模式之一,在平时开发中或多或少都会使用它,如Android中的Activity里的各个生命周期方法,以onCreate方法为例,它就可以看作是一个工厂方法,在其中我们将构造的View通过setContentView返回给framework处理,剩下的布局就由系统去创建。总结来说,定义一个用于创建对象的接口,让子类决定实例化哪个类。它的使用场景是任何需要生成复杂对象的地方,都可以使用工厂方法模式。复杂对象使用工厂模式,用new就可以完成创建的对象无需使用工厂模式。
工厂方法模式uml类图
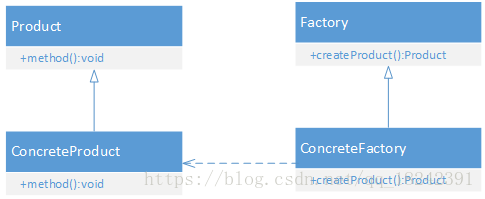
工厂模式通用模板代码:
abstract class Product{

    /**
     *  抽象的产品方法,具体方法由子类去实现
     */
    abstract fun method()

}

class ConcreteProductA : Product(){

    override fun method() {
        println("具体产品类A")
    }
}

class ConcreteProductB : Product(){

    override fun method() {
        println("具体产品类B")
    }
}

/**
 *  抽象工厂类,生产什么产品由子类去实现
 */
abstract class Factory{

    abstract fun createProduct(): Product

}

class ConcreteFactory: Factory(){
    override fun createProduct(): Product = ConcreteProductA()
}

//Test
@Test
fun demo1(){
    val factory = ConcreteFactory()
    val product = factory.createProduct()
    product.method() //具体产品类A
}上述代码中构造的工厂对象,通过其生产的产品对象,得到的产品对象是ConcreteProductA,如果想得到产品对象B,直接更换就好了。
还有一种比较常见的是利用反射更加简洁的生产具体对象
/**
 * 反射版本
 */
abstract class FactoryWithReflect{

    abstract fun <T:Product> createProduct(clz: Class<T>): T?

}

class ConcreteFactoryWithReflect: FactoryWithReflect(){

    override fun <T : Product> createProduct(clz: Class<T>): T? {
        var product: T? = null
        try {
            product = Class.forName(clz.name).newInstance() as T
        }catch (e:Exception){
            e.printStackTrace()
        }
        return product
    }
}

//test
@Test
fun demo2(){
    val factory = ConcreteFactoryWithReflect()
    val product = factory.createProduct(ConcreteProductA::class.java)
    product?.method()
}根据第二版本看出,想要什么样的实例,只需要传入对应的class就可以了,这种方法比较简洁,动态。当然也可以为每一个产品创建一个具体的工厂。
工厂方法模式在android中的应用
拿在本文开头onCreate举例,它是Activity的一个入口点,接下来就看下如何在Android系统中调用的onCreate 方法。对于一个应用程序来说,其真正的入口是ActivityThread类里面的main方法,ActivityThread是一个final类,不能被继承,当Zygote进程孵化出一个新的应用进程之后,会执行ActivityThread的main方法。
public static void main(String[] args) {
 ...
    Looper.prepareMainLooper();

    ActivityThread thread = new ActivityThread();
    thread.attach(false);

    if (sMainThreadHandler == null) {
        sMainThreadHandler = thread.getHandler();
    }

    if (false) {
        Looper.myLooper().setMessageLogging(new
                LogPrinter(Log.DEBUG, "ActivityThread"));
    }
...
    Looper.loop();

    throw new RuntimeException("Main thread loop unexpectedly exited");
}main方法里面做了一些常规逻辑,比如准备Looper和消息队列,然后调用ActivityThread的attach方法将其绑定到ActivityManagerService中,接着就是不断的读取消息队列中的消息并分发消息(事件驱动模型)
看下attach方法

private void attach(boolean system) {
    sCurrentActivityThread = this;
    mSystemThread = system;
    if (!system) {
    ...
        final IActivityManager mgr = ActivityManager.getService();
        try {
            mgr.attachApplication(mAppThread);
        } catch (RemoteException ex) {
            throw ex.rethrowFromSystemServer();
        }
    ...
    }
    ...
}通过system来区分是系统还是普通应用,我们只看普通应用,ActivityManager.getService() 返回的就是一个AMS对象,由于AMS是系统服务,所以它们之间需要进程通信,接着调用attachApplication,来将mAppThread 交给AMS 处理,看下attachApplication方法
//AMS
@Override
public final void attachApplication(IApplicationThread thread) {
    synchronized (this) {
        int callingPid = Binder.getCallingPid();
        final long origId = Binder.clearCallingIdentity();
        attachApplicationLocked(thread, callingPid);
        Binder.restoreCallingIdentity(origId);
    }
}接着转向调用attachApplicationLocked
    private final boolean attachApplicationLocked(IApplicationThread thread,
            int pid) {
...
        try {
...
                thread.bindApplication(processName, appInfo, providers,
                        app.instr.mClass,
                        profilerInfo, app.instr.mArguments,
                        app.instr.mWatcher,
                        app.instr.mUiAutomationConnection, testMode,
                        mBinderTransactionTrackingEnabled, enableTrackAllocation,
                        isRestrictedBackupMode || !normalMode, app.persistent,
                        new Configuration(getGlobalConfiguration()), app.compat,
                        getCommonServicesLocked(app.isolated),
                        mCoreSettingsObserver.getCoreSettingsLocked(),
                        buildSerial); //1
...
        } catch (Exception e) {
...
            return false;
        }
...
        mProcessesOnHold.remove(app);

        boolean badApp = false;
        boolean didSomething = false;

        if (normalMode) {
            try {
                if (mStackSupervisor.attachApplicationLocked(app)) { //2
                    didSomething = true;
                }
            } catch (Exception e) {
                badApp = true;
            }
        }
...
        return true;
}这个方法逻辑很长,简化了不必要的逻辑之后,只剩下两个主要的方法bindApplication 和 attachApplicationLocked,第一个方法参数很多,如其名字一样,将ApplicationThread对象绑定到AMS中。而第二个方法mStackSupervisor指向一个ActivityStackSupervisor,而attachApplicationLocked方法描述如下
    boolean attachApplicationLocked(ProcessRecord app) throws RemoteException {
        final String processName = app.processName;
        boolean didSomething = false;
        for (int displayNdx = mActivityDisplays.size() - 1; displayNdx >= 0; --displayNdx) {
            ArrayList<ActivityStack> stacks = mActivityDisplays.valueAt(displayNdx).mStacks;
            for (int stackNdx = stacks.size() - 1; stackNdx >= 0; --stackNdx) {
                final ActivityStack stack = stacks.get(stackNdx);
                if (!isFocusedStack(stack)) {
                    continue;
                }
                stack.getAllRunningVisibleActivitiesLocked(mTmpActivityList);
                final ActivityRecord top = stack.topRunningActivityLocked();
                final int size = mTmpActivityList.size();
                for (int i = 0; i < size; i++) {
                    final ActivityRecord activity = mTmpActivityList.get(i);
                    if (activity.app == null && app.uid == activity.info.applicationInfo.uid
                            && processName.equals(activity.processName)) {
                        try {
                            if (realStartActivityLocked(activity, app,
                                    top == activity /* andResume */, true /* checkConfig */)) {
                                didSomething = true;
                            }
                        } catch (RemoteException e) {
                       ...
                            throw e;
                        }
                    }
                }
            }
        }
        if (!didSomething) {
            ensureActivitiesVisibleLocked(null, 0, !PRESERVE_WINDOWS);
        }
        return didSomething;
    }
方法的代码比较长,而主要逻辑是
if (realStartActivityLocked(activity, app, top == activity /*andResume */, true /* checkConfig */)) {
     didSomething = true;
}
这里就是真正启动Activity的逻辑
final boolean realStartActivityLocked(ActivityRecord r, ProcessRecord app,
            boolean andResume, boolean checkConfig) throws RemoteException {

...
//所有参数信息准备好之后,就可以真正启动Activity了
app.thread.scheduleLaunchActivity(new Intent(r.intent), r.appToken,
       System.identityHashCode(r), r.info,
       mergedConfiguration.getGlobalConfiguration(),
       mergedConfiguration.getOverrideConfiguration(), r.compat,
       r.launchedFromPackage, task.voiceInteractor, app.repProcState, r.icicle,
       r.persistentState, results, newIntents, !andResume,
       mService.isNextTransitionForward(), profilerInfo);

...

}这个方法中会准备Activity的参数信息,准备完毕之后调用ApplicationThread的scheduleLaunchActivity方法启动Activty,
@Override
public final void scheduleLaunchActivity(Intent intent, IBinder token, int ident,
        ActivityInfo info, Configuration curConfig, Configuration overrideConfig,
        CompatibilityInfo compatInfo, String referrer, IVoiceInteractor voiceInteractor,
        int procState, Bundle state, PersistableBundle persistentState,
        List<ResultInfo> pendingResults, List<ReferrerIntent> pendingNewIntents,
        boolean notResumed, boolean isForward, ProfilerInfo profilerInfo) {

    updateProcessState(procState, false);
 //将参数封装到一个ActivityClientRecord对象中
    ActivityClientRecord r = new ActivityClientRecord();

    r.token = token;
    r.ident = ident;
    r.intent = intent;
    r.referrer = referrer;
    r.voiceInteractor = voiceInteractor;
    r.activityInfo = info;
    r.compatInfo = compatInfo;
    r.state = state;
    r.persistentState = persistentState;

    r.pendingResults = pendingResults;
    r.pendingIntents = pendingNewIntents;

    r.startsNotResumed = notResumed;
    r.isForward = isForward;

    r.profilerInfo = profilerInfo;

    r.overrideConfig = overrideConfig;
    updatePendingConfiguration(curConfig);

    sendMessage(H.LAUNCH_ACTIVITY, r);
}这个方法中首先构造一个ActivityClientRecord 对象,设置相关参数,最后通过sendMessage 方法发送一个启动Activity的消息,由ActivityThread的Handler启动,在ActivityThread 中维护了一个Handler的实例H,看下它是怎么处理H.LAUNCH_ACTIVITY 这样的标志消息的
    private class H extends Handler {
        public static final int LAUNCH_ACTIVITY         = 100;
...
        public void handleMessage(Message msg) {
            switch (msg.what) {
                case LAUNCH_ACTIVITY: {
                    Trace.traceBegin(Trace.TRACE_TAG_ACTIVITY_MANAGER, "activityStart");
                    final ActivityClientRecord r = (ActivityClientRecord) msg.obj;

                    r.packageInfo = getPackageInfoNoCheck(
                            r.activityInfo.applicationInfo, r.compatInfo);
                    handleLaunchActivity(r, null, "LAUNCH_ACTIVITY");

                } break;
        }
}它会调用handleLaunchActivity(r, null, "LAUNCH_ACTIVITY"); 方法,而在这个方法中会调用performLaunchActivity 方法,这个方法里面是处理具体Activity的启动逻辑
private Activity performLaunchActivity(ActivityClientRecord r, Intent customIntent) {
    //获取ActivityInfo
    ActivityInfo aInfo = r.activityInfo;
    if (r.packageInfo == null) {
        //获取packageInfo
        r.packageInfo = getPackageInfo(aInfo.applicationInfo, r.compatInfo,
                Context.CONTEXT_INCLUDE_CODE);
    }
    //获取ComponentName
    ComponentName component = r.intent.getComponent();
    if (component == null) {
        component = r.intent.resolveActivity(
            mInitialApplication.getPackageManager());
        r.intent.setComponent(component);
    }

    if (r.activityInfo.targetActivity != null) {
        component = new ComponentName(r.activityInfo.packageName,
                r.activityInfo.targetActivity);
    }

    ContextImpl appContext = createBaseContextForActivity(r);
    //通过Instrumentation构造Activity对象并设置参数
    Activity activity = null;
    try {
        java.lang.ClassLoader cl = appContext.getClassLoader();
        activity = mInstrumentation.newActivity(
                cl, component.getClassName(), r.intent);
        StrictMode.incrementExpectedActivityCount(activity.getClass());
        r.intent.setExtrasClassLoader(cl);
        r.intent.prepareToEnterProcess();
        if (r.state != null) {
            r.state.setClassLoader(cl);
        }
    } catch (Exception e) {
...
    }

    try {
        //获取Application对象
        Application app = r.packageInfo.makeApplication(false, mInstrumentation);
...
        if (activity != null) {
...
            if (r.mPendingRemoveWindow != null && r.mPreserveWindow) {
                //构造window对象
                window = r.mPendingRemoveWindow;
                r.mPendingRemoveWindow = null;
                r.mPendingRemoveWindowManager = null;
            }
            appContext.setOuterContext(activity);
            //将相关参数绑定到activity
            activity.attach(appContext, this, getInstrumentation(), r.token,
                    r.ident, app, r.intent, r.activityInfo, title, r.parent,
                    r.embeddedID, r.lastNonConfigurationInstances, config,
                    r.referrer, r.voiceInteractor, window, r.configCallback);

            if (customIntent != null) {
                activity.mIntent = customIntent;
            }
            r.lastNonConfigurationInstances = null;
            checkAndBlockForNetworkAccess();
            activity.mStartedActivity = false;
            int theme = r.activityInfo.getThemeResource();
            if (theme != 0) {
                activity.setTheme(theme);
            }

            activity.mCalled = false;
            //调用Activity的onCreate方法
            if (r.isPersistable()) {
                mInstrumentation.callActivityOnCreate(activity, r.state, r.persistentState);   //1
            } else {
                mInstrumentation.callActivityOnCreate(activity, r.state);
            }
   ...
        }
        r.paused = true;

        mActivities.put(r.token, r);

    } catch (SuperNotCalledException e) {
        throw e;

    } catch (Exception e) {
      ...
    }

    return activity;
}注释一处会调用callActivityOnCreate 方法
public void callActivityOnCreate(Activity activity, Bundle icicle,
        PersistableBundle persistentState) {
    prePerformCreate(activity);
    activity.performCreate(icicle, persistentState);
    postPerformCreate(activity);
}而在performCreate 中最终会调用onCreate方法
final void performCreate(Bundle icicle) {
    performCreate(icicle, null);
}

final void performCreate(Bundle icicle, PersistableBundle persistentState) {
    mCanEnterPictureInPicture = true;
    restoreHasCurrentPermissionRequest(icicle);
    if (persistentState != null) {
        onCreate(icicle, persistentState);
    } else {
    //最终执行onCreate方法的调用
        onCreate(icicle);
    }
   ...
}到这里,基本就明白了整个Activity的启动流程到onCreate方法的调用,而对于外部调用者来说,里面做的什么操作基本都是不知道的,只是提供onCreate这一系列生命周期方法,这就是典型的工厂模式设计模式
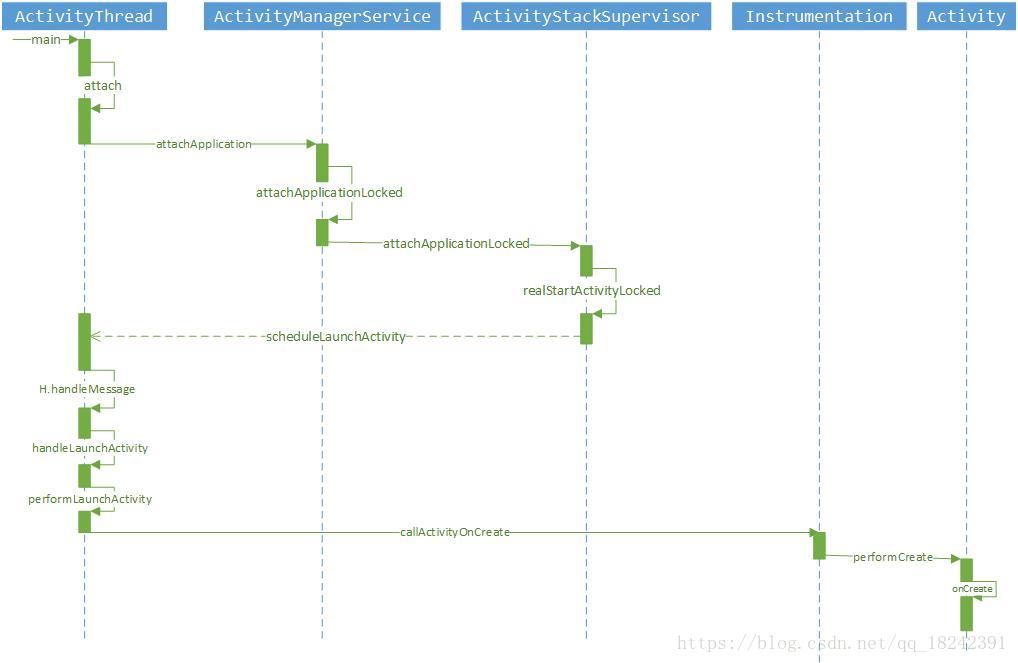
为了看得更清楚,画了一个时序图,方便理解
总结来说,工厂设计模式可以简化类的创建过程,但是也导致类的结构复杂化了,所以是否要选择工厂设计模式,需要权衡利弊了。
抽象工厂模式介绍
抽象工厂模式(Abstract Factory Pattern)也是创建型设计模式之一,起源于以前对不同操作系统图形化解决方案,如不同操作系统对按钮和文本控件的实现不同,展示效果也不同。
定义:为创建一组相关或者是相互依赖的对象提供一个接口,而不需要指定它们具体的类。
使用场景:一个对象族有相同的约束时可以使用抽象工厂模式。比如Android,IOS,Window Phone下都有短信软件和拨号软件,两者都是相同的功能,但是在不同操作系统平台下,其代码的实现逻辑也是不相同的,这时候就可以采用抽象工厂模式。还有一个就是换皮肤功能,一整套一起换
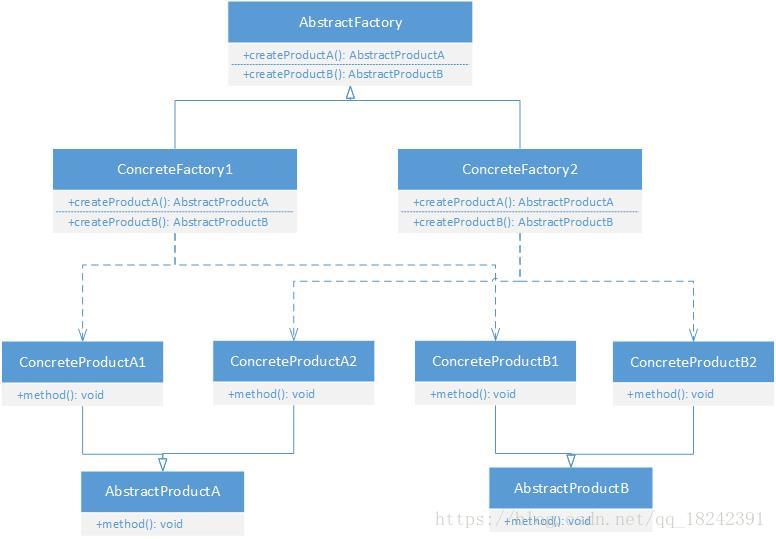
抽象工厂模式uml类图
抽象工厂模式的模板代码
/**
 *  抽象产品A
 */
abstract class AbstractProductA{
    /**
     * 抽象方法
     */
    abstract fun method()

}

/**
 * 具体产品A1
 */
class ConcreteProductA1: AbstractProductA(){

    override fun method() {
        println("具体产品A1")
    }
}

/**
 * 具体产品A2
 */
class ConcreteProductA2: AbstractProductA(){

    override fun method() {
        println("具体产品A2")
    }
}

/**
 * 抽象产品B
 */
abstract class AbstractProductB{
    /**
     * 抽象方法
     */
    abstract fun method()

}

/**
 *  具体产品B1
 */
class ConcreteProductB1: AbstractProductB(){

    override fun method() {
        println("具体产品B1")
    }
}

/**
 *  具体产品B2
 */
class ConcreteProductB2: AbstractProductB(){

    override fun method() {
        println("具体产品B2")
    }
}

/**
 *  抽象工厂
 */
abstract class AbstractFactory{
    /**
     *  生产产品A
     */
    abstract fun createProductA(): AbstractProductA

    /**
     *  生产产品B
     */
    abstract fun createProductB(): AbstractProductB

}

/**
 *  具体工厂1
 */
class ConcreteFactory1: AbstractFactory(){

    override fun createProductA(): AbstractProductA = ConcreteProductA1()

    override fun createProductB(): AbstractProductB = ConcreteProductB1()
}

/**
 *  具体工厂2
 */
class ConcreteFactory2: AbstractFactory(){

    override fun createProductA(): AbstractProductA = ConcreteProductA2()

    override fun createProductB(): AbstractProductB = ConcreteProductB2()
}
角色介绍:
AbstractProduct: 抽象产品角色,它为每种产品申明接口
ConcreteProduct:具体产品角色,它定义具体工厂生产的具体产品对象。
AbstractFactory:抽象工厂,负责声明创建一种产品的方法。
ConcreteFactory:具体工厂,实现了抽象工厂中创建产品的方法。
抽象工厂模式在android中的应用
在平时的开发过程中很少用到抽象工厂模式,一个重要原因就是略显复杂,对于Android开发者来说,一个比较适合的应用就是主题的修改,下面就模拟一套亮色主题LightTheme和暗色主题DarkTheme,而在这两种主题下有各自的UI元素,这种时候就可以使用抽象工厂模式
/**
 *  抽象主题按钮
 */
abstract class ThemeButton(context: Context) : Button(context){

    init {
        initTextColor()
    }

    /**
     *  初始化文本颜色
     */
    abstract fun initTextColor()

}

/**
 * 暗色按钮
 */
class DarkButton(context: Context): ThemeButton(context){

    override fun initTextColor() {
        setTextColor(R.color.dartColor)
    }
}

/**
 *  亮色按钮
 */
class LightButton(context: Context): ThemeButton(context){

    override fun initTextColor() {
        setTextColor(R.color.lightColor)
    }
}

/**
 *  抽象主题工厂类
 */
abstract class AbstractThemeFactory(val context: Context){

    abstract fun createButton(): ThemeButton

}

/**
 *  暗色按钮工厂
 */
class DarkThemeFactory(context: Context): AbstractThemeFactory(context){

    override fun createButton(): ThemeButton = DarkButton(context)
}

/**
 *  亮色按钮工厂
 */
class LightThemeFactory(context: Context): AbstractThemeFactory(context){

    override fun createButton(): ThemeButton = LightButton(context)
}

//Test
 */
@RunWith(AndroidJUnit4::class)
class AbstractFactoryPatterThemeTest {

    @Test
    fun test() {

        val factoryDark = DarkThemeFactory(InstrumentationRegistry.getTargetContext())
        println("暗色:"+factoryDark.createButton())

        val factoryLight = LightThemeFactory(InstrumentationRegistry.getTargetContext())
        println("亮色:"+factoryLight.createButton())

    }

}

result:
暗色:com.microcity.myapplication.DarkButton{8cd843f VFED..C.. ......I. 0,0-0,0}
亮色:com.microcity.myapplication.LightButton{5495f0d VFED..C.. ......I. 0,0-0,0}
在上面的例子中定义了一个主题按钮ThemeButton 抽象类,接着实现了DarkButton 暗色和LightButton亮色两种按钮。然后定义了一个生产ThemeButton 的工厂类,接着实现了DarkThemeFactory和LightThemeFactory 两种主题的工厂类,分别用来实现不同主题的ThemeButton,这就是大致的逻辑。
注意:虽然这种模式简化了类之间的分工合作,但是无疑增加了大量的类,是否要使用这种设计模式,还是要攒横下利弊的,因为如果新增加了一个UI控件的时候,那么抽象的类都需要修改,并且具体的实现类也需要修改,这样修改起来还是很麻烦的。
抽象工厂模式的优缺点
- 优点:
分离接口与实现,客户端使用抽象工厂来创建需要的对象,而不需要知道具体的实现是谁,只是面向产品的接口编程,使其从具体的产品实现中解耦,同时基于接口与实现的分离,使抽象该工厂方法模式在切换产品类时候更加灵活,容易。
- 缺点:
第一个就是类文件的爆炸性增加,二是不容易扩展新的产品类,每当增加一个产品类就需要修改抽象工厂,那么所有具体的工厂类均会被修改。
参考
1 .《Android源码设计模式解析与实战》
2 . 抽象工厂模式