Android的动画分三种:View动画、帧动画和属性动画。其实帧动画也属于View动画的一种,只不过它和平移、旋转等常见的View动画在表现形式上略有不同而已。
1.1 View动画
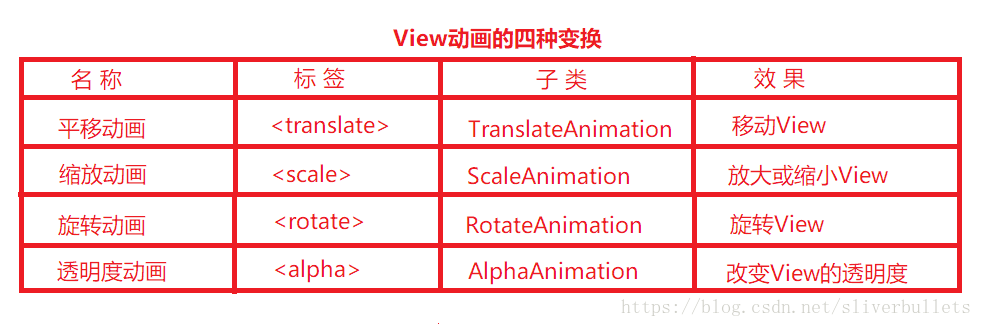
View动画的作用对象是View,他支持4种动画效果,分别是:平移动画、缩放动画、透明度动画、旋转动画。除了这四种典型的变换效果外,帧动画也属于View动画,但是帧动画的表现形式和上面的四种变换效果不太一样。下面在总结过程中所提到View动画均值这四种变换,帧动画会单独总结。
1.1.1View动画的类型
View动画的四种变换效果对应着:Animation的四个子类:TranslateAnimation、ScaleAnimation、RotateAnimation和AlphaAnimation。这四种动画既可以通过XML来定义,也可以通过代码来动态创建,对于View动画来说,建议采用XML来定义动画,因为XML格式的动画可读性更好。
要使用View动画,首先要创建动画的XML文件,这个文件的路径为:res/anim/filename.xml,也就是在res文件夹下创建anim文件夹然后再创建xml,动画的XML语法及含义如下:
<?xml version="1.0" encoding="utf-8"?>
<set xmlns:android="http://schemas.android.com/apk/res/android"
    android:fillAfter=["true" | "false"]  //动画结束后,效果是否保留,false会回到原位置
    android:interpolator="@[packge]:anim/interpolator_resource" // 插值器
    android:shareInterpolator=["true" | "false"]> // 表示是否和集合共享同一个插值器

    <!--平移-->
    <translate
        android:duration="float"   //播放时间
        android:fromYDelta="float" //起始位置x
        android:fromXDelta="float" //起始位置y
        android:toXDelta="float"   //x的结束位置
        android:toYDelta="float"/> //y的结束位置
    <!--放缩-->
    <scale
        android:fromYScale="float" //竖直方向缩放起始值
        android:toYScale="float"   //竖直方向缩放结束值
        android:fromXScale="float" //水平方向缩放起始值
        android:toXScale="float"   //水平方向缩放结束值
        android:pivotX="float"     //缩放的轴点x坐标,它会影响缩放的效果
        android:pivotY="float"/>   //缩放的轴点y坐标,它会影响缩放的效果
    <!--透明度-->
    <alpha
        android:fromAlpha="float"  //透明度的起始值
        android:toAlpha="float" /> //透明度的结束值
    <!--旋转-->
    <rotate
        android:fromDegrees="float" //旋转开始的角度
        android:toDegrees="float"   //旋转结束的角度
        android:pivotX="float"      //轴点的x坐标
        android:pivotY="float"/>    //轴点的y坐标

    <set>
        ... ...
    </set>

</set>
可以看出View动画既可以是单个动画,也可以有由一系列动画组成。
其中提到了轴点这个概念:默认情况下轴点是View的中心,它会导致动画效果以它为中心点展现。
<set>标签表示动画集合,对应AnimationSet类,它可以包含若干个动画,
并且它的内部也是可以嵌套其他动画集合。它有两个属性如下:
android:interpolator
表示动画集合所采用的插值器,插值器影响动画的速度,若不指定该属性,默认加速减速插值器即@android:anim/accelerate_decelerate_interpolator。
android:shareInterpolator
表示集合中的动画是否和集合共享同一个插值器。如果为false,则,子动画就需要单独指定插值器或使用默认插值器。
设置View动画XML格式
//假如我们要给mButton设置动画
Animation animation = AnimationUtils.loadAnimation(this,R.anim.animation_test);
mButton.startAnimation(animation);
设置View动画java代码格式
//效果:mButton在300ms内透明度从0变到1
AlphaAnimation alphaAnimation = new AlphaAnimation(0,1);
alphaAnimation.setDuration(300);
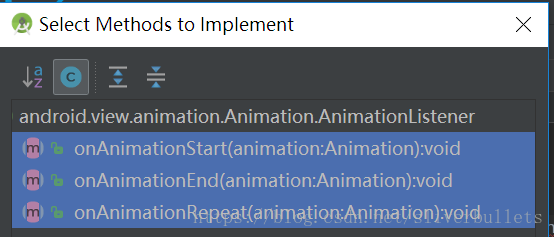
mButton.satrtAnimation(alphaAnimation);另外,通过Animation的setAnimationListener方法可以给View动画添加监听,即:animation.setAnimationListener(animationListener)。
接口如下所示:
1.1.2 自定义View动画
自定义View只需要继承Animation这个抽象类,然后重写它的initialize和applyTransformation方法。
构造方法:传入需要的值,比如起始值,结束值,是否保留动画效果等等
initialize:做一些初始化工作。
applytransformation:进行矩形变换,很多时候需要采用Camera来简化矩阵变换的过程。
//关于矩阵变换等等写
1.1.3 帧动画
帧动画是顺序播放一组预先定义好的图片,类似电影播放。不同于View动画,系统提供了另一个类AnimationDrawable来使用帧动画。
如下通过XML定义一个AnimationDrawable:
//res/drawable/frame_animation.xml注意它在drawable下
<?xml version="1.0" encoding="utf-8"?>
<animation-list xmlns:android="http//schemas.android.com/apk/res/android"
android:oneshot="false">
    <item android:drawable="@drawable/image1"
          android:duration="500"/>
    <item android:drawable="@drawable/image2"
          android:duration="500"/>
    <item android:drawable="@drawable/image3"
          android:duration="500"/>
</animation-list>
使用:将上述Drawable作为View的背景并通过Drawable来播放动画即可:
Button mButton = findViewById(R.id.button);
mButton.setBackgroundResource(R.drawable.frame_animation);
AnimationDrawable drawable =(AnimationDrawable) mButton.getBackground();
drawable.start();
特点:使用简单,比较容易引起OOM,所以用帧动画时避免使用过多尺寸较大的图片。
1.2 View 动画的特殊使用场景
View动画还可以在一些特殊的场景下使用,比如:ViewGroup中可以控制子View的出场效果,在Activity中可以实现不同Activity之间的切换效果。
1.2.1 LayoutAnimation
LayoutAnimation作用于ViewGroup,为ViewGroup指,指定了一个动画,这样当他的子View出场时都会具有这种效果。这种做法常用在ListView上,就是我们常看到ListView的每个Item以一定的动画方式入场。
给ViewGroup的子元素加上入场效果的步骤如下:
XML方式:
1)定义LayoutAnimation
//res/anim/anim_layout.xml
<layoutAnmiation
    xmlns:android="http://schemas.android.com/apk/res/android"
    //delay:子元素开始动画的时间延迟,比如播放周期为300ms,0.5的意思是第一个150ms出场,第二个300ms出场,以此类推
    andriod:delay="0.5"
    //三种选项 [normal:顺序显示,reverse:逆向显示,random:随机入场]
    android:animationOrder="normal"
    //为子元素指定入场动画
    android:animation="@anim/anim_item"/>

---------------------------------------------------------------
2)为子元素指定具体的入场动画
//res/anim/anim_item.xml
<?xml version="1.0" encoding="utf-8"?>
<set xmlns:android="http://schemas.android.com/apk/res/android"
    android:duration="300"
    android:interpolator="@android:anim/accelerate_interpolator"
    android:shareInterpolator="true">
    <alpha
        android:fromAlpha="0.0"
        android:toAlpha="1.0"/>
    <translate
        android:fromXDelta="500"
        android:toXDelta="0"/>
</set>
3)为ViewGroup指定android:layoutAnmation=”@anim/anim_layout”。这样ViewGroup的子元素就有入场动画了。
比如ListView:
<ListView
    android="@+id/list1"
    android:layout_width="match_parent"
    android:layout_height="match_parent"
    android:layoutAnimation="@anim/anim_layout"
    android:background="#fff4f7f9"
    android:cacheColorHint="#00000000"
    android:divider="#ddddbdb"
    android:dividerHeight="1.0px"
    android:listSelector="@android:color/transparent" />
java代码方式实现:
ListView listView = findViewById(R.id.list1);
Animation animation = AnimationUtils.loadAnimation(this, R.anim.anim_item);
LayoutAnimationController controller = new LayoutAnimationController(animation);
controller.setDelay(0.5);
controller.setOrder(LayoutAnmationController.ORDER_NORMAL);
listView.setLayoutAnimation(controller);
1.2.2 Activity的切换效果
Actvity有默认的切换效果,但是这个效果我们也可以自定义,主要用到了overridePendingTransition(int enterAnim, int exitAnim)这个方法,这个方法必须在startActivity(Intent)或者finish()之后调用才能生效。
它的参数含义如下:
enterAnim——Activity被打开时,所需的动画资源的id
exitAnim——Activity被暂停时,所需要的动画资源id
当启动一个Activity时,可以按照如下方式为其添加自定义的切换效果:
Intent intent = new Intent(this, TestActivity.class);
startActivity(intent);
overridePendingTransition(R.anim.enter_anim, R.anim.exit_anim);
当Activity退出时,也可以为其指定自己的切换效果:
@Override
public void finish(){
    super.finish();
    overridePendingTransition(R.anim.enter_anim, R.anim.exit_anim);
}
Fragment也可以添加切换动画,首先Fragment有两种,一种是android.app.Fragment包里面的Fragment类,另一种是support-v4包下的Fragment类。第一种FragmentManager里面的FragmentTransaction事务只支持XML中的animator标签,如objectAnimator属性动画,不支持传统的补间动画标签如’<’translate’>’,’<’alpha’>’等;后者不能使用属性动画,支持XML中的animation标签,也就是传统的补间动画。由于后者的Fragment这个类API11新引入的,我们可以通过FragmentTransation中的setCustomAnimations()方法来添加切换动画。这个动画也是View动画,之所以不能用属性动画,是因为属性动画也是API11新引入的。
v4包下的Fragment添加View动画用法:
FragmentManager fm = getSupportFragmentManager();
FragmentTransaction fragmentTransaction = fm.beginTransaction();
fragmentTransaction.setCustomAnimations(R.anim.in_from_right,R.anim.out_to_left);
1.3属性动画
1.3.1 使用属性动画
作用对象:可以对任意对象的属性进行动画,不仅仅是View,动画默认时间300ms,默认帧率10ms/帧。
效果:在一个时间间隔内完成对象从一个属性值到另一个属性值的改变。
常用的动画类:ValueAnimator、ObjectAnimator和AnimatorSet。其中ObjectAnimator继承自ValueAnimator,AnimatorSet是动画集合,可以定义一组动画。
使用举例:
代码实现:
1)ObjectAnimator
ObjectAnimator.ofFloat(myObject,"translationY",-myObject.getHeight()).start(); 效果是:动画在默认时间完成View向上平移它自己高度的距离。
2)ValueAnimator
ValueAnimator colorAnim = ObjectAnimator.ofInt(this, "backgroundColor",/*Red*/0xFFFF8080,/*Blue*/0xFF8080FF);
colorAnim.setDuration(3000);
colorAnim.setEvaluator(new ArgbEvaluator());
colorAnim.setRepeatCount(ValueAnimator.INFINITE);
colorAnim.setRepeatMode(ValueAnimator.REVERSE);
colorAnim.start();
效果:3000ms内背景色由红到蓝渐变,动画无限循环并且有反转的效果。
3)AnimatorSet
AnimatorSet set = new AnimatorSet();
set.playTogether(
    ObjectAnimator.ofFloat(myView,"rotationX",0,360),
    ObjectAnimator.ofFloat(myView,"rotationY",0,180),
    ObjectAnimator.ofFloat(myView,"rotation",0,-90),
    ObjectAnimator.ofFloat(myView,"translationX",0,90),
    ObjectAnimator.ofFloat(myView,"translationY",0,90),
    ObjectAnimator.ofFloat(myView,"scaleX",1,1.5f),
    ObjectAnimator.ofFloat(myView,"scaleY",1,0.5f),
    ObjectAnimator.ofFloat(myView,"alpha",1,0.25f,1)
);
set.setDuration(5 *1000).start();
效果:5000ms,内View发生了平移、缩放、透明度改变,旋转。
tip:我用华为手机看不到旋转的效果,如果不注释掉那三行旋转代码View就会消失,什么也看不到;注释之后除了旋转都正常。
XML实现:
首先,它需要定义在res/animator/目录下,语法如下:
 <set
     android:ordering=["together" | "sequentially"]>

    <objectAnimator
        android:propertyName="string"    //属性动画作用对象的属性的名称
        android:duration="int"     //一次动画的时间
        android:valueFrom="float | int | color"    //属性起始值
        adnroid:valueTo="float | int | color"      //属性结束值
        android:startOffset="int"                  //动画延迟播放的时间
        android:repeatCount="int"     //动画的重复次数,默认0,一次播放;-1,无限循环
        android:repeatMode=["restart" | "reverse"]    //动画的重复模式,restart->连续(顺序)重复,reverse->逆向重复
        android:valueType=["intType" | "floatType"] />    //所指属性的类型,是int还是float类型

    <animator
        android:duration="int"
        android:valueFrom="float | int | color"
        adnroid:valueTo="float | int | color"
        android:startOffset="int"
        android:repeatCount="int"
        android:repeatMode=["restart" | "reverse"]
        android:valueType=["intType" | "floatType"] />
    <set>
        ...
    </set>
</set>
上面代码,set标签对应AnimatorSet;objectAnmator标签对应ObjectAnmiaor;animator标签对应ValueAnimator。
set标签的android:ordering属性,有两个可选值”together”和”sequentially”。”together”表示动画集合的子动画同时播放,”sequentially”表示动画集合按照前后顺序播放,默认”together”。
定义好的XML需要设置到我们的View上去,如下(假如是:res/animator/test_animator.xml):
AnimatorSet set = AnimatorInflater.loadAnimator(myContext, R.anim.test.animator);
set.setTarget(mButton);//这里是给我们的View设置上了这个动画
set.satrt();
建议:采用代码写属性动画,XML写View动画。采用代码写属性动画,这是因为很多时候一个属性的起始值我们是无法提前确定的,如:一个Button从屏幕左边移动到屏幕右边,由于我们无法提前知道屏幕的宽度,故无法将具体属性值写在XML中。
1.3.2 理解插值器和估值器
属性动画中插值器和估值器是实现非匀速动画的重要手段。
TimeInterpolator(时间插值器),它的作用:根据时间的流逝来计算出当前属性改变的百分比。
系统预置的有:
LinearInterPolator(线性插值器:匀速动画)、
AccelearateDecelerateInterpolator(加速减速插值器:动画两头快中间慢)、
DecelearteInterpolator(减速插值器:动画越来越慢)
TypeEvaluator(估值器),它的作用:根据当前属性改变的百分比计算改变后的属性值。
举个例子:
它表示一个匀速动画,
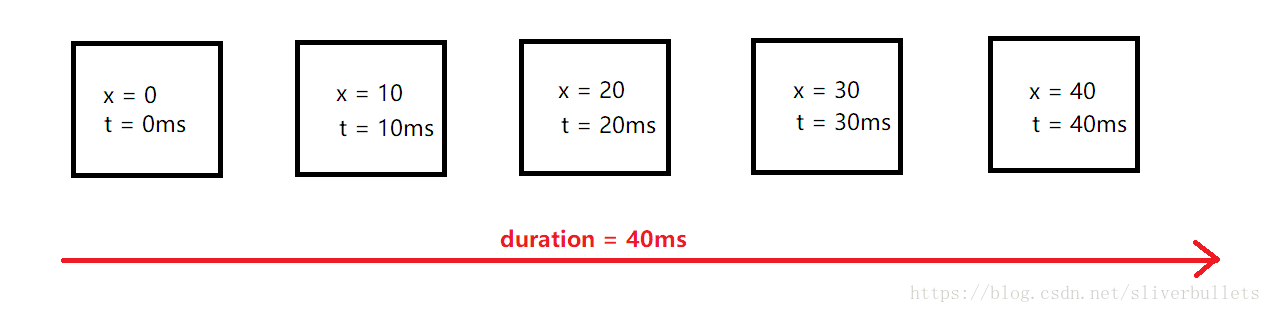
首先我们知道第一幅图不需要间隔时间,再就是默认10ms刷新一帧,故我们的View需要五帧。我们来考虑第三帧(x = 20,t=20ms),当时间t= 20ms的时候,时间的流逝百分比是0.5(20ms/40ms = 0.5),那么x应改变多少呢?这个就用到了插值器和估值器的算法了,由于是线性插值器,所以是均匀动画的。线性插值器的返回值和输入值一样,因此插值器返回的值是0.5,这意味着x的改变是0.5,这时就该用到估值器了,看下它的实现
@param fraction   The fraction from the starting to the ending values
public Integer evaluate(float fraction, Integer startValue, Integer endValue) {
        int startInt = startValue;
        return (int)(startInt + fraction * (endValue - startInt));
}
这个方法的三个参数分别表示:估值小数,开始值,结束值。
对于我们的例子,就是:0。5,0,40。经过上述方法计算后,返回20,所以我们的X应该改变20,也就是t=20ms,x=20的由来。
总结:
1.属性动画要求对象的该属性要有set方法和get方法(可选,若动画的时候没有传递初始值,则需要该方法,否者程序直接Crash)。
2.我们在自定义插值器和估值器的时候要实现其接口,并需要实现其对应的方法。插值器要实现Interpolator或TimeInterpolator; 估值器要实现TypeEvaluator方法。
1.3.3 属性动画的监听器
用于监听动画的播放过程,主要有如下两个接口:
Ⅰ. AnimatorListener
public static interface AnimatorListener{
    void onAnimationStart(Animator animation);
    void onAnimationEnd(Animator animation);
    void onAnimationCancle(Animator animation);
    void onAnimationRepeat(Animator animation);
}
可以看出,它可以监听动画的开始、结束、取消、重复播放。同时为了方便开放,系统还提供了AnimatorListenerAdapter这个类,它是AnimatorListener的适配器类,这样我们就可以有选择的实现上面四个方法了。
Ⅱ. AnimatorUpdateListener
public static interfaceAnimatorUpdateListener{
    void onAnimationUpdate(ValueAnimator animation);
}
AnimatorUpdateListener比较特殊,它会监听整个动画过程,动画是由许多帧组成的,每播放一帧,onAnimationUpdate就会被调用一次。
1.3.4 对任意属性做动画
举个例子:给Button加一个动画 ,让这个Button的宽度从当前宽度增加到500px。
先看View动画去实现这样一个效果,View动画只支持四种变换:平移、旋转、缩放、不透明度。用scaleX可以使Button在x方向被放大,看起来好像是宽度增加了。但实际上只是Button被放大了,而且由于只x方向放大,这个时候Button的背景以及上面的文字都会被拉伸,这和我们想要的结果不一样。
那我们用属性动画来实现:
private void performAniamate(){
    ObjectAnimator.ofInt(mButton,"width",500).setDuration(5000).start();
}

@Override
public void onClick(View v){
    if(v == mButoon){
    performAnimate();
    }
}
上述代码运行后发现没效果,如果随便传一个属性过去,轻则没动画效果,重则程序直接Crash。
属性动画的原理:属性动画根据外界传递的属性的初始值和最终值,以动画的效果多次去调用set方法,每次传给set的值随着时间的推移,越来越接近最终值。
两个必要条件:
1)属性动画要求作用的对象提供该属性的set方法,如果没有传递初识值还要提供get方法,因为系统要去取它的初识值,否则可能会Crash。
2)对属性所做的改变要能通过某种方式显示出来,比如UI的改变之类。
而上述对Button的width属性做动画没效果的原因是因为:Button内部虽然提供了getWidth和setWidth方法,但是这个setWidth方法不改变视图的大小,它是TextView新添加的方法,View是没有这个setWidth方法的,但是Button继承了TextView,所以Button也有了这个方法:
//这个方法在TextView里
@android.view.RemotableViewMethod
    public void setWidth(int pixels) {
        mMaxWidth = mMinWidth = pixels;
        mMaxWidthMode = mMinWidthMode = PIXELS;

        requestLayout();
        invalidate();
    }
发现这个方法在设置自己的最大、最小宽度值,这和TextView的宽度不是一个东西。具体来说,TextView在XML中有一个属性:android:layout_width,这个才是它的宽度;还有一个android:width属性,这个对应上述代码的setWIdth方法。总之,TextView和Button的setWidth、getWidth干的不是同一件事情,通过setWidth无法改变空间的宽度,所以对width属性做动画无效(未满足第二个条件)。
对于上述问题,官方文档有3种解法:
1.如果你有权限,给你的对象加上get和set方法。
2.用一个类包装原始对象,间接为它提供get和set方法。
3.采用VauleAnimator,监听动画过程,自己实现属性的改变。
具体来介绍:
1.如果你有权限,给你的对象加上get和set方法。
这个方法很直接,但权限却很难搞,大多数我们是没有权限的。就比如Button,我们无法给Button加上一个合适的set方法,因为这是Android SDK内部实现的。
2.用一个类包装原始对象,间接为它提供get和set方法。
这是一个很有用的方法,还很方便。
如下:
private void performAnimate(){
    ViewWrapper wrapper = new ViewWrapper(mButton);
    ObjectAnimator.ofInt(wrapper, "width", 500).setDuration(5000).start();
}

@Ovrride
public void onClick(View v){
    if(v == mButton){
        performAnimate();
    }
}

private static class ViewWrapper{
    private View mTarget;

    public ViewWrapper(View target){
        mTarget = tagget;
    }

    public int getWidth(){
        return mTarget.getLayoutParams.width;
    }

    public void setWidth(ing width){
        mTarget.getLayoutParams().width = width;
        mTarget.requsetLayout();
    }
}
上面代码中,用ViewWrapper类封装了我们原来的Button,然后我们通过setWidth间接的修改了Button的width,最后我们对ViewWrapper的width属性做动画就好。
3.采用VauleAnimator,监听动画过程,自己实现属性的改变。
VauleAnimator本身不做用于任何对象,直接使用它也没有任何效果。它可以对一个值做动画,然后我们可以监听其动画过程,这动画过程中修改我们的属性值,这样也就相当于我们的对象做了动画。
private void performAnimate(final View target, final int start, final int end){
    ValueAnimator valueAnimator = ValueAnimator.ofInt(1,100);
    valueAnimator.addUpdateListener(new AnimatiorUpdateListener(){
        private IntEvaluator mEvalutor = new IntEvaluator();

        @Ovrride
        public void onAnimationUpdate(ValueAnimatior animator){
            int currentValue = (Integer)animator.getAnimatedValue();
            Log.d(TAG,"current value: "+ currentValue);
            float fraction = animator.getAnimatedFraction();
            target.getLayoutParams().width = mEvaluator.evaluate(fraction, start, end);
            target.requestLayout();
        }
    });
    valueAnimator.setDuration(5000).start();
}

@Override
public void onClick(View v){
    if(v == mButton){
        performAnimate(mButton,mButton.getWidth(), 500);
    }
}
这个方法也可以最终实现我们想要的结果。这里我们用ValueAnimator设置了一个5000ms内1~100的动画,由于动画的每一帧(默认10ms每帧)会回调onAnimationUpdate方法,在这个方法里我们可以根据当前整数值计算出Button的宽度(通过估值器),然后设置一下,再requestLayout()刷新一下布局。
1.3.5 属性动画的工作原理
首先,我们要找一个入口:
ObjectAnimator.ofInt(mButton,”width”,500).setDuration(5000).start();
先看ObjectAnimator的start方法:
  @Override
    public void start() {
        AnimationHandler.getInstance().autoCancelBasedOn(this);
        if (DBG) {
            Log.d(LOG_TAG, "Anim target, duration: " + getTarget() + ", " + getDuration());
            for (int i = 0; i < mValues.length; ++i) {
                PropertyValuesHolder pvh = mValues[i];
                Log.d(LOG_TAG, "   Values[" + i + "]: " +
                    pvh.getPropertyName() + ", " + pvh.mKeyframes.getValue(0) + ", " +
                    pvh.mKeyframes.getValue(1));
            }
        }
        super.start();
    }
这个方法中,先获得的一个AnimationHandler的实例(单例模式),然后是一段Log,最后调用父类的start()方法。前面提到过,ObjectAnimator继承自ValueAnimator。
如下是ValueAnimator的start方法:
@Override
    public void start() {
        start(false);
    }
-----------------------------------------------------
private void start(boolean playBackwards) {
        if (Looper.myLooper() == null) {
            throw new AndroidRuntimeException("Animators may only be run on Looper threads");
        }
        mReversing = playBackwards;
        mSelfPulse = !mSuppressSelfPulseRequested;
        // Special case: reversing from seek-to-0 should act as if not seeked at all.
        if (playBackwards && mSeekFraction != -1 && mSeekFraction != 0) {
            if (mRepeatCount == INFINITE) {
                // Calculate the fraction of the current iteration.
                float fraction = (float) (mSeekFraction - Math.floor(mSeekFraction));
                mSeekFraction = 1 - fraction;
            } else {
                mSeekFraction = 1 + mRepeatCount - mSeekFraction;
            }
        }
        mStarted = true;
        mPaused = false;
        mRunning = false;
        mAnimationEndRequested = false;
        // Resets mLastFrameTime when start() is called, so that if the animation was running,
        // calling start() would put the animation in the
        // started-but-not-yet-reached-the-first-frame phase.
        mLastFrameTime = -1;
        mFirstFrameTime = -1;
        mStartTime = -1;
        addAnimationCallback(0);

        if (mStartDelay == 0 || mSeekFraction >= 0 || mReversing) {
            // If there's no start delay, init the animation and notify start listeners right away
            // to be consistent with the previous behavior. Otherwise, postpone this until the first
            // frame after the start delay.
            startAnimation();
            if (mSeekFraction == -1) {
                // No seek, start at play time 0. Note that the reason we are not using fraction 0
                // is because for animations with 0 duration, we want to be consistent with pre-N
                // behavior: skip to the final value immediately.
                setCurrentPlayTime(0);
            } else {
                setCurrentFraction(mSeekFraction);
            }
        }
    }
上面代码中,addAnimationCallback(0)这个方法:
//现在在ValueAnimator.java
 private void addAnimationCallback(long delay) {
        if (!mSelfPulse) {
            return;
        }
        getAnimationHandler().addAnimationFrameCallback(this, delay);
    }
---------------------------------------------------------------
  public void addAnimationFrameCallback(final AnimationFrameCallback callback, long delay) {
        if (mAnimationCallbacks.size() == 0) {
            getProvider().postFrameCallback(mFrameCallback);
        }
        if (!mAnimationCallbacks.contains(callback)) {
            mAnimationCallbacks.add(callback);
        }

        if (delay > 0) {
            mDelayedCallbackStartTime.put(callback, (SystemClock.uptimeMillis() + delay));
        }
    }
注意这一句getProvider().postFrameCallback(mFrameCallback)中的mFrameCallback:
 private final Choreographer.FrameCallback mFrameCallback = new Choreographer.FrameCallback() {
        @Override
        public void doFrame(long frameTimeNanos) {
            doAnimationFrame(getProvider().getFrameTime());
            if (mAnimationCallbacks.size() > 0) {
                getProvider().postFrameCallback(this);
            }
        }
    };
-------------------------------------------------------
//再跟踪doAnimationFrame(getProvider().getFrameTime())这个方法
//发现我们进到了AnimationHandler.java这个里面
private void doAnimationFrame(long frameTime) {
        long currentTime = SystemClock.uptimeMillis();
        final int size = mAnimationCallbacks.size();
        for (int i = 0; i < size; i++) {
            final AnimationFrameCallback callback = mAnimationCallbacks.get(i);
            if (callback == null) {
                continue;
            }
            if (isCallbackDue(callback, currentTime)) {
                callback.doAnimationFrame(frameTime);
                if (mCommitCallbacks.contains(callback)) {
                    getProvider().postCommitCallback(new Runnable() {
                        @Override
                        public void run() {
                            commitAnimationFrame(callback, getProvider().getFrameTime());
                        }
                    });
                }
            }
        }
        cleanUpList();
    }
我们发现,很快就调到了JNI层(跟踪的有点乱),不过JNI曾最终还是要回来的,它的run方法会被调用,这个Runnable涉及和底层的交互。我们就看一下过程,重点是ValueAnimator中的doAnimationFrame方法。
如下是ValueAnimator的doAnimationFrame():
public final boolean doAnimationFrame(long frameTime) {
        if (mStartTime < 0) {
            // First frame. If there is start delay, start delay count down will happen *after* this
            // frame.
            mStartTime = mReversing ? frameTime : frameTime + (long) (mStartDelay * sDurationScale);
        }

        // Handle pause/resume
        if (mPaused) {
            mPauseTime = frameTime;
            removeAnimationCallback();
            return false;
        } else if (mResumed) {
            mResumed = false;
            if (mPauseTime > 0) {
                // Offset by the duration that the animation was paused
                mStartTime += (frameTime - mPauseTime);
            }
        }

        if (!mRunning) {
            // If not running, that means the animation is in the start delay phase of a forward
            // running animation. In the case of reversing, we want to run start delay in the end.
            if (mStartTime > frameTime && mSeekFraction == -1) {
                // This is when no seek fraction is set during start delay. If developers change the
                // seek fraction during the delay, animation will start from the seeked position
                // right away.
                return false;
            } else {
                // If mRunning is not set by now, that means non-zero start delay,
                // no seeking, not reversing. At this point, start delay has passed.
                mRunning = true;
                startAnimation();
            }
        }

        if (mLastFrameTime < 0) {
            if (mSeekFraction >= 0) {
                long seekTime = (long) (getScaledDuration() * mSeekFraction);
                mStartTime = frameTime - seekTime;
                mSeekFraction = -1;
            }
            mStartTimeCommitted = false; // allow start time to be compensated for jank
        }
        mLastFrameTime = frameTime;
        // The frame time might be before the start time during the first frame of
        // an animation.  The "current time" must always be on or after the start
        // time to avoid animating frames at negative time intervals.  In practice, this
        // is very rare and only happens when seeking backwards.
        final long currentTime = Math.max(frameTime, mStartTime);
        boolean finished = animateBasedOnTime(currentTime);

        if (finished) {
            endAnimation();
        }
        return finished;
    }
上面代码中,有这样一句:boolean finished = animateBasedOnTime(currentTime),在这个方法的内部调用了animateValue方法.
animateValue方法代码如下:
 @CallSuper
    void animateValue(float fraction) {
        fraction = mInterpolator.getInterpolation(fraction);
        mCurrentFraction = fraction;
        int numValues = mValues.length;
        for (int i = 0; i < numValues; ++i) {
            mValues[i].calculateValue(fraction);
        }
        if (mUpdateListeners != null) {
            int numListeners = mUpdateListeners.size();
            for (int i = 0; i < numListeners; ++i) {
                mUpdateListeners.get(i).onAnimationUpdate(this);
            }
        }
    }
上述代码中的calculateValue方法就是计算每帧动画所对应的属性的值,下面着重看一下在哪里用到了set和get方法,这个才是我们要关心的。
在初始化的时候,如果属性的初始值没有提供,则get方法就会被调用。
下面是PropertyValuesHolder的setupValue方法:
 private void setupValue(Object target, Keyframe kf) {
        if (mProperty != null) {
            Object value = convertBack(mProperty.get(target));
            kf.setValue(value);
        } else {
            try {
                if (mGetter == null) {
                    Class targetClass = target.getClass();
                    setupGetter(targetClass);
                    if (mGetter == null) {
                        // Already logged the error - just return to avoid NPE
                        return;
                    }
                }
                Object value = convertBack(mGetter.invoke(target));
                kf.setValue(value);
            } catch (InvocationTargetException e) {
                Log.e("PropertyValuesHolder", e.toString());
            } catch (IllegalAccessException e) {
                Log.e("PropertyValuesHolder", e.toString());
            }
        }
    }
可以发现get方法是通过反射来调用的。
当动画的下一帧到来的时候,PropertyValuesHolder中的setAnimaterdValue方法会将新的属性值设置给对象,调用其set方法。
 void setAnimatedValue(Object target) {
        if (mProperty != null) {
            mProperty.set(target, getAnimatedValue());
        }
        if (mSetter != null) {
            try {
                mTmpValueArray[0] = getAnimatedValue();
                mSetter.invoke(target, mTmpValueArray);
            } catch (InvocationTargetException e) {
                Log.e("PropertyValuesHolder", e.toString());
            } catch (IllegalAccessException e) {
                Log.e("PropertyValuesHolder", e.toString());
            }
        }
    }
1.4 使用动画的注意事项
1.OOM问题
主要出现在帧动画中,当图片数量较多且图片较大时就极易出现OOM,这个在实际开发中要尤其注意,尽量避免使用帧动画。
2.内存泄漏
在属性动画中有一类无限循环的动画,在Activity退出时需要及时停止,否则将会导致Activity无法释放从而造成内存泄漏,通过验证后发现View动画不存在这个问题。
3.兼容性问题
动画在3.0以下的系统上有兼容性问题,在某特殊场景可能无法正常工作,因此做好适配工作。
4.View动画问题
View动画但是对View的影像做动画,并不是真正的改变View的状态,因此有时候会出现动画完成后View无法隐藏的现象,即setVisibility(View.GONE)失效了,这个时候只要调用view.clearAnimation()清除动画即可解决此问题。
5.不要使用px
要尽量使用dp,因为px会导致在不同设备上有不同的效果。
6.动画元素的交互
将Veiw移动后,在3.0以前的系统上,不管是View动画还是属性动画,新位置均无法触发单击事件,同时,老位置可以触发单击事件。从3.0开始,属性动画的单击事件出发位置为移动后的位置,但View动画仍然在原始位置。
7.硬件加速
使用动画的过程中,建议开启硬件加速,这样会提高动画的流畅性。