一 Beautiful Soup
Beautiful Soup 是一个可以从HTML或XML文件中提取数据的Python库。它能够通过你喜欢的转换器实现惯用的文档导航、查找、修改文档的方式
二 Beautiful Soup的使用
- Beautiful Soup的安装
pip install bs4
- 如何使用
将一段文档传入BeautifulSoup 的构造方法,就能得到一个文档的对象, 可以传入一段字符串或一个文件句柄
hello.html原文件:
<!DOCTYPE html>
<html lang="en">
<head>
    <meta charset="UTF-8">
    <title>Title</title>
</head>
<body>
<p style="color: #aaffaa" class="class1" id="one">第一章</p>
<p id="one1">第二章</p>
<div>hello</div>
</body>
</html>
快速使用:
from bs4 import BeautifulSoup
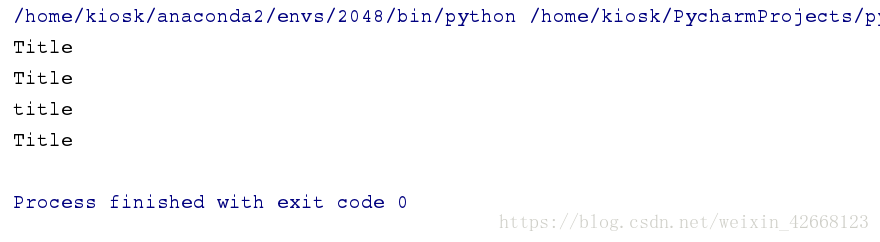
soup = BeautifulSoup(open("hello.html"),'html5lib')
print(soup)
soup1 = BeautifulSoup('<b class="boldest">Extremely bold</b>','html5lib')
print(soup1)
执行结果:
这里需要传入两个参数,第一个是文件名,第二个是解析器
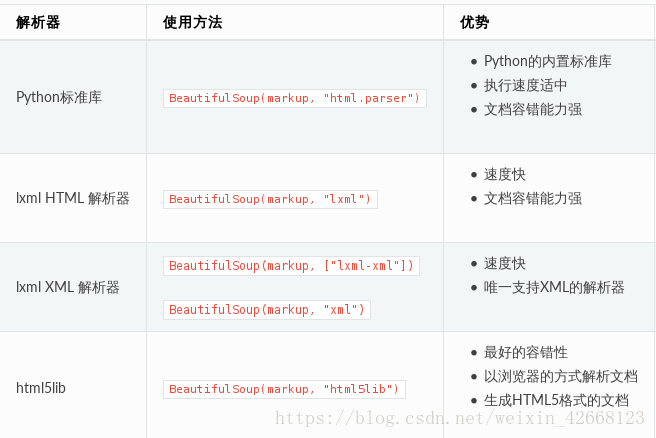
其中主要的解析器有下面几种,优势为:
注意:Python标准库是python自带的,不用安装,剩下的都需要安装,还有就是第二个和第三个都是需要安装C语言库的

- 对象的种类
Beautiful Soup将复杂HTML文档转换成一个复杂的树形结构,每个节点都是Python对象,所有对象可以归纳为4种: Tag 、NavigableString 、 BeautifulSoup 、Comment
Tag: 标签对象
NavigableString : 字符内容操作对象
BeautifulSoup: 文档对象
Comment:是一个特殊类型的 NavigableString 对象 - 获取标签
from bs4 import BeautifulSoup
soup = BeautifulSoup(open('hello.html'), 'html.parser')
# 获取标签, 默认获取找到的第一个符合的内容
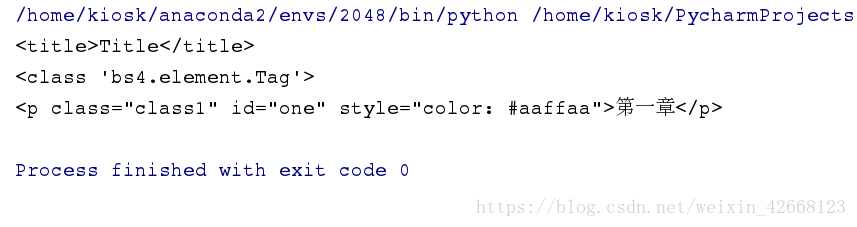
print(soup.title)
print(type(soup.title))
print(soup.p)
执行结果:
可以看到返回的标题属性为 Tag
- 获取标签的属性
print(soup.p.attrs)
# 获取标签指定属性的内容
print(soup.p['id'])
print(soup.p['class'])
print(soup.p['style'])
执行结果:
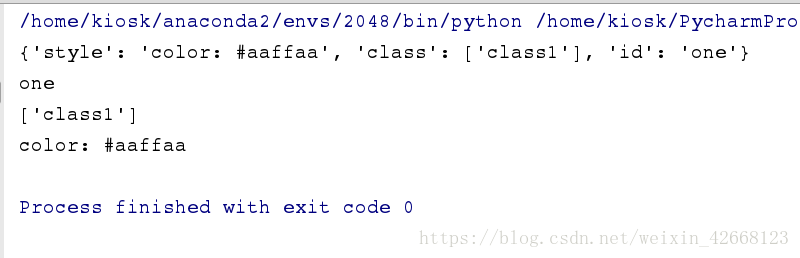
Tag 对象中很重要的属性就是Attributes,可以直接通过 ’ .attrs ’ 获取
一个tag可能有很多个属性,有一个 “class” 的属性,值为 “class1” 。tag的属性的操作方法与字典相同
tag的属性可以被添加,删除或修改,至于方法么,自然跟字典相同了
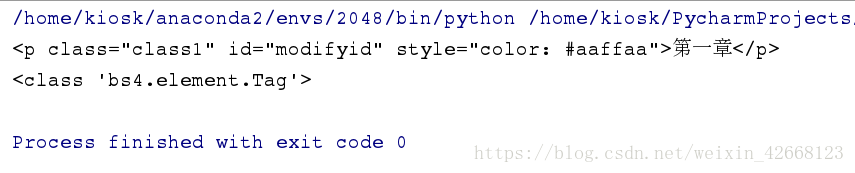
# 对属性进行修改
soup.p['id'] = 'modifyid'
print(soup.p)
print(type(soup.p))
执行结果:
- 获取标签的文本内容
print(soup.title.text)
print(soup.title.string)
print(soup.title.name)
print(soup.head.title.string)
执行结果:
这里也可以通过 dir 方法来查看帮助信息
['HTML_FORMATTERS', 'XML_FORMATTERS', '__bool__', '__call__', '__class__', '__contains__', '__copy__', '__delattr__', '__delitem__', '__dict__', '__dir__', '__doc__', '__eq__', '__format__', '__ge__', '__getattr__', '__getattribute__', '__getitem__', '__gt__', '__hash__', '__init__', '__init_subclass__', '__iter__', '__le__', '__len__', '__lt__', '__module__', '__ne__', '__new__', '__reduce__', '__reduce_ex__', '__repr__', '__setattr__', '__setitem__', '__sizeof__', '__str__', '__subclasshook__', '__unicode__', '__weakref__', '_all_strings', '_attr_value_as_string', '_attribute_checker', '_find_all', '_find_one', '_formatter_for_name', '_is_xml', '_lastRecursiveChild', '_last_descendant', '_select_debug', '_selector_combinators', '_should_pretty_print', '_tag_name_matches_and', 'append', 'attribselect_re', 'attrs', 'can_be_empty_element', 'childGenerator', 'children', 'clear', 'contents', 'decode', 'decode_contents', 'decompose', 'descendants', 'encode', 'encode_contents', 'extract', 'fetchNextSiblings', 'fetchParents', 'fetchPrevious', 'fetchPreviousSiblings', 'find', 'findAll', 'findAllNext', 'findAllPrevious', 'findChild', 'findChildren', 'findNext', 'findNextSibling', 'findNextSiblings', 'findParent', 'findParents', 'findPrevious', 'findPreviousSibling', 'findPreviousSiblings', 'find_all', 'find_all_next', 'find_all_previous', 'find_next', 'find_next_sibling', 'find_next_siblings', 'find_parent', 'find_parents', 'find_previous', 'find_previous_sibling', 'find_previous_siblings', 'format_string', 'get', 'getText', 'get_attribute_list', 'get_text', 'has_attr', 'has_key', 'hidden', 'index', 'insert', 'insert_after', 'insert_before', 'isSelfClosing', 'is_empty_element', 'known_xml', 'name', 'namespace', 'next', 'nextGenerator', 'nextSibling', 'nextSiblingGenerator', 'next_element', 'next_elements', 'next_sibling', 'next_siblings', 'parent', 'parentGenerator', 'parents', 'parserClass', 'parser_class', 'prefix', 'preserve_whitespace_tags', 'prettify', 'previous', 'previousGenerator', 'previousSibling', 'previousSiblingGenerator', 'previous_element', 'previous_elements', 'previous_sibling', 'previous_siblings', 'quoted_colon', 'recursiveChildGenerator', 'renderContents', 'replaceWith', 'replaceWithChildren', 'replace_with', 'replace_with_children', 'select', 'select_one', 'setup', 'string', 'strings', 'stripped_strings', 'tag_name_re', 'text', 'unwrap', 'wrap']
- 操纵子节点
一个Tag可能包含多个字符串或其它的Tag,这些都是这个Tag的子节点。Beautiful Soup提供了许多操作和遍历子节点的属性
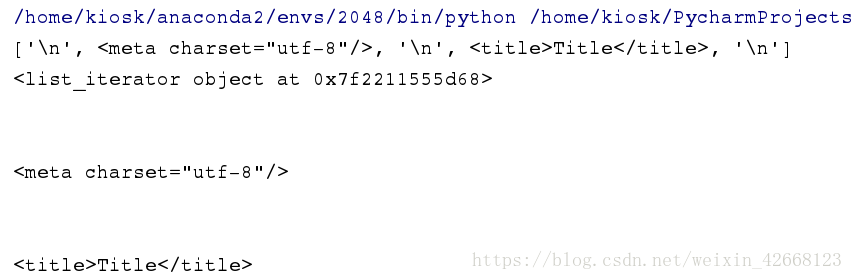
print(soup.head.contents)
print(soup.head.children)
for el in soup.head.children:
    print(el)
执行结果:
注意:
tag的 .contents 属性可以将tag的子节点以列表的方式输出
而tag的 .children 属性是将其以生成器的方式输出,这时就可以对tag的子节点进行循环遍历
- 面向对象的匹配
1).查找指定的标签内容
res=soup.p
print(res)
执行结果:
这样查找的结果就是,只会查找到第一个符合条件的,并不能找到所有符合条件的
这是就要用到 find_all 方法了

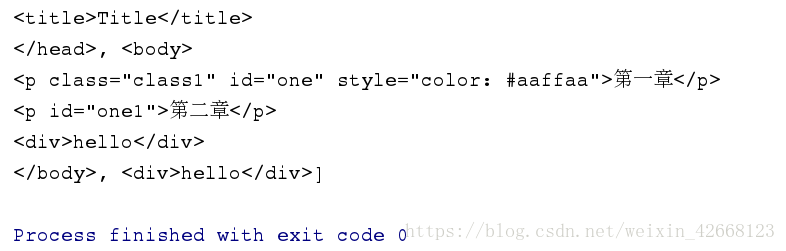
res1 = soup.find_all('p')
print(res1)
执行结果:
这样就可以找到所有符合条件的
2). 与正则表达式的结合使用
首先对于正则表达式进行编译,这样可以提高查找速率

pattern = r'd.+'
pattern = re.compile(pattern)
print(re.findall(pattern, 'this is a dog,only a dog'))
执行结果:
通过 re 的函数 compile 可以将规则进行编译,这样来提高效率
然后将正则与soup相结合

res1 = soup.find_all(re.compile(r'd+'))
print(res1)
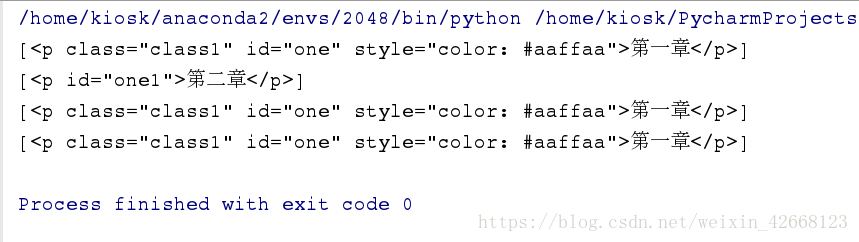
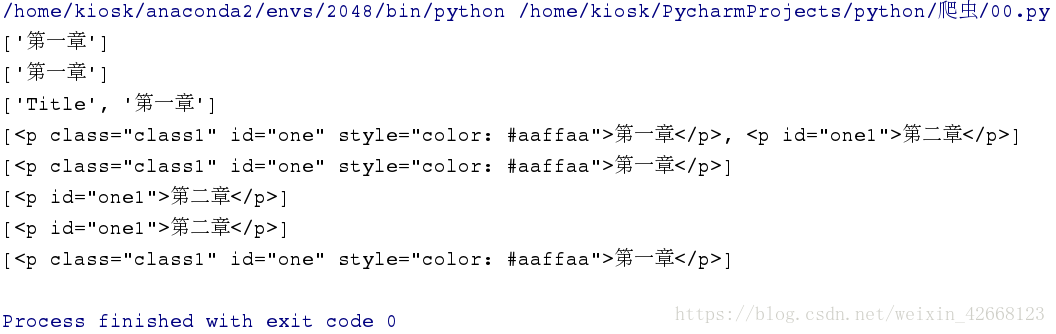
3). 详细查找标签
print(soup.find_all('p', id='one'))
print(soup.find_all('p', id=re.compile(r'one\d{1}')))
print(soup.find_all('p', class_="class1"))
print(soup.find_all('p', class_=re.compile(r'class\d{1}')))
执行结果:
查找多个标签
print(soup.find_all(['p', 'div']))
print(soup.find_all([re.compile('^d'), re.compile('p')]))
可以同时寻找满足多个条件的内容

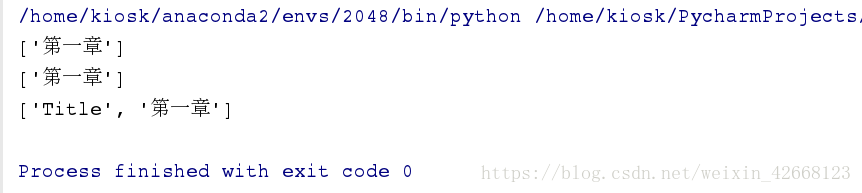
4). 内容的匹配
print(soup.find_all(text='第一章'))
print(soup.find_all(text=re.compile('第一章')))
print(soup.find_all(text=[re.compile('第一章'), 'Title']))
执行结果:
5). CSS匹配
写CSS样式的时候,是可以通过选择器对html选择性进行编辑的
在CSS中常见选择器: 标签选择器(div), 类选择器(.class1), id选择器(#idname), 属性选择器(p[type=“text”])
# 标签选择器(div)
res1 = soup.select("p")
print(res1)
# 类选择器(.class1)
res2 = soup.select(".class1")
print(res2)
# id选择器(#idname)
res3 = soup.select("#one1")
print(res3)
#  属性选择器(p[type="text"]
print(soup.select("p[id='one1']"))
print(soup.select("p['class']"))
执行结果:
三 小总结
到现在为止,所知道的关于html有:
获取网页内容的----- urllib, requests
分析网页常用的模块------ re, bs4(beautifulsoup4)
四 应用
浏览CSDN时,发现了一篇好的文章,想将其导出来,但是显然只想导出的是正文的内容,那些多于的内容是不需要的
比如,这篇博文:(https://blog.csdn.net/sunhf_csdn/article/details/83057119)
我们要的肯定是正文内容,像左边的推荐内容显然是不需要的
首先不管我们需要什么,都需要先爬取整个的html

from bs4 import BeautifulSoup
import requests

url='https://blog.csdn.net/sunhf_csdn/article/details/83057119'
def get_concent(url):
    response=requests.get(url)
    soup=BeautifulSoup(response.text,'html.parser')
    print(soup)
get_concent(url)
执行结果:
然后我们再通过 soup 对其进行分析
我们需要的(行业“+AI”,华为认真了!),这个标题显然是需要的,还有就是正文的内容
注意:在获取内容的时候,头部信息也是需要获取的,head信息是对内容的说明
from bs4 import BeautifulSoup
import requests

url='https://blog.csdn.net/sunhf_csdn/article/details/83057119'
def get_concent(url):
    response=requests.get(url)
    soup=BeautifulSoup(response.text,'html.parser')
    # 获取head标签的内容
    head = soup.head
    # 获取博客标题
    title = soup.find_all(class_="title-article")[0].get_text()
    # 获取博客内容
    content = soup.find_all(class_="article_content")[0]
    # 写入本地文件
    with open('westos.html', 'w') as f:
        f.write(str(head))
        f.write('<h1>%s</h1>\n\n' % (title))
        f.write(str(content))
get_concent(url)
执行结果:
