深入浅出Spring task定时任务
在工作中有用到spring task作为定时任务的处理,spring通过接口TaskExecutor和TaskScheduler这两个接口的方式为异步定时任务提供了一种抽象。这就意味着spring容许你使用其他的定时任务框架,当然spring自身也提供了一种定时任务的实现:spring task。spring task支持线程池,可以高效处理许多不同的定时任务。同时,spring还支持使用Java自带的Timer定时器和Quartz定时框架。限于篇幅,这里将只介绍spring task的使用。
其实,官方文档已经介绍地足够详细,只不过都是英文版,所以为了更好地理解并使用spring task,首先会对spring task的实现原理做一个简单的介绍,然后通过实际代码演示spring task是如何使用的。这里会涉及到一个很重要的知识点:cron表达式。
TaskExecutor和TaskScheduler
TaskExecutor是spring task的第一个抽象,它很自然让人联想到jdk中concurrent包下的Executor,实际上TaskExecutor就是为区别于Executor才引入的,而引入TaskExecutor的目的就是为定时任务的执行提供线程池的支持,那么,问题来了,为什么spring不直接使用jdk自带的Executor呢?TaskExecutor源码如下?
public interface TaskExecutor extends Executor {
    void execute(Runnable var1);
}
- 1
- 2
- 3
那么,答案很显然,TaskExecutor提供的线程池支持也是基于jdk自带的Executor的。用法于Executor没有什么不同。
TaskScheduler是spring task的第二个抽象,那么从字面的意义看,TaskScheduler就是为了提供定时任务的支持咯。TaskScheduler需要传入一个Runnable的任务做为参数,并指定需要周期执行的时间或者触发器,这样Runnable任务就可以周期性执行了。传入时间很好理解,有意思的是传入一个触发器(Trigger)的情况,因为这里需要使用cron表达式去触发一个定时任务,所以有必要先了解下cron表达式的使用。
在spring 4.x中已经不支持7个参数的cronin表达式了,要求必须是6个参数(具体哪个参数后面会说)。cron表达式的格式如下:
{秒} {分} {时} {日期(具体哪天)} {月} {星期}
- 1
- 秒:必填项,允许的值范围是0-59,支持的特殊符号包括
,-*/,,表示特定的某一秒才会触发任务,-表示一段时间内会触发任务,*表示每一秒都会触发,/表示从哪一个时刻开始,每隔多长时间触发一次任务。 - 分:必填项,允许的值范围是0-59,支持的特殊符号和秒一样,含义类推
- 时:必填项,允许的值范围是0-23,支持的特殊符号和秒一样,含义类推
- 日期:必填项,允许的值范围是1-31,支持的特殊符号相比秒多了
?,表示与{星期}互斥,即意味着若明确指定{星期}触发,则表示{日期}无意义,以免引起冲突和混乱。 - 月:必填项,允许的值范围是1-12(JAN-DEC),支持的特殊符号与秒一样,含义类推
- 星期:必填项,允许值范围是1~7 (SUN-SAT),1代表星期天(一星期的第一天),以此类推,7代表星期六,支持的符号相比秒多了
?,表达的含义是与{日期}互斥,即意味着若明确指定{日期}触发,则表示{星期}无意义。
比如下面这个cron表达式:
// 表达的含义是:每半分钟触发一次任务
30 * * * * ?
- 1
- 2
spring提供了一个CronTrigger,通过传入一个Runnable任务和CronTrigger,就可以使用cron表达式去指定定时任务了,是不是非常方面。实际上,在工程实践上,cron表达式也是使用很多的。实际上,是执行了下面的代码:
scheduler.schedule(task, new CronTrigger("30 * * * * ?"));
- 1
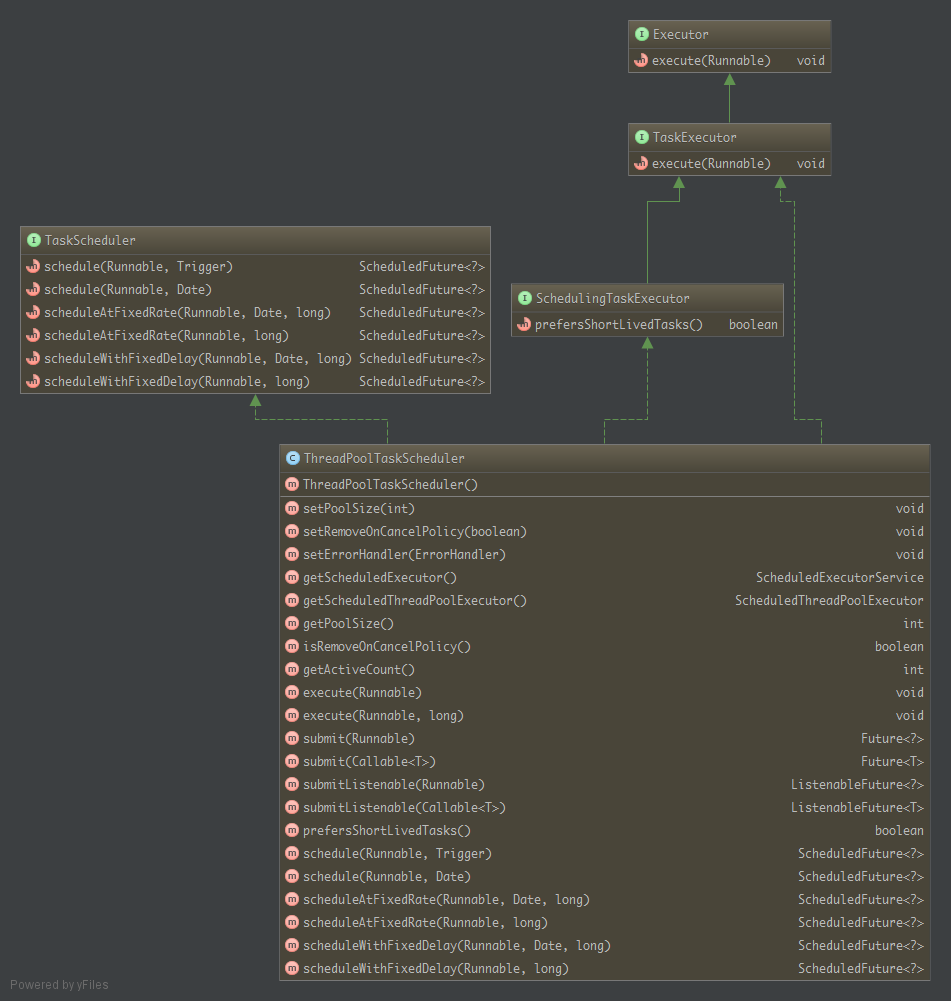
TaskScheduler抽象的好处是让需要执行定时任务的代码不需要指定特定的定时框架(比如Timer和Quartz)。TaskScheduler的更简单的实现是ThreadPoolTaskScheduler,它实际上代理一个jdk中的SchedulingTaskExecutor,并且也实现了TaskExecutor接口,所以需要经常执行定时任务的场景可以使用这个实现(Spring推荐)。我们再来看一下TaskExecutor和TaskScheduler的类继承关系:
通常而言,使用spring task实现定时任务有两种方式:注解和xml配置文件。这里使用xml配置文件的方式加以说明。
实战
创建Maven工程,pom.xml:
<?xml version="1.0" encoding="UTF-8"?>
<project xmlns="http://maven.apache.org/POM/4.0.0"
         xmlns:xsi="http://www.w3.org/2001/XMLSchema-instance"
         xsi:schemaLocation="http://maven.apache.org/POM/4.0.0 http://maven.apache.org/xsd/maven-4.0.0.xsd">
    <modelVersion>4.0.0</modelVersion>

    <groupId>com.rhwayfun</groupId>
    <artifactId>sring-task-demo</artifactId>
    <version>1.0-SNAPSHOT</version>

    <dependencies>
        <dependency>
            <groupId>org.springframework</groupId>
            <artifactId>spring-context</artifactId>
            <version>4.2.4.RELEASE</version>
        </dependency>
    </dependencies>

    <build>
        <plugins>
            <plugin>
                <groupId>org.apache.maven.plugins</groupId>
                <artifactId>maven-compiler-plugin</artifactId>
                <version>3.5.1</version>
                <configuration>
                    <source>1.8</source>
                    <target>1.8</target>
                </configuration>
            </plugin>
        </plugins>
    </build>
</project>
- 1
- 2
- 3
- 4
- 5
- 6
- 7
- 8
- 9
- 10
- 11
- 12
- 13
- 14
- 15
- 16
- 17
- 18
- 19
- 20
- 21
- 22
- 23
- 24
- 25
- 26
- 27
- 28
- 29
- 30
- 31
- 32
开发需要执行定时任务的方法:
package com.rhwayfun.task;

import org.springframework.stereotype.Component;

import java.time.LocalDateTime;

/**
 * @author ZhongCB
 * @date 2016年09月10日 14:30
 * @description
 */
@Component
public class App {

    public void execute1(){
        System.out.printf("Task: %s, Current time: %s\n", 1, LocalDateTime.now());
    }

    public void execute2(){
        System.out.printf("Task: %s, Current time: %s\n", 2, LocalDateTime.now());
    }

    public void execute3(){
        System.out.printf("Task: %s, Current time: %s\n", 3, LocalDateTime.now());
    }

    public void execute4(){
        System.out.printf("Task: %s, Current time: %s\n", 4, LocalDateTime.now());
    }

    public void execute5(){
        System.out.printf("Task: %s, Current time: %s\n", 5, LocalDateTime.now());
    }

    public void execute6(){
        System.out.printf("Task: %s, Current time: %s\n", 6, LocalDateTime.now());
    }

    public void execute7(){
        System.out.printf("Task: %s, Current time: %s\n", 7, LocalDateTime.now());
    }

    public void execute8(){
        System.out.printf("Task: %s, Current time: %s\n", 8, LocalDateTime.now());
    }

    public void execute9(){
        System.out.printf("Task: %s, Current time: %s\n", 9, LocalDateTime.now());
    }

    public void execute10(){
        System.out.printf("Task: %s, Current time: %s\n", 10, LocalDateTime.now());
    }

    public void execute11(){
        System.out.printf("Task: %s, Current time: %s\n", 11, LocalDateTime.now());
    }

}
- 1
- 2
- 3
- 4
- 5
- 6
- 7
- 8
- 9
- 10
- 11
- 12
- 13
- 14
- 15
- 16
- 17
- 18
- 19
- 20
- 21
- 22
- 23
- 24
- 25
- 26
- 27
- 28
- 29
- 30
- 31
- 32
- 33
- 34
- 35
- 36
- 37
- 38
- 39
- 40
- 41
- 42
- 43
- 44
- 45
- 46
- 47
- 48
- 49
- 50
- 51
- 52
- 53
- 54
- 55
- 56
- 57
- 58
- 59
- 60
spring配置文件如下:
<?xml version="1.0" encoding="UTF-8"?>
<beans xmlns="http://www.springframework.org/schema/beans"
       xmlns:xsi="http://www.w3.org/2001/XMLSchema-instance"
       xmlns:context="http://www.springframework.org/schema/context"
       xmlns:task="http://www.springframework.org/schema/task"
       xsi:schemaLocation="
            http://www.springframework.org/schema/beans http://www.springframework.org/schema/beans/spring-beans-4.1.xsd
            http://www.springframework.org/schema/context http://www.springframework.org/schema/context/spring-context-4.1.xsd
            http://www.springframework.org/schema/task http://www.springframework.org/schema/task/spring-task-4.1.xsd">

    <!-- 配置注解扫描 -->
    <context:component-scan base-package="com.rhwayfun.task"/>

    <task:scheduler id="taskScheduler" pool-size="100" />

    <task:scheduled-tasks scheduler="taskScheduler">
        <!-- 每半分钟触发任务 -->
        <task:scheduled ref="app" method="execute1" cron="30 * * * * ?"/>
        <!-- 每小时的10分30秒触发任务 -->
        <task:scheduled ref="app" method="execute2" cron="30 10 * * * ?"/>
        <!-- 每天1点10分30秒触发任务 -->
        <task:scheduled ref="app" method="execute3" cron="30 10 1 * * ?"/>
        <!-- 每月20号的1点10分30秒触发任务 -->
        <task:scheduled ref="app" method="execute4" cron="30 10 1 20 * ?"/>
        <!-- 每年10月20号的1点10分30秒触发任务 -->
        <task:scheduled ref="app" method="execute5" cron="30 10 1 20 10 ?"/>
        <!-- 每15秒、30秒、45秒时触发任务 -->
        <task:scheduled ref="app" method="execute6" cron="15,30,45 * * * * ?"/>
        <!-- 15秒到45秒每隔1秒触发任务 -->
        <task:scheduled ref="app" method="execute7" cron="15-45 * * * * ?"/>
        <!-- 每分钟的每15秒时任务任务,每隔5秒触发一次 -->
        <task:scheduled ref="app" method="execute8" cron="15/5 * * * * ?"/>
        <!-- 每分钟的15到30秒之间开始触发,每隔5秒触发一次 -->
        <task:scheduled ref="app" method="execute9" cron="15-30/5 * * * * ?"/>
        <!-- 每小时的0分0秒开始触发,每隔3分钟触发一次 -->
        <task:scheduled ref="app" method="execute10" cron="0 0/3 * * * ?"/>
        <!-- 星期一到星期五的10点15分0秒触发任务 -->
        <task:scheduled ref="app" method="execute11" cron="0 15 10 ? * MON-FRI"/>
    </task:scheduled-tasks>

</beans>
- 1
- 2
- 3
- 4
- 5
- 6
- 7
- 8
- 9
- 10
- 11
- 12
- 13
- 14
- 15
- 16
- 17
- 18
- 19
- 20
- 21
- 22
- 23
- 24
- 25
- 26
- 27
- 28
- 29
- 30
- 31
- 32
- 33
- 34
- 35
- 36
- 37
- 38
- 39
- 40
- 41
- 42
编写测试代码:
package com.rhwayfun.task;

import org.springframework.context.ApplicationContext;
import org.springframework.context.support.ClassPathXmlApplicationContext;

/**
 * @author ZhongCB
 * @date 2016年09月10日 14:55
 * @description
 */
public class AppTest {

    public static void main(String[] args) {
        ApplicationContext context = new ClassPathXmlApplicationContext("classpath:/app-context-task.xml");
    }
}
- 1
- 2
- 3
- 4
- 5
- 6
- 7
- 8
- 9
- 10
- 11
- 12
- 13
- 14
- 15
- 16
运行测试代码,控制台会定时输出每个定时任务的日志信息,说明测试通过。
小插曲
由于项目使用jdk 1.8进行开发,所以初始的时候每次pom文件发生修改,编译器的版本又变成了jdk 1.5,后面发现需要在pom文件中添加build便签那部分才能将默认的编译器进行修改。也算一个小收获了。