spring task是Spring3.0以后自主开发的定时任务工具,可以将它比作一个轻量级的Quartz,而且使用起来很简单,除spring相关的包外不需要额外的包,而且支持注解和配置文件两种形式。
使用@Scheduled注解方式:
第一步:
import java.util.HashMap;
import org.apache.log4j.Logger;
import org.springframework.amqp.core.AmqpTemplate;
import org.springframework.beans.factory.annotation.Autowired;
import org.springframework.scheduling.annotation.Scheduled;
import org.springframework.stereotype.Component;
public class DemoTask {
private static Logger logger = Logger.getLogger(DemoTask.class);
@Autowired
AmqpTemplate amqpTemplate;
@Scheduled(cron = "0/1 * * * * ? ")
public void testTask() {
amqpTemplate.convertAndSend("test",new HashMap<String,Object>());
}
}
第二步:spring-task.xml添加配置:
<task:annotation-driven/>
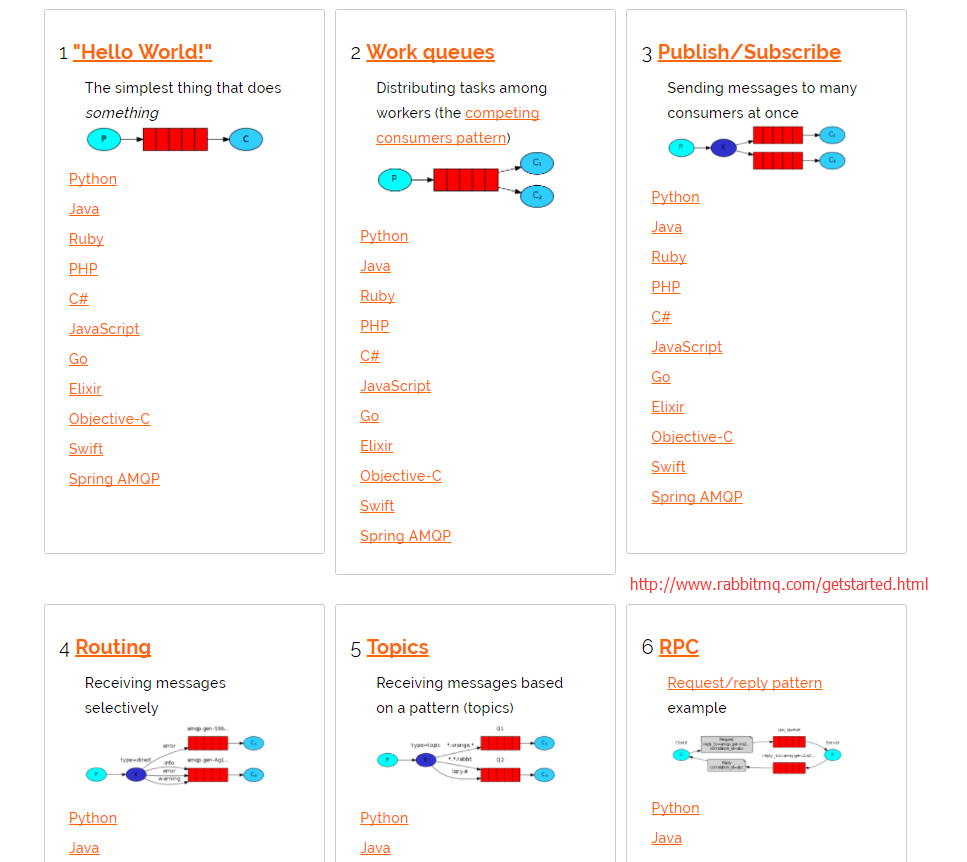
RabbitMQ
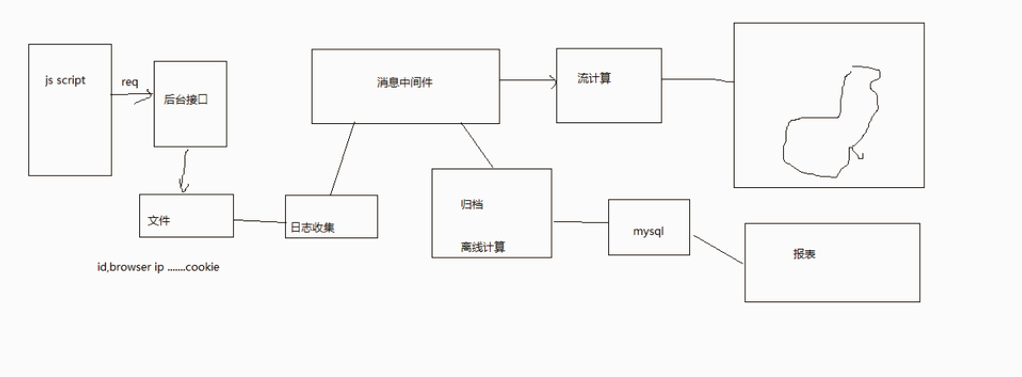
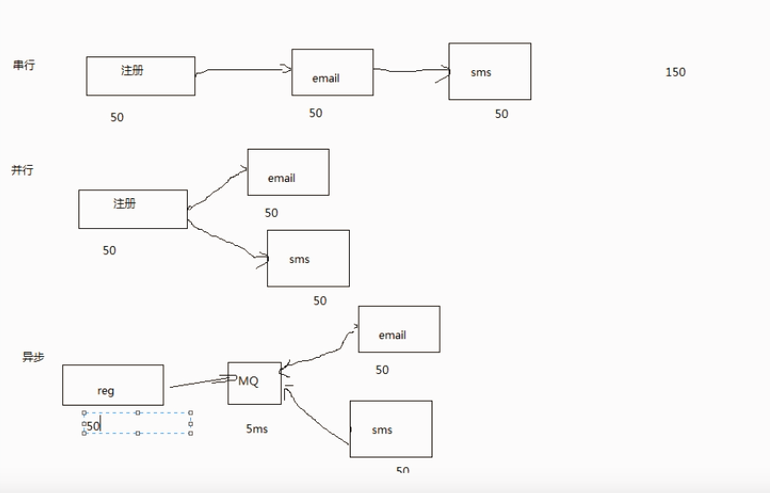
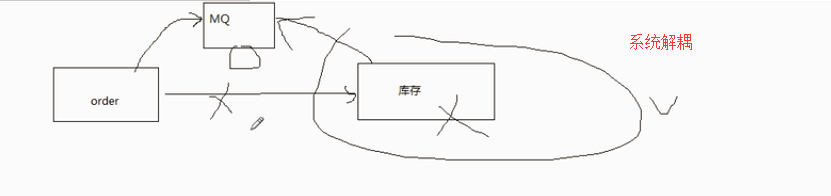
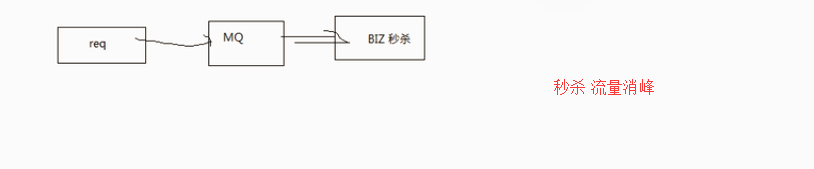
01.消息中间件概述,使用场景(日志处理,异步,系统解耦,流量削锋)
02.Rabbitmq安装,控制台简介,管理员添加
03.用户vhost配置以及介绍
04.java操作简单队列,生产者发送消息到队列,消费者接收消息
05.简单队列的缺陷,工作队列work queues之 轮询分发(Round-robin),以及轮询分发现象
06.工作队列work queues 公平分发(fair dispatch);prefetchCount = 1来限制RabbitMQ发送的消息,手动应答ack。
07.消息应答ack与消息持久化durable
08.publish/subscribe发布订阅模式 交换机(转发器)匿名转发Nameless exchange, Fanout Exchange不处理路由键 ,
Direct Exchange处理路由键, Topic Exchange将路由键和某模式进行匹配。队列绑定交换机(Exchange) ;
09.routing路由模式
10.topic主题模式
11.Rabbitmq之消息确认机制(AMQP事务机制)txSelect(), txCommit()以及txRollback(),事务机制的缺陷
12.Rabbitmq之消息确认机制(Confirm机制串行) waitForConfirms
13.Rabbitmq之消息确认机制(Confirm机制异步) ConfirmListener deliveryTag unconfirm集合维护
14.spring集成rabbitmq-client,template 的使用
15.大数据日志收集系统消息中间件应用(消息存储) 组件订阅
16.搜索系统DIH消息中间件应用 (topic模式,队列绑定)
01.消息中间件概述,使用场景(日志处理,异步,系统解耦,流量削锋)
02.Rabbitmq安装,控制台简介,管理员添加
安装与配置
Windows安装:
http://www.rabbitmq.com/#getstarted安装rabbitmq之前需要安装Erlang
First you need to install a supported version of Erlang for Windows. Download and run the Erlang for Windows installer. 64-bit versions are highly recommended.
Important: you must run the Erlang installer using an administrative account otherwise a registry key expected by the RabbitMQ installer will not be present.
http://www.rabbitmq.com/install-windows.html
supported version of Erlang : 查看对应Erlang下载版本
Erlang for Windows : 下载Erlang
安装顺序:Erlang rabbitmq 直接下一步
安装完成之后创建一个名为ERLANG_HOME的环境变量,其值指向erlang的安装目录,同时将%ERLANG_HOME%\bin加入到Path中,最后打开命令行,输入erl,如果出现erlang的版本信息就表示erlang语言环境安装成功
安装完成点击RabbitMQ Commond 弹窗命令窗口,输入:rabbitmq-plugins enable rabbitmq_management 回车,启用插件
C:\Program Files\RabbitMQ Server\rabbitmq_server-3.7.3\sbin>rabbitmq-plugins enable rabbitmq_management
Enabling plugins on node rabbit@DESKTOP-92Q0OUP:
rabbitmq_management
The following plugins have been configured:
rabbitmq_management
rabbitmq_management_agent
rabbitmq_web_dispatch
Applying plugin configuration to rabbit@DESKTOP-92Q0OUP...
Plugin configuration unchanged.
打开浏览器控制台:
http://localhost:15672
默认账号:guest guest
如果打不开,查看勾选隐藏的文件,将该目录下两个文件全部删掉:
C:\Users\yz\AppData\Roaming\RabbitMQ\db
删除后重新安装rabbitmq.exe
Linux安装:
安装Erlang:
1.准备目录
cd /usr/local/src
mkdir rabbitmq
cd rabbitmq
2.添加仓库地址 为了减少安装错误,使用仓库安装,类似于maven
vi /etc/yum.repos.d/rabbitmq-erlang.repo
[rabbitmq-erlang]
name=rabbitmq-erlang
baseurl=https://dl.bintray.com/rabbitmq/rpm/erlang/20/el/7
gpgcheck=1
gpgkey=https://www.rabbitmq.com/rabbitmq-release-signing-key.asc
repo_gpgcheck=0
enabled=1
3.安装erlang
sudo yum install erlang
验证:
erl
安装RabbitMQ
下载http://www.rabbitmq.com/install-rpm.html 点击下载rabbitmq-server-3.7.3-1.el7.noarch.rpm 上传到rabbitmq
安装:
rpm --import https://www.rabbitmq.com/rabbitmq-release-signing-key.asc
# this example assumes the CentOS 7 version of the package
yum install rabbitmq-server-3.7.3-1.el7.noarch.rpm
启动、停止:
/sbin/service rabbitmq-server start
/sbin/service rabbitmq-server stop
设置开机启动:
chkconfig rabbitmq-server on
打开浏览器控制台:
http://localhost:15672
默认账号:guest guest
1.添加用户:
Admin --> Add a user
Username:yz
Password:123
Tags(角色):选Admin
03.用户vhost配置以及介绍
virtual hosts 相当于mysql的db
2.点击右侧Virtual Hosts 菜单 ,进入http://localhost:15672/#/vhosts页面
3.点击 Add a new virtual host,添加数据库一般以/开头
Name: /vhost_mmr
4.对用户授权
点击:/vhost_mmr 进入http://localhost:15672/#/vhosts/%2Fvhost_mmr页面
找到Set permission User选择yz 点击Set permission授权
创建完用户并授权成功后适应新用户密码进行登录测试是否成功。
RabbitMQ 控制台:Overview Connections Channels Exchanges Queues Admin
Overview :概览
Totals :总共发送信息个数
Protocol Bound to Port
amqp 0.0.0.0 5672
amqp :: 5672 --> mq通信协议
clustering :: 25672 --> 集群端口号
http 0.0.0.0 15672 --> mq端口号
http :: 15672
Connections : 连接
Channels : 频道(通道)
Exchanges : 交换机
Queues : 队列
Admin : 用户管理
04.java操作简单队列,生产者发送消息到队列,消费者接收消息
Maven依赖:
<dependency>
<groupId>com.rabbitmq</groupId>
<artifactId>amqp-client</artifactId>
<version>4.0.2</version>
</dependency>
<dependency>
<groupId>org.springframework.amqp</groupId>
<artifactId>spring-rabbit</artifactId>
<version>1.1.1.RELEASE</version>
</dependency>
<dependency>
<groupId>log4j</groupId>
<artifactId>log4j</artifactId>
<version>1.2.16</version>
</dependency>
<dependency>
<groupId>junit</groupId>
<artifactId>junit</artifactId>
<version>3.8.1</version>
<scope>test</scope>
</dependency>
/**
* 获取MQ的连接
* Created by yz on 2018/3/2.
*/
public class ConnectoinUtils {
public static Connection getConnection() throws IOException, TimeoutException {
//定义一个连接工厂
ConnectionFactory factory = new ConnectionFactory();
//设置服务地址
factory.setHost("127.0.0.1");
//设置AMQP(通信)端口号 5672
factory.setPort(5672);
//设置vhost数据库
factory.setVirtualHost("/vhost_mmr");
//用户名
factory.setUsername("yz");
//密码
factory.setPassword("123");
//获取一个连接
Connection connection = factory.newConnection();
return connection;
}
}
/**
* 生产者
* Created by yz on 2018/3/2.
*/
public class Send {
private static final String QUEUE_NAME = "test_simple_queue";
public static void main(String[] args) throws IOException, TimeoutException {
//获取一个连接
Connection connection = ConnectoinUtils.getConnection();
//从连接中获取一个通道
Channel channel = connection.createChannel();
//创建队列声明
channel.queueDeclare(QUEUE_NAME, false, false, false, null);
String message = "Hello World!";
channel.basicPublish("", QUEUE_NAME, null, message.getBytes());
System.out.println("发送消息: " + message );
channel.close();
connection.close();
}
}
发送消息完成进入: http://localhost:15672 点击 Queues(队列)菜单 看到刚发送的消息
/**
* 消费者获取消息
* Created by yz on 2018/3/2.
*/
public class Recv {
private final static String QUEUE_NAME = "test_simple_queue";
/**
* 新的api
* @throws IOException
* @throws TimeoutException
*/
public static void main(String[] argv) throws IOException, TimeoutException {
//获取连接
Connection connection = ConnectoinUtils.getConnection();
//创建频道
Channel channel = connection.createChannel();
//创建队列声明
channel.queueDeclare(QUEUE_NAME, false, false, false, null);
//定义消息者 事件模型,一旦有消息进入就触发
Consumer consumer = new DefaultConsumer(channel) {
//获取到到达的消息
@Override
public void handleDelivery(String consumerTag, Envelope envelope,
AMQP.BasicProperties properties, byte[] body)
throws IOException {
String message = new String(body, "UTF-8");
System.out.println("接收到的消息:" + message);
}
};
//监听队列
channel.basicConsume(QUEUE_NAME, true, consumer);
}
/**
* 老的api,不建议使用
* @throws IOException
* @throws TimeoutException
*/
public static void oldApi() throws IOException, TimeoutException {
//获取连接
Connection connection = ConnectoinUtils.getConnection();
//创建频道
Channel channel = connection.createChannel();
//定义队列的消费者
QueueingConsumer consumer = new QueueingConsumer(channel);
//监听队列
channel.basicConsume(QUEUE_NAME,true,consumer);
while (true){
try {
QueueingConsumer.Delivery delivery = consumer.nextDelivery();
String msg = new String(delivery.getBody());
System.out.println(msg);
} catch (InterruptedException e) {
e.printStackTrace();
}
}
}
}
05.简单队列的缺陷,工作队列work queues之 轮询分发(Round-robin),以及轮询分发现象
简单队列的不足:耦合性高,生产者一一对应消费者(如果有多个消费者消费队列中的消息,这时候就不行了),队列名变更,这时候要同时变更
解决:work queues 工作队列 一个生产者对应多个消费者
为什么会出现工作队列
simple队列 是一一对应的,而且实际开发,生产者发送消息是毫不费力的,而消费者一般是要跟业务相结合的,消费者接受到消息之后就需要处理,可能需要花费时间,这时候队列就会积压了很多消息。
/**
* Work Queues 生产者
* Created by yz on 2018/3/2.
*/
public class Send {
private static final String QUEUE_NAME = "test_work_queue";
public static void main(String[] args) throws IOException, TimeoutException, InterruptedException {
//获取连接
Connection connection = ConnectoinUtils.getConnection();
//获取channel
Channel channel = connection.createChannel();
//声明队列
channel.queueDeclare(QUEUE_NAME,false,false,false,null);
for (int i = 0; i < 50; i++) {
String msg = "hello "+i;
System.out.println("Work Queues send: "+ msg);
channel.basicPublish("",QUEUE_NAME,null,msg.getBytes());
Thread.sleep(1*20);
}
//关闭资源
channel.close();
connection.close();
}
}
/**
* Work Queues 消费者1
* Created by yz on 2018/3/2.
*/
public class Recv1 {
private static final String QUEUE_NAME = "test_work_queue";
public static void main(String[] args) throws IOException, TimeoutException, InterruptedException {
//获取连接
Connection connection = ConnectoinUtils.getConnection();
//获取channel
Channel channel = connection.createChannel();
//声明队列
channel.queueDeclare(QUEUE_NAME,false,false,false,null);
//定义消费者
Consumer consumer = new DefaultConsumer(channel) {
//消息到达触发这个方法-获取到到达的消息
@Override
public void handleDelivery(String consumerTag, Envelope envelope,
AMQP.BasicProperties properties, byte[] body)
throws IOException {
String message = new String(body, "UTF-8");
System.out.println("Recv1 msg:" + message);
try {
Thread.sleep(2000);
} catch (InterruptedException e) {
e.printStackTrace();
}
}
};
//监听队列
boolean autoAck = true;
channel.basicConsume(QUEUE_NAME, autoAck, consumer);
}
}
/**
* Work Queues 消费者2
* Created by yz on 2018/3/2.
*/
public class Recv2 {
private static final String QUEUE_NAME = "test_work_queue";
public static void main(String[] args) throws IOException, TimeoutException, InterruptedException {
//获取连接
Connection connection = ConnectoinUtils.getConnection();
//获取channel
Channel channel = connection.createChannel();
//声明队列
channel.queueDeclare(QUEUE_NAME,false,false,false,null);
//定义消费者
Consumer consumer = new DefaultConsumer(channel) {
//消息到达触发这个方法-获取到到达的消息
@Override
public void handleDelivery(String consumerTag, Envelope envelope,
AMQP.BasicProperties properties, byte[] body)
throws IOException {
String message = new String(body, "UTF-8");
System.out.println("Recv2 msg:" + message);
try {
Thread.sleep(1000);
} catch (InterruptedException e) {
e.printStackTrace();
}
}
};
//监听队列
boolean autoAck = true;
channel.basicConsume(QUEUE_NAME, autoAck, consumer);
}
}
现象:消费者2并没有因为设置休眠的时间短而多接收消息。消费者2和消费者1处理的消息一样多
消费者1:奇数
消费者2:偶数
这种方式叫做轮询分发(round-robin)结果就是消息平分,不管谁忙或者谁清闲,都不会多给一个消息。
06.工作队列work queues 公平分发(fair dispatch); prefetchCount = 1来限制RabbitMQ发送的消息,手动应答ack。
消费者需手动反馈,使用公平分发必须关闭自动应答ack 改成手动
/**
* Work Queues 生产者
* Created by yz on 2018/3/2.
*/
public class Send {
private static final String QUEUE_NAME = "test_work_queue";
public static void main(String[] args) throws IOException, TimeoutException, InterruptedException {
//获取连接
Connection connection = ConnectoinUtils.getConnection();
//获取channel
Channel channel = connection.createChannel();
//声明队列
channel.queueDeclare(QUEUE_NAME,false,false,false,null);
/**
* 每个消费者发送确认消息之前,消费队列不发送下一个消息到消费者,一次只处理一个消息
* 限制发送给同一个消费者不得超过一条消息
*/
int prefetchCount = 1;
channel.basicQos(prefetchCount);
for (int i = 0; i < 50; i++) {
String msg = "hello "+i;
System.out.println("Work Queues send: "+ msg);
channel.basicPublish("",QUEUE_NAME,null,msg.getBytes());
Thread.sleep(1*5);
}
//关闭资源
channel.close();
connection.close();
}
}
/**
* Work Queues 消费者1
* Created by yz on 2018/3/2.
*/
public class Recv1 {
private static final String QUEUE_NAME = "test_work_queue";
public static void main(String[] args) throws IOException, TimeoutException, InterruptedException {
//获取连接
Connection connection = ConnectoinUtils.getConnection();
//获取channel
final Channel channel = connection.createChannel();
//声明队列
channel.queueDeclare(QUEUE_NAME,false,false,false,null);
//保证一次只分发一个
int prefetchCount = 1;
channel.basicQos(prefetchCount);
//定义消费者
Consumer consumer = new DefaultConsumer(channel) {
//消息到达触发这个方法-获取到到达的消息
@Override
public void handleDelivery(String consumerTag, Envelope envelope,
AMQP.BasicProperties properties, byte[] body)
throws IOException {
String message = new String(body, "UTF-8");
System.out.println("Recv1 msg:" + message);
try {
Thread.sleep(2000);
} catch (InterruptedException e) {
e.printStackTrace();
}finally {
// 回执
channel.basicAck(envelope.getDeliveryTag(),false);
}
}
};
//监听队列,自动应答改成false
boolean autoAck = false;
channel.basicConsume(QUEUE_NAME, autoAck, consumer);
}
}
/**
* Work Queues 消费者2
* Created by yz on 2018/3/2.
*/
public class Recv2 {
private static final String QUEUE_NAME = "test_work_queue";
public static void main(String[] args) throws IOException, TimeoutException, InterruptedException {
//获取连接
Connection connection = ConnectoinUtils.getConnection();
//获取channel
final Channel channel = connection.createChannel();
//声明队列
channel.queueDeclare(QUEUE_NAME,false,false,false,null);
//保证一次只分发一个
int prefetchCount = 1;
channel.basicQos(prefetchCount);
//定义消费者
Consumer consumer = new DefaultConsumer(channel) {
//消息到达触发这个方法-获取到到达的消息
@Override
public void handleDelivery(String consumerTag, Envelope envelope,
AMQP.BasicProperties properties, byte[] body)
throws IOException {
String message = new String(body, "UTF-8");
System.out.println("Recv2 msg:" + message);
try {
Thread.sleep(1000);
} catch (InterruptedException e) {
e.printStackTrace();
}finally {
// 回执
channel.basicAck(envelope.getDeliveryTag(),false);
}
}
};
//监听队列,自动应答改成false
boolean autoAck = false;
channel.basicConsume(QUEUE_NAME, autoAck, consumer);
}
}
现象:消费者2处理的消息比消费者1多,能者多劳
07.消息应答ack与消息持久化durable
boolean autoAck = false;
channel.basicConsume(QUEUE_NAME, autoAck, consumer);
boolean autoAck = true;(自动确认模式,表示一旦mq将消息分发给消费者,消息就会从内存中删除)
这种情况下,如果杀死正在执行的消费者,就会丢失正在处理的消息。
boolean autoAck = false;(手动模式)如果有一个消费者挂掉,就会交付给其他消费者,rabbitmq支持消息应答,消费者发送一个消息应答告诉rabbitmq,这个消息我已经处理完成,你可以删了,然后rabbitmq就删除内存中的消息。
消息应答默认是打开的,false
如果rabbitmq挂了,消息任然会丢失!!
消息的持久化
//声明队列
boolean durable = false;
channel.queueDeclare(QUEUE_NAME,durable,false,false,null);
小细节:如果我们将程序中的boolean durable = false;改成true,是不可的,尽管代码是正确的,他也不会运行成功!因为我们已经定义了一个叫test_work_queue,这个queue是未持久化的,rabbitmq不允许重新定义(不同参数)一个已经存在的队列。
解决方案,将该queue删掉从新赋值。
08.publish/subscribe发布订阅模式 交换机(转发器)匿名转发Nameless exchange, Fanout Exchange不处理路由键 ,
Direct Exchange处理路由键, Topic Exchange将路由键和某模式进行匹配。队列绑定交换机(Exchange) ;
订阅模式:例如公共号
模型:

解读:
1.一个生产者,多个消费者
2.每一个消费者都有自己的队列
3.生产者没有直接把消息发送到队列,而是发到了交换机(转发器exchange)
4.每个队列都要绑定到交换机上
5.生成者发送的消息,经过交换机,到达队列,机会能实现一个消息被多个消费者消费
/**
* Publish/Subscribe 发布/订阅 生产者
* Created by yz on 2018/3/2.
*/
public class Send {
private static final String EXCHANGE_NAME = "test_exchange_fanout";
public static void main(String[] args) throws IOException, TimeoutException {
//获取连接
Connection connection = ConnectoinUtils.getConnection();
//获取channel
Channel channel = connection.createChannel();
//声明交换机
channel.exchangeDeclare(EXCHANGE_NAME,"fanout"); //fanout分发
//发送消息
String msg = "hello ps";
channel.basicPublish(EXCHANGE_NAME,"",null,msg.getBytes());
System.out.println("send msg:"+msg);
//关闭资源
channel.close();
connection.close();
}
}
消息发送成功后,进入页面点击 Exchanges 交换机菜单

消息哪儿去了?丢失了!因为交换机没有存储的能力,在rabbitmq里面只有队列有存储的能力。因为这个时候还没有队列(消费者)绑定到这个交换机,所以数据丢失了。
消费者:
/**
* Publish/Subscribe 发布/订阅 消费者1
* Created by yz on 2018/3/2.
*/
public class Recv1 {
private static final String QUEUE_NAME = "test_exchange_fanout_email";
private static final String EXCHANGE_NAME = "test_exchange_fanout";
public static void main(String[] args) throws IOException, TimeoutException {
//获取连接
Connection connection = ConnectoinUtils.getConnection();
//获取channel
final Channel channel = connection.createChannel();
//声明队列
channel.queueDeclare(QUEUE_NAME,false,false,false,null);
//绑定队列到交换机(转发器)
channel.queueBind(QUEUE_NAME,EXCHANGE_NAME,"");
//保证一次只分发一个
int prefetchCount = 1;
channel.basicQos(prefetchCount);
//定义消费者
Consumer consumer = new DefaultConsumer(channel) {
//消息到达触发这个方法-获取到到达的消息
@Override
public void handleDelivery(String consumerTag, Envelope envelope,
AMQP.BasicProperties properties, byte[] body)
throws IOException {
String message = new String(body, "UTF-8");
System.out.println("Recv1 msg:" + message);
try {
Thread.sleep(2000);
} catch (InterruptedException e) {
e.printStackTrace();
}finally {
// 回执
channel.basicAck(envelope.getDeliveryTag(),false);
}
}
};
//监听队列,自动应答改成false
boolean autoAck = false;
channel.basicConsume(QUEUE_NAME, autoAck, consumer);
}
}
/**
* Publish/Subscribe 发布/订阅 消费者2
* Created by yz on 2018/3/2.
*/
public class Recv2 {
private static final String QUEUE_NAME = "test_exchange_fanout_sms";
private static final String EXCHANGE_NAME = "test_exchange_fanout";
public static void main(String[] args) throws IOException, TimeoutException, InterruptedException {
//获取连接
Connection connection = ConnectoinUtils.getConnection();
//获取channel
final Channel channel = connection.createChannel();
//声明队列
channel.queueDeclare(QUEUE_NAME,false,false,false,null);
//绑定队列到交换机(转发器)
channel.queueBind(QUEUE_NAME,EXCHANGE_NAME,"");
//保证一次只分发一个
int prefetchCount = 1;
channel.basicQos(prefetchCount);
//定义消费者
Consumer consumer = new DefaultConsumer(channel) {
//消息到达触发这个方法-获取到到达的消息
@Override
public void handleDelivery(String consumerTag, Envelope envelope,
AMQP.BasicProperties properties, byte[] body)
throws IOException {
String message = new String(body, "UTF-8");
System.out.println("Recv2 msg:" + message);
try {
Thread.sleep(1000);
} catch (InterruptedException e) {
e.printStackTrace();
}finally {
// 回执
channel.basicAck(envelope.getDeliveryTag(),false);
}
}
};
//监听队列,自动应答改成false
boolean autoAck = false;
channel.basicConsume(QUEUE_NAME, autoAck, consumer);
}
}
进入控制台:http://localhost:15672/#/exchanges 点击test_exchange_fanout

09.routing路由模式
Exchange(交换机又叫做转发器)
一方面是接收生产者的消息,另一方面是向队列推送消息
匿名转发 ""
channel.basicPublish("","",null,msg.getBytes());
Fanout(不处理路由键,只需要将队列绑定到交换机,就会转发到与该交换机绑定的所有队列中)
//声明交换机
channel.exchangeDeclare(EXCHANGE_NAME,"fanout");
Direct(处理路由键,消费发送时带一个路由的key,队列也需要一个key,如果绑定的队列与路由key相匹配,就会把消息转发到对应的队列里面)
路由模式

/**
* Routing 生产者
* Created by yz on 2018/3/2.
*/
public class Send {
private static final String EXCHANGE_NAME = "test_exchange_direct";
public static void main(String[] args) throws IOException, TimeoutException {
//获取连接
Connection connection = ConnectoinUtils.getConnection();
//获取channel
Channel channel = connection.createChannel();
//声明交换机
channel.exchangeDeclare(EXCHANGE_NAME,"direct");
//发送消息
String msg = "hello direct!";
String routingKey = "info";
channel.basicPublish(EXCHANGE_NAME,routingKey,null,msg.getBytes());
System.out.println("send msg:"+msg);
//关闭资源
channel.close();
connection.close();
}
}
/**
* Routing 消费者1
* Created by yz on 2018/3/2.
*/
public class Recv1 {
private static final String QUEUE_NAME = "test_exchange_direct_1";
private static final String EXCHANGE_NAME = "test_exchange_direct";
public static void main(String[] args) throws IOException, TimeoutException {
//获取连接
Connection connection = ConnectoinUtils.getConnection();
//获取channel
final Channel channel = connection.createChannel();
//声明队列
channel.queueDeclare(QUEUE_NAME,false,false,false,null);
//绑定队列到交换机(转发器)
channel.queueBind(QUEUE_NAME,EXCHANGE_NAME,"error");
//保证一次只分发一个
int prefetchCount = 1;
channel.basicQos(prefetchCount);
//定义消费者
Consumer consumer = new DefaultConsumer(channel) {
//消息到达触发这个方法-获取到到达的消息
@Override
public void handleDelivery(String consumerTag, Envelope envelope,
AMQP.BasicProperties properties, byte[] body)
throws IOException {
String message = new String(body, "UTF-8");
System.out.println("Recv1 msg:" + message);
try {
Thread.sleep(2000);
} catch (InterruptedException e) {
e.printStackTrace();
}finally {
// 回执
channel.basicAck(envelope.getDeliveryTag(),false);
}
}
};
//监听队列,自动应答改成false
boolean autoAck = false;
channel.basicConsume(QUEUE_NAME, autoAck, consumer);
}
}
/**
* Routing 消费者2
* Created by yz on 2018/3/2.
*/
public class Recv2 {
private static final String QUEUE_NAME = "test_exchange_direct_2";
private static final String EXCHANGE_NAME = "test_exchange_direct";
public static void main(String[] args) throws IOException, TimeoutException {
//获取连接
Connection connection = ConnectoinUtils.getConnection();
//获取channel
final Channel channel = connection.createChannel();
//声明队列
channel.queueDeclare(QUEUE_NAME,false,false,false,null);
//绑定队列到交换机(转发器)
channel.queueBind(QUEUE_NAME,EXCHANGE_NAME,"error");
channel.queueBind(QUEUE_NAME,EXCHANGE_NAME,"info");
channel.queueBind(QUEUE_NAME,EXCHANGE_NAME,"warning");
//保证一次只分发一个
int prefetchCount = 1;
channel.basicQos(prefetchCount);
//定义消费者
Consumer consumer = new DefaultConsumer(channel) {
//消息到达触发这个方法-获取到到达的消息
@Override
public void handleDelivery(String consumerTag, Envelope envelope,
AMQP.BasicProperties properties, byte[] body)
throws IOException {
String message = new String(body, "UTF-8");
System.out.println("Recv2 msg:" + message);
try {
Thread.sleep(1000);
} catch (InterruptedException e) {
e.printStackTrace();
}finally {
// 回执
channel.basicAck(envelope.getDeliveryTag(),false);
}
}
};
//监听队列,自动应答改成false
boolean autoAck = false;
channel.basicConsume(QUEUE_NAME, autoAck, consumer);
}
}
路由模式缺陷:只能定义"error"、"info"、"warning" 这三种key
10.topic主题模式
Topic exchange
将路由键和某模式匹配
# 匹配一个或多个
. 匹配一个
goods.#匹配
goods.insert
goods.update
模型

/**
* Topic 生产者
* Created by yz on 2018/3/2.
*/
public class Send {
private static final String EXCHANGE_NAME = "test_exchange_topic";
public static void main(String[] args) throws IOException, TimeoutException {
//获取连接
Connection connection = ConnectoinUtils.getConnection();
//获取channel
Channel channel = connection.createChannel();
//声明交换机
channel.exchangeDeclare(EXCHANGE_NAME,"topic");
//发送消息
String msg = "商品...";
String routingKey = "goods.update";
channel.basicPublish(EXCHANGE_NAME,routingKey,null,msg.getBytes());
System.out.println("send msg:"+msg);
//关闭资源
channel.close();
connection.close();
}
}
/**
* Topic 消费者1
* Created by yz on 2018/3/2.
*/
public class Recv1 {
private static final String QUEUE_NAME = "test_exchange_topic_1";
private static final String EXCHANGE_NAME = "test_exchange_topic";
public static void main(String[] args) throws IOException, TimeoutException {
//获取连接
Connection connection = ConnectoinUtils.getConnection();
//获取channel
final Channel channel = connection.createChannel();
//声明队列
channel.queueDeclare(QUEUE_NAME,false,false,false,null);
//绑定队列到交换机(转发器)
channel.queueBind(QUEUE_NAME,EXCHANGE_NAME,"goods.add");
//保证一次只分发一个
int prefetchCount = 1;
channel.basicQos(prefetchCount);
//定义消费者
Consumer consumer = new DefaultConsumer(channel) {
//消息到达触发这个方法-获取到到达的消息
@Override
public void handleDelivery(String consumerTag, Envelope envelope,
AMQP.BasicProperties properties, byte[] body)
throws IOException {
String message = new String(body, "UTF-8");
System.out.println("Recv1 msg:" + message);
try {
Thread.sleep(2000);
} catch (InterruptedException e) {
e.printStackTrace();
}finally {
// 回执
channel.basicAck(envelope.getDeliveryTag(),false);
}
}
};
//监听队列,自动应答改成false
boolean autoAck = false;
channel.basicConsume(QUEUE_NAME, autoAck, consumer);
}
}
/**
* Topic 消费者2
* Created by yz on 2018/3/2.
*/
public class Recv2 {
private static final String QUEUE_NAME = "test_exchange_topic_2";
private static final String EXCHANGE_NAME = "test_exchange_topic";
public static void main(String[] args) throws IOException, TimeoutException {
//获取连接
Connection connection = ConnectoinUtils.getConnection();
//获取channel
final Channel channel = connection.createChannel();
//声明队列
channel.queueDeclare(QUEUE_NAME,false,false,false,null);
//绑定队列到交换机(转发器)
channel.queueBind(QUEUE_NAME,EXCHANGE_NAME,"goods.#");
//保证一次只分发一个
int prefetchCount = 1;
channel.basicQos(prefetchCount);
//定义消费者
Consumer consumer = new DefaultConsumer(channel) {
//消息到达触发这个方法-获取到到达的消息
@Override
public void handleDelivery(String consumerTag, Envelope envelope,
AMQP.BasicProperties properties, byte[] body)
throws IOException {
String message = new String(body, "UTF-8");
System.out.println("Recv2 msg:" + message);
try {
Thread.sleep(1000);
} catch (InterruptedException e) {
e.printStackTrace();
}finally {
// 回执
channel.basicAck(envelope.getDeliveryTag(),false);
}
}
};
//监听队列,自动应答改成false
boolean autoAck = false;
channel.basicConsume(QUEUE_NAME, autoAck, consumer);
}
}
11.Rabbitmq之消息确认机制(AMQP事务机制)txSelect(), txCommit()以及txRollback(),事务机制的缺陷
在rabbitmq中,可以通过持久化数据解决rabbitmq服务器异常造成的数据丢失问题。
问题:生产者将消息发送出去之后,消息到底有没有到达rabbitmq服务器,默认的情况下是不知道的。
两种方式:
AMQP 实现了事务机制,类似于MySQL事务
Confirm 模式
事务机制
txSelect txCommit txRollback
txSelect :用于将当前channel设置成transation模式
txCommit :用于提交事务
txRollback :回滚事务
/**
* AMQP事务机制 生产者
* Created by yz on 2018/3/2.
*/
public class TxSend {
private static final String QUEUE_NAME = "test_exchange_tx";
public static void main(String[] args) throws IOException, TimeoutException {
//获取连接
Connection connection = ConnectoinUtils.getConnection();
//获取channel
Channel channel = connection.createChannel();
//声明队列
channel.queueDeclare(QUEUE_NAME,false,false,false,null);
String msg = "hello tx message...";
System.out.println(msg);
try {
//开始事务
channel.txSelect();
//发送消息
channel.basicPublish("", QUEUE_NAME, null, msg.getBytes());
//测试回滚,消息将发送不出去
int x = 1/0;
//提交事务
channel.txCommit();
} catch (IOException e) {
//回滚事务
channel.txRollback();
System.out.println("send message txRollback");
}finally {
//关闭资源
channel.close();
connection.close();
}
}
}
/**
* AMQP事务机制 消费者1
* Created by yz on 2018/3/2.
*/
public class TxRecv {
private static final String QUEUE_NAME = "test_exchange_tx";
public static void main(String[] args) throws IOException, TimeoutException {
//获取连接
Connection connection = ConnectoinUtils.getConnection();
//获取channel
Channel channel = connection.createChannel();
//声明队列
channel.queueDeclare(QUEUE_NAME,false,false,false,null);
//监听队列
channel.basicConsume(QUEUE_NAME, true, new DefaultConsumer(channel) {
//获取到到达的消息
@Override
public void handleDelivery(String consumerTag, Envelope envelope,
AMQP.BasicProperties properties, byte[] body)
throws IOException {
String message = new String(body, "UTF-8");
System.out.println("接收到的消息:" + message);
}
});
}
}
这种模式有什么不好?降低消息的吞吐量
注解方式:
rabbitmq.properties
rabbitmq.host=127.0.0.1
rabbitmq.username=yz
rabbitmq.password=123
spring-rabbitmq.xml
<!-- RabbitMQ 连接工厂 -->
<bean id="connectionFactory" class="org.springframework.amqp.rabbit.connection.CachingConnectionFactory">
<constructor-arg value="${rabbitmq.host}" />
<property name="username" value="${rabbitmq.username}" />
<property name="password" value="${rabbitmq.password}" />
</bean>
!-- RabbitMQ 模板 -->
<rabbit:template id="amqpTemplate" connection-factory="connectionFactory"/>
<rabbit:admin connection-factory="connectionFactory" />
<rabbit:queue name="test.coupon" durable="true" auto-delete="false" exclusive="false"/>
<bean id="testConsumer" class="com.yz.consumer.TestConsumer" />
<rabbit:listener-container connection-factory="connectionFactory">
<rabbit:listener ref="testConsumer" method="run" queue-names="test.coupon" />
</rabbit:listener-container>
