做Android开发有一段时间了,经常与后台服务器进行交互,有时就会想,后台服务器到底是怎么工作的呢?我发出去一个http请求,他怎么接收到,又怎么进行处理、返回信息呢?
怀着这个疑问,我进行了好一通搜索。然后,还是想动动手,自己搭建一个简单的服务器。
我的环境是win7,那么,就在win7下搭建一个吧。最简单的,自然是win7自带的,IIS,全称Internet Information Service,即Internet信息服务,专用于微软操作系统平台。
简单说下步骤:
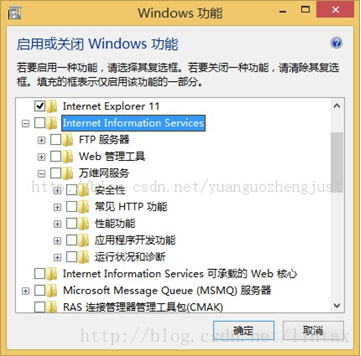
1,启用IIS功能,一般在控制面板的“启用或关闭windows功能”里面;
2,准备好一个html文件,例如如下的内容:
<html>

<head>
<title>Lintax的主页</title>
</head>

<body>
<h1>lintax的主页</h1>
<p><font color="green">内容会很精彩的哦</font></p>
<img src="lovely.jpg" width="300" />
<p><font color="red">敬请期待...</font></p>
</body>

</html>
放在默认的路径下(C:\Inetpub\wwwroot),文件名使用index.htm。
为什么要使用index.htm,原来是默认打开的文件名有这样几个:
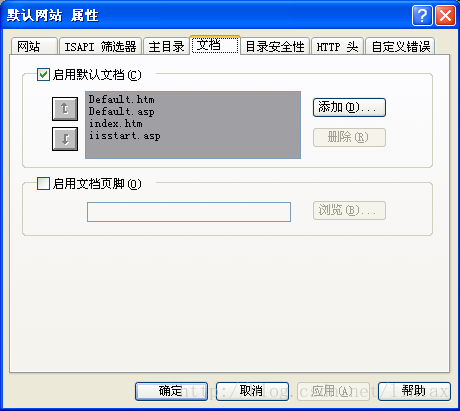
我们使用index.htm,就可以使用 http://localhost/ 来访问了。否则,就需要指定htm文件名才能访问,像这样:
http://localhost/login.htm 。
3,输入网址测试访问,可以看见:
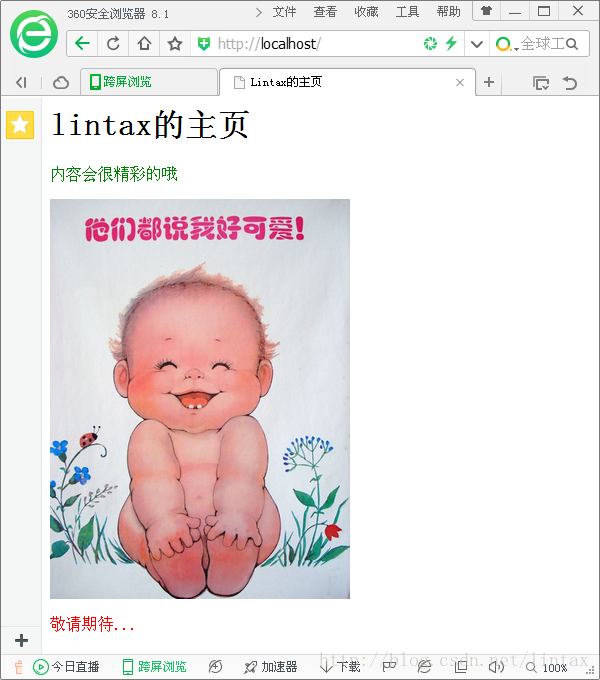
这样,我们就搭建起来了一个简单的服务器。在局域网里其他的电脑上输入:
http://192.168.100.100 (这个ip是我的电脑的ip,根据需要修改)
就可以访问我们提供的页面了。如果转到公网上,全世界的人都可以访问到了。
但是,最初的问题还存在,就是我们现在看见的,只是一个静态页面,这个服务器,并不能针对我们的请求进行正确与否的判断,进而做出相应的回复。
那么,怎样才能对请求进行处理?
在再次经历一番搜索后,我选择了一个方案,使用java的servlet+tomcat来实现。毕竟,做Android这么久了,对java还是比较熟悉了,用java来进行后台控制,后续如果想深入的话,可以在此基础上继续研究。
下面说下搭建过程:
1,下载tomcat,解压。我用的版本是:apache-tomcat-7.0.57。
2,下载eclipse j2ee,注意,即使原来是用eclipse开发的Android,现在开发java的eclipse版本也是不一样的。
我用的eclipse版本是:Kepler Service Release 2
然后,对下载的压缩包解压,然后运行起来。
3,在eclipse中新建一个web project工程,选择动态的。
4,通过Eclipse创建和编写Servlet。
建立一个类,继承HttpServlet,实现doGet()、doPost(),代码如下:
package servlet.study;

import java.io.IOException;
import java.io.PrintWriter;
import javax.servlet.ServletException;
import javax.servlet.http.HttpServlet;
import javax.servlet.http.HttpServletRequest;
import javax.servlet.http.HttpServletResponse;

/**
 * Servlet implementation class ServletDemo
 */
public class ServletDemo extends HttpServlet {
    private static final long serialVersionUID = 1L;

    private String name = "";
    private String password = "";
    /**
     * Default constructor.
     */
    public ServletDemo() {
        System.out.println("log: ServletDemo enter");
    }

    /**
     * @see HttpServlet#doGet(HttpServletRequest request, HttpServletResponse response)
     */
    protected void doGet(HttpServletRequest request, HttpServletResponse response) throws ServletException, IOException {

        String url=request.getRequestURL().toString();
        System.out.println("log: ServletDemo doGet: url="+url);

        String strName = request.getParameter("name");
        String strPassword = request.getParameter("password");
        System.out.println("log: ServletDemo doGet: name="+strName+": password="+strPassword);
        boolean isPass = false;

        if(url!=null && url.contains("login")){
            try{
                if((strName!=null)&&(strPassword!=null)){
                    if(name.contentEquals(strName) && password.contentEquals(strPassword) ){
                        isPass = true;
                    }
                }
            } catch (Exception e){
                e.printStackTrace();
            }
        }

        //返回json
        response.setContentType("text/json");
        PrintWriter out = response.getWriter();
        if(isPass){
            out.println("{\"result\":\"success\"}");
        } else {
            out.println("{\"result\":\"input info is invalid\"}");
        }
        out.flush();
        out.close();
    }

    /**
     * @see HttpServlet#doPost(HttpServletRequest request, HttpServletResponse response)
     */
    protected void doPost(HttpServletRequest request, HttpServletResponse response) throws ServletException, IOException {
        System.out.println("log: ServletDemo doPost:");
        response.setContentType("text/json");
        PrintWriter out = response.getWriter();
        String url=request.getRequestURL().toString();
        System.out.println("log: ServletDemo doPost: url="+url);

        try{
            name = request.getParameter("name");
            password = request.getParameter("password");
            System.out.println("log: ServletDemo doPost: name="+name+": password="+password);
            if(url!=null && url.contains("register")){
                out.println("{\"result\":\"success\"}");
            } else {
                out.println("{\"result\":\"fail\"}");
            }
        } catch (Exception e){
            out.println("{\"result\":\"fail\"}");
        }
    }
}
在web.xml中配置servlet和servlet-mapping:
<?xml version="1.0" encoding="UTF-8"?>
<web-app xmlns:xsi="http://www.w3.org/2001/XMLSchema-instance" xmlns="http://java.sun.com/xml/ns/javaee" xsi:schemaLocation="http://java.sun.com/xml/ns/javaee http://java.sun.com/xml/ns/javaee/web-app_2_5.xsd" id="WebApp_ID" version="2.5">
  <display-name>WebTest</display-name>
  <welcome-file-list>
    <welcome-file>index.html</welcome-file>
    <welcome-file>index.htm</welcome-file>
    <welcome-file>index.jsp</welcome-file>
    <welcome-file>default.html</welcome-file>
    <welcome-file>default.htm</welcome-file>
    <welcome-file>default.jsp</welcome-file>
  </welcome-file-list>
  <servlet>
    <description>my J2EE deom for servlet</description>
    <display-name>disp ServletDemo</display-name>
    <servlet-name>ServletDemo</servlet-name>
    <servlet-class>servlet.study.ServletDemo</servlet-class>
  </servlet>
  <servlet-mapping>
    <servlet-name>ServletDemo</servlet-name>
    <url-pattern>/api/login</url-pattern>
    <url-pattern>/api/register</url-pattern>
  </servlet-mapping>
</web-app>
在servlet-mapping中,我映射了两个url,一个是“/api/register”,一个是“/api/login”,分别代表注册与登录。实际上,对于同一个servlet,这只是两个不同的称呼罢了,真正做区别处理的是java代码中。我添加了对url命令的判断,在doGet中处理了login,在doPost中处理了register,从而实现了注册与登录功能。
5,运行,选择Run on Server
选择手动指定server,找到tomcat的目录,运行。
此时报错,编译不过,有如下信息:
Description Resource    Path    Location    Type
HttpServlet cannot be resolved to a type    ServletDemo.java
/WebTest/src/servlet/study  line 12 Java Problem
HttpServlet cannot be resolved to a type
原来是jdk 里不包括servlet-api.jar 这个包,此包在Tomcat 中存在,按如下方式操作一下即可:
项目名–> 右键
Property–> 选择
Java Build Path–> 选择
Add External JARs–> 选择
把servlet-api.jar 的路径输入。
继续运行,出现doGet调用信息(是eclipse环境运行,执行了一次默认请求):
log: ServletDemo doGet: url=http://localhost:8080/WebTest/api/login
log: ServletDemo doGet: name=null: password=null
如图:

这次请求,由于没有指定用户名与密码,所以返回失败。
第二次发请求,进行注册:
使用Postman进行post请求注册,
具体Postman的按照与使用,可以参考:
http://www.cnblogs.com/s380774061/p/4624326.html
url使用:http://127.0.0.1:8080/WebTest/api/register
用表单提交两项:name=z&password=a
然后出现doPost调用信息:
log: ServletDemo doPost: url=http://localhost:8080/WebTest/api/register
log: ServletDemo doPost: name=z: password=a
正常的注册操作,返回成功,如下图:

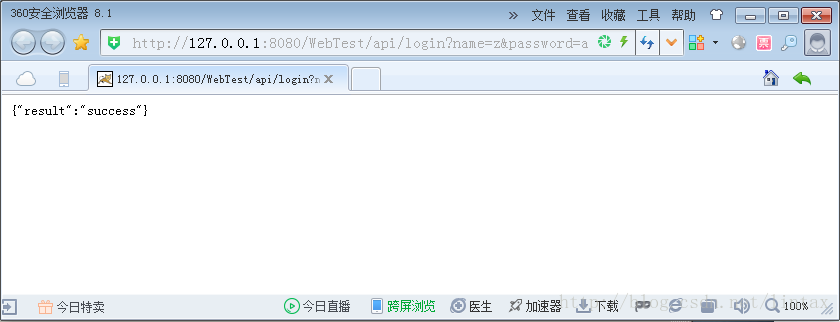
第三次,在浏览器上发Get请求登录:
http://127.0.0.1:8080/WebTest/api/login?name=z&password=a
服务器端的log信息:
log: ServletDemo doGet: url=http://127.0.0.1:8080/WebTest/api/login
log: ServletDemo doGet: name=z: password=a
由于第二次的post已经给用户名与密码赋值了,这次的访问,使用的是同样的用户名与密码,所以,这次的访问,返回是成功的结果:
上面我们是使用的浏览器与postman进行的测试,还有一个测试的方法,就是使用Android工程运行测试,可以使用上一个博文的附件Android demo(http://download.csdn.net/detail/lintax/9777979),是与本文的服务器端的demo相匹配的。
注意,在Android Deom中要指定正确的IP,在我的demo中,设置的是我的电脑的ip(192.168.100.100),在具体测试环境中,要相应修改下。运行时,要保证手机与服务器在一个局域网中,通常使用WIFI就可以了。
本文的服务器端的demo:
http://download.csdn.net/detail/lintax/9786392
参考:
http://blog.csdn.net/yuanguozhengjust/article/details/25747729
http://blog.chinaunix.net/uid-25799257-id-3774015.html