spring boot下建议使用:
https://github.com/SpringForAll/spring-boot-starter-swagger
<dependency>
    <groupId>com.spring4all</groupId>
    <artifactId>swagger-spring-boot-starter</artifactId>
    <version>1.7.1.RELEASE</version>
</dependency>
Swagger使用
1、在pom.xml中加入Swagger2的依赖
<dependency>
        <groupId>io.springfox</groupId>
        <artifactId>springfox-swagger2</artifactId>
        <version>2.2.2</version>
    </dependency>
    <dependency>
        <groupId>io.springfox</groupId>
        <artifactId>springfox-swagger-ui</artifactId>
        <version>2.2.2</version>
    </dependency>
2 在Application.java同级创建Swagger2的配置类Swagger2。
@Configuration
@EnableSwagger2
public class Swagger2 {

    public static final String SWAGGER_SCAN_BASE_PACKAGE = "abc.boot.examples.web";
    public static final String VERSION = "1.0.0";

    @Bean
    public Docket createRestApi() {
        return new Docket(DocumentationType.SWAGGER_2)
                .apiInfo(apiInfo())
                .select()
                .apis(RequestHandlerSelectors.basePackage(SWAGGER_SCAN_BASE_PACKAGE))//api接口包扫描路径
                .paths(PathSelectors.any())//可以根据url路径设置哪些请求加入文档,忽略哪些请求
                .build();
    }
    private ApiInfo apiInfo() {
        return new ApiInfoBuilder()
            .title("Swagger2 接口文档示例")//设置文档的标题
            .description("更多内容请关注:http://www.abc.com")//设置文档的描述->1.Overview
            .version(VERSION)//设置文档的版本信息-> 1.1 Version information
            .contact(new Contact("ABC Boot", "http://www.abc.comt", ""))//设置文档的联系方式->1.2 Contact information
            .termsOfServiceUrl("www.abc.com")//设置文档的License信息->1.3 License information
            .build();
    }
}
3 注解使用
**@ApiOperation**

@ApiOperation(value="获取用户列表", notes="获取所有用户列表",produces = "application/json")
@RequestMapping(value="/users", method= RequestMethod.GET)
public List<User> getUserList() {
List<User> r = new ArrayList<User>(users.values());
    return r;
}

**@ApiResponses**

@ApiOperation(value="获取用户详细信息", notes="根据url的id来获取用户详细信息",produces = "application/json")
// ApiResponses 增加返回结果的描述
@ApiResponses(value = {@ApiResponse(code = 405,message = "Invalid input",response = Integer.class)}) (1)
@ApiImplicitParam(name = "id",value = "用户ID",dataType = "int",paramType = "path")  (2)
@RequestMapping(value="/users/{id}", method= RequestMethod.GET)
public User getUser(@PathVariable Integer id) {
    return users.get(id);
}

(1) 在默认Response的基础上增加新的Response说明
(2) 使用ApiImplicitParam描述接口参数

**@ApiImplicitParams**

@ApiOperation(value="更新用户名称", notes="更新指定用户的名称")
@RequestMapping(value="/users/{id}", method= RequestMethod.POST)
@ApiImplicitParams({  (1)
        @ApiImplicitParam(name = "id",value = "用户ID",paramType = "path",dataType = "int"),  (2)
        @ApiImplicitParam(name = "userName",value = "用户名称",paramType = "form",dataType = "string")
})
public void updateUserName(@PathVariable Integer id,@RequestParam String userName){
    User u = users.get(id);
    u.setName(userName);
}
(1) 使用ApiImplicitParams描述多个参数
(2) 使用ApiImplicitParam时,需要指定paramType,这样也便于swagger ui 生成参数的输入格式。

paramType 有五个可选值 : path, query, body, header, form

**@ApiParam**

@ApiOperation(value="创建用户-传递简单对象", notes="传递简单对象",produces = "application/json")
@RequestMapping(value="/users-1", method= RequestMethod.POST)
//可以不加ApiParam注解,需要给参数添加描述时可以使用这个注解,或者使用ApiImplicitParams注解 (1)
public Map postUser(@RequestParam  String userName,@ApiParam("地址") @RequestParam(required = false) String address) {
    User user = new User();
    user.setId(Math.round(10));
    user.setName(userName);
    user.setAddress(address);
    users.put(user.getId(), user);
    return ImmutableMap.of("user",user);
}
(1) 使用ApiParam描述接口参数

ApiImplicitParam 与 ApiParam 的区别
ApiImplicitParam: This is the only way to define parameters when using Servlets or other non-JAX-RS environments.

对Servlets或者非 JAX-RS的环境,只能使用 ApiImplicitParam。
在使用上,ApiImplicitParam比ApiParam具有更少的代码侵入性,只要写在方法上就可以了,但是需要提供具体的属性才能配合swagger ui解析使用。
ApiParam只需要较少的属性,与swagger ui配合更好。
传递复杂对象 By ModelAttribute

@ApiOperation(value="创建用户-传递复杂对象", notes="传递复杂对象DTO, url参数拼接",produces = "application/json")
@RequestMapping(value="/users-2", method= RequestMethod.POST)
//传递对象推荐使用ModelAttribute注解
public Map postUser2(@ModelAttribute User user) {  (1)
    users.put(user.getId(),user);
    return ImmutableMap.of("user",user);
}
(1) ModelAttribute 是Spring mvc的注解,这里Swagger可以解析这个注解,获得User的属性描述

**@ApiModel**

@ApiModel(value = "User", description = "用户对象")
public class User {

    @ApiModelProperty(value = "ID")
    private Integer id;
    @ApiModelProperty(value = "姓名")
    private String name;
    @ApiModelProperty(value = "地址")
    private String address;
    @ApiModelProperty(value = "年龄",access = "hidden")
    private int age;
    @ApiModelProperty(value = "性别")
    private int sex;
    .......
}
传递复杂对象 By RequestBody

@ApiOperation(value="创建用户-传递复杂对象", notes="传递复杂对象DTO,json格式传递数据",produces = "application/json")
@RequestMapping(value="/users-3", method= RequestMethod.POST)
//json格式传递对象使用RequestBody注解
public User postUser3(@RequestBody User user) {
    users.put(user.getId(),user);
    return user;
}
**PathVariable**

@ApiOperation(value="删除用户- PathVariable", notes="根据url的id来指定删除对象")
@RequestMapping(value="/users/{id}", method = RequestMethod.DELETE)
public void deleteUser(@PathVariable Integer id) {  (1)
    users.remove(id);
}
(1) PathVariable是Spring 的注解,对于这种简单的参数,就可以不用写ApiParam来描述接口参数。

数组的描述

@ApiOperation(value="删除用户-传递数组", notes="删除对象,传递数组")
@RequestMapping(value="/users/deleteByIds", method = RequestMethod.DELETE)
public void deleteUser(@ApiParam("用户ID数组") @RequestParam Integer[] ids) {  (1)
    for (int id:ids){
        users.remove(id);
    }
}
(1) 这里用ApiParam为数组参数添加描述
**
实例演示:
**
@RestController
@RequestMapping(value="/users")     // 通过这里配置使下面的映射都在/users下,可去除
public class UserController {

    static Map<Long, User> users = Collections.synchronizedMap(new HashMap<Long, User>());

    @ApiOperation(value="获取用户列表", notes="")
    @RequestMapping(value={""}, method=RequestMethod.GET)
    public List<User> getUserList() {
        List<User> r = new ArrayList<User>(users.values());
        return r;
    }

    @ApiOperation(value="创建用户", notes="根据User对象创建用户")
    @ApiImplicitParam(name = "user", value = "用户详细实体user", required = true, dataType = "User")
    @RequestMapping(value="", method=RequestMethod.POST)
    public String postUser(@RequestBody User user) {
        users.put(user.getId(), user);
        return "success";
    }

    @ApiOperation(value="获取用户详细信息", notes="根据url的id来获取用户详细信息")
    @ApiImplicitParam(name = "id", value = "用户ID", required = true, dataType = "Long")
    @RequestMapping(value="/{id}", method=RequestMethod.GET)
    public User getUser(@PathVariable Long id) {
        return users.get(id);
    }

    @ApiOperation(value="更新用户详细信息", notes="根据url的id来指定更新对象,并根据传过来的user信息来更新用户详细信息")
    @ApiImplicitParams({
            @ApiImplicitParam(name = "id", value = "用户ID", required = true, dataType = "Long"),
            @ApiImplicitParam(name = "user", value = "用户详细实体user", required = true, dataType = "User")
    })
    @RequestMapping(value="/{id}", method=RequestMethod.PUT)
    public String putUser(@PathVariable Long id, @RequestBody User user) {
        User u = users.get(id);
        u.setName(user.getName());
        u.setAge(user.getAge());
        users.put(id, u);
        return "success";
    }

    @ApiOperation(value="删除用户", notes="根据url的id来指定删除对象")
    @ApiImplicitParam(name = "id", value = "用户ID", required = true, dataType = "Long")
    @RequestMapping(value="/{id}", method=RequestMethod.DELETE)
    public String deleteUser(@PathVariable Long id) {
        users.remove(id);
        return "success";
    }

}
如上代码所示,我们通常需要自己增加一些说明来丰富文档内容。如下所示,我们通过@ApiOperation注解来给API增加说明、通过@ApiImplicitParams、@ApiImplicitParam注解来给参数增加说明。
完成上述代码添加上,启动Spring Boot程序,访问:http://localhost:8080/swagger-ui.html
。就能看到RESTful API的页面。如下图所示。
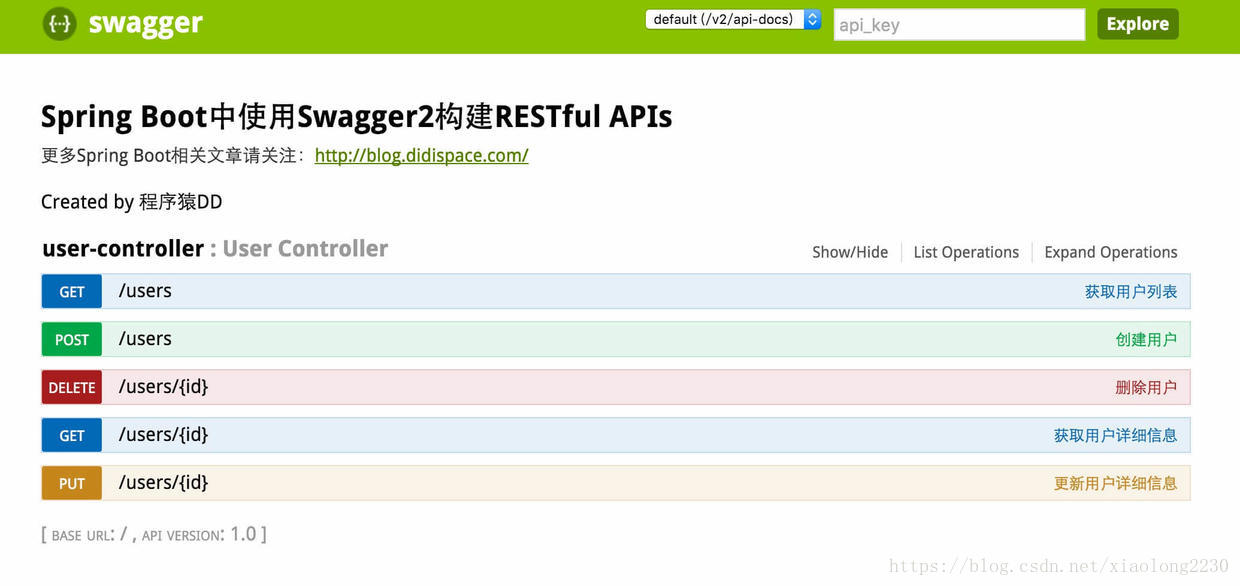
我们可以再点开具体的API请求,以POST类型的/users请求为例,可找到上述代码中我们配置的Notes信息以及参数user的描述信息,如下图所示。
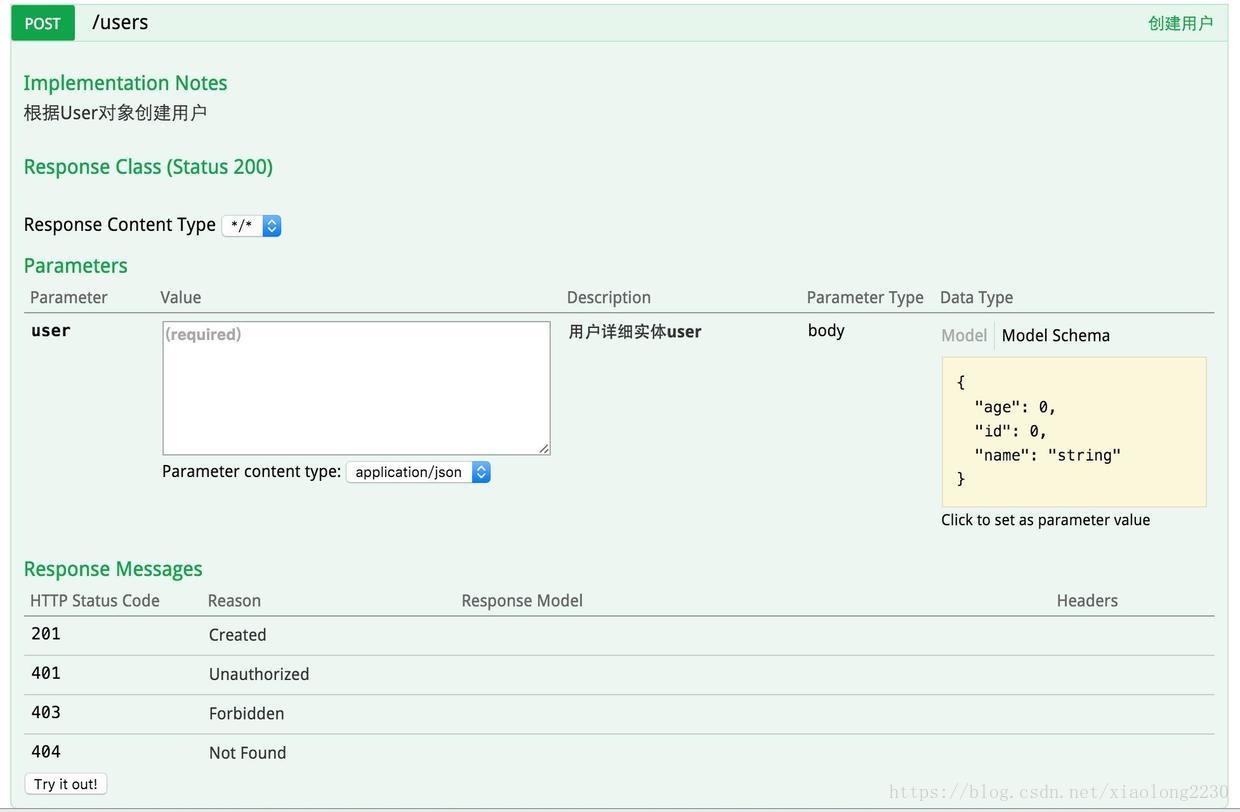
API文档访问与调试
在上图请求的页面中,我们看到user的Value是个输入框?是的,Swagger除了查看接口功能外,还提供了调试测试功能,我们可以点击上图中右侧的Model Schema(黄色区域:它指明了User的数据结构),此时Value中就有了user对象的模板,我们只需要稍适修改,点击下方“Try it out!”按钮,即可完成了一次请求调用!
此时,你也可以通过几个GET请求来验证之前的POST请求是否正确。
相比为这些接口编写文档的工作,我们增加的配置内容是非常少而且精简的,对于原有代码的侵入也在忍受范围之内。因此,在构建RESTful API的同时,加入swagger来对API文档进行管理,是个不错的选择。