版权声明:黄河爱浪,[email protected], https://blog.csdn.net/u013350495/article/details/82958632
在上一篇《单选框/复选框美化》中,使用到了关键先生 <label>,但是很不幸运,在下拉列表框(<select>)中,<label>并不能通过指向来展开选项,所以只能通过 自定义的方式 模拟一个下拉列表框的功能。
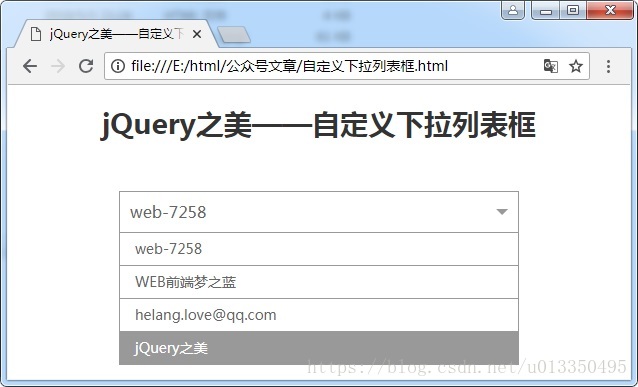
上效果图:
源码如下:
<!--
    author:helang
    Email:[email protected]
-->
<!DOCTYPE html>
<html lang="en">
<head>
    <meta charset="UTF-8">
    <meta name="viewport"
          content="width=device-width, initial-scale=1.0, minimum-scale=1.0, maximum-scale=1.0, user-scalable=no">
    <meta name="author" content="[email protected]">
    <title>jQuery之美——自定义下拉列表框</title>
    <style type="text/css">
        body{
            margin: 0;
            padding: 0;
            background-color: #ffffff;
            font-size: 14px;
            font-family: 'Microsoft YaHei', 'Times New Roman', Times, serif;
            letter-spacing: 0;
            color: #333333;
        }
        .select_box{
            padding: 0 10px;
            position: relative;
            height: 40px;
            line-height: 40px;
            border: #999999 solid 1px;
            color: #666666;
            user-select: none;
            font-size: 16px;

        }
        .select_box:after{
            content: '';
            display: block;
            width:0;
            height:0;
            border-right:6px solid transparent;
            border-left:6px solid transparent;
            border-top:6px solid #999999;
            position: absolute;
            right: 10px;
            top: 17px;
        }
        .select_box>ul{
            margin: 0;
            padding: 0;
            list-style: none;
            position: absolute;
            width: 100%;
            height: auto;
            border: #999999 solid 1px;
            left: -1px;
            top: 40px;
            display: none;
            background-color: #ffffff;
            z-index: 1;
            font-size: 14px;
        }
        .select_box>ul>li{
            margin: 0;
            line-height: 32px;
            border-top: #999999 solid 1px;
            padding: 0 15px;
        }
        .select_box>ul>li:first-child{
            border-top: none;
        }
        .select_box>ul>li:hover{
            background-color: #999999;
            color: #ffffff;
        }
    </style>
</head>
<body>
<h1 style="text-align: center;">jQuery之美——自定义下拉列表框</h1>
<div style="width: 400px; margin: 50px auto;">
    <div class="select_box" id="stlect_1">
        <div>请选择</div>
    </div>
</div>
<h5 style="text-align: center;">[email protected]</h5>
<script type="text/javascript" src="https://mydarling.gitee.io/resource/jQuery/jquery-1.9.1.min.js"></script>
<script type="text/javascript">
    /* jQuery对象级别插件扩展 */
    $.fn.extend({
        hlSelect:function (data) {
            var _self={};
            _self.el=$(this);
            _self.data=data || [];
            _self.setList=function(){
                var htmlStr='<ul>';
                $.each(_self.data,function (index,item) {
                    htmlStr+='<li>'+item+'</li>';
                });
                htmlStr+='</ul>';
                _self.el.append(htmlStr);
            };
            _self.setList();

            _self.ListEl = $(this).children("ul");
            _self.el.click(function () {
                if(_self.ListEl.is(':hidden')){
                    _self.ListEl.show();
                }else {
                    _self.ListEl.hide();
                }
            });
            _self.ListEl.on("click",">li",function () {
                _self.el.children("div").html($(this).html());
            });
        }
    });

    $("#stlect_1").hlSelect(['web-7258','WEB前端梦之蓝','[email protected]','jQuery之美']);
</script>
</body>
</html>
源码部分只是模拟一个下拉列表框的功能,在功能的完整上还有一大步距离。
下篇预告:jQuery之美——页面语言切换
更多精彩文章,敬请持续关注——WEB前端梦之蓝
用微信扫描下方的二维码可直接关注该公众号哦,或者打开微信公众号搜索 “web-7258”,关注后会在第一时间将最新文章推送给您哦!