不积跬步无以至千里
本文讲解前三种解锁的实现,指纹由下一篇来讲解。
主要需要有两点
1、每次都有5次解锁。
2、随着尝试次数的增加,时间增长。
3、关机重启后仍然能计算时间。(指纹解锁不需要)
前摘
修改这4种解锁方式是:Pin码解锁、密码解锁、图案解锁和指纹解锁,修改解锁失败的等待时间?做过SystemUI相关模块都知道解锁这一块的验证密码等等操作一般是通过JNI通过Native做的验证操作,数据获取一般也是涉及到C的逻辑。由于考虑其实系统其他的界面功能上也会有解锁的这几种方式,例如:Settings里面的设置解锁方式那里,因此修改锁屏上的解锁等待时间,要修改到共有接口,因此这个功能的添加,并不是这么简单的去修改SystemUI的,但是在网上搜索相关修改等待时间的blog,并没有,因此在这把修改的步骤记录下来。
一、 定位修改的起始点
首先定位需要修改的地方,通过monitor工具,获取如下
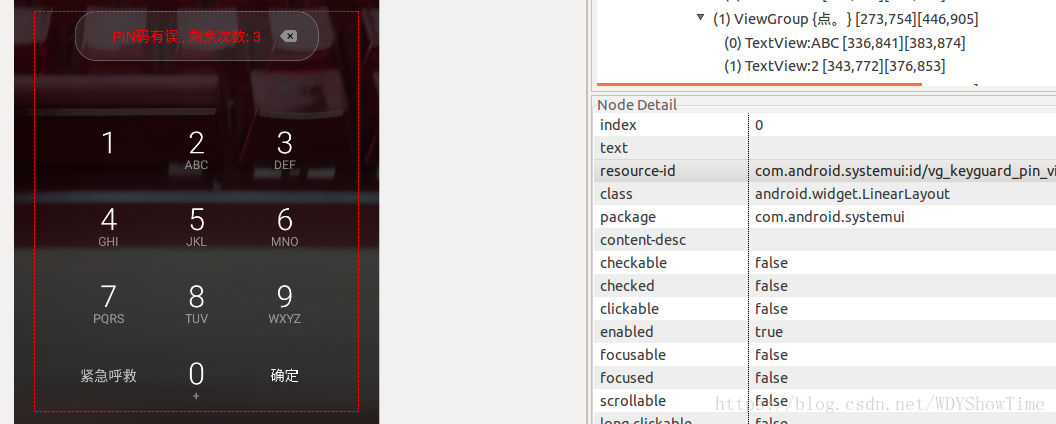
就可以获取某个控件的id,然后锁定layout布局了,然后就可以找到相关的代码了。
二、分析整体的修改逻辑
以此类推,因此我们发现要修改的这几种解锁方式主要分为两大类,两大类为:1、PIN码、密码和图案 2、指纹解锁
分为两大类的主要原因是因为指纹解锁的主要逻辑并不在Keyguard里面而是SystemUI里面,因为在7.0的代码上Keyguard和SystemUI是分开的,8.0则合到了一起。
三、具体修改的实现
修改PIN码、密码和图案解锁
通过上边的工具定位代码得知,相关类如下:

如图,其实相关类为KeyguardPINView、KeyguardPassworkView和KeyguardPatternView
这几个就是PIN码、密码和图案对应的自定义View,而其中的点击并操作的逻辑也是在这里面,感觉根据MVC的设计原则,感觉有点不符合这点啊哈哈哈。。。结果View和Model放到一起了。
其实为什么PIN码和密码放到一起呢?因为他们有个共同的父类KeyguardAbsKeyInputView.java,关于解锁逻辑的显示控制也在父类里,因此PIN码和密码解锁在这个父类里做操作就可以了。
其中代码如下:
        mPendingLockCheck = LockPatternChecker.checkPassword(
                mLockPatternUtils,
                entry,
                userId,
                new LockPatternChecker.OnCheckCallback() {

                    @Override
                    public void onEarlyMatched() {
                        android.util.Log.i("wangdy","KeyguardAbs.onEarlyMatfched");
                        onPasswordChecked(userId, true /* matched */, 0 /* timeoutMs */,
                                true /* isValidPassword */);
                    }

                    @Override
                    public void onChecked(boolean matched, int timeoutMs) {
                        android.util.Log.i("wangdy","KeyguardAbs.onChecked.matched:"+matched+",timeoutMs:"+timeoutMs);
                        setPasswordEntryInputEnabled(true);
                        mPendingLockCheck = null;
                        if (!matched) {
                            onPasswordChecked(userId, false /* matched */, timeoutMs,
                                    true /* isValidPassword */);
                        }
                    }

                });
    }
其实关于锁屏PIN码、密码和图案解锁都是依靠这个LockPatternChecker.checkPassword方法去验证密码,然后利用LockPatternChecker.OnCheckCallback这个回调来返回验证结果,这个验证结果的回调也是通过JNI一系列步骤完成的。
先看其中的两个回调方法
1、onChecked 这个回调方法是当验证失败的时候才会回调,这里会返回matched,这里会返回false,timeoutMs这里就是时间间隔。
2、onEarlyMatched 这个回调方法是当验证成功的时候才会回调。
发现问题:
其实刚开始做这个功能的时候并没有考虑做全局的,就想在这里做一个时间的拦截,然后自己把这个时间间隔改了,就能完成需求,其实后来测试并不行,所以这里就牵扯出了发现的几个问题。
经测试发现,如下问题:
1、系统默认返回都是30×1000
2、默认锁屏第三次尝试解锁时候,并不是5次。
3、就算你强制能让第三次尝试的还能输入密码尝试解锁,但是系统下边是锁定的,并不能进行正常的解锁尝试(即输入的正常密码,并不能解锁成功,返回仍然是失败)
因此,根据需求要做成全局的,就找到根源把这个返回时间修改成自己想要的这样,所有实现这个回调的应用都能获取到新制定规则的时间(这里是指Settings(其实每个应用)那边其实也是实现这边的回调接口,然后系统返回这个时间都能接受到最新的时间规则)。
这样就一直追,追到了这个类gatekeeper.cpp。(其实做系统开发,修改或者添加功能,就是找到一个突破口,一直追追)其实真正的返回时间的是在这里写好的。如下:
/system/gatekeeper/gatekeeper.cpp 的ComputeRetryTimeout函数
原生代码:
/*
 * Calculates the timeout in milliseconds as a function of the failure
 * counter 'x' as follows:
 *
 * [0. 5) -> 0
 * 5 -> 30
 * [6, 10) -> 0
 * [11, 30) -> 30
 * [30, 140) -> 30 * (2^((x - 30)/10))
 * [140, inf) -> 1 day
 *
 */
uint32_t GateKeeper::ComputeRetryTimeout(const failure_record_t *record) {
    static const int failure_timeout_ms = 30000;
    if (record->failure_counter == 0) return 0;

    if (record->failure_counter > 0 && record->failure_counter <= 10) {
        if (record->failure_counter % 5 == 0) {
            return failure_timeout_ms;
        }  else {
            return 0;
        }
    } else if (record->failure_counter < 30) {
        return failure_timeout_ms;
    } else if (record->failure_counter < 140) {
        return failure_timeout_ms << ((record->failure_counter - 30) / 10);
    }

    return DAY_IN_MS;
}
根据上边可以看出,30000这个数字很敏感嘛,系统一直返回的就是这个30000ms,终于找到了,是一个固定值。其实细看这个方法可以看出来,它是通过记录失败的次数然后进行了判断,返回时间间隔。
总结上边代码:
1、当失败0次,返回0ms
2、当失败大于0,失败小于10次,就是当前两次时,每次失败5次后,返回30000ms,意思是这总前两次都可以尝试5次机会
3、当失败次数小于30次,就是当总次数是10次到30次时,返回30000ms,意思是第二次以后为每次就只有一次尝试机会解锁,就要等待时间。直到总次数为30次时。
4、当总次数大于30次到140次,就是需要左移运算出毫秒数。
这里有两种次数,一种是每次解锁都有5次尝试机会(但是只有前两次),后边每次都要等待时间,这里就是前边我们遇到的问题。
因此修改这个方法的规则,解决问题
修改后代码:
uint32_t GateKeeper::ComputeRetryTimeout(const failure_record_t *record) {
    static const int failure_timeout_ms = 60*1000;
    if (record->failure_counter == 0) return 0;
    if (record->failure_counter > 0) {
        if (record->failure_counter % 5 == 0) {
                if(record->failure_counter/5 == 1){
                    return 2*failure_timeout_ms;
                }else if(record->failure_counter/5 == 2){
                    return 5*failure_timeout_ms;
                }else if(record->failure_counter/5 == 3){
                    return 15*failure_timeout_ms;
                }else if(record->failure_counter/5 == 4){
                    return 30*failure_timeout_ms;
                }else if(record->failure_counter/5 == 5){
                    return 60*failure_timeout_ms;
                }else if(record->failure_counter/5 >= 6){
                    return 120*failure_timeout_ms;
                }
        }  else {
            return 0;
        }
    }
    return 2*failure_timeout_ms;
}
这样,我们就修改了它原生的规则。实现时间的动态改变,随着尝试次数的增加。
写到这已经满足了需求上的前两条需求了,现在就要满足实现第三条关机重启仍然能计算时间。
根据逻辑如下代码:
 private void onPasswordChecked(int userId, boolean matched, int timeoutMs,
            boolean isValidPassword) {

        boolean dismissKeyguard = KeyguardUpdateMonitor.getCurrentUser() == userId;
        if (matched) {
            mCallback.reportUnlockAttempt(userId, true, 0);
            if (dismissKeyguard) {
                mDismissing = true;
                mCallback.dismiss(true);
            }
        } else {
            if (isValidPassword) {
                mCallback.reportUnlockAttempt(userId, false, timeoutMs);
                if (timeoutMs > 0) {
                    long deadline = mLockPatternUtils.setLockoutAttemptDeadline(
                            userId, timeoutMs);
//                    long deadline = //mLockPatternUtils.setLockoutAttemptDeadlineBySystemCurrentTime(
//                            userId, timeoutMs);
                    android.util.Log.i("wangdy","KeyguardAbs.onPasswordChecked.timeoutMs:"+timeoutMs+",deadline:"+deadline);
                    handleAttemptLockout(deadline);
                }
            }
其实这里就是上边说的回调接口调用的方法,来处理验证密码失败或者成功的逻辑,其中上边逻辑处理成功就是matched为true的时候,失败为false的时候,因此看false这边通过这句代码
long deadline = mLockPatternUtils.setLockoutAttemptDeadline(
                            userId, timeoutMs);
设置了时间,然后返回一个终止时间(就是计时结束的时间戳),然后去实现倒计时处理的。
来看一下,这个方法是怎么记录时间戳的?
/frameworks/base/core/java/com/android/internal/widget/LockPatternUtils.java
/**
     * Set and store the lockout deadline, meaning the user can't attempt his/her unlock
     * pattern until the deadline has passed.
     * @return the chosen deadline.
     */
    public long setLockoutAttemptDeadline(int userId, int timeoutMs) {
        final long deadline = SystemClock.elapsedRealtime() + timeoutMs;
        setLong(LOCKOUT_ATTEMPT_DEADLINE, deadline, userId);
        setLong(LOCKOUT_ATTEMPT_TIMEOUT_MS, timeoutMs, userId);
        return deadline;
    }
由代码得知,其实参数是时间间隔,然后通过SystemClock.elapsedRealtime()这个方法获取开机时间加上时间间隔,然后得到计时结束的时间戳存储起来。
其实每次亮屏后会出现倒计时的界面是重新获取了计时结束的时间戳,如下代码:
@Override
    public void onResume(int reason) {
        reset();
    }

@Override
    public void reset() {
        // start fresh
        mDismissing = false;
        resetPasswordText(false /* animate */, false /* announce */);
        // if the user is currently locked out, enforce it.
        long deadline = mLockPatternUtils.getLockoutAttemptDeadline(
                KeyguardUpdateMonitor.getCurrentUser());
        if (shouldLockout(deadline)) {
            handleAttemptLockout(deadline);
        } else {
            resetState();
        }
    }
其中的mLockPatternUtils.getLockoutAttemptDeadlineBySystemCurrentTime(KeyguardUpdateMonitor.getCurrentUser())方法就是获取的计时结束时间戳,通过判断是否时间戳是否失效,设置界面倒计时是否显示,所以再看一下获取的计时结束时间戳的方法如下
/**
     * @return The elapsed time in millis in the future when the user is allowed to
     *   attempt to enter his/her lock pattern, or 0 if the user is welcome to
     *   enter a pattern.
     */
    public long getLockoutAttemptDeadline(int userId) {
        long deadline = getLong(LOCKOUT_ATTEMPT_DEADLINE, 0L, userId);
        final long timeoutMs = getLong(LOCKOUT_ATTEMPT_TIMEOUT_MS, 0L, userId);
        final long now = SystemClock.elapsedRealtime();
        if (deadline < now && deadline != 0) {
            // timeout expired
            setLong(LOCKOUT_ATTEMPT_DEADLINE, 0, userId);
            setLong(LOCKOUT_ATTEMPT_TIMEOUT_MS, 0, userId);
            return 0L;
        }

        if (deadline > (now + timeoutMs)) {
            // device was rebooted, set new deadline
            deadline = now + timeoutMs;
            setLong(LOCKOUT_ATTEMPT_DEADLINE, deadline, userId);
        }

        return deadline;
    }
通过获取存储的计时结束时间戳,然后对比现在的时间,因为SystemClock.elapsedRealtime()获取的是开机到现在的时间,所以只要关机重启,就会走下边的判断会根据最新的时间加上时间间隔,存储起来作为开机后的计时结束时间戳。因此就看到开后会重新等待30秒的现象,因此我们在这里想要实现效果修改逻辑。
添加代码接口,一个set,一个get,如下代码:
/**
     * Set and store the lockout deadline by SystemCurrentTime, meaning the user can't attempt his/her unlock
     * pattern until the deadline has passed.
     * @return the chosen deadline.
     */
    public long setLockoutAttemptDeadlineBySystemCurrentTime(int userId, int timeoutMs) {
        final long deadline = System.currentTimeMillis() + timeoutMs;
        setLong(LOCKOUT_ATTEMPT_DEADLINE_CURRENTTIME, deadline, userId);
        setLong(LOCKOUT_ATTEMPT_TIMEOUT_MS, timeoutMs, userId);
        return deadline;
    }

    /**
     * @return The SystemCurrentTime in millis in the future when the user is allowed to
     *   attempt to enter his/her lock pattern, or 0 if the user is welcome to
     *   enter a pattern.
     */
    public long getLockoutAttemptDeadlineBySystemCurrentTime(int userId) {
        long deadline = getLong(LOCKOUT_ATTEMPT_DEADLINE_CURRENTTIME, 0L, userId);
        final long now = System.currentTimeMillis();
        if (deadline < now && deadline != 0) {
            // timeout expired
            setLong(LOCKOUT_ATTEMPT_DEADLINE_CURRENTTIME, 0, userId);
            setLong(LOCKOUT_ATTEMPT_TIMEOUT_MS, 0, userId);
            return 0L;
        }
        return deadline;
    }
这样把对应的方法set和get方法替换了(KeyguardAbsKeyInputView.java这是PIN码和密码解锁,KeyguardPatternView.java这里是图案的),就可以了。这样就满足了PIN码、密码和图案解锁的需求。
由于指纹解锁和前三种解锁流程不一样,下一篇再写。Over