版权声明:本文为博主原创文章,未经博主允许不得转载。 https://blog.csdn.net/hry2015/article/details/80614315
Swagger简述
Swagger 是一款RESTFUL接口的文档在线自动生成+功能测试功能软件
Swagger 是一个规范和完整的框架,用于生成、描述、调用和可视化 RESTful 风格的 Web 服务。总体目标是使客户端和文件系统作为服务器以同样的速度来更新。文件的方法,参数和模型紧密集成到服务器端的代码,允许API来始终保持同步
Spring Boot集成Swagger
本文涉及的工程: swagger
pom.xml
swagger需要引入如下的jar
<!--  引入swagger包 -->
<dependency>
    <groupId>io.springfox</groupId>
    <artifactId>springfox-swagger2</artifactId>
    <version>2.2.2</version>
</dependency>
<dependency>
    <groupId>io.springfox</groupId>
    <artifactId>springfox-swagger-ui</artifactId>
    <version>2.2.2</version>
</dependency>
@EnableSwagger2
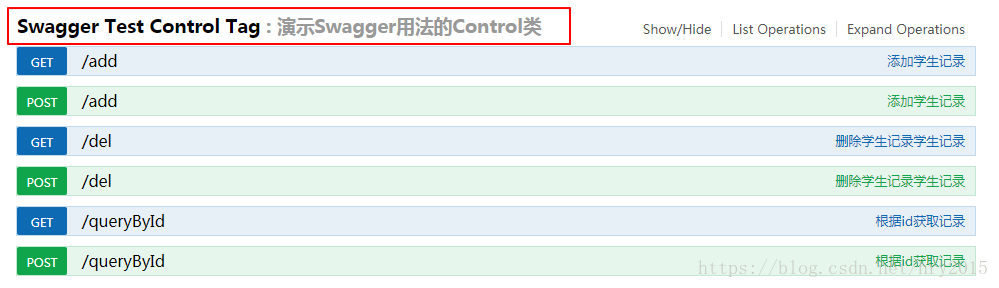
使用@EnableSwagger2注解在Control类上就可以swagger的功能
@RestController
@EnableSwagger2 // 启动swagger注解
// api-value:定义名称,如果没有定义,则默认显示类名
@Api(value = "Swagger Test Control", description = "演示Swagger用法的Control类", tags = "Swagger Test Control Tag")
public class SwaggerTestCtl {
..
}
执行启动类
执行启动类,访问如下连接
http://127.0.0.1:8080/swagger-ui.html#/
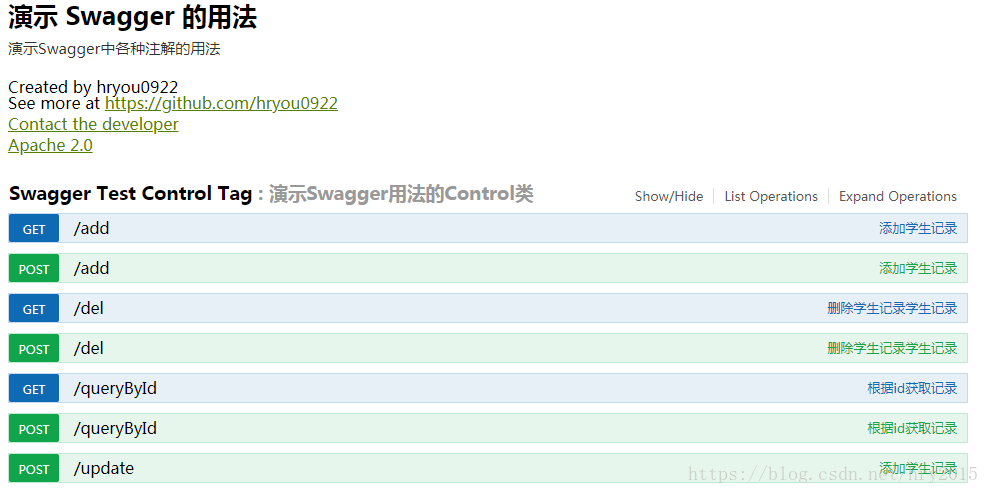
就可以进入swagger页面,进行接口测试,界面如下:
ApiInfo类
我们创建ApiInfo实例,我们为swagger配置更多的接口说明
@Bean
public Docket api() {
return new Docket(DocumentationType.SWAGGER_2)
.apiInfo(getApiInfo())
// .pathMapping("/")// base,最终调用接口后会和paths拼接在一起
.select()
// .paths(Predicates.or(PathSelectors.regex("/api/.*")))//过滤的接口
.apis(RequestHandlerSelectors.basePackage("com.hry.swagger.ctl")) //过滤的接口
.paths(PathSelectors.any())
.build();
}
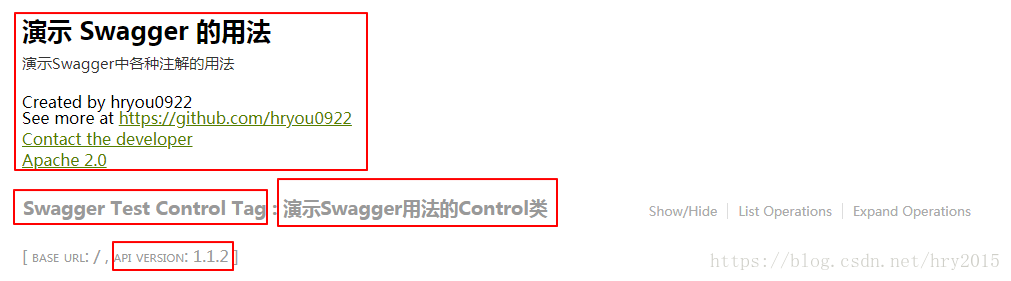
private ApiInfo getApiInfo() {
// 定义联系人信息
Contact contact = new Contact("hryou0922","https://github.com/hryou0922", "[email protected]");
return new ApiInfoBuilder()
.title("演示 Swagger 的用法") // 标题
.description("演示Swagger中各种注解的用法") // 描述信息
.version("1.1.2") // //版本
.license("Apache 2.0")
.licenseUrl("http://www.apache.org/licenses/LICENSE-2.0")
.contact(contact)
.build();
}重启服务,界面如下:
swagger的注解
swagger的注解概述
我们可以使用swagger定义更详细接口说明
@Api:用在类上,标志此类是Swagger资源
    value:接口说明
    tags:接口说明,可以在页面中显示。可以配置多个,当配置多个的时候,在页面中会显示多个接口的信息

@ApiOperation:用在方法上,描述方法的作用

@ApiImplicitParams:包装器:包含多个ApiImplicitParam对象列表

@ApiImplicitParam:定义在@ApiImplicitParams注解中,定义单个参数详细信息
        ○ paramType:参数放在哪个地方
            § header-->请求参数的获取:@RequestHeader
            § query-->请求参数的获取:@RequestParam
            § path(用于restful接口)-->请求参数的获取:@PathVariable
            § body(以流的形式提交 仅支持POST)
            § form(以form表单的形式提交 仅支持POST)
        ○ name:参数名
        ○ dataType:参数的数据类型 只作为标志说明,并没有实际验证
            § Long
            § String
        ○ required:参数是否必须传
            § true
            § false
        ○ value:参数的意义
        ○ defaultValue:参数的默认值

@ApiModel:描述一个Swagger Model的额外信息
    @ApiModel用在类上,表示对类进行说明,用于实体类中的参数接收说明

@ApiModelProperty:在model类的属性添加属性说明

@ApiParam:用于Controller中方法的参数说明

@ApiResponses:包装器:包含多个ApiResponse对象列表

@ApiResponse:定义在@ApiResponses注解中,一般用于描述一个错误的响应信息
        ○ code:错误码,例如400
        ○ message:信息,例如"请求参数没填好"
        ○ response:抛出异常的类

@Authorization  Declares an authorization scheme to be used on a resource or an operation.

@AuthorizationScope Describes an OAuth2 authorization scope.
演示使用注解demo
本节我们演示上节的注解如何使用
@Api
用在类上,标志此类是Swagger资源,对接口更加详细说明
@RestController
@EnableSwagger2 // 启动swagger注解
@Api(value = "Swagger Test Control", description = "演示Swagger用法的Control类", tags = "Swagger Test Control Tag")
public class SwaggerTestCtl {

}
结果如下:
@ApiOperation
用在方法上,描述方法的作用
// 方法的说明
@ApiOperation(value = "根据id获取记录", response = Student.class)
// 定义请求参数
@ApiImplicitParams({ @ApiImplicitParam(paramType = "query", dataType = "String", name = "id", value = "主键", required = true) })
public Student queryById(String id){
    System.out.println("queryById id = " + id);
    return new Student();
}
结果如下:

@ApiImplicitParams 和 @ApiImplicitParam
// 定义请求参数
@ApiImplicitParams({ @ApiImplicitParam(paramType = "query", dataType = "String", name = "id", value = "主键", required = true) })
public Student queryById(String id){
   System.out.println("queryById id = " + id);
   return new Student();
}
结果如下:

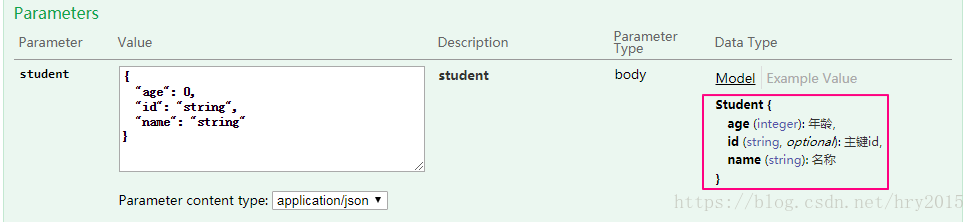
@ApiModel 和@ApiModelProperty
定义model类
@ApiModel( description = "学生")
public class Student {
    @ApiModelProperty(value = "主键id")
    private String id;
    @ApiModelProperty(value = "名称", required = true)
    private String name;
    @ApiModelProperty(value = "年龄", required = true)
    private int age;
…
}
在方法使用
@RequestMapping(value = "/update", method = {RequestMethod.POST})
// 方法说明
@ApiOperation(value = "添加学生记录", notes="传递复杂对象DTO",produces = "application/json")
public int update(@RequestBody Student student){
    System.out.println("update student = " + student);
    return 1;
}
结果如下:
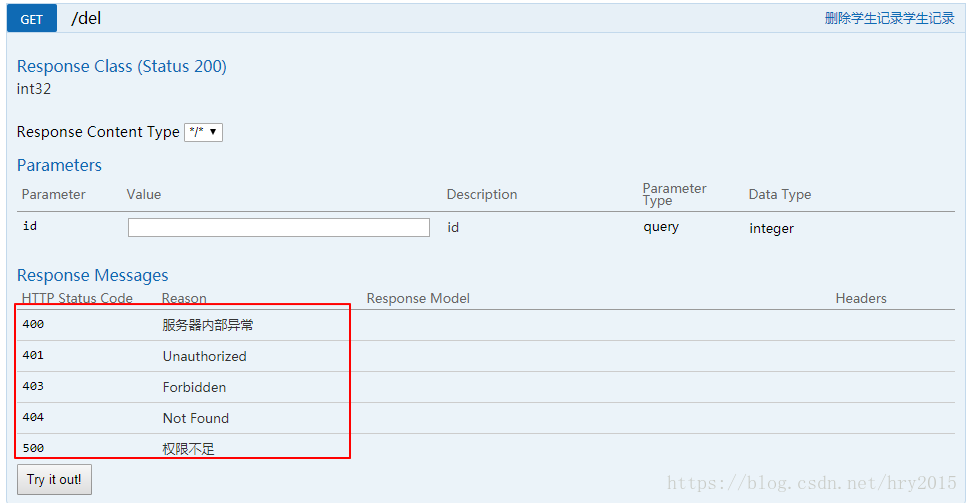
@ApiResponses和@ApiResponse
@RequestMapping(value = "/del", method = {RequestMethod.POST, RequestMethod.GET})
// 方法说明
@ApiOperation(value = "删除学生记录学生记录")
// 定义返回值意义
@ApiResponses({
        @ApiResponse(code = 400, message = "服务器内部异常"),
        @ApiResponse(code = 500, message = "权限不足") })
public int del(int id){
    System.out.println("del id = " + id);
    return 1;
}
结果如下:
其它
在测试过程中,可能出现界面内容没有被刷新,则可以使用 shift + F5 强制刷新
代码
以上的详细的代码见下面 github代码,请尽量使用tag v0.22,不要使用master,因为我不能保证master代码一直不变