前言
原本想写完ioc接着写aop的,但是在写aop的过程中用了点mvc的技术点,想了想,还是先把mvc记录一下好了
什么是SpringMVC?
在上一篇介绍Springioc的博客时,有张架构图,可以看到SpringMVC也是Spring框架的一部分,那么SpringMVC到底是什么呢?
Spring mvc属于表现层的框架,基于ioc功能开发,用于开发web程序,按MVC结构开发。

这是一幅用灵魂画出来的架构图,然后我简单介绍一下运行流程
1、 用户发送请求至前端控制器DispatcherServlet
2、 DispatcherServlet收到请求调用HandlerMapping处理器映射器。
3、 处理器映射器根据请求url找到具体的处理器,生成处理器对象及处理器拦截器(如果有则生成)一并返回给DispatcherServlet。
4、
DispatcherServlet通过HandlerAdapter处理器适配器调用处理器
5、 执行处理器(Controller,也叫后端控制器)。
6、 Controller执行完成返回ModelAndView
7、 HandlerAdapter将controller执行结果ModelAndView返回给DispatcherServlet
8、 DispatcherServlet将ModelAndView传给ViewReslover视图解析器
9、 ViewReslover解析后返回具体View
10、DispatcherServlet对View进行渲染视图(即将模型数据填充至视图中)。
11、DispatcherServlet响应用户
入门案例
国际惯例,我们先模拟一个简单的helloworld请求界面,下面是请求到相应的流程
hello.do-->DispatcherServlet-->HandlerMapping-->HelloController(返回ModelAndView)-->ViewResolver-->/hello.jsp
1 创建maven工程,配置pom.xml
<project xmlns="http://maven.apache.org/POM/4.0.0" xmlns:xsi="http://www.w3.org/2001/XMLSchema-instance"
xsi:schemaLocation="http://maven.apache.org/POM/4.0.0 http://maven.apache.org/xsd/maven-4.0.0.xsd">
  <modelVersion>4.0.0</modelVersion>
  <groupId>cn.chf</groupId>
  <artifactId>SpringMVC</artifactId>
  <version>0.0.1-SNAPSHOT</version>
  <packaging>war</packaging>

    <!-- 指定字符编码和版本信息 -->
  <properties>
        <project.build.sourceEncoding>UTF-8</project.build.sourceEncoding>
        <spring.version>4.2.1.RELEASE</spring.version>
    </properties>

    <dependencies>

        <!-- Spring 框架基本的核心工具类 -->
        <dependency>
            <groupId>org.springframework</groupId>
            <artifactId>spring-core</artifactId>
            <version>${spring.version}</version>
        </dependency>

         <!-- Spring 核心提供了大量扩展 -->
        <dependency>
            <groupId>org.springframework</groupId>
            <artifactId>spring-context</artifactId>
            <version>${spring.version}</version>
        </dependency>

      <!-- SpringMVC -->
    <dependency>
        <groupId>org.springframework</groupId>
        <artifactId>spring-webmvc</artifactId>
        <version>${spring.version}</version>
    </dependency>
    <!-- SpringAop -->
    <dependency>
        <groupId>org.springframework</groupId>
        <artifactId>spring-aop</artifactId>
        <version>${spring.version}</version>
    </dependency>
  </dependencies>

</project>
2 配置DispatcherServlet(web.xml)
<?xml version="1.0" encoding="UTF-8"?>
<web-app xmlns:xsi="http://www.w3.org/2001/XMLSchema-instance" xmlns="http://java.sun.com/xml/ns/javaee"
xsi:schemaLocation="http://java.sun.com/xml/ns/javaee http://java.sun.com/xml/ns/javaee/web-app_2_5.xsd" version="2.5">
  <display-name>SpringMVC</display-name>
 <!-- 配置DispatcherServlet -->
 <servlet>
    <servlet-name>springmvc</servlet-name>
    <servlet-class>
    org.springframework.web.servlet.DispatcherServlet
    </servlet-class>
    <!-- 指定SpringMVC配置文件的位置和名称 -->
    <init-param>
        <param-name>contextConfigLocation</param-name>
        <param-value>classpath:spring-mvc.xml</param-value>
    </init-param>
   </servlet>
   <servlet-mapping>
    <servlet-name>springmvc</servlet-name>
    <url-pattern>*.do</url-pattern> <!-- 设置所有以do结尾的请求进入SpringMVC -->
  </servlet-mapping>
  </web-app>
3 创建SpringMVC核心配置文件
创建一个Spring-mvc.xml文件,文件名可以自定义,但是要和web.xml中的classpath所指定的文件名一致,先配置MVC注解驱动,在配置Controller扫描包使配置bean的注解生效,最后配置视图解析器
<?xml version="1.0" encoding="UTF-8"?>
<beans xmlns="http://www.springframework.org/schema/beans"
	xmlns:xsi="http://www.w3.org/2001/XMLSchema-instance"
	xmlns:context="http://www.springframework.org/schema/context"
	xmlns:jdbc="http://www.springframework.org/schema/jdbc"
	xmlns:jee="http://www.springframework.org/schema/jee"
	xmlns:tx="http://www.springframework.org/schema/tx"
	xmlns:aop="http://www.springframework.org/schema/aop"
	xmlns:mvc="http://www.springframework.org/schema/mvc"
	xmlns:util="http://www.springframework.org/schema/util"
	xmlns:jpa="http://www.springframework.org/schema/data/jpa"
	xsi:schemaLocation="
		http://www.springframework.org/schema/beans http://www.springframework.org/schema/beans/spring-beans-4.1.xsd
		http://www.springframework.org/schema/context http://www.springframework.org/schema/context/spring-context-4.1.xsd
		http://www.springframework.org/schema/jdbc http://www.springframework.org/schema/jdbc/spring-jdbc-4.1.xsd
		http://www.springframework.org/schema/jee http://www.springframework.org/schema/jee/spring-jee-4.1.xsd
		http://www.springframework.org/schema/tx http://www.springframework.org/schema/tx/spring-tx-4.1.xsd
		http://www.springframework.org/schema/data/jpa http://www.springframework.org/schema/data/jpa/spring-jpa-1.3.xsd
		http://www.springframework.org/schema/aop http://www.springframework.org/schema/aop/spring-aop-4.1.xsd
		http://www.springframework.org/schema/mvc http://www.springframework.org/schema/mvc/spring-mvc-4.1.xsd
		http://www.springframework.org/schema/util http://www.springframework.org/schema/util/spring-util-4.1.xsd">


	<!-- HandlerMapping组件,支持@RequestMapping注解驱动 -->
	<mvc:annotation-driven />
	<!-- 配置Controller扫描包 -->
	<context:component-scan base-package="cn.chf"/>
	<!-- ViewResolver视图解析器 -->
	<bean id="viewResolver"
		class="org.springframework.web.servlet.view.InternalResourceViewResolver">
		<!-- 指定视图位置 -->
		<property name="prefix"  value="/WEB-INF/"></property>
		<!-- 指定视图类型 -->
		<property name="suffix"  value=".jsp"></property>
	</bean>

</beans>
4 编写逻辑代码
实体类
package cn.chf.entity;

public class Person {

	private String id; // id
	private String name; // 姓名
	private String age;  //年龄
	private String interest;//爱好
	public String getId() {
		return id;
	}
	public void setId(String id) {
		this.id = id;
	}
	public String getName() {
		return name;
	}
	public void setName(String name) {
		this.name = name;
	}
	public String getAge() {
		return age;
	}
	public void setAge(String age) {
		this.age = age;
	}
	public String getInterest() {
		return interest;
	}
	public void setInterest(String interest) {
		this.interest = interest;
	}


}
controller层业务代码
package cn.chf;

import org.springframework.stereotype.Controller;
import org.springframework.web.bind.annotation.RequestMapping;
import org.springframework.web.servlet.ModelAndView;

@Controller
public class HelloController {

	     //ModelAndView封装了视图名字和传出去的数据
		@RequestMapping("/hello.do")
		public ModelAndView execute() throws Exception {
			// TODO 调用模型组件处理
			ModelAndView mav = new ModelAndView();
			mav.setViewName("hello");//找hello视图
			mav.getModel().put("data", "HelloWorld");//放入数据,可以传递到jsp
			return mav;
		}
}
前端jsp文件
<%@ page language="java" contentType="text/html; charset=UTF-8"
    pageEncoding="UTF-8"%>
<!DOCTYPE html>
<html>
<head>
<meta charset="UTF-8">
<title>Insert title here</title>
</head>
<body>
  <h1>第一个MvC程序</h1>
   <h2>${data}</h2>
</body>
</html>
启动tomcat访问 http://localhost:端口号/项目名/hello.do
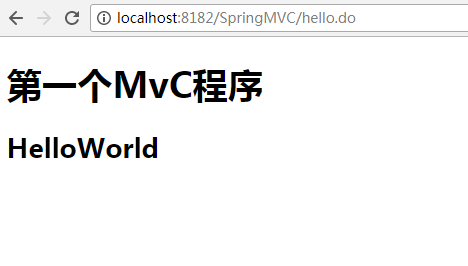
这边我们的Springmvc就搭建完成了, 流程一定要清晰