回顾下springmvc原理图:

DispatcherServlet是Spring MVC的核心,每当应用接受一个HTTP请求,由DispatcherServlet负责将请求分发给应用的其他组件。
在旧版本中,DispatcherServlet之类的servlet一般在web.xml文件中配置,该文件一般会打包进最后的war包种;但是Spring 3引入了注解,我将要介绍,如何基于注解配置Spring MVC。
1、Spring mvc无配置文件夹,采用注解方式启动。
把配置的内容 转换为 Java代码
步骤:
1、加载Spring容器 加载dispatcherservlet
tomcat只要读到这几个类,就可以帮助初始化了
配置文件代码和pom文件
<project xmlns="http://maven.apache.org/POM/4.0.0" xmlns:xsi="http://www.w3.org/2001/XMLSchema-instance" xsi:schemaLocation="http://maven.apache.org/POM/4.0.0 http://maven.apache.org/xsd/maven-4.0.0.xsd">
  <modelVersion>4.0.0</modelVersion>
  <groupId>com.toov5.springbootmvc</groupId>
  <artifactId>springbootmvc</artifactId>
  <version>0.0.1-SNAPSHOT</version>
 <dependencies>
		<!--Java语言操作tomcat -->
		<dependency>
			<groupId>org.apache.tomcat.embed</groupId>
			<artifactId>tomcat-embed-core</artifactId>
			<version>8.5.16</version>
		</dependency>
		<!-- spring-web -->
		<dependency>
			<groupId>org.springframework</groupId>
			<artifactId>spring-web</artifactId>
			<version>5.0.4.RELEASE</version>
			<scope>compile</scope>
		</dependency>
		<!-- spring-mvc -->
		<dependency>
			<groupId>org.springframework</groupId>
			<artifactId>spring-webmvc</artifactId>
			<version>5.0.4.RELEASE</version>
			<scope>compile</scope>
		</dependency>
		<!-- tomcat对jsp支持 -->
		<dependency>
			<groupId>org.apache.tomcat</groupId>
			<artifactId>tomcat-jasper</artifactId>
			<version>8.5.16</version>
		</dependency>
	</dependencies>

</project>
加载SpringMVC容器
正如可以通过多种方式配置DispatcherServlet一样,也可以通过多种方式启动Spring MVC特性。原来我们一般在xml文件中使用<mvc:annotation-driven>元素启动注解驱动的Spring MVC特性。
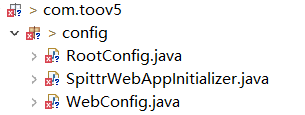
package com.toov5.config;

import org.springframework.context.annotation.Bean;
import org.springframework.context.annotation.ComponentScan;
import org.springframework.context.annotation.Configuration;
import org.springframework.web.servlet.ViewResolver;
import org.springframework.web.servlet.config.annotation.EnableWebMvc;
import org.springframework.web.servlet.config.annotation.WebMvcConfigurerAdapter;
import org.springframework.web.servlet.view.InternalResourceViewResolver;

/*
 * spring mvc的配置信息
 *
 */
@Configuration   //表示配置
@EnableWebMvc   //开启springmvc功能 扫包 视图转换 拦截器
@ComponentScan("com.toov5.controller")  //扫controller包 类似与传统的配置中 开启扫包模式那段xml配置
public class WebConfig extends WebMvcConfigurerAdapter {

    //需要配置视图器
    // 创建SpringMVC视图解析器
        @Bean
        public ViewResolver viewResolver() {
            InternalResourceViewResolver viewResolver = new InternalResourceViewResolver();
            viewResolver.setPrefix("/WEB-INF/views/");
            viewResolver.setSuffix(".jsp");
                //可以在JSP页面中通过${}访问beans
            viewResolver.setExposeContextBeansAsAttributes(true);
            return viewResolver;
        }


}
package com.toov5.config;

import org.springframework.context.annotation.ComponentScan;
import org.springframework.context.annotation.Configuration;

/*
 * 加载非Springmvc 的配置
 *
 */

@Configuration
@ComponentScan(basePackages = "com.toov5")  //扫整个项目的
public class RootConfig {


}
加载SpringMVCDispatcherServlet
AbstractAnnotationConfigDispatcherServletInitializer这个类负责配置DispatcherServlet、初始化Spring MVC容器和Spring容器。getRootConfigClasses()方法用于获取Spring应用容器的配置文件,这里我们给定预先定义的RootConfig.class;getServletConfigClasses负责获取Spring MVC应用容器,这里传入预先定义好的WebConfig.class;getServletMappings()方法负责指定需要由DispatcherServlet映射的路径,这里给定的是"/",意思是由DispatcherServlet处理所有向该应用发起的请求。
package com.toov5.config;

import org.springframework.web.servlet.support.AbstractAnnotationConfigDispatcherServletInitializer;

/*
 * 加载springmvc--dispatcherservlet
 * 下面的这个接口 初始化dispatcherservlet
 */
public class SpittrWebAppInitializer extends AbstractAnnotationConfigDispatcherServletInitializer {

    // 加载根容器 加载跟配置信息 spring核心
    protected Class<?>[] getRootConfigClasses() {
        // TODO Auto-generated method stub
        return new Class[] { RootConfig.class };
    }

    // 加载SpringMVC容器 springmvc 加载配置信息
    protected Class<?>[] getServletConfigClasses() {

        return new Class[] { WebConfig.class };  //相当于一个数组里面放了一个Class
    }

    // SpringMVCDispatcherServlet 拦截的请求 /   拦截所有请求
    protected String[] getServletMappings() {

        return new String[] { "/" };
    }

}
controller层
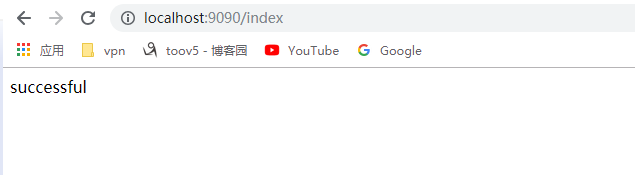
package com.toov5.controller;

import org.springframework.web.bind.annotation.RequestMapping;
import org.springframework.web.bind.annotation.RestController;

@RestController //Spring mvc 提供的哈
public class IndexController {

    @RequestMapping("/index")
    public String index(){
        return "successful";
    }

}
package com.toov5.controller;

import org.springframework.stereotype.Controller;
/*
 * 跳转页面
 *
 */
import org.springframework.web.bind.annotation.RequestMapping;
@Controller
public class UserController {

    @RequestMapping("/pageIndex")
    public String pageIndex(){
        return "pageIndex";
    }

}
tomcat:
package com.toov5;

import java.io.File;

import javax.servlet.ServletException;

import org.apache.catalina.LifecycleException;
import org.apache.catalina.WebResourceRoot;
import org.apache.catalina.core.StandardContext;
import org.apache.catalina.startup.Tomcat;
import org.apache.catalina.webresources.DirResourceSet;
import org.apache.catalina.webresources.StandardRoot;

public class AppTomcat {
    public static void main(String[] args) {
        //使用Java内置tomcat运行spring mvc框架 原理:tomcat加载到spring mvc注解启动方式,就会创建spring mvc容器
        try {
            start();
        } catch (ServletException e) {
            // TODO Auto-generated catch block
            e.printStackTrace();
        } catch (LifecycleException e) {
            // TODO Auto-generated catch block
            e.printStackTrace();
        }
    }
    public static void start() throws ServletException, LifecycleException {

        // 创建Tomcat容器
        Tomcat tomcatServer = new Tomcat();
        // 端口号设置
        tomcatServer.setPort(9090);
        // 读取项目路径    这样可以加载到静态资源
        StandardContext ctx = (StandardContext) tomcatServer.addWebapp("/", new File("src/main").getAbsolutePath());
        // 禁止重新载入
        ctx.setReloadable(false);
        // class文件读取地址    启动后 在target生成编译后的class文件
        File additionWebInfClasses = new File("target/classes");
        // 创建WebRoot
        WebResourceRoot resources = new StandardRoot(ctx);
        // tomcat内部读取Class执行
        resources.addPreResources(
                new DirResourceSet(resources, "/WEB-INF/classes", additionWebInfClasses.getAbsolutePath(), "/"));
        tomcatServer.start();
        // 异步等待请求执行
        tomcatServer.getServer().await();

    }
}
启动后:
右键点击项目刷新会出现:

这时候是虚拟创建一个tomcat目录,
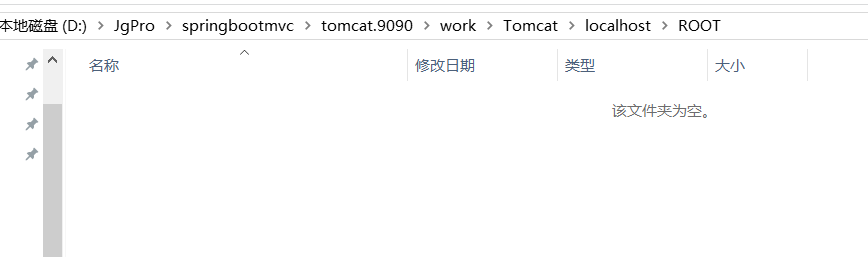
点进去里面没有class文件,它的class文件全部在内存里面(也可以写到硬盘上)
最后的目录结构:

访问请求

下面继续完善service层
package com.toov5.service;

import org.springframework.stereotype.Service;

@Service
public class UserService {

     public String index(){
         return "successful again";

     }

}
controller的修改
package com.toov5.controller;

import org.springframework.beans.factory.annotation.Autowired;
import org.springframework.web.bind.annotation.RequestMapping;
import org.springframework.web.bind.annotation.RestController;

import com.toov5.service.UserService;

@RestController //Spring mvc 提供的哈
public class IndexController {
   @Autowired
   private UserService userService;


    @RequestMapping("/index")
    public String index(){
//        return "successful";
       return    userService.index();
    }

}
SpittrWebAppInitializer需要修改:
 、
、
要不扫描不到service的!
启动访问:

是不是很有趣呀~~~~