这篇文章的目的就是用来记录一下java单元测试报告产生的过程,防止时间久忘记。
先讲直接使用eclipse去搭建一个测试环境的流程:

上面是一个简单例子的搭建,src中存放源码,test中存放测试代码,注意添加test文件夹后请把它add到build_path中。
接着我们来看一下Calculator.java和CalculatorTest.java
package com.elastos;

public class Calculator {

	public String one() {
		return "One";
	}

	public String two() {
		return "Two";
	}

}
package com.elastos.test;
import junit.framework.TestCase;
import org.junit.Test;
import com.elastos.Calculator;
public class CalculatorTest extends TestCase {
private Calculator calculator = new Calculator();
@Test
public void testOne() {
assertEquals("One", calculator.one());
}
@Test
public void testTwo() {
assertEquals("One", calculator.two());
}
}
这里有个问题值得说一下,我使用了JUnit4,JUnit4有个最大的特定就是不用继承TestCase,使用Annotation就OK了。于是我就这么干了,结果发现:
	No tests found in com.elastos.test.CalculatorTest

<span style="color:#FF0000;">junit.framework.AssertionFailedError: No tests found in com.elastos.test.CalculatorTest</span>
找不到测试用例,于是我又让它继承了TestCase,这样一来就立马OK了。继承TestCase之后,上面的@Test其实是多余的,不用也可以。
(个人猜想Ant可能会先去判断测试类是否实现了Test接口。有,就提取测试用例;没有,就直接跳过,抛出异常。这里先把猜想放这里,待有时间好好研究一下。
如果对Test接口有疑惑,可以阅读下我的另一篇文章http://blog.csdn.net/nitibu/article/details/47975137)。
下面我们就开始使用Ant执行测试用例并且输出测试报告。
右击项目文档,选择export,就会弹出如下对话框:

选择建立Ant Buildfile就会在工程目录下产生一个build.xml。当然,这个文件也可以自己手动去创建,做个自定义的build.xml。
build.xml产生后,右击该文件,然后点击Run As Ant Build就好了。如下:
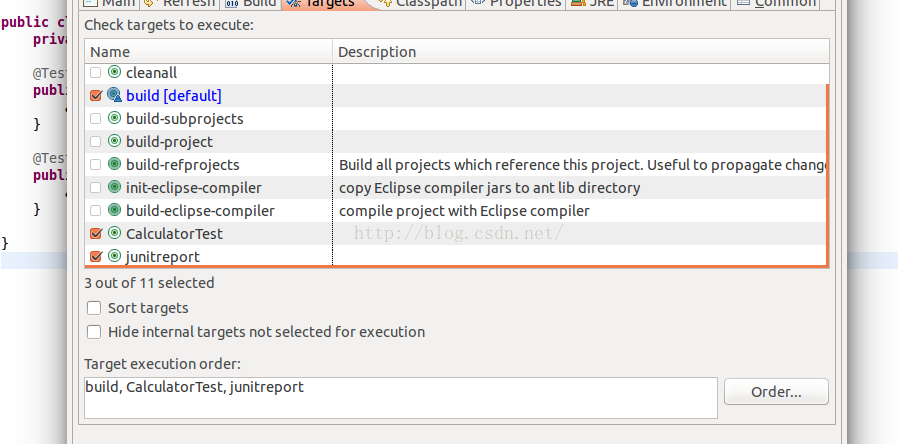
上面我勾选了三项,分别依次进行了编译、运行CalculatorTest、输出测试报告。
那么这都是怎么在build.xml中实现的呢?
<target depends="build-subprojects,build-project" name="build"/>上面就代表build,依赖build-subprojects,build-project
    <target name="build-subprojects"/>
    <target depends="init" name="build-project">
        <echo message="${ant.project.name}: ${ant.file}"/>
        <javac debug="true" debuglevel="${debuglevel}" destdir="bin" includeantruntime="false" source="${source}" target="${target}">
            <src path="src"/>
            <src path="test"/>
            <classpath refid="Calculator.classpath"/>
        </javac>
    </target>
build-subprojects没干什么事情,我们来看build-project,它依赖于init,编译src、test下代码放到bin文件中。
<target name="init">
        <mkdir dir="bin"/>
        <copy includeemptydirs="false" todir="bin">
            <fileset dir="src">
                <exclude name="**/*.java"/>
            </fileset>
        </copy>
        <copy includeemptydirs="false" todir="bin">
            <fileset dir="test">
                <exclude name="**/*.java"/>
            </fileset>
        </copy>
    </target>
新建一个bin文件夹,然后把src、test下所有非java结尾的文件连带目录一起拷贝到bin/文件夹下面。
编译完成后,就去执行CalculatorTest
    <target name="CalculatorTest">
        <mkdir dir="${junit.output.dir}"/>
        <junit fork="yes" printsummary="withOutAndErr">
            <formatter type="xml"/>
            <test name="com.elastos.test.CalculatorTest" todir="${junit.output.dir}"/>
            <classpath refid="Calculator.classpath"/>
        </junit>
    </target>
新建junit文件夹存放执行结果。fork="yes"表示在一个独立的VM进程中运行tests。
    <target name="junitreport">
        <junitreport todir="${junit.output.dir}">
            <fileset dir="${junit.output.dir}">
                <include name="TEST-*.xml"/>
            </fileset>
            <report format="frames" todir="${junit.output.dir}"/>
        </junitreport>
    </target>
生成测试报告放在junit文件夹中,实际上就提取TEST-*.xml中的一些信息放到index.html。
打开index.html,就是你想要的报告。如下:
