在上文《wxWidgets Tips: Compile wxWidgets 3.1.0 using Visual Studio 2015》中,我们用 Visual Studio 2015 编译了 wxWidgets 3.1.0 的静态库、动态链接库。接下来我们继续创建 wxWidgets 应用程序。
在本例中我们以静态链接库的方式引用 wxWidgets。
详细步骤
我们用 Visual Studio Community 2015 这个免费版本来演示。

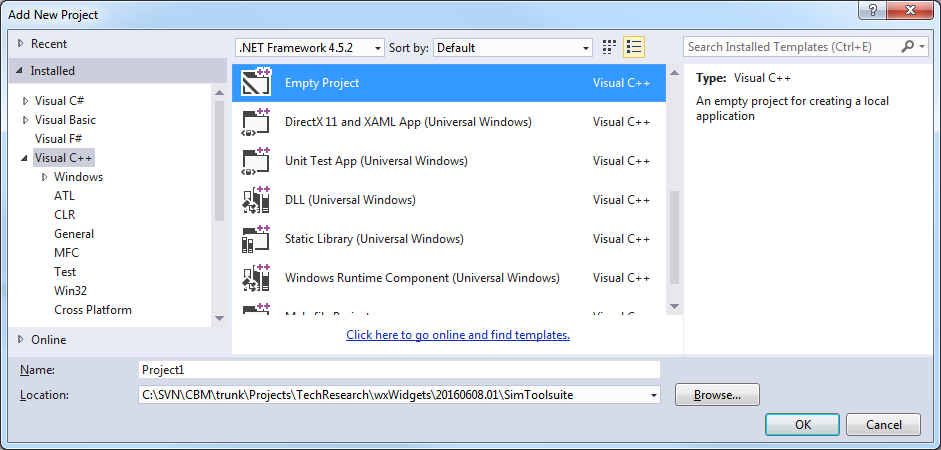
创建一个空的 C++ Win32 项目:
在这个空的 Win32 项目里面,添加一个 C++ 源文件。就添加一个 main.cpp 吧,里面就放一个空函数:
void main()
{
}
只有当我们往这个空项目里面添加任意一个 C++ 源文件,在 Project Properties 里面,那些关于 C++ 的设置项才可用。这就是为什么我们添加这个文件的原因。
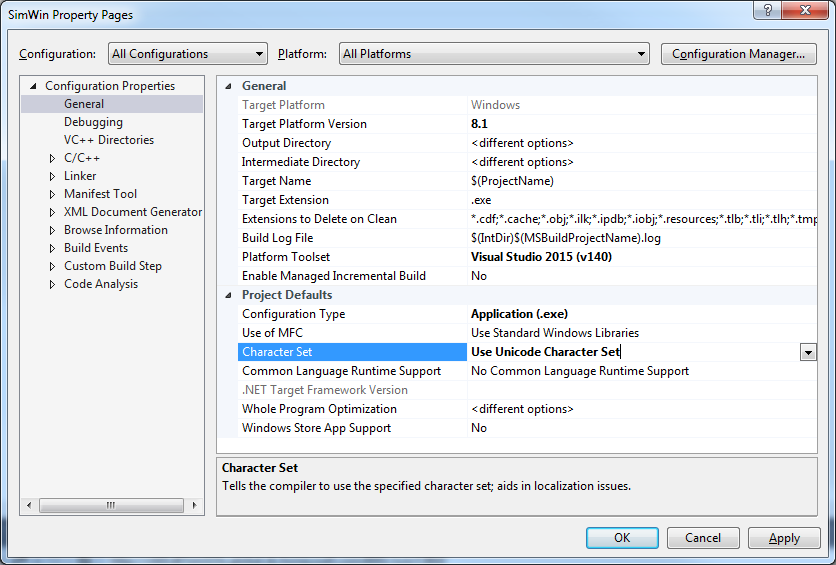
设置该项目使用 Unicode 字符集:
Project properties | General | Character Set | Unicode
在 Project properties | C/C++ | General | Additional Include Directories 中,添加:
$(WXWIN)\include
$(WXWIN)\include\msvc
在 Project properties | C/C++ | Preprocessor | Preprocessor Definitions 中,添加:
WIN32
__WXMSW__
_WINDOWS
wxUSE_GUI=1
WINVER=0x0500
专门针对 Debug configuration,在 Project properties | C/C++ | Preprocessor | Preprocessor Definitions 中,添加:
_DEBUG
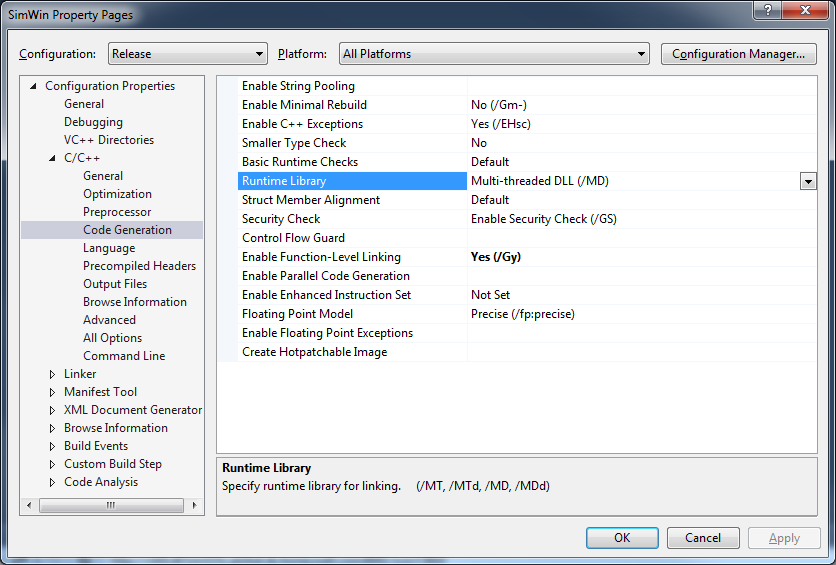
__WXDEBUG__为 Release configuration 设置 C 语言运行库为:Multithreaded DLL (/MD)
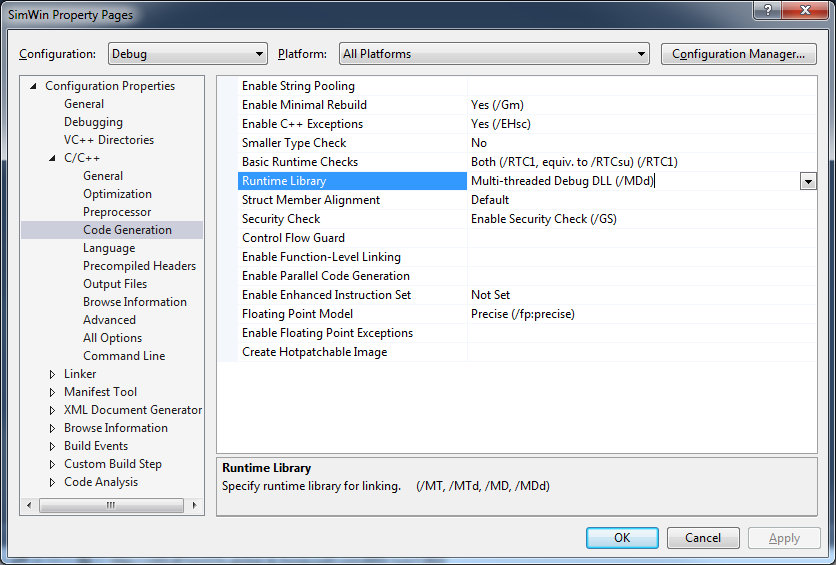
为 Debug configuration 设置 C 语言运行库为:Debug Multithreaded DLL (/MDd)
在 Project properties | C/C++ | Precompiled Headers: Not using Precompiled Headers 中:选择 Not using Precompiled Headers。
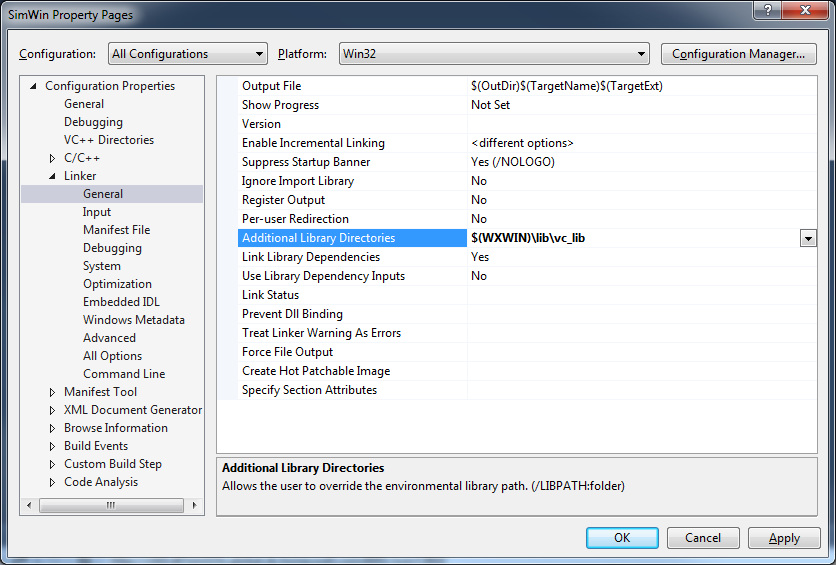
对于 Project properties | Linker | General | Additional Library Directories:
为 x86 平台 添加:

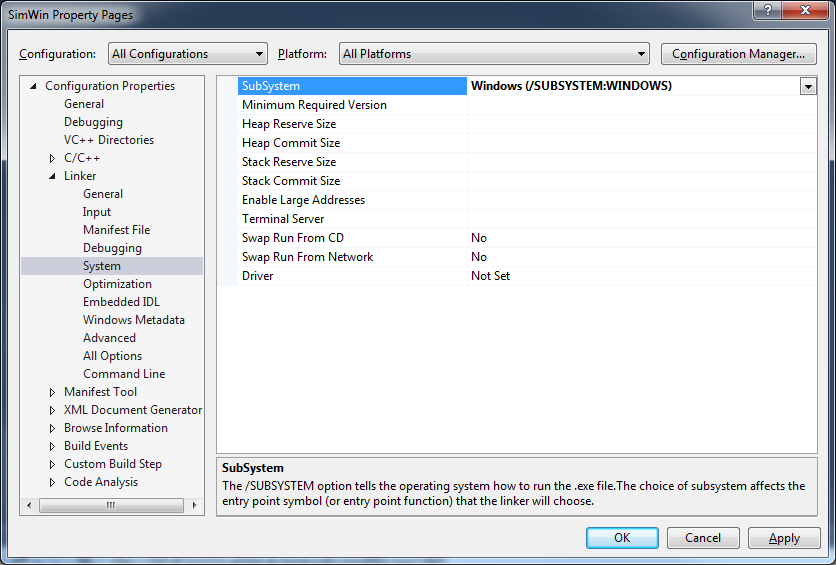
设置 Project properties | Linker | System | SubSystem: Windows (/SUBSYSTEM:WINDOWS)
对于 Project properties | Linker | Input | Additional Depenedencies 添加
comctl32.lib
rpcrt4.lib
winmm.lib
wsock32.lib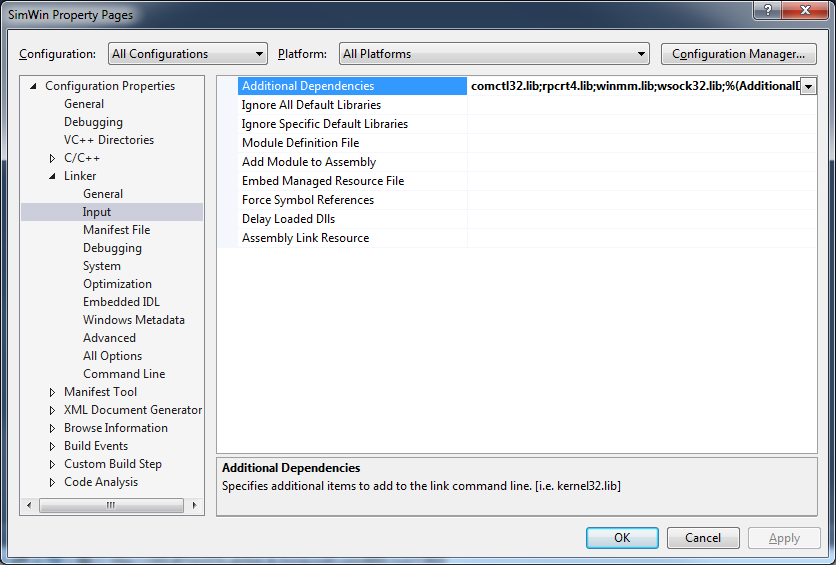
继续添加:
Project properties | Linker | Input | Additional Depenedencies

Release : wxmsw31u_core.lib
Debug   : wxmsw31ud_core.lib

Release : wxbase31u.lib
Debug   : wxbase31ud.lib

Release : wxpng.lib
Debug   : wxpngd.lib

Release : wxzlib.lib
Debug   : wxzlibd.lib

Release : wxjpeg.lib
Debug   : wxjpegd.lib
然后我们就可以在 mian.cpp 中写我们的第一个 wxWidgets 例子了:
// wxWidgets "Hello world" Program
// For compilers that support precompilation, includes "wx/wx.h".
#include <wx/wxprec.h>
#ifndef WX_PRECOMP
    #include <wx/wx.h>
#endif
class MyApp: public wxApp
{
public:
    virtual bool OnInit();
};
class MyFrame: public wxFrame
{
public:
    MyFrame(const wxString& title, const wxPoint& pos, const wxSize& size);
private:
    void OnHello(wxCommandEvent& event);
    void OnExit(wxCommandEvent& event);
    void OnAbout(wxCommandEvent& event);
    wxDECLARE_EVENT_TABLE();
};
enum
{
    ID_Hello = 1
};
wxBEGIN_EVENT_TABLE(MyFrame, wxFrame)
    EVT_MENU(ID_Hello,   MyFrame::OnHello)
    EVT_MENU(wxID_EXIT,  MyFrame::OnExit)
    EVT_MENU(wxID_ABOUT, MyFrame::OnAbout)
wxEND_EVENT_TABLE()
wxIMPLEMENT_APP(MyApp);
bool MyApp::OnInit()
{
    MyFrame *frame = new MyFrame( "Hello World", wxPoint(50, 50), wxSize(450, 340) );
    frame->Show( true );
    return true;
}
MyFrame::MyFrame(const wxString& title, const wxPoint& pos, const wxSize& size)
        : wxFrame(NULL, wxID_ANY, title, pos, size)
{
    wxMenu *menuFile = new wxMenu;
    menuFile->Append(ID_Hello, "&Hello...\tCtrl-H",
                     "Help string shown in status bar for this menu item");
    menuFile->AppendSeparator();
    menuFile->Append(wxID_EXIT);
    wxMenu *menuHelp = new wxMenu;
    menuHelp->Append(wxID_ABOUT);
    wxMenuBar *menuBar = new wxMenuBar;
    menuBar->Append( menuFile, "&File" );
    menuBar->Append( menuHelp, "&Help" );
    SetMenuBar( menuBar );
    CreateStatusBar();
    SetStatusText( "Welcome to wxWidgets!" );
}
void MyFrame::OnExit(wxCommandEvent& event)
{
    Close( true );
}
void MyFrame::OnAbout(wxCommandEvent& event)
{
    wxMessageBox( "This is a wxWidgets' Hello world sample",
                  "About Hello World", wxOK | wxICON_INFORMATION );
}
void MyFrame::OnHello(wxCommandEvent& event)
{
    wxLogMessage("Hello world from wxWidgets!");
}