转载请注明出处:http://blog.csdn.net/anyfive/article/details/50455256
介绍
字体图标是指将图标做成字体文件(.ttf),从而代替传统的png等图标资源。
使用字体图标的优点和缺点分别为:
优点:
1. 可以高度自定义图标的样式(包括大小和颜色),对于个人开发者尤其适用
2. 可以减少项目和安装包的大小(特别你的项目中有很多图片icon时,效果将是M级)
3. 几乎可以忽略屏幕大小和分辨率,做到更好的适配
4. 使用简单
……
缺点:
1. 只能是一些简单的icon,不能代替如背景图、9图等资源
2. 一些需要文字说明的icon,图片资源将会是更好的选择
3. 对设计的要求更高,不同icon可能拥有不同的边距,这时要切换icon时还要设置大小
4. 由于边距的存在可能存在无法填满控件的情况
5. 无法在android studio中进行实时预览
……
字体图标对大部分项目来说都是一种更好的选择
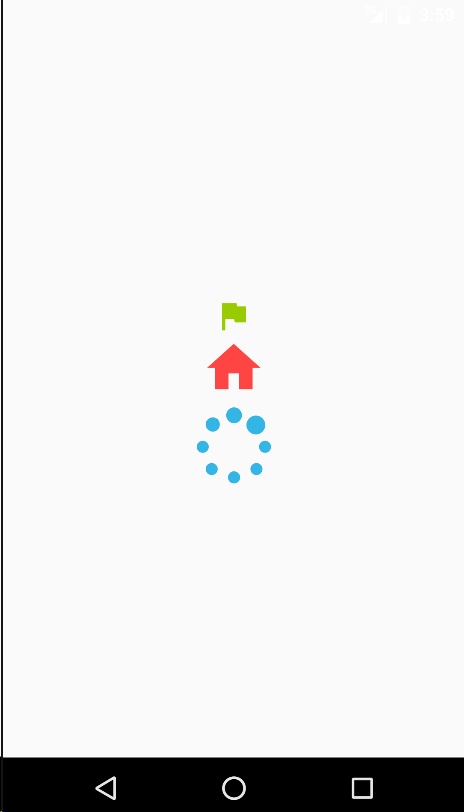
演示
使用
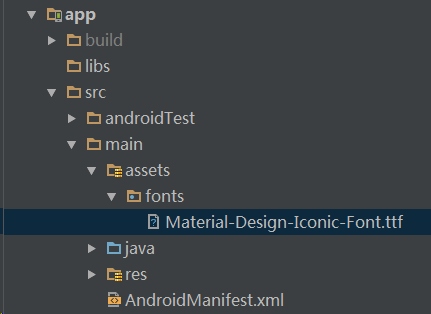
1. 将字体文件导入项目中
直接将字体文件(.ttf)放入assets中
2.在application中初始化TypeFace
注意:android的界面渲染只有16.7ms,在渲染时才加载字体明显是不明智的选择,会造成明显的卡顿,其中最明显的表现在activity的跳转会造成较长的时间的延迟。
public class BaseApplication extends Application {
    private static BaseApplication instance;
    public static synchronized BaseApplication getInstance() {
        return instance;
    }
    //字体图标
    private Typeface iconTypeFace;
    public Typeface getIconTypeFace() {
        return iconTypeFace;
    }
    @Override
    public void onCreate() {
        super.onCreate();
        instance = this;
        iconTypeFace = Typeface.createFromAsset(getAssets(),"fonts/Material-Design-Iconic-Font.ttf");
    }
}
记得在AndroidManifest.xml中配置你的application
3. 继承文本框,自定义图标控件
只需要给图标控件加载application中加载的字体图标
public class IconView extends TextView {
    public IconView(Context context) {
        super(context);
        init();
    }
    public IconView(Context context, AttributeSet attrs) {
        super(context, attrs);
        init();
    }
    public IconView(Context context, AttributeSet attrs, int defStyleAttr) {
        super(context, attrs, defStyleAttr);
        init();
    }
    private void init() {
//        设置字体图标
        this.setTypeface(BaseApplication.getInstance().getIconTypeFace());
    }
}
4.在strings中定义各图标的unicode编码(使用\u前缀)
例如:
    <string name="icon_spniner">\uf3ec</string>
    <string name="icon_flag">\uf162</string>
    <string name="icon_home">\uf175</string>
注意:图标的unicode编码由设计师给出,一般在提供字体图标的网站上也可找到对应的unicode编码
5.直接在布局中使用
<?xml version="1.0" encoding="utf-8"?>
<LinearLayout
    xmlns:android="http://schemas.android.com/apk/res/android"
    android:layout_width="match_parent"
    android:layout_height="match_parent"
    android:gravity="center"
    android:orientation="vertical">
    <com.mrw.iconfonttest.IconView
        android:layout_width="wrap_content"
        android:layout_height="wrap_content"
        android:textColor="@android:color/holo_green_light"
        android:textSize="30sp"
        android:text="@string/icon_flag"
        />
    <com.mrw.iconfonttest.IconView
        android:layout_width="wrap_content"
        android:layout_height="wrap_content"
        android:textColor="@android:color/holo_red_light"
        android:textSize="50sp"
        android:text="@string/icon_home"
        />
    <com.mrw.iconfonttest.IconView
        android:layout_width="wrap_content"
        android:layout_height="wrap_content"
        android:textColor="@android:color/holo_blue_light"
        android:textSize="70sp"
        android:text="@string/icon_spniner"
        />
</LinearLayout>
6.运行便可看到文章开头处的演示页面
写在最后
如你所见,使用字体图标可以高度自定义图标的大小和颜色,对于个人开发者来说是一个特别好的消息,再也不用在找图标时考虑颜色和大小了。
资源分享:
android 5.0的material-design-iconic-font
github的开源项目:android-iconics(提供了另一种字体图标的使用方法)
typicons
fontawesome